
Related Manuals for ZENEC ZEM-W652U


Summary of Contents for ZENEC ZEM-W652U
- Page 1 6.5" WIDESCREEN TFT-LCD ACTIVE MATRIX COLOR MONITOR MODEL NO: ZEM-W652U INSTRUCTION MANUAL...
- Page 2 ZENEC 6.5“ TFT-LCD COLOR MONITOR Vielen Dank das Sie sich für den ZEM-W652U Monitor von ZENEC entschieden haben. Mit dem Kauf dieses Monitors haben Sie sich für ein innovatives und professionelles Produkt ent- schieden, das Ihnen eine lange Lebensdauer garantiert.
- Page 3 SICHERHEITSHINWEISE ■ Betriebstemperatur Das Gerät sollte keiner extremen Hitzeeinwirkung ausgesetzt werden. Beachten Sie weiterhin, dass TFT Panels unterhalb von 0° nicht korrekt funktionieren. Bei sehr tiefen Temperaturen im Winter kann es daher zu Funktionsstörungen des Panels kommen. Warten Sie mit der Inbetriebnahme des Monitors ab, bis sich der Fahrgastraum durch die Heizung oder die Klimaanlage etwas aufgewärmt hat.
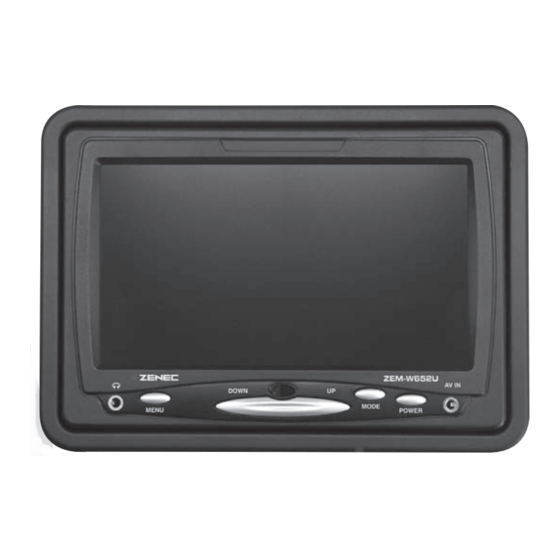
- Page 4 2. BEDIENTEIL UND ANSCHLUSSKABEL 1. Kopfhörerbuchse 2. MENU – Taste 3. DOWN - Taste 4. IR – Empfänger 5. UP - Taste 6. MODE – Taste 7. POWER – Taste 8. Videoeingang AV2 (3.5mm Klinkenstecker) 9. Anschlusskabel 10. Anschlusskabel mit A/V – Eingängen und Stromversorgung 11.
- Page 5 DOWN – Taste Drücken Sie die DOWN – Taste um die Lautstärke des Kopfhörerausgangs zu verringern. Wenn Sie sich im Menü befinden, können Sie durch drücken der DOWN – Taste den Wert des jeweiligen Menüpunktes verringern. VIDEO SELECT – Taste Drücken Sie die VIDEO SELECT –...
- Page 6 5. KOPFSTÜTZENMONTAGE Bitte beachten: Es ist empfehlenswert das Sie sich bei der Installation des Monitors an einen Fachmann wenden. Er kann Ihnen garantieren dass Sie alle Funktionen optimal nutzen können und in den Genuss eines optimalen Bildes kom- men. Schritt - Richten Sie den Arbeitsplatz ein Entfernen Sie die Kopfstütze.
- Page 7 Schritt - Verlegen des Anschlusskabels Verlegen Sie das mitgelieferte Kabel bis zu einer Öffnung die sich an der unteren Seite der Kopfstütze befindet. Schließen Sie kurz alle benötigten Kabel an, um die Funktionen des Monitors zu überprüfen. Schritt - Montage der Kopfstützenhalterung Bevor Sie den Monitor anschließen, müssen Sie das Anschlusskabel durch die dafür vorge-...
-
Page 8: Fehlersuche
6. FEHLERSUCHE 6.1 DAS GERÄT LÄSST SICH NICHT EINSCHALTEN 1. Überprüfen Sie ob das Anschlusskabel richtig mit dem Monitor verbunden ist. 2. Überprüfen Sie ob der rote (+12V) und schwarze (GND) Draht des Anschlusskabels richtig mit der Stromversorgung Ihres Fahrzeuges verbunden ist. Das Verpolen der beiden Drähte kann eine Beschädigung des Monitors verursachen. -
Page 10: Technical Features
■ IR-remote control in credit card format SPECIAL FEATURES 16:9 High Quality Wide Screen Display Panel: The ZEM-W652U is a TFT-LCD active matrix 16:9 widescreen video monitor, featuring a 6.5“ high quality color LCD screen. It deploys a color LCD panel with 336’960 dots resolution, to give you excellent picture detail. -
Page 11: Safety Recommendations
SAFETY RECOMMENDATIONS: ■ OPERATING TEMPERATURE Never expose this TFT-LCD color monitor to extreme heat or direct sunlight. Please note, that TFT monitors should not be operated in very cold environments (below 0°C). During winter time, wait until the passenger compartment of your vehicle has heated up enough, to allow for a proper function of your LCD monitor. - Page 12 2.OPERATING KEYS AND DESCRIPTION OF WIRE HARNESS 1. EARPHONE jack 2. MENU key 3. DOWN key 4. IR-RECEIVER eye 5. UP key 6. MODE key 7. POWER key 8. AV-IN jack / AV2 9. INTERFACE wire 10. SYSTEM WIRING harness 11.
- Page 13 4. MENU FUNCTIONS OF KEYS AT MONITOR FRONT CONTRAST: Press UP or DOWN key to adjust Contrast BRIGHTNESS: Press UP or DOWN key to adjust Brightness COLOR: Press UP or DOWN key to adjust Color HUE: Press UP or DOWN key to adjust Hue (only for NTSC video sources) VOLUME: Press UP or DOWN key to adjust Volume of headphone output MODE:...
-
Page 14: Installation
5. INSTALLATION NOTE: It is recommended that the installation of this monitor is carried out by qualified persons, to achieve reliable function and best picture quality. Step - Set up your work area Remove the headrest and put it down in an uncluttered and clean working area. - Page 15 Step - Route the wiring through the headrest Run the supplied cable through the opening and out the bottom of the headrest. If possible, con- ceal the wires using a shaft covering. Connect the +12V power, ground and video leads to test the function of the monitor.
-
Page 16: Troubleshooting
6. TROUBLESHOOTING 6.1 NO POWER 1. Make sure the system wire is connected to the main wire coming from the monitor, and also double check if the plug is inserted properly. 2. Make sure the system wire harness and especially the black and red wires (for current supply) are connected to the on board voltage system of the vehicle. -
Page 17: Specifications
7. SPECIFICATIONS Screen Size 6.5“ (165mm) diagonal Native Display Aspect Ratio 16:9 Display Type Color TFT-LCD Active Matrix Display Active Display Area 154.08mm (W) x 87.05mm (H) Native Screen Resolution 1440 (H) x 234 (V) = 336‘960 Dots Back Illumination Cold Cathode Filament Tube Brightness 400 cd/m2... - Page 18 2 YEARS LIMITED WARRANTY Dear customer Thank you for purchasing this ZENEC product. It is advisable to keep the original packing material for any future transporting of the product. Should your ZENEC product require warranty service, please return it to the retailer from whom it was purchased or the distributor in your country.
- Page 19 ZENEC Model: ZEM-W652U Serial Number: ..........................Date of Purchase: ......................... Your name: ........................... Your address: ..........................City: .............................. State: ........ZIP or Postal Code ................ Country: ............................Dealer’s address & stamp...
Need help?
Do you have a question about the ZEM-W652U and is the answer not in the manual?
Questions and answers