
Related Manuals for ElektroPhysik MiniTest 7400 FH


Summary of Contents for ElektroPhysik MiniTest 7400 FH
- Page 1 Technical Manual /Operating Instructions MiniTest 7200 FH / MiniTest 7400 FH Thickness Gauges...
-
Page 2: Table Of Contents
5.4.1 Measurement without Sensor Stand..................19 5.4.2 Using the sensor stand ......................20 5.4.3 Delete Readings ........................20 5.5 S ...............20 TORING EADINGS INTO TATISTICS EMORY 5.5.1 Data Logging Mode ......................20 5.5.2 Manual Data Storage......................21 © ElektroPhysik MiniTest 7200 FH / MiniTest 7400 FH... - Page 3 9. DATA OUTPUT / DATA TRANSFER..................38 ........................38 9.1 D RINT 9.1.1 Screen Shot........................39 9.1.2 Print-out a Batch.......................39 9.2 T PC ......................40 RANSFER ATA TO A 10. MAIN MENU ..........................41 10.1 D ..........................41 ATABASE © ElektroPhysik MiniTest 7200 FH / MiniTest 7400 FH...
- Page 4 14. TECHNICAL SPECIFICATION.....................50 ..................50 14.1 G AUGE AND ENSOR PECIFICATION 14.2 D ......................52 ELIVERY CHEDULE 14.2.1 Thickness gauge MiniTest 7200 FH / 7400 FH ..............52 14.2.2 Sensors ..........................52 14.3 A ..........................53 CCESSORIES 15. APPENDIX ..........................56 ........................56 15.1 T ROUBLESHOOTING ................59 15.2 D...
-
Page 5: Introduction
Suitable for use in industrial production areas, the measuring systems MiniTest 7200 / 7400 FH measure hollow parts, containers and sheet material of all kinds such as bottles, cans, injections moldings, car bodies, glass, SMC components etc made of non-magnetic (non-ferrite) materials. © ElektroPhysik MiniTest 7200 FH / MiniTest 7400 FH... -
Page 6: First Steps
The red marking at the probe plug must be positioned correctly to the red marking at the sensor plug. f) Fully engage the sensor plug into the sensor socket to the stop. Sensor Socket © ElektroPhysik MiniTest 7200 FH / MiniTest 7400 FH... -
Page 7: Switch On And Take Readings
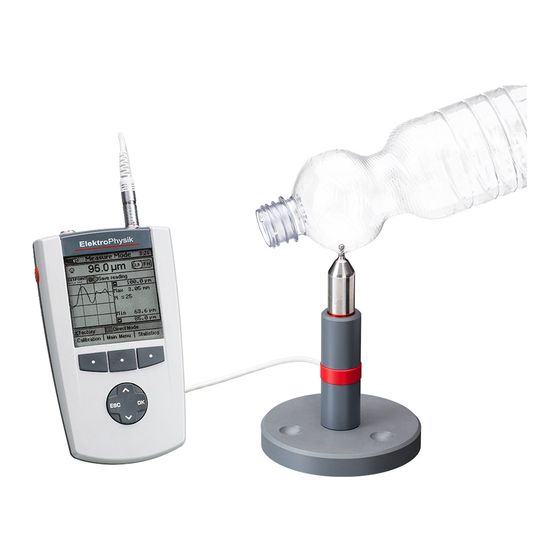
Target ball diameter, hiere: 4.0 mm. Flashing antenna symbol if sensor is connected Active batch, here: Pet bottle Selected calibration mode, here: (only with Minitest 7400 FH) Zero calibration Status line © ElektroPhysik MiniTest 7200 FH / MiniTest 7400 FH... - Page 8 The target ball is placed on the opposite side near the sensor. Keep the sensor in rectangular position to the surface and move it across the surface of sample. © ElektroPhysik MiniTest 7200 FH / MiniTest 7400 FH...
-
Page 9: Description Of The Measuring System
The Function keys and the command and navigation key block may be backlit on request. This adds additional comfort in poor light conditions (for more details please refer to section 10.5.2) © ElektroPhysik MiniTest 7200 FH / MiniTest 7400 FH... -
Page 10: Sockets And Interfaces
3.1.4 Power supply 3.1.4.1 Batteries and storage batteries Both models, MiniTest 7400 FH and MiniTest 7200 FH, are powered by a set of four alkaline- manganese cells, 1.5V, AA LR6 size (Batteries included in the standard supply schedule.). As an alternative, both models may be operated on rechargeable NiMH (type AA-HR6) storage batteries or via a power supply unit (available as an option). -
Page 11: Power Supply Unit
FH 4 sensor to cover the 0 …4 mm range FH 10 sensor to cover the 0…10 mm range. Both sensors feature a wear-resistant sensor tip most suitable also for hard materials such as glass, for instance. © ElektroPhysik MiniTest 7200 FH / MiniTest 7400 FH... -
Page 12: Sensor Stand
Both sensor types come with a spring-loaded V-grooved sensor stand. The use of the sensor stand ensures increased reproducibility of readings by adding stability of the sensor during measurement so that even small parts can be measured without problems. © ElektroPhysik MiniTest 7200 FH / MiniTest 7400 FH... -
Page 13: The User Menu
Number of readings Adjusted set point Minimum reading Maximum reading Active batch (MiniTest 7400FH only) CALIBRATION MODE Status line The current function key proper-ties are indicated in the line above the function keys. © ElektroPhysik MiniTest 7200 FH / MiniTest 7400 FH... -
Page 14: Measure Mode -Graphics Screen With Minitest 7400 Fh
Power supply indicator Process capability, cp and cpk Active batch (MiniTest 7400 FH only) Selected calibration mode The current function key proper-ties are indicated in the line above the function keys. © ElektroPhysik MiniTest 7200 FH / MiniTest 7400 FH... -
Page 15: User Menu
Press OK to confirm. The current selection will be highlighted. Use the arrows to select the requested parameter (e.g. English) and press OK to confirm. To undo your selection, press ESC and you will return to the previous menu level. © ElektroPhysik MiniTest 7200 FH / MiniTest 7400 FH... -
Page 16: Numerical Entries
“Entry accepted” option. See also section 10.5.5 for further reference. Complete your entry by pressing Function key “Ready”. Complete your entry by pressing Function key “Ready” and then confirm “Save changes?” by pressing OK. © ElektroPhysik MiniTest 7200 FH / MiniTest 7400 FH... -
Page 17: Measure Mode
You can continue to take readings in the active batch You can create a new batch (only with MiniTest 7400 FH model) You can choose an exiting batch from the database (please refer to section 7.2). © ElektroPhysik MiniTest 7200 FH / MiniTest 7400 FH... -
Page 18: Target Ball Size
Please refer to section 6 for more details on this issue. There are three calibration methods available: Factory Zero only Multi-point calibration (Zero + 1 to 4 Point(s) © ElektroPhysik MiniTest 7200 FH / MiniTest 7400 FH... -
Page 19: Measurement Without Sensor Stand
Keep the sensor in right-angle position to the object to be measured and scan continuously over the surface. For storing readings, please refer to section 5.5.1. © ElektroPhysik MiniTest 7200 FH / MiniTest 7400 FH... -
Page 20: Using The Sensor Stand
Make your selection and press OK to confirm. If you wish to undo your setting (before OK has been pressed) press ESC and the gauge will return to the previous menu level. © ElektroPhysik MiniTest 7200 FH / MiniTest 7400 FH... -
Page 21: Manual Data Storage
Make sure to put the sensor into the correct measuring position and to press ESC before storing the Maximum reading into memory. OK must be pressed BEFORE the sensor is moved from its measuring position. © ElektroPhysik MiniTest 7200 FH / MiniTest 7400 FH... -
Page 22: Correct Sensor Position
The reading will therefore be higher than the actual thickness. Remedy: Make sure to keep the sensor in perpendicular position to the sample. If necessary, use the sensor stand. © ElektroPhysik MiniTest 7200 FH / MiniTest 7400 FH... -
Page 23: Incorrect Readings Through Blocked Target Ball
Ferruginous particles in the material to be measured may lead to erratic readings because the ferruginous particles may influence the measuring signal. This will lead to readings smaller than the actual thickness. © ElektroPhysik MiniTest 7200 FH / MiniTest 7400 FH... -
Page 24: Calibration
In some cases it may become necessary to recalibrate if a new target ball is used (also if it has the same diameter as the previously used one). To be sure, check calibration in © ElektroPhysik MiniTest 7200 FH / MiniTest 7400 FH... -
Page 25: Calibration Methods
Further calibration points are recommended if measurement will be over a larger thickness range and if accuracy requirements are high. © ElektroPhysik MiniTest 7200 FH / MiniTest 7400 FH... -
Page 26: How To Calibrate
(To get reasonable values it is always recommended to take several readings and to have the mean calculated). Press OK to confirm. A ticked box right to “Zero“ will confirm successful calibration. Now the gauge is ready for measurement. © ElektroPhysik MiniTest 7200 FH / MiniTest 7400 FH... -
Page 27: Multi-Point Calibration (Zero + 1 To 4 Point(S) )
If this value is the same as specified on the precision standard, press OK to complete the calibration procedure. If not, please use arrow keys to correct the value as requested. © ElektroPhysik MiniTest 7200 FH / MiniTest 7400 FH... -
Page 28: Delete Calibration Point
Press “Delete” Function key and press OK to confirm or ESC to abort. Pressing “Delete” Function key a second time will remove the (X) from the check box. If you press again “Delete” Function key, the calibration value will also be deleted. © ElektroPhysik MiniTest 7200 FH / MiniTest 7400 FH... -
Page 29: Calibration Error Sources
Worn or damaged precision standards: Please precision standards impeccable condition. Build-up on the sensor tip. Clean sensor tip from metal parts, dirt particles etc. by using a soft cloth. © ElektroPhysik MiniTest 7200 FH / MiniTest 7400 FH... -
Page 30: Data Storage
One batch is firmly installed under the name “Direct Mode”. This batch cannot be deleted nor can it be renamed. The model MiniTest 7200 FH does not include the database feature, but it offers one predefined measuring batch. -
Page 31: Database Of The Minitest 7400 Fh
“Actions” and press OK to confirm “New Directory” which is highlighted. Enter a name in the alphanumerical input field. For more details, please refer to section 4.4.3 “Alphanumerical Entries”. © ElektroPhysik MiniTest 7200 FH / MiniTest 7400 FH... -
Page 32: Create A New Batch
From Main Menu select “Database”. Use arrow keys to select the requested batch. Press OK to confirm. The data stored under this batch appear on display. Press OK to switch to Measure Menu. © ElektroPhysik MiniTest 7200 FH / MiniTest 7400 FH... -
Page 33: Delete A Batch / A Directory
Use arrow keys to go to “Rename”. Press OK to confirm. On the alphanumerical input field the name to be changed appears. This name can be changed (see section 4.4.3 “Alphanumerical Entries”.) This action will not change the username. © ElektroPhysik MiniTest 7200 FH / MiniTest 7400 FH... -
Page 34: Statistics
This is to prevent input errors such as entering a wrong measuring unit. Press OK to confirm your changes. Spec. limits can be deleted via the function key “Delete”. Spec. limits can be set before or after readings have been taken. © ElektroPhysik MiniTest 7200 FH / MiniTest 7400 FH... -
Page 35: Set Point (Differential Mode)
Move the cursor to the reading to be deleted. Press function key “Help/Extra”. Move cursor to “Delete Readings” and press OK to confirm or press ESC to abort. Readings that have been deleted are marked by (X). © ElektroPhysik MiniTest 7200 FH / MiniTest 7400 FH... -
Page 36: Delete All Readings
Average ( Standard deviation (s) Minimum Maximum Variation coefficient Process capability indices Cp and Cpk (if spec. limits have been set). For more detailed information on statistics please refer to section 15.3. © ElektroPhysik MiniTest 7200 FH / MiniTest 7400 FH... -
Page 37: Histogram On Minitest 7400 Fh
“Trend”. A trend illustrates the tendency of readings so that deviations can be quickly identified. The limit range is the gray-highlighted-area. For a trend-diagram, at least 5 readings are required. © ElektroPhysik MiniTest 7200 FH / MiniTest 7400 FH... -
Page 38: Data Output / Data Transfer
9. Data Output / Data Transfer Both models, MiniTest 7200 FH and MiniTest 7400 FH are equipped with a bi-directional RS232 interface and an infrared interface (IrDA 1.9). Readings and statistics of a batch can be transferred to a PC or to the MiniPrint 7000 data printer (available as an option). -
Page 39: Screen Shot
Press function key “Print” to start the print-out. To abort, press “ESC”. 9.1.1 Screen Shot Please refer to section 11.2 “Special functions“. 9.1.2 Print-out a Batch Please refer to section 9.1 “Data Print-out” © ElektroPhysik MiniTest 7200 FH / MiniTest 7400 FH... -
Page 40: Transfer Data To Apc
(s), Min., Max. Variation Coefficient, Cp and Cpk ). Measuring Values or Measuring Values + Deleted Values (see also section 8.2.2). Operator (with MiniTest 7200 FH Notes-Field only) ----- (remains empty) Press OK to confirm you selection. Connect the MiniTest FH via the RS232 cable to your computer or align the infrared windows of your computer or of your IrDA adapter respectively. -
Page 41: Main Menu
Select “Batch properties” and press OK to confirm. Now you can view: Batch name (with MiniTest 7400 FH) Create date, Modified date User name. Press function key “Statistics” to view the statistics of this batch.. © ElektroPhysik MiniTest 7200 FH / MiniTest 7400 FH... -
Page 42: Readings
Logging rate (see 5.5) Graphics on/off (see section 4.3.2) Upper spec. limit (see section 8.1.1) Lower spec. limit (see section 8.1.1) Set point (see section 8.1.2) 10.4.4 Calibration Please refer to section 6. © ElektroPhysik MiniTest 7200 FH / MiniTest 7400 FH... -
Page 43: Setup
10.5 Setup 10.5.1 General Remarks In this menu both models, MiniTest 7200 FH and 7400 FH can be adjusted to customer requirements. From Measure Menu press function key “Main Menu”. Use arrow key to select “Setup”. Press OK to confirm. -
Page 44: Data Outputs
The duration can be adjusted to 50, 100, 150, 200, 250, 300, 350, 400 ms or to © ElektroPhysik MiniTest 7200 FH / MiniTest 7400 FH... -
Page 45: User Preferences
From Setup Menu use arrow keys to go to “Gauge Specs“. Press OK to confirm. Now you can view gauge specifications. For viewing sensor data press function key “Sensor”. In case of service requests please make available these data for further reference. © ElektroPhysik MiniTest 7200 FH / MiniTest 7400 FH... -
Page 46: Special Functions
All directories and batches will be deleted along with their readings, statistics and calibration values. Press ESC to abort the Total Reset process. Only the language settings remain in memory. © ElektroPhysik MiniTest 7200 FH / MiniTest 7400 FH... -
Page 47: Special Functions
The Special functions menu is meant for quick access to these functions at any time during operation. To quit the Special functions menu and to go back to your current operation, press OK to confirm your setting or ESC. © ElektroPhysik MiniTest 7200 FH / MiniTest 7400 FH... -
Page 48: Quick Reference
Meas. Mode Language Target Ball Size Meas. System Data logging mode Loudspeaker Logging rate Signal Volume Graphics Auto Switch OFF Uppers spec. limit Entry accepted Lower spec. limit Modification lock Set point © ElektroPhysik MiniTest 7200 FH / MiniTest 7400 FH... -
Page 49: Care And Maintenance
• Try to save battery life e. g. by operating the MiniTest 7200 FH / 7400 FH in Auto Switch off mode, instead of continuous service. 13.2 Maintenance Generally, no maintenance work is required for MiniTest 7200 FH / 7400 FH. -
Page 50: Technical Specification
± (50µm + 3%)* ± (30µm + 1.5%)* ± (20µm + 1%)* • All percentages are related to the measuring value Measurement on horizontal surfaces, mean value calculated from a minimum of 10 readings © ElektroPhysik MiniTest 7200 FH / MiniTest 7400 FH... - Page 51 365 mm x 450 mm x 140 mm case: Power supply: 4 x 1,5 V LR 6 – AA baby cells, Power supply unit (90 to 240V AC / 48 - 62 Hz) © ElektroPhysik MiniTest 7200 FH / MiniTest 7400 FH...
-
Page 52: Delivery Schedule
14.2 Delivery Schedule 14.2.1 Thickness gauge MiniTest 7200 FH / 7400 FH Order number Description Thickness gauge MiniTest 7400 FH for non-magnetic materials 80-176-0000 Thickness gauge MiniTest 7200 FH for non-magnetic materials 80-177-0000 including: Instruction manual in German/English/French on CD-Rom... -
Page 53: Accessories
Rubber protection case with positioning device (included in standard supply schedule) Belt for rubber protection case 82-010-0016 Case with shoulder belt for MiniTest 7200 FH / 7400 FH 82-010-0007 Plastics carrying case (incl. in standard supply schedule) 82-020-0033 Dust protection pouch... - Page 54 1 set precision standards for sensor FH10 for multi-point calibration for target ball 82-175-0020 dia. 2.5 mm, comprising: 1 set precision standards approx. 0.25 mm, 0.43 mm, 0.75 mm, 1.3 mm and 2.2mm © ElektroPhysik MiniTest 7200 FH / MiniTest 7400 FH...
- Page 55 1 set of target balls, 9 mm target ball size (10 pcs) 82-175-0014 Manufacturer’s Test Certificate according to DIN 55350 M for precision standards Manufacturer’s Test Certificate according to DIN 55350 M for 1 set precision standards for multi-point calibration © ElektroPhysik MiniTest 7200 FH / MiniTest 7400 FH...
-
Page 56: Appendix
Infinite adjustment required. “Make sure there is no target ball near the sensor. Please keep the sensor away from metallic objects or magnetic See also section 6.1 fields.” If this message persists, press © ElektroPhysik MiniTest 7200 FH / MiniTest 7400 FH... - Page 57 This step is required to tip or by any magnetic field. make the gauge ready for © ElektroPhysik MiniTest 7200 FH / MiniTest 7400 FH...
- Page 58 The following errors may be remedied by a total reset (see section 11.1) keyboard failure no measuring admitted illogical readings If the gauge cannot be switched off via the ON/OFF button, remove and reinsert batteries. © ElektroPhysik MiniTest 7200 FH / MiniTest 7400 FH...
-
Page 59: Detection Of Error Sources (Inf Flag)
To be sure, take double the distance form the error source. In the default measure mode using a target ball, it is not of importance if the “INF”-flag disappears. © ElektroPhysik MiniTest 7200 FH / MiniTest 7400 FH... -
Page 60: Statistical Terms
(number of readings minus 1). Variation coefficient (Var.-coeff.) The variation coefficient is the standard deviation divided by the arithmetic mean. The variation coefficient is indicated in percent. ×100 © ElektroPhysik MiniTest 7200 FH / MiniTest 7400 FH... - Page 61 In addition to the spread, the cpk index also takes into account the location of midpoint as related to the specification limits. − Cpku − Cpko Cpk = Min { Cpkl, Cpku } where USL = Upper specification limit where LSL = Lower specification limit © ElektroPhysik MiniTest 7200 FH / MiniTest 7400 FH...
-
Page 62: Safety Notes
Keep away from watches and metallic parts The static magnetic field created by the sensor may magnetize watches or other metallic parts. Make sure to keep a safety distance of at least 20 cm from such items. © ElektroPhysik MiniTest 7200 FH / MiniTest 7400 FH... - Page 63 If you connect the gauge to another device as recommended by the manufacturer, please refer to the corresponding instruction manual for detailed information on safety issues. Do only connect original accessories recommended by the manufacturer of the MiniTest 7200 FH / 7400 FH. Keep away from water The measuring unit is not waterproof.
-
Page 64: Declaration Of Conformity
We, ElektroPhysik, Pasteurstr. 15, D-50735 Cologne, Germany, declare in sole responsibility that the products MiniTest 7400 FH, MiniTest 7200 FH and MiniPrint 7000 to which this declaration relates is in conformity with the provisions of directive 89 / 336 / EEC (Electromagnetic compatibility), in Germany: EMVG (Gesetz über die elektromagnetische Verträglichkeit) of... -
Page 65: After Sales Service
15.6 After Sales Service MiniTest 7200 FH / MiniTest 7400 FH models are manufactured according to state-of-the-art production methods using high-class components. Careful production controls along with a Certified Quality Management according to DIN EN ISO 9001 ensure optimum product quality. -
Page 66: Index
..........34 Infrared............38 user name ..........32, 41 USL..........14, 34, 61 Distributed by: ABQ Industrial LP USA Tel: +1 (281) 516-9292 / (888) 275-5772 eFax: +1 (866) 234-0451 Web: https://www.abqindustrial.net E-mail: info@abqindustrial.net © ElektroPhysik MiniTest 7200 FH / MiniTest 7400 FH...
Need help?
Do you have a question about the MiniTest 7400 FH and is the answer not in the manual?
Questions and answers