
Related Manuals for ElektroPhysik MiniTest 430


Summary of Contents for ElektroPhysik MiniTest 430
- Page 1 MiniTest 430 Technical Reference and Operating Manual Advancing with Technology Elektro Physik VERSION: 3.03...
- Page 2 Subject to change without notice thickness reading that is TWICE what it should be. Responsibility for proper ElektroPhysik Dr. Steingroever GmbH & Co. KG use of the instrument and recognition Pasteurstr.15 of this phenomenon rests solely with 50735 Koln...
-
Page 3: Table Of Contents
〖6.4.5〗Gain setting ............E-13 〖6.4.6〗Switch off mode ..........E-13 〖6.4.7〗Contrast .............. E-14 〖6.4.8〗Language ............E-14 〖6.4.9〗Gauge data ............E-14 〖6.4.10〗Probe calibration ..........E-12 〖6.4.11〗Totalt reset ............E-14 【6.5】Data ..................E-14 7 Measuring technology ..............E-15 【7.1】 Measuring methods ............. E-15 ElektroPhysik... - Page 4 Contents 【7.2】 Pipeline measurement method ..........E-16 8 Maintenance and precautions ............E-16 【8.1】Power check ................E-16 【8.2】Precautions ................E-17 〖8.2.1〗 General precautions.......... E-17 〖8.2.2〗 Precaution during the measuring ...... E-17 9 Standard delivery ................E-18 Appendix ................... E-19 ElektroPhysik...
-
Page 5: General Description
Auto switch off: 2 minutes, 5 minutes or shut down manually. Power: 2 AA batteries, work 64 hours continuously. Environment: Operating temperature: -20℃~50℃ Storage temperature: -25℃~60℃ Dimensions: 130mm(L)×73mm(W)×24mm(H) Weight: 190g (Without battery) Optional accessory: Probe: U5.0, U7.5, U10.0, U5HT, U2.0. ElektroPhysik... -
Page 6: Measuring Principle
By accurately measuring the ultrasonic travel time, the thickness will be getting and displayed. 4 Complete set, spare parts and contents 【4.1】Complete set ① Screen ② Keypad ③ Battery compartment (back cover ) ④ Nameplate(back cover ) ⑤ Probe socket (identify pin) ⑥ USB interface ElektroPhysik... -
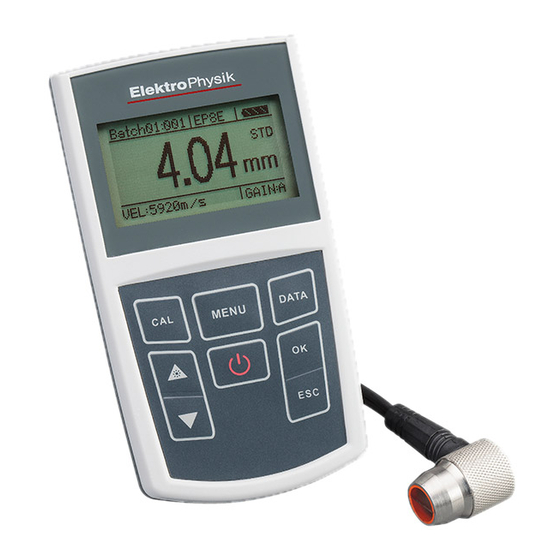
Page 7: Display
The measured data file groups and the storage data in each file group. Probe type Full battery Flat battery indicator Measuring mode Measurement icon and measuring unit The current selected gain method of the amplifier The current selected sound velocity The current measured data ElektroPhysik... -
Page 8: Keypad
In menu operation, press “OK” to confirm, and “ESC” to exit. ⑤ Shortcut key of calibration. auto calibration and sound velocity measurement are available. ⑥ Data shortcut key. Note: For the operation of each function key, it will give detailed instruction in the function operation below. ElektroPhysik... -
Page 9: Preparation Before Measurement
Mainly used in the measurement of thin wall thickness and small curvature surface. U10.0: Mainly used in the measurement of thin wall thickness and small curvature surface. U2.0: Mainly used in the measurement of coarse particles such as cast iron. ElektroPhysik... -
Page 10: Treatment Of The Measured Surface
“Please insert the probe”, at this moment insert the probe into the socket and waiting to go to the measuring status. Note: Please use the standard provided probe, otherwise the instrument will does not work normally and displaying “Error”. ElektroPhysik... -
Page 11: Measurement
Press key, and then press to select the options. 〖6.3.1〗Auto calibration Using different probe, wear out probe and the environment temperature will all cause measurement error, for these factors, the “Auto calibration” function is available. ElektroPhysik... - Page 12 Re-measure the sample's thickness and recheck the deviation between the measured value and the actual value. If the two values are the same, that sound velocity is the accurate value of the materials. ElektroPhysik...
-
Page 13: Menu Display And Operations
Main menu 【6.4】Menu display and operations Press to enter the menu screen and press select the options. Press “OK” to go to the selected option item, Press “ESC” to exit and go to measuring status. ElektroPhysik... -
Page 14: Measuring Mode
Scan mode: This mode is recommended to measure the high temperature work-piece. After going to the measuring mode, the instrument display: ElektroPhysik... - Page 15 Measuring mode ElektroPhysik...
-
Page 16: Sound Velocity Of The Instrument
Note: the 9 values are just the theriotic values, if users want to get accuret measuremnts , please refer to the sound velictiy function and get he more accurate sound velocity. The 9 materials are: aluminum, titanium, steel, stainless steel, glass, copper, brass, polystyrene and nylon. ElektroPhysik E-10... -
Page 17: Database
In the database, users can set or delete any file in the 10 file groups. 《6.4.3.1》Memory setting In this function, users can select a file name according to your actual needs, once the file is selected , it will become the current file which used to save the measured data. E-11 ElektroPhysik... - Page 18 Firstly, choose the file you want to delete and select it: Note: When delete some file, all storage measured data in the file will be deleted. So users should confirm the invalid data before deleting files or backup the files in your PC. ElektroPhysik E-12...
-
Page 19: Measurement Unit
There are four different working modes: Auto, Low, medium and high. Auto: match different probe and meets almost all the measuring requirements. Low: Suitable for high scattering and small attenuation materials Medium: Suitable for many measurements. E-13 ElektroPhysik... -
Page 20: Switch Off Mode
〖6.4.7〗Contrast There are six contrast levels to meet the measuring requirements. 〖6.4.8〗Language There are only two languages can be selected, which are Germany and English. Other languages will be added in future. ElektroPhysik E-14... -
Page 21: Gauge Data
During the usage, when users can not ensure why the problems comes out and with some questions on setting, this function can be used to make the parameters to reset the factory status to eliminate any abnormal because of the parameters setting. E-15 ElektroPhysik... -
Page 22: Data
Note: The process is available when the measurement icon disappeared 7 Measuring technology 【7.1】Measuring methods The instrument provides many measuring methods. Single point measuring method: use the probe to measure any point of the work-piece to be measured and the displayed value is the thickness. ElektroPhysik E-16... -
Page 23: Pipeline Measurement Method
The backlight can not be switched on for a long time, because it is a big consumer of electricity. Note: if the instrument did not used for a long time, please take out of the battery to avoid leakage to damage the instrument. E-17 ElektroPhysik... -
Page 24: Precautions
3. If the probe wears out, it will cause the displayed value unstable, please replace the probe. ElektroPhysik E-18... -
Page 25: Standard Delivery
Standard delivery 9 Standard delivery Main unit 1 set Probe (U5.0) 1 piece Coupling agent 1 bottle Instrument case 1 piece Certificate 1 piece Instruction manual 1 piece AA battery 2 pieces E-19 ElektroPhysik... -
Page 26: Appendix
0.180 4600 Lead 0.085 2200 Magnesium 0.230 5800 Mercury 0.057 1400 Molybdenum 0.250 6300 Monel 0.210 5400 Neoprene 0.063 1600 Nickel 0.220 5600 Nylon, 6.6 0.100 2600 Oil (SAE 30) 0.067 1700 Platinum 0.130 3300 plexiglass 0.110 1700 ElektroPhysik E-20... - Page 27 Steel, Mild 0.233 5920 Steel, Stainless 0.228 5800 Teflon 0.060 1400 0.130 3300 Titanium 0.240 6100 Tungsten 0.200 5200 Uranium 0.130 3400 Water 0.584 1480 Zinc 0.170 4200 Note: All the sound velocity listed above and for reference only. E-21 ElektroPhysik...
Need help?
Do you have a question about the MiniTest 430 and is the answer not in the manual?
Questions and answers