Table of Contents
Advertisement
Quick Links
DATA PROJECTOR
V3-131/ V3-111
User's Manual
* DLP™ (Digital Light Processing) and DMD (Digital Micromirror Device) are registered trademarks of Texas Instru-
ments Incorporated (U.S.A.).
* DMD is an ultra-precise part developed by Texas Instruments (U.S.A.) which takes the place of liquid crystal (in the
projector).
* VGA and XGA are trademarks or registered trademarks of International Business Machines Corporation (U.S.A.).
* S-VGA is a registered trademark of Video Electronics Standards Association.
* Microsoft, Windows, and PowerPoint are registered trademarks of Microsoft Corporation (U.S.A. and other countries).
* Macintosh is a trademark of Apple Computer Inc. (U.S.A.).
Note that even in the absence of explanatory notes, serious attention is paid to the trademarks of the various companies
and to the product trademarks.
IMPORTANT
Advertisement
Chapters
Table of Contents

Related Manuals for Plus V3-131


Summarization of Contents
Important Safety Information
Precautions
Please read this manual carefully before using your PLUS Data Projector and keep the manual handy for future reference.
CAUTION
TO PREVENT SHOCK, DO NOT OPEN THE CABINET. NO USER-SERVICEABLE PARTS INSIDE. REFER SERVICING TO QUALIFIED PLUS SERVICE PERSONNEL.
WARNING
TO PREVENT FIRE OR SHOCK, DO NOT EXPOSE THIS UNIT TO RAIN OR MOISTURE. DO NOT USE THIS UNIT'S GROUNDED PLUG WITH AN EXTENSION CORD OR IN AN OUTLET UNLESS ALL THREE PRONGS CAN BE FULLY INSERTED.
RF Interference
WARNING: This is a class A product. In a domestic environment this product may cause radio interference in which case the user may be required to take adequate measures.
DOC Compliance Notice
This Class A digital apparatus meets all requirements of the Canadian Interference-Causing Equipment Regulations.
Important Safeguards
Installation
For best results, use the unit in a darkened room. Place the unit on a flat, level surface in a dry area away from dust and moisture.
Power Supply
The unit is designed to operate on a power supply of 100 - 240 V 50/60 Hz AC. Ensure that your power supply fits these requirements.
Cleaning
Disconnect the power cable (mains lead) from the unit. Clean the cabinet of the unit periodically with a damp cloth.
Lamp Replacement
Be sure to replace the lamp when the Status indicator comes on. If you continue to use the lamp after 2000 hours of usage, the lamp will turn off.
Fire and Shock Precautions
Ensure that there is sufficient ventilation and that vents are unobstructed to prevent the buildup of heat inside the unit.
Carrying around
When carrying the unit around, please use the storage case that comes with it and, to protect the lens from scratches, always shut the sliding lens shutter.
CAUTION - HOT!
The area around the exhaust vents is hot during and immediately after image projection. To avoid burns, keep your hands away from this area.
Major Features
World's thinnest projector – just 35 mm thick
Plus is seeing just how thin the projector can be made. With our retractable lens and other unique ideas and technologies, we have developed a projector just 35 mm thick.
Designed for portability
The flat design allows the projector to fit in a regular business bag along with documents and a laptop.
Sharp, clear picture
The DLP™™ display system affords RGB color fidelity and inconspicuous gaps between the individual dots, thereby permitting the display of small characters and diagrams with distinct clarity.
High contrast ration of 2000:1
Use of a new generation of DMD devices has given birth to an amazing 2000:1 high contrast ratio.
Powerful functions for presentations
A wide variety of easy-to-set functions have been built into the projector, from a digital keystone correction function to an auto adjustment function.
Great moving image playback capabilities using the same principles as DLP Cinema technology
Plus DLP type projectors have the same makings as the DLP Cinema technology used in movie theaters.
Security lock function
The lock can be set so that a password must be input when the projector is started up. Without the correct password, no operations other than turning the power on and off can be performed.
Eco-mode switch function for the lamp output
Using the lamp Eco-mode will extend the life of the lamp and lower the power consumption.
Checking the Supplied Accessories
Wireless remote control unit
This controls the projector. Please remove the transportation insulation sheet at time of purchase.
Power cable (1.8 m / 5.9 feet) [1]
This power cable supplies power to the unit. See Page E-22 about connections.
RGB signal cable (Mini D-sub 15-pin, 2 m / 6.6 feet) [1]
This is used in making connections with a personal computer. See Page E-17 about connections.
User's Manual (CD-ROM edition) [1]
User's Manual (Simplified Edition) [1]
Storage case [1], Cable case [1]
These cases are designed to hold the projector itself and its accessories. Use them when storing the projector.
Expendables and Options
V3 Series lamps Model V3-120 (ordering code: 28-051)
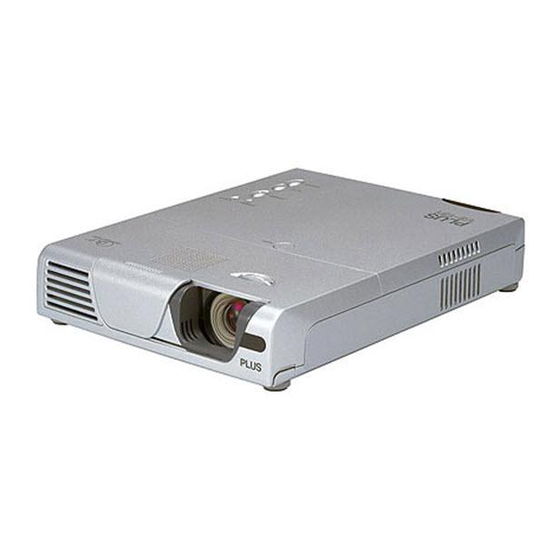
Names of the Main Unit Parts
Handling the Lens Unit
Instructions for operating the lens unit, including extending and retracting it.
Built-in Security Slot
This security slot supports the MicroSaver Security System manufactured by Kensington Microware Inc.
Names of the Remote Control Parts
Precautions Handling of the Remote Control
Important advice on how to handle and maintain the remote control unit to ensure its proper function.
Preparing the Remote Control
Button Battery Replacement
Step-by-step guide on how to replace the button battery in the remote control.
Remote Control Range
Details the operational range and optimal angles for the remote control's infrared transmitter.
The Procedure Up to Projecting to the Screen
About DLP projectors
Notes potential rare occurrences of black or bright spots among picture elements in DLP projectors.
Placement Guide
V3-131 Screen Size and Projection Distance
Provides a table and diagram showing screen sizes and corresponding projection distances for the V3-131 model.
V3-111 Screen Size and Projection Distance
Provides a table and diagram showing screen sizes and corresponding projection distances for the V3-111 model.
Installation Height of Projection Screen [Reference]
Provides a formula and example for calculating the required installation height of the projection screen.
Connecting Personal Computers and Video Equipment
Connections with Personal Computer
Details how to connect a personal computer using the RGB signal cable.
To Output the External Output Signal of a Notebook Computer
Provides instructions and a table for activating external output from notebook computers.
Connections with Composite Signals
Explains how to connect video equipment using VIDEO or S-VIDEO connectors.
Connections with Component Signals
Details how to connect video equipment with YCbCr or YPbPr connectors.
Connections with the AUDIO Jack
Instructions for connecting audio devices to the projector's audio input.
Power Cable Connections and Switching the Power On/Off
Operating
Procedure for connecting the power cable and turning the projector on.
When [Menu Language Select] is Displayed Upon Switching On the Power
Guide for selecting the display language of the projector upon first use.
Finishing
Steps for safely turning off the projector and disconnecting power.
Adjustment of the Projection Screen
Adjustment of the Projection Screen
Steps to adjust the projected image to fit the screen, including alignment and keystone correction.
Making Adjustments with the Adjusters
Detailed instructions on using the projector's adjusters to raise or lower the image.
General Operation
Input Selection
How to select the input signal source for projection.
Automatic Adjustment
Function to automatically adjust image position, size, and color fidelity for analog RGB signals.
Selection of Aspect Ratio
How to set the horizontal and vertical picture proportions for different input signals.
Freezing a Moving Picture
How to stop and view a still image from a moving picture source.
Cancelling Video and Audio Temporarily
How to mute the video and audio output simultaneously.
Lamp Mode
How to select between Eco mode and Normal mode for lamp brightness and lifespan.
Keystone
How to adjust for trapezoidal distortion of the projected image.
Adjustment of the Volume
How to adjust the volume of the projector's built-in speaker.
Enlargement of the Image and Video Movement
Function to digitally enlarge and move images from a computer or video source.
Using the Presentation Timer
How to set and use the built-in timer for presentations.
Protecting the Projector with the Security Lock
How to register a password to prevent unauthorized use of the projector.
Canceling the password/Changing the password
Instructions on disabling or modifying the projector's security password.
Using the Quick Menu
Function to quickly access and perform frequently used adjustments.
Content of Adjustments and Settings
Lists the available adjustments and settings accessible through the quick menu.
Menu Operation Method
Names and functions of remote control unit buttons used for menu operations
Details the remote control buttons used for menu navigation and selection.
Menu Screen Names and Functions
Describes the structure and elements of the projector's menu interface.
Performing Menu Operations
General guidelines for interacting with the projector's menu system.
Selection of the Menu Name
How to navigate through the main menu categories using the remote control.
Displaying the Cursor
How to display the cursor for selecting item names within the menu.
Selection of the Item Name
How to select specific adjustment or setting items within a menu.
Making Adjustments/Settings
How to adjust or set values for selected menu items.
Closing the Menu
Instructions on how to exit the projector's menu display.
Selecting Another Menu Name with Remote Control Operation
How to switch between main menu categories using the remote control.
List of Item Names Offering Input Selection and Adjustments/Settings
Table detailing adjustable items based on input signal type.
Image
Brightness / Contrast / Color / Tint / Sharpness
Adjusts basic picture qualities like brightness, contrast, color, tint, and sharpness.
Picture Adj. / Fine Picture / H Position / V Position
Fine-tuning image adjustments when automatic settings are insufficient.
Picture Adj. (Picture Adjustment)
Adjusts image when bright and dark vertical bands appear on the screen.
Fine Picture
Adjusts for lack of color fidelity or flickering in the picture.
H Position
Adjusts the horizontal position of the image.
V Position
Adjusts the vertical position of the image.
Reset
Resets image adjustment/setting values to standard settings.
Color
Quick Color Adj.
Selects preset color modes to adjust picture appearance.
Gamma
Corrects dark portion proportions for natural color or computer display.
Color Temp.
Adjusts white balance for better color reproduction and skin tones.
White
Emphasizes whites of text or diagrams on the personal computer.
Color Space
Sets color space for component signals to ensure normal image color.
White Balance
Automatically adjusts black and white levels for optimal PC signal display.
View
Aspect
Sets horizontal and vertical picture proportions for input signals.
Filter
Adjusts sharpness when the input signal is resized for projector display.
Vertical Flip
Function to invert image vertically or horizontally for rear projection.
Keystone
Corrects trapezoidal distortion when projector and screen are at an angle.
Keystone Save
Saves current keystone adjustment values for recall after power cycling.
Setup
Auto Source
Automatically detects the input signal when power is switched on or input changes.
Auto Power Off
Switches off projector power automatically when no signal is detected.
Menu Position
Sets the display position of the on-screen menu.
Lamp Mode
Selects between Eco and Normal modes for lamp brightness and lifespan.
Input Format
Sets the input signal format for various connectors like RGB, Video, and S-Video.
Presentation Timer
Configures the built-in timer for presentations, setting its duration.
Option
Language
Sets the display language for on-screen messages and menus.
On Screen
Switches on/off messages displayed with a black frame, like signal info.
Background
Sets the screen color displayed when the input source is no-signal.
Startup Screen
Selects whether to display the logo screen at startup time.
Security Lock
Enables or disables the security lock feature, requiring a password for operation.
Info.
Status
Displays information about the projector, like model and firmware version.
Factory Default
Returns all adjustments and settings to their standard factory default values.
Lamp Timer Reset
Resets the lamp timer, typically after replacing the lamp cartridge.
Resolution / Frequency
Displays the resolution and frequency of the detected input signal.
Lamp Timer
Displays the remaining life of the projector lamp.
When an Indicator is Lit or Flashing
Thermal Protector
Actions to take when the projector's temperature becomes abnormally high.
Need help?
Do you have a question about the V3-131 and is the answer not in the manual?
Questions and answers