cecotec PROCLEAN 5110 RETRO Manual
- Instruction manual (158 pages) ,
- Instruction manual (18 pages)
Advertisement
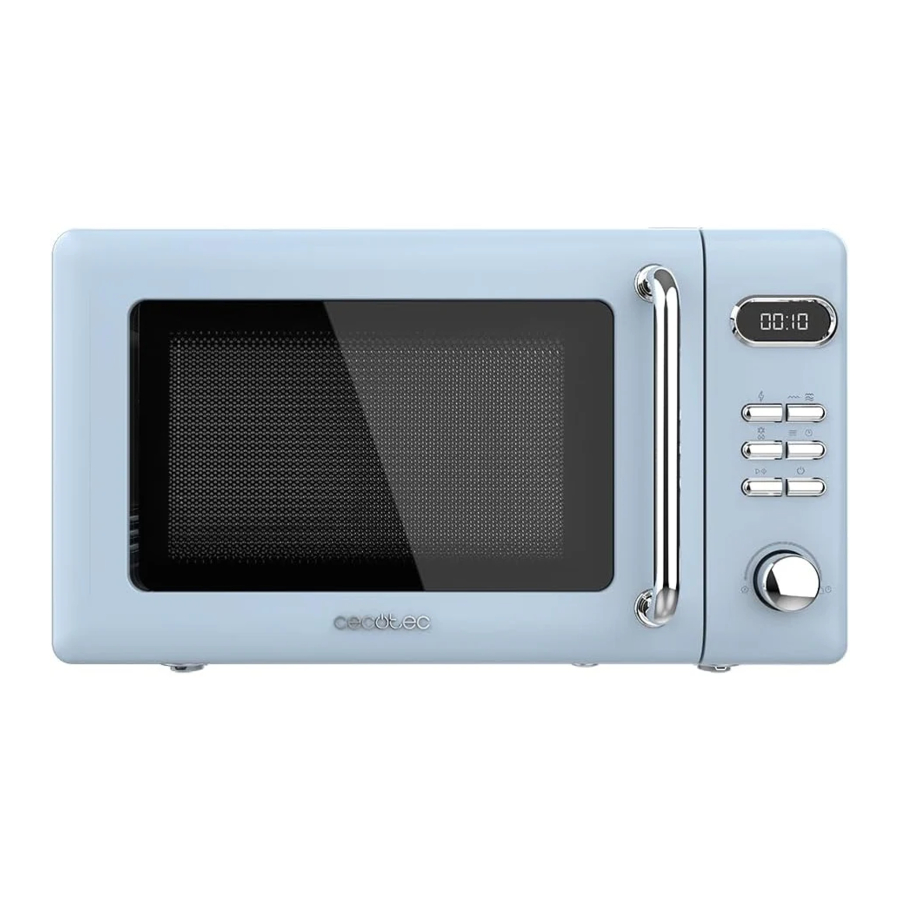
PARTS AND COMPONENTS
FIG. 1

- Door Lock
The microwave door must be properly closed in order to operate. - Display window
Window that allows the user to see the cooking status. - Turntable ring
The glass turntable settles on its wheels. The ring supports the turntable and helps to balance it when turning. - Rotating shaft
The glass turntable settles on the shaft; the motor underneath drives the turntable to rotate. - Turntable
The food settles on the turntable, its rotation during operation helps to cook food evenly. Place the rotating ring first. Fit the turntable onto the rotating shaft and make sure that it is properly engaged. - Control panel
See details below (control panel is subject to change without notice). - Grill
It is used to place the food to be grilled. - Waveguide cover
It is inside the microwave, next to the control panel wall. Do not remove the waveguide cover.
FIG. 2

- Display
- Power button
- Defrost
- Pause/Cancel button
- Grill/Combi
- Presetting/clock
- Beginning
- Self-cooking
- Time/weight
- Self-cooking/Time-Weight Selector
NOTE:
The graphics in this manual are schematic representations and may not exactly match the device.
BEFORE USE
- This device is packaged in a way as to protect it during transport. Take the device out of its box and remove all packaging materials. You can keep the original box and other packaging elements in a safe place. This will help you prevent damage to the device when transporting it in the future. In case the original packaging is disposed of, make sure all packaging materials are recycled accordingly.
- Make sure all parts and components are included and in good conditions. If there is any piece missing or in bad conditions, contact the official Cecotec Technical Support Service immediately.
OPERATION
Before cooking
The LED flashes 3 times when plugged into the mains. The ":" symbol then flashes on the display, prompting you to enter the cooking menu and time.
Self-cooking / Time-Weight Selector
You can increase or decrease the cooking time, weight or select the automatic cooking menu during operation by turning the selector.
Pause/Cancel
In the initial or entry stage: press once to cancel the entry programmes and resume the initial stage.
During cooking: press once to stop microwave operation, press twice to cancel cooking programmes.
Auto reminder
When the preset cooking procedure has been completed, the display will show "END" and three beeps will sound to prompt you to remove the food. If you do not press the Pause/ Cancel button once or do not open the door, a beep will sound at an interval of 3 minutes.
Instant cooking
In the standby state, press the Start button, the microwave will start cooking at high power; the default cooking time of the system is 1 minute. You can increase or decrease the cooking time by turning the knob.
Note: The instant cooking function applies to one of the following situations:
- Activate the instant cooking function in 2 minutes when the microwave door is closed.
- Activate the instant cooking function within 2 minutes by pressing Pause/Cancel.
- Activate the instant cooking function within 2 minutes of the end of the pre-set cooking programme.
Clock settings
The Clock button allows you to enter the current time, when the ":" symbol flashes on the display after plugging it in.
| Example: set at 12:30 | ||
| Steps | Symbol | |
| 1 | After switching on, the: flash | : |
| 2 | Press the Pre-setting/Clock button once. | 00:00 |
| 3 | Turn the Self-cooking/Time-Weight selector to set the exact hours. | 12:00 |
| 4 | Press the Pre-setting/Clock button again. | 12:00 |
| 5 | Turn the Self-cooking/Time-Weight selector to set the exact minutes. | 12:30 |
| 6 | Press the Presetting/Clock button again or wait 5 seconds, and the numbers will be fixed. | |
Microwave cooking
Use this function in order to cook or heat food. Press the power button, the display will show 100P-80P-60P - 40P- 20P.
| High power | 100% microwave power. Applicable for fast and thorough cooking. |
| Medium-high power | 80% microwave power. Applicable for medium express cooking. |
| Medium power | 60% microwave power. For steam cooking. |
| Medium-low power | 40% microwave power. Applicable for defrosting food. |
| Low power | 20% microwave power. Applicable for heat preservation. |
- The maximum programmable time is 60 minutes.
- Never run the microwave at idle.
- When the microwave is operating at full power, power will automatically decrease after a while to extend lifespan.
- If you turn the food during operation, press the Start button once, and the preset cooking procedure will continue.
- If you intend to remove the food before the preset time, you must press the Pause/Cancel button once to clear the preset procedure and prevent unintended operation of the next use.
| Example: to cook at P80 for 10 minutes. | ||
| Steps | Symbol | |
| 1 | After switching on, the: flash | : |
| 2 | Select the desired microwave power by pressing the power button consecutively. | P80 |
| 3 | Turn the Self-Cooking/Time/Weight selector to set the cooking time. | 10:00 |
| 4 | Press the Start button to start and the display will show the running time. | |
Grill or Grill/Microwave combination
This function is used for grilling food, press this button. The display will show G-C1-C2.
| G | Grill: the heating element will be hot during operating time. It is used to grill thin meat or pork, sausage or chicken wings. |
| C.1 | Combination of grill and microwave. 30% of microwave time and 70% of grill time. |
| C.2 | Combination of grill and microwave. 55% of microwave time and 45% of grill time. |
Note: In grill mode, all parts of the microwave may become very hot, including the rack and containers. Be careful when removing any objects from the microwave. To avoid burns, use thick cloths or oven oven mitts. Please note that the introduction of non-heat resistant containers may damage those containers.
| Example: for grilling food with cooking menu C.2 for 10 minutes. | ||
| Steps | Symbol | |
| 1 | After switching on, the: flash | : |
| 2 | Press the Combi/Grill button to select the grill mode. | C.2 |
| 3 | Turn the Self-Cooking/Time-Weight selector to set the cooking time. | 10:00 |
| 4 | Press the Start button to start cooking. | |
Defrost
This function is used for defrosting food. Press the Defrost button and the display will cycle through d.1-d.2-d.3.
| d.1 | For defrosting meat, the weight ranges from 0.1 to 2.0 kg. |
| d.2 | For defrosting poultry meat, the weight ranges from 0.2 to 3.0 kg. |
| d.3 | For defrosting fish, the weight ranges from 0.1 to 0.9 kg. |
- It is necessary to turn the food over during operation to obtain a uniform effect.
- Defrosting normally takes longer than cooking food.
- If the food can be cut by knife, the defrosting process is complete.
- Microwaves penetrate about 4 cm into most foods.
- Defrosted food should be consumed as soon as possible. It is not advisable to put it back in the refrigerator or to refreeze it.
| Example: for defrosting 0,4 kg of poultry meat | ||
| Steps | Symbol | |
| 1 | After switching on, the: flash | : |
| 2 | Press the Defrost button to select the type of food. | d.2 |
| 3 | Adjust the amount of food by turning the Self-Cooking/TimeWeight selector. | 0.4 |
| 4 | Press the Start button to start defrosting. | |
| 5 | During defrosting, two beeps will sound to prompt you to turn the food over. Open the door and turn the food over. Close the door. Next, press the Start/Pause button again to continue defrosting. | |
Auto-cooking
- The microwave has a pre-set cooking menu for easy operation. When the display flashes:, turn the selector to self-cooking, the display will change to show A.1, A.2. A.8
- Choose the appropriate menu according to the type and weight of the food and strictly follow the instructions in the table below. Otherwise, the cooking effect will be greatly affected.
| Symbol | Type | Method |
| A.1 | Popcorn | Suitable for making a bag of corn with a weight of 85g. If the popcorn opening speed has been reduced to 1x for 1-2 seconds, you must press Pause / Cancel to stop the opening process. |
| A.2 | Popcorn | Same as A.1 but the weight is 100 g. |
| A.3 | Pizza | Heat a refrigerated pizza slice of 0.15 kg. |
| A.4 | Drinks | Heat a 250 ml glass of liquid. The liquid temperature is about 5-10 ℃. Use a glass and do not cover it. |
| A.5 | Drinks | Heat a 500 ml glass of liquid. The liquid temperature is about 5-10 ℃. Use a glass and do not cover it. |
| A.6 | Potato | Boil the potato strips, cut into 5 mm width, height and length. The total weight is about 0.45 kg. Place the strips in a large bowl and cover the bowl with a thin film to prevent water loss. |
| A.7 | Potato | Same as A.6 except that the weight of the potato strips is about 0.65 kg. |
| A.8 | Fish | Perfect steaming 0.45 kg of fish. After washing the fish and removing the scales, cut a slit in the skin of the fish and place it in a shallow dish of 22-27-cm diameter, covering it with a thin film to prevent water loss. After cooking, leave to stand for 2 minutes. |
- The temperature of the food before cooking would be 20-25 ℃. A higher or lower temperature of the food before cooking would require an increase or decrease of the cooking time.
- The temperature, weight, and shape of the food will strongly influence the microwave effect on the cooking process. If any deviation from the factor indicated in the above menu is detected, you can adjust the cooking time to obtain the best result.
| Example: Steaming 0.45 kg of fish | ||
| Steps | Symbol | |
| 1 | After switching on, the: flash | : |
| 2 | Turn the Self-Cooking/Time-Weight selector to set the cooking time. | A.8 |
| 3 | Start cooking by pressing the Start button. The LED will count down to show the operating time. | |
Delayed start
- If you do not want the menu to start immediately, you can preset the menu and cooking time and the preset menu will start automatically at the set time. The adjustment will consist of 2 steps:
- Setting the current clock.
- Setting the menu and cooking time.
- Example: now it is 12:30 on the clock. If you want the microwave to start cooking automatically with a microwave power of 100P for 9 minutes and 30 seconds at 14:20.
| Example: now it is 12:30 on the clock. If you want the microwave to start cooking automatically with a microwave power of 100P for 9 minutes and 30 seconds at 14:20. | ||
| Steps | Symbol | |
| 1 | After switching on, the: flash | : |
| 1.1 | Press the Pre-setting/Clock button. | 00:00 |
| 1.2 | Set the hours by turning the Self-cooking/Time-Weight selector. | 12:00 |
| 1.3 | Press the Presetting/Clock button again to confirm the hours. | 12:00 |
| 1.4 | Set the minutes by turning the Self-cooking/Time-Weight selector. | 12:30 |
| 1.5 | Press the Presetting/Clock button again or wait 5 seconds, and the numbers will be fixed. | 12:30 |
| 2 | Setting the menu and cooking time. | |
| 2,1 | Select the desired microwave power by pressing the power button consecutively. | 100 P |
| 2.2 | Turn the Self-cooking/Time-Weight selector to set the cooking time. | 9:30 |
| 2.3 | Press and hold the Presetting/Clock button for 3 seconds to return to the current clock. | |
| 3 | Set the time you expect to start. Repeat the steps of 1.2, 1.3, 1.4. | 14:20 |
| 4 | Press the Presetting/Clock button to confirm the delayed menu. The programme is activated. The menu will start at 14:20. | |
| 5 | You can check the preset start time by pressing the Pre-setting/ Clock button. | |
Multi-sequence cooking
For best cooking results, some recipes require a different cooking mode and time. You can programme your personalised menu as follows:
| Example: You want to microwave food with 100P for 3 minutes and then 20P for 9 minutes. It is the configuration of 2 sequences. | ||
| Steps | Symbol | |
| 1 | 100P microwave for 3min | |
| 1.1 | Select the desired microwave power by pressing the power button consecutively. | 100 P |
| 1.2 | Turn the Self-cooking/Time-Weight selector to set the cooking time. | 3:00 |
| 2 | 20P for 9 minutes. | |
| 2,1 | Select the desired microwave power by pressing the power button consecutively. | 20P |
| 2.2 | Select the desired microwave power by pressing the power button consecutively. | 9:00 |
| 3 | Start cooking by pressing Start. | |
- When cooking in 100P mode is finished, the microwave will start the next operation automatically.
- A maximum of 4 sequences can be set at a time. Repeat the steps explained in the example above.
Child lock function
Use this function to lock the control panel when cleaning or to prevent children from using the microwave without supervision. All buttons are inoperative in this mode.
- Activating the child lock: Hold down the Start/Pause button for 3 seconds.
- Deactivate the lock: Hold down the Start/Pause button for 3 seconds.
UTENSILS GUIDE
It is strongly recommended to use suitable and safe containers for microwave cooking. In general, heat-resistant ceramic, glass or plastic containers are suitable for microwave cooking. Never use metal containers for microwave and combination cooking, as sparks are likely to occur. Please, refer to the following table.
| Container material | Microwave | Grill | Combi | Notes |
| Heatproof ceramics | Yes | Yes | Yes | Never use ceramics decorated with metallic or glazed edges. |
| Heatproof plastic | Yes | No | No | Not suitable for prolonged cooking in microwave. |
| Heatproof glass | Yes | Yes | Yes | |
| Plastic film | Yes | No | No | It should not be used for cooking meat or chops, as excessive heat can damage the film. |
| Grill | No | Yes | Yes | The grill grid can only be used in grill and combination modes. |
| Metal container | No | No | No | Not to be used in the microwave. Microwaves cannot penetrate through metal. |
| Lacquered | No | No | No | Poor heat-resistance. Not suitable for high temperature cooking. |
| Bamboo or paper | No | No | No | Poor heat-resistance. Not suitable for high temperature cooking. |
CLEANING AND MAINTENANCE
The microwave should be cleaned regularly, and any food remainder removed.
- Unplug the appliance and allow it to cool down before cleaning. Never immerse the device in water or other liquids.
- Failure to maintain the microwave in a clean condition could lead to deterioration of the surface that could adversely affect the lifespan of the appliance and possibly result in hazards.
- Never use strong detergent, petrol, abrasive powder or metal brush to clean any part of the appliance.
- Do not remove the mica plate cover.
- When the product is not in use, it should be placed in dry and ventilated places if possible.
- Details on how to clean food contact surfaces:
- After use, wipe the waveguide cover with a damp cloth, followed by a dry cloth to remove any food splashes and grease. Accumulated grease can overheat and start to smoke or catch fire.
Cleaning tips
- Details for cleaning of door seals, cavity and adjacent parts.
- Exterior: use a soft, damp cloth to clean the surface of the appliance.
- Door: clean the door and window with a soft damp cloth.
- Clean the door seals and adjacent parts to remove any spills or splashes. Clean the control panel with a soft and slightly damp cloth.
- Inner walls: clean the inner surfaces with a soft, damp cloth.
- Clean the waveguide cover to remove any food splashes.
- Turntable / Turntable ring / Rotating shaft: Wash with mild soapy water.
- Rinse with clean water and allow to dry thoroughly.
TECHNICAL SPECIFICATIONS
Product reference: 01711 / 01712 / 01713 / 01714 / 01715
Product: Proclean 5110 Retro Blue/Green/Yellow/Beige/Red
Power inlet: 1150 W
Power output: 700 W
Grill power: 800 W
Voltage: 230 V
Frequency: 50 Hz
Microwave frequency: 2450 MHz
Technical specifications may change without prior notification to improve product quality. Made in China | Designed in Spain
Documents / ResourcesDownload manual
Here you can download full pdf version of manual, it may contain additional safety instructions, warranty information, FCC rules, etc.
Advertisement


Need help?
Do you have a question about the PROCLEAN 5110 RETRO BLUE and is the answer not in the manual?
Questions and answers