Advertisement
- 1 Super 8. Better than perfect.
- 2 Registration
- 3 What's in the Box
- 4 Overview
- 5 Overview - Back Panel
- 6 Install the Battery
- 7 Charge the Battery
- 8 Install the Lens
- 9 Install the Pistol Grip
- 10 Power On and Setup
- 11 Power Off
- 12 Setup and Navigation
- 13 Load the Film Cartridge
- 14 Create Cartridge and Set Film Type
- 15 Set Frame Rate
- 16 Set Alternative Frame Rate (Function Button)
- 17 Use Alternative Frame Rate (Function Button)
- 18 Set Run Mode
- 19 Auto Off Mode
- 20 Viewfinder Overview
- 21 Compose the Scene (Viewfinder)
- 22 Aspect Ratio Overlay (Viewfinder)
- 23 Adjust Exposure, Focus, and Shoot
- 24 Unload and Process Film
- 25 Recording Audio: SD Card
- 26 Insert and Format SD Card
- 27 Connect Microphone or Line Input
- 28 Transfer Audio Files: SD card
- 29 You are good to go when...
- 30 Proper Care of Your Camera
- 31 Documents / Resources
Super 8. Better than perfect.
There are some moments that digital just can't replicate. The incomparable warmth, depth, and beauty of film simply has no equal. These are the moments that inspire us, that move us forward, and enlighten us. Merging analog magic with digital convenience in the most accessible and easy-to-use film format ever invented.
The new KODAK Super 8 camera is the most advanced camera in its category. Industrial design, lens options and a complete system from action to cut. It's more than a camera. Welcome to your new platform for creativity. Nice to see you again, Super 8.
www.kodak.com/go/super8
Registration
Register your new KODAK Super 8 Camera to activate your warranty and stay up-to-date on special offers, tips and additional services.
www.kodak.com/go/super8
What's in the Box

- Super 8 Camera
- C mount Cap
- Lens Cap
- Wide Angle 6mm Lens 1:1.2
- Lens Cap
- Lens Hood
- Getting Started Guide
- Super 8 Camera Battery with Cover
- Micro USB Charging Cable
- KODAK Super 8 Camera USB Power Adapter ( US / UK / EU Version )
- Cleaning Cloth
- Pistol Grip
- KODAK TRI-X Reversal Film
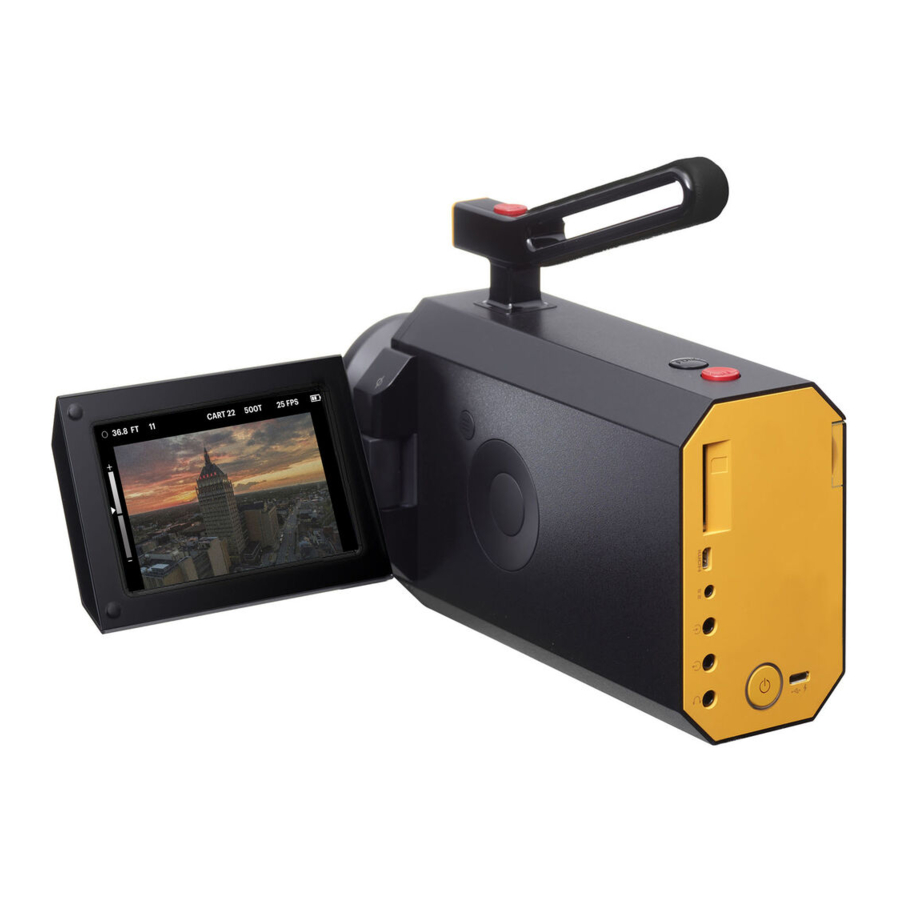
Overview

- Run Button
- Function Button
- Top Handle
- Lens
- Lens Hood
- Pistol Grip
- Thumbscrew
- Cartridge Window
- Film Compartment
- Film Door
- Battery Compartment
- LCD Viewfinder Menu Button
- Confirm Button
- Touch Wheel
Overview - Back Panel

- SD Card Slot (audio recordings / firmware updates / file transfer)
- Micro HDMI (external display)
- 2.5mm Jack (remote access)
- 3.5mm Line Input
- 3.5mm Mic Input
- 3.5mm Headphone Output
- Power Button
- Micro USB (charging)
Install the Battery

The camera will NOT work without a battery. The battery MUST be fully charged BEFORE using the camera for the first time. Use only a genuine KODAK Super 8 Camera Battery.
- Open the film door.

- Insert the battery and lift and twist the handle clockwise to lock it into place.

- Close the film door.


Charge the Battery

Connect one end of the Micro USB Charging
Cable to the camera and the other end to the USB Power Adapter. Plug the adapter into a wall outlet.
The camera power button light will turn red when charging and will turn green when fully charged (about 3.5 hours).
Use only the Super 8 Camera USB Power Adapter supplied with the camera.
NOTE: Spare batteries are available separately.
Install the Lens

- Remove and save all lens and camera caps.IMPORTANT: Only use C-mount lenses that are flush with the thread. CS-Mount lenses will damage the thread.
- With the lens mount facing up, carefully attach the lens by turning it clockwise until secure. The index line must be oriented at the top of the camera.
![]()
Over-tightening the lens can damage the mount and change the focus of the camera. - Install the lens hood (optional): Carefully screw hood into end of lens until secure.
![]()
Never release or change any of the visible screws on the lens or at the mount.

Install the Pistol Grip
To install the pistol grip, align it with run button towards front of camera. Turn the thumbscrew until tight.

Power On and Setup
- Open the LCD viewfinder.
- Press the power button to turn the camera on.
TIP: To prevent damage to the LCD screen, close the LCD viewfinder when the camera is not in use.
Power Off

- Press and hold the power button for approximately 5 seconds.
- Camera to completely power down.
Setup and Navigation

- Go to the System screen.
- Set your Language.
- Drag your finger around the touch wheel to navigate through a list - clockwise to scroll down, counter clockwise to scroll up.
- Press the confirm button to choose an item.
- Press the menu button to toggle between the menu and the viewfinder display.
Load the Film Cartridge
Before you load the cartridge, turn the transport wheel clockwise to take up slack in the film. IMPORTANT: Turning the wheel counterclockwise will damage the cartridge.

- Open the film door.
- With the power on, insert the cartridge, with the notches toward the front of the camera and the label facing out. Align the cartridge notch with the registration pin.
- Push cartridge down until it snaps into place.
- Close the film door.
Create Cartridge and Set Film Type
With the power on, the camera detects when a cartridge has been loaded. The Add Cartridge screen will display.
- Select Create to create "Cartridge1". You'll be reminded to mark the cartridge later with that name/number.

- Select Film Type and then select the type you loaded. The camera automatically adjusts the exposure range for each film type.
- If you select "Other Film" the camera light meter is disabled, you can expose any film individually by using an external light meter in cine mode.

- Selecting "Other Film" will simplify cartridge changes by reducing menu selection steps.
TIP: Shoot a practice roll of film to get familiar with your camera and its functions.


Set Frame Rate
- Go to the Camera screen.

- Select Run Button.
Choose the primary frame rate.
FPS = Frames Per Second
18 FPS: ~ 3 minutes, 20 seconds run time (default)
24 FPS: ~ 2 minutes, 30 seconds run time
25 FPS: ~ 2 minutes, 24 seconds run time
36 FPS: ~ 1 minute, 40 seconds run time
(for slow motion on playback)


Audio recording is only available for frame rates of 24 FPS and 25 FPS.
Set Alternative Frame Rate (Function Button)
You can temporarily change the frame rate during a scene with the function button. For example, while shooting at 18 FPS, you can switch to 36 FPS for a slow motion effect on playback.
- From the Camera menu, select Function Button and choose the frame rate.
NOTE: The default value is 36 FPS.


Use Alternative Frame Rate (Function Button)

- When shooting, press and hold the function button (while run is still engaged) to change the frame rate.
Filming tip: Changing the frame rate influences the exposure; you may need to adjust the aperture (A) by +½ stop from 18 to 24/25, or +1 stop from 18 to 36 FPS. - Release the function button to return to the original frame rate.
Set Run Mode
The run button's Run Mode can be set to:
- Pressed: press and hold the run button to shoot film, and release the button to stop.
- Latched: press and release the run button to start shooting, then press and release again to stop.

Auto Off Mode

- Camera powers off after 15 minutes of idle time. This is the default setting which can be changed in the menu "Camera". This mode helps conserve power when the camera is not in use.
- Press the Power button to turn camera on.
Viewfinder Overview

- Film Counter: will turn red when the cartridge is down to the last 5 feet (1.5 m), that is, 10-20 seconds remaining, depending on FPS. Select feet or meters in Viewfinder menu. (Viewfinder > Film Counter)
- Scene Counter: incremented each time you press the run button. It starts at 1 for each new cartridge. (Viewfinder > Scene Counter)
- Cartridge Number: the number assigned when you loaded and created a new cartridge
- Film Type: the cartridge type you selected
- Frame Rate: the frame rate (for run button, or function button when pressed)
- Battery condition: battery charge remaining
- Light Meter: shows light level; adjust exposure accordingly (Viewfinder > Light Meter)
- Volume Meter: shows volume level for external mic or line input (Audio > Volume Meter)
- Audio Input Type: displayed if external mic or line input present (Audio > Input Type)
- SD Card: displayed if SD Card present

Reminder: Press the menu button to toggle between the menu and the viewfinder display.
Compose the Scene (Viewfinder)
The camera always exposes the film in an Extended Super 8 gate frame.
NOTE: The Extended Super 8 gate frame is closer to a 16:9 format; a regular Super 8 gate frame is closer to a 4:3 format.
You can set the viewfinder to simulate a Super 8 frame with a vertical bar as a visual aid. (Viewfinder > View Gate)
You can then create a Super 8 frame width during post-production.
")
Aspect Ratio Overlay (Viewfinder)
You can set the viewfinder to frame a specific aspect ratio as a visual aid.
(Viewfinder > Aspect Ratio Overlay)
You can then edit to your chosen aspect ratio during post-production.
")
Adjust Exposure, Focus, and Shoot

- Based on the light meter display, adjust the exposure with the aperture ring (A).
NOTE: The image in the LCD viewfinder is not affected by the exposure setting; it always displays an optimally exposed image, for use in all lighting conditions. - Adjust focus with the focus ring.
TIP: For precise focus to the object, measure the distance to the object from the film plane mark (B) on the camera. - Shoot film: Press the run button to begin shooting. Shooting will continue until you release the run button, or press it again, depending on how you set the run mode.
Each time you start and stop shooting, you create a scene, starting with Scene 1.
Scenes are numbered per cartridge.
Unload and Process Film
To unload the cartridge:

- Open the film door.
- Lift the cartridge and pull it out.
![]()
To avoid damaging the film gate, do NOT use any tool to pry the film cartridge from the camera. - If you haven't already labeled the cartridge with the assigned cartridge number (e.g. Cartridge1), do it now. (A permanent marker works well.)
A Super 8 film processing lab directory is available at: www.kodak.com/go/Super8
TIP: Be sure to note both the cartridge number and barcode number for your records.

Recording Audio: SD Card
With an external microphone or audio device, you can record audio to an SD card while shooting film.
An audio file is created each time you press the run button, and is named CxxxSyyyFnnnn.wav:
Cxxx: Cartridge #, starting at C001
Syyy: Scene #, starting at S001
Fnnnn: Frame counter value
When shooting, use a clapboard with the cartridge number, scene number, and frame rate (FPS). This information will be used to synchronize the audio file during edit.
NOTE: Audio recording is only available for frame rates of 24 FPS and 25 FPS. There is no audio recording when Function button is pressed.
NOTE: Film footage will be exposed without audio.

Insert and Format SD Card

A 16GB SD card (purchased separately) is recommended. Maximum size: 32GB

- Insert the SD card.
- Format the SD card:
- From the System menu, select SD Card.
- Select Erase and Format.
NOTE: Average file size for 1 minute of audio - 11MB.

Connect Microphone or Line Input
- Plug an external microphone (sold separately) into the 3.5mm mic input, OR, plug an external audio device (sold separately) into the 3.5mm line input.

- From the Audio menu, select Input Type (External Mic or Line Input).
- For external mic: Adjust the Input Volume as needed, and choose whether to display a Volume Meter.
Line Input: fixed volume input.


Transfer Audio Files: SD card

- Gently push in the SD card to eject it.
- Transfer audio files from the SD card to your computer.
You can synchronize audio with your digital scans using your preferred video editor, such as Final Cut, Premiere, Vegas, etc.
You are good to go when...
- The battery is fully charged.
- The camera is powered on.
- All lens caps have been removed.
- The film cartridge is fully seated.
- The lens aperture ring is open (not on "C").
If the LCD screen is black/blank after checking the above: - Power on the camera.
- Reset your film type for optimal exposure.
Proper Care of Your Camera
Your camera should be kept in a dry and dust-free environment.
Cleaning: Use a soft microfiber cloth for the body, and a lens cleaning cloth/paper for the lens and LCD.
Clean the film gate after every few cartridge insertions, to remove film emulsion built up and dust.

- Open the film door, and hold the camera.
- Carefully clean the gate with a film camera cleaning brush, making sure nothing gets caught in the gate.
- Use a manual air blow bulb to remove all particles at the gate. You can also carefully blow with an air bulb into the c-mount opening to remove small particles and fluffs on the viewfinder ground glass.
![]()
Never use compressed air out of a can and keep distance to mechanical parts! - Remove the battery from the camera for extended storage.
See Super 8 tips at: http://www.kodak.com/go/Super8tips
Documents / Resources
References
Download manual
Here you can download full pdf version of manual, it may contain additional safety instructions, warranty information, FCC rules, etc.
Advertisement


Need help?
Do you have a question about the Super 8 and is the answer not in the manual?
Questions and answers