Advertisement
- 1 Introduction
- 2 IN THE BOX
- 3 IMPORTANT NOTE
- 4 INTRODUCTION
- 5 PARTS AND CONTROLS
- 6 INSTALLING THE BATTERIES AND SD CARD
- 7 USING THE CAMERA
- 8 THE OFF, ON, AND SURVEILLANCE MODES
- 9 Wi-Fi CONNECTION
- 10 ADVANCED SETTINGS
- 11 MOUNTING AND POSITIONING
- 12 REVIEW PHOTOS OR VIDEOS
- 13 TECHNICAL SPECIFICATIONS
- 14 TROUBLESHOOTING
- 15 Documents / Resources
Introduction
We appreciate your business and want to earn your trust. Please refer to the notes below and the instructions in this manual to ensure that you are completely satisfied with this product.
In case of any further questions or concerns, please get in touch with us at:
NA&UK: support@zopudt.com EU: support.eu@zopudt.com or visit our page:
www.zopudt.com
IN THE BOX
1 x Camera, 1 x Mounting Strap, 1 x Instruction Manual, 1 x Mini USB Cord
Note: Memory card and batteries are not included (user supplied).
IMPORTANT NOTE
About Batteries
Require eight (8) 1.5V AA Alkaline or Lithium batteries. We recommend the use of Energizer AA Lithium batteries in this camera to obtain maximum battery life.
Do not mix old and new batteries.
Do not mix battery type.
Rechargeable NiMH AA batteries can be used, but the lower voltage (generally 1.2V) they produce has short lifetime, you may have to replace them frequently.
Remove batteries when the camera is NOT in use.
About SD Card
Require a standard-size SDHC/SDXC memory card (maximum capacity 256GB, Class 10). Recommend using SanDisk 32GB SDHC Class 10 memory cards in the camera to obtain the best cost-performance.
Before first use, please format your SD card in the camera by using "Format SD Card" in the menu settings.
About App Wi-Fi Connection
For better performance, we recommend that your phone is within 15 meters (45 feet) of your camera. Since there may be interference around, if the signal is not good, please move closer to the camera gradually.
INTRODUCTION
About the Camera
The GardePro E6 is a new generation of Wi-Fi trail camera. The camera has a built-in Wi-Fi and Bluetooth module, so that you can connect and operate the camera through a dedicated app ("GardePro Mobile"). The Bluetooth module, operating in low power, is used for device discovery, and Wi-Fi is used for preview, image transmission and settings.
The camera features the all-new innovative and ultra-clear imaging technology, encompasses smart night vision, blur reduction, and noise reduction technology to deliver high resolution image quality.
Main Features
- Bluetooth connection for device discovery
- Wi-Fi connection for preview, playback, and settings
- High quality pictures (32MP still photos), 1296P 20fps or 1080P 30fps H.264 video clips with audio
- Clear night vision, flash range 80ft. (25m), the camera is equipped with 36pcs high performance infrared no glow 940nm LEDs that function as a flash (invisible to human and animal eyes)
- Wide view angle - 110°
- Easy to use/program with well-designed operation buttons and built-in 2.4-inch color screen, easy to program, review pictures and videos on the screen
- 3 working modes - Motion detection, Time lapse and Hybrid
- Fast trigger time - approx. 0.2s, Fast recovery time - 0.5s, Long trigger distance up to 75ft. (23m), Detection Angle - 70°
- Info strip on each capture: Date, Time, Temperature & Moon phase
- Operation Hours, Loop Recording, Time Lapse, Password Protected
- Built for any climate - IP66, Operation Temperature: -4~140°F
- Support SD/SDHC/SDXC memory card, max capacity 256GB(not included in the scope of delivery)
- Extremely long in-field battery life up to 8 months in a stand-by state with 8 AA 1.5V batteries(not included in the scope of delivery)
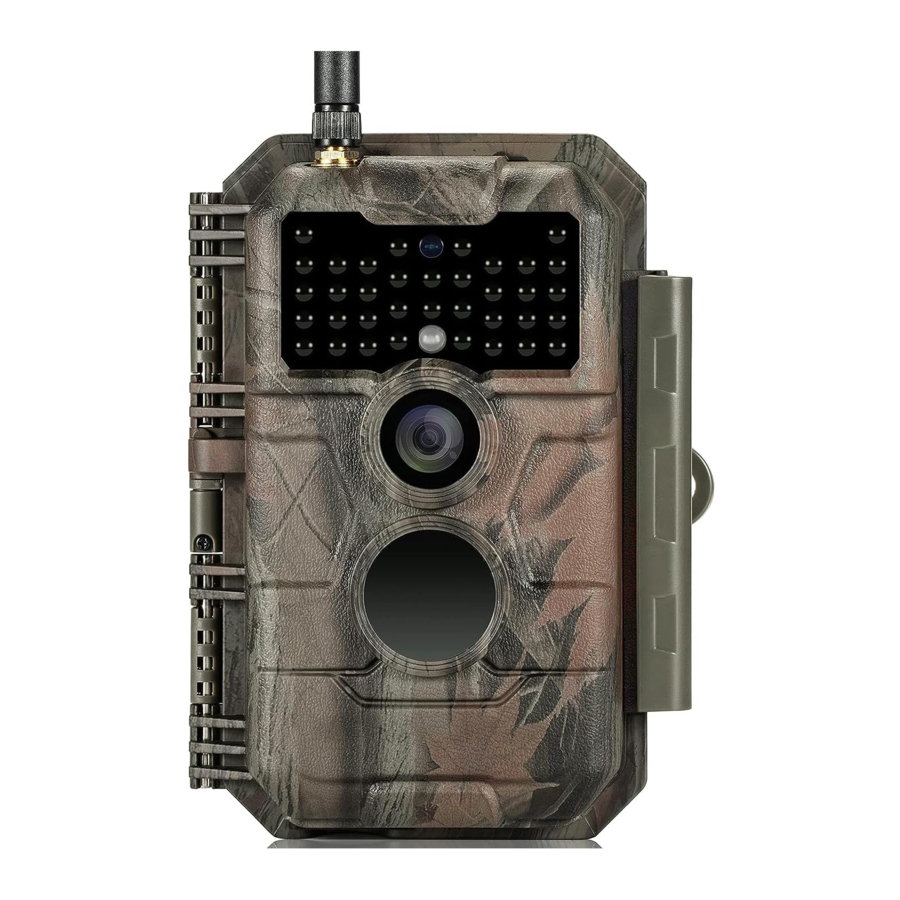
PARTS AND CONTROLS
The camera is equipped with 36pcs high efficiency infrared LEDs, LED Indicators, Lens, PIR Sensors, Lock Holes in front view (Figure 1).
TIP: During use, the black PIR Lens may be dirty or have scratches, however it does not affect the performance due to the reliability design. If you must clean it, please try to blow it off or pick out the dirt very lightly. Please do not try to wipe it, which may cause more scratches.

The camera provides the following connections for external devices: Mini USB port and SD card slot etc. (Figure 2).
Figure 2: Bottom View

The camera has one security cable hole and two strap holes on the back. The strap can be put through the strap holes and fastened securely around a tree trunk by pulling the end of the strap firmly (Figure 3).
Figure 3: Right / Back View

The camera has a 2.4-inch built-in LCD screen, which can be used for reviewing pictures or videos and menu displaying, and exclusive keypad design for easy program and operation, 8 AA batteries slot supported (Figure 4).
Figure 4: Inside View

Figure 5: Operation Buttons

A power switch is used to power on (ON mode) or off the camera (OFF mode). A START button is used to quickly make the camera into the surveillance mode (motion detection) or time lapse per your settings (Figure 5). When the camera is in the surveillance mode, press the START button to wake up the camera.
INSTALLING THE BATTERIES AND SD CARD
Before you begin learning how to use your camera, you will first need to install a set of batteries and insert an SD card. Although that may only take you a minute, there are some important notes about both batteries and SD cards you should be aware of, so please take the time to read the following directions and cautions:
Loading Batteries
After opening the cover of the battery compartment, you will see that the camera has eight battery slots (Figure 6). A full eight batteries must be installed for the camera to operate. Be sure to insert each battery with correct polarity (negative or "flat" end against the long spring of each battery slot).
In ON mode when battery power level gets low, the message "Low Battery" will show on the screen, please replace the batteries. If the battery indicator shows in RED, this does mean the batteries are not able to drive IR LEDs flash at night, however the batteries still work at daytime until "Low Battery". If you want to continue night vision, please replace the batteries.
Figure 6: Loading the Batteries

Inserting the SD Card
Insert the SD card (with the camera powered off), before beginning to operate the camera. Don't insert or remove the SD card when the camera is powered on or in the surveillance mode. (Figure 7).
Figure 7: Inserting the SD Card

The following describes how to insert and remove the SD card:
- Insert the SD card into the card slot with its label side upwards. A "click" sound indicates that the card is installed successfully. If the wrong side of the card is facing up, you will not be able to insert it without force, there is only one correct way to insert cards. If the SD card is not installed correctly, the device will not display an SD card icon on the screen in ON mode. Formatting the SD card by using the camera's "Format SD Card" menu option before first use is recommended, especially when a card has been used in other devices.
- To take out the SD card, just gently push in the card (do not try to pull it out without pushing in first). The card is released from the slot and ready to be removed when you hear the click. Be sure the camera's power is switchedOFF before inserting or removing SD cards or batteries.
USING THE CAMERA
Once you've prepared your camera by properly installing batteries and an SD card, you could simply take it outside, strap it to a tree (or not - according to your application scenario), switch it ON, press START button and leave-and you might get some great photos that are exactly what you wanted. However, we highly recommend that you first spend some additional time indoors with this manual and your camera until you know a bit more about what those control keys do. If nothing else, you'll probably want to at least set the date and time so the camera will imprint them (or not-it's your option) on your photos as they are taken, learn how to set the camera to shoot video clips instead of still photos if you like, and read some tips about mounting it on a tree.
THE OFF, ON, AND SURVEILLANCE MODES
The camera has three basic operational modes:
- OFF mode: Power switch in the OFF position (The camera is powered off).
- ON mode: Power switch in the ON position (The camera is powered on and its screen is on).
- SURVEILLANCE mode: When the camera is powered on, press START button to enter the surveillance mode. When the screen is off, the camera enters standby and will perform according to your settings.
App & Wi-Fi Connection:
You can use the app to connect the camera when the camera is operating in the ON or SURVEILLANCE mode.
OFF Mode
The OFF mode is the "safe" mode when any actions must be taken, e.g., replacing the SD card or batteries, or transporting the device. And of course, when you are storing or not using the camera, you will switch it to OFF. Please note that in the OFF mode the camera still consumes a little power. It's a good idea to take the batteries out of the battery compartment if the camera will not be used for a long time.
ON Mode
In the ON mode you can check and change the settings of the camera with the help of its built-in screen. These settings, found in the menu by pressing MENU key, let you change the photo or video resolution, interval between photos, switch the time imprint on, etc. (See more in Section ADVANCED SETTINGS).
On the screen display, you will see an information screen that shows how many images have been taken, the battery level, camera or video mode, etc.
 ATTENTION PLEASE: In the ON mode, the camera will automatically enter SURVEILLANCE mode if there is no operation (key pressing) within 5 minutes. Then the camera will perform as your settings in the menu.
In the ON mode, you can connect the camera to a computer's USB port to download your images.
SURVEILLANCE Mode
Any time after the batteries and SD card have been inserted, you can switch on the camera. When the START button is pressed, the camera will enter into the SURVEILLANCE mode. If the Mode in the settings is set as "Motion Detection", the camera will count down a 30-second delay and then be ready to capture images. If the Mode is set as "Time Lapse", there will be no 30-second counting down, and the camera will be ready to enter Time Lapse.
Once in the SURVEILLANCE mode, no manual controls are needed or possible (the control keys have no effect). The camera will take photos or videos automatically (according to its current parameter settings).
TIP: You can press the START button again to wake up the camera and reprogram your camera if required.
Wi-Fi CONNECTION
Download GardePro Mobile App
Before using the Wi-Fi functionality, please download the "GardePro Mobile" app.


NOTES:
The screenshots shown in this section are indicative only. The actual diagram on different versions of app, iOS and Android may differ.
During the use of the GardePro app (Referred to as app), please grant the app access to Wi-Fi, Bluetooth, storage, location and camera of your device, and enable the Local Network (if on iOS14 or later), which are necessary to take pictures and videos.
Enable Wi-Fi and Bluetooth
Enable Wi-Fi and Bluetooth on your mobile phone before opening the app. This step is optional, however it can speed up the connection between app and camera.
Figure 8: Enable Wi-Fi and Bluetooth

Add Your Camera
Ensure that your camera is in ON mode and in close proximity to you. To establish a stable connection, move within 45ft of the camera with no obstacles obstructing the signal, such as walls or glass doors.
Open the app, tap Wi-Fi camera (Figure 9).
Figure 9: Tap to add your camera

NOTE: The app is an unified app, supports Wi-Fi camera and cellular camera (sold separately).
Search Your Camera and Link
Figure 10: Select your camera

By default, in the list the camera will be indicated as ID "NONAME_GardePro_E6" if the camera name is not assigned. After you set the camera name in settings, the camera
ID will be updated as "XXXX_GardePro_E6" (XXXX is a 4-character choice, you can set your camera name).
The app automatically searches for all Wi-Fi trail cameras nearby, please make sure your camera is within the Wi-Fi range. This process may take up to 15 seconds. If there is no device shown in the list, please click the Refresh button on the top-right corner.
Tap the one you want to add (Figure 10). The app starts connecting to your camera. It might take up to 15 seconds to build the Bluetooth and Wi-Fi connection between the app and camera. There are 4 steps (Illustration omitted):
- Connecting through Bluetooth...
- Activating the camera...
- Searching Wi-Fi... The camera display will turn off during Wi-Fi connecting.
- Connecting through Wi-Fi...
A system pop-up message will show (Figure 11).
Figure 11: Allow Wi-Fi Connection on iOS Device

Please tap 'Join' to allow Wi-Fi connection. The string "CAM8Z6_E9316A9F2066" is the name of Wi-Fi hotspot on the camera to allow Wi-Fi connection. Among cameras, the prefix CAM8Z6 is fixed, E9316A9F2066 is the internal camera identifier which may vary from different cameras.
NOTE: On Android devices, there might be different system pop-up messages that ask for allowing app connection to camera since different mobile phone manufacturers may modify and customize this system message.
After connected, a pop-up message would show as below:
Tap "Start" to enjoy your app journey (Figure 12).
Figure 12: Connected

App Navigation
The app supplies 4 main features: Camera, Status, Settings and Gallery. See the Table 1 and Figure 13~16 for more details.
Table 1 - App Navigation
| Features | Details | Refer to |
| Camera | Preview, manual taking pictures or videos. Note: When your Wi-Fi camera is connected, motion detection will be disabled. It will be enabled again when you disconnect your Wi-Fi camera or close the app for 90 seconds. | Figure 13 |
| Status | Camera status, including battery level, total memory card capacity and used capacity, internal temperature of the camera, number of pictures and videos stored on the SD Card, camera model, firmware version number, etc. | Figure 14 |
| Settings | Display or program camera settings, such as mode, picture quality etc. | Figure 15 |
| Gallery | Review or download the pictures or videos the camera has taken. | Figure 16 |
Figure 13: Camera

Figure 14: Status

Figure 15: Settings

Figure 16: Gallery

Important Notes on App Wi-Fi Connection
| No. | Notes |
| 1 | When the camera's Wi-Fi is connected, the camera will stop SURVEILLANCE (motion detecting or time lapse). Disconnect Wi-Fi to enable the camera to go back to SURVEILLANCE mode. TIP: How to re-enable the camera start motion detection? Tap the camera ID "JOHN_GardePro_E6" to disconnect or remove the current camera, or add new camera (refer to the following figures).  |
| 2 | On the phone device, when the app is closed or runs in the background, there is a maximum of 90-second timeout of Wi-Fi connection between app and camera, before timeout, you can re-open and operate on the app without reconnecting. However, the camera will not work (capture motions) until the Wi-Fi timeout is done. Before timeout, you must disconnect Wi-Fi manually to enable the camera to capture motions. |
| 3 | When the app connects to the camera, the RED indicator will flash once. |
ADVANCED SETTINGS
The trail camera comes with preset manufacturer settings. You can change the settings to meet your requirements. Once the camera screen is on, press MENU key to enter/exit the menu. Press the UP/DOWN key to move the marker, Press the LEFT/RIGHT key to change the setting, and press the OK key to confirm the change. Always remember to press the OK to save the change. Otherwise, you will lose your new setting.
Table 2 – Camera Settings
| Parameter | Settings (Bold = default) | Description |
| Mode | Motion Detection , Time Lapse, Hybrid | In Motion Detection mode, the camera will take photos or videos once triggered. In Time Lapse mode, the camera will take photos or videos periodically according to your preset "Timelapse Interval" parameter. Hybrid mode includes both above. |
| Photo or Video | Photo, Video, Photo+ Video | Select whether still photos or video clips are taken. |
| Photo Quality | 32MP 24MP 16MP 8MP 4MP | Select desired resolution for still photos. Higher resolution produces better quality photos, but creates larger files that take more of the SD card capacity. Larger files require longer time to write to the SD card, which will slightly slow the shutter speed. |
| Photo Burst | 01, 02, 03, 04, 05 | Select the number of photos taken in sequence per trigger. |
| Video Quality | 1296P 1080P 720P | Select video resolution (pixels per frame). Higher resolution produces better quality videos, but creates larger files that take more of the SD card capacity. |
| Video Length | 10 seconds, Optional from 3s to 5m | Select video recording length. Note: It is highly recommended to set the night video length to less than 30 seconds as the IR LEDs will consume more battery power. |
| Video Sound | On Off | Selecting On will record video with sound. |
| Video Format | MP4 MOV | MP4 is the mainstream format in the video industry, more compatible with any player. Select MOV in case some legacy digital camera software must be working with videos in MOV format. |
| Detection Delay | 10 seconds, optional from 0s to 60m | Select the shortest length of time that the camera will wait until it responds to any subsequent triggers from the PIR sensor after a game is first detected. During the selected interval, the camera will not take pictures/videos. This prevents the SD card from filling up with too many redundant images. 0 means capture as fast as possible. Note: This option is invalid if Mode is set as "Time Lapse". |
| PIR Sensitivity | High, Medium Low | Select the sensitivity of the PIR sensor. Temperature affects the sensitivity. The High setting is suitable when the ambient temperature is warm or you want to capture distant objects or capture more, and the Medium/Low setting is helpful in cold weather. Note: this option is invalid if Mode is set as "Time Lapse". |
| Motion Test | This feature helps you aim the camera at your target area. | |
| Timelapse Interval | First Shot Time: hh: mm | Set the earliest shot time after Time Lapse or Hybrid mode is enabled. If you would like to get photos earlier, it is recommended to set it later than the current time. |
| Interval: optional from 3s to 24h | Set time lapse interval. It takes effect ONLY when Mode is set as Time Lapse or Hybrid, the camera will automatically take photos/videos according to the set interval, regardless of whether the PIR sensor has detected any game. This is helpful when observing cold-blooded animals like snakes, or the process of flowering, etc. Note: This option is invalid if Mode is set as "Motion Detection". | |
| Timelapse Period | On Off | Selecting On to set a specific working time period for your camera in Time Lapse mode or Hybrid mode. You can set up to 2 different time periods for the camera, and it will not capture time-lapse photos or videos outside of those periods. Note: This option is invalid if Mode is set as "Motion Detection". |
| WIFI | On/Off | Selecting On to enable Wi-Fi, you can use the app to connect the camera. Selecting Off to disable Wi-Fi, the camera will operate in stand-alone mode and save battery power. Only change CHX when you feel WiFi signal is not good or you have multiple WiFi cameras nearby. |
| Date / Time | M/D/Y hh: mm AM/PM | M – Month, D – Day, Y – Year hh – Hour, mm – Minute Note: Use "LEFT/RIGHT" key to switch parameters, use "UP/DOWN" to set current date and time. Date input format may change. Please refer to "Date Format" parameter settings accordingly. |
| Date Format | D/M/Y M/D/Y Y/M/D | Select date format which will be shown on the screen and each capture. |
| Time Format | 12h 24h | Select time format which will be shown on the screen and each capture. 12h - AM/PM |
| Camera Name | On Off | Select On to assign a name, 4-character long, in the form of Capital A-Z, 0-9 to record the location in the photos (e.g. A123 for Yellow Stone Park). This helps multi-camera users identify the location when reviewing the photos. |
| Info Strip | On Off | Select On to show date, time, temperature, moon phase on each capture. |
| Loop Recording | On Off | Selecting On option will cause the oldest files to be overwritten with new captures when the SD card reaches its capacity. With Off option selected, the camera will stop capturing images once the SD card reaches capacity. |
| Operation Hours | On Off | Select On if you only want the camera to work within a specified time period every day. For instance, if the starting time is set at 18:35 and the ending time at 8:25, the camera will function from 18:35 the current day to 8:25 the next day. Outside the time period the camera will not be triggered. Note: This option is ONLY valid if Mode is set as "Motion Detection". |
| Password | On Off | Set up a 4-digit password to protect your camera from unauthorized users. If the code is lost, you can contact customer support to reset the password. |
| Format SD Card | Yes No | All files will be deleted after formatting the SD card. It's highly recommended that you format the SD card if it has been used previously in other devices. Caution: make sure wanted files on the SD card have been backed up first! |
| Factory Reset | Yes No | Selecting Yes will return all your previous settings back to the manufacturer default. |
| Version | Defined | Display the version of the camera. |
MOUNTING AND POSITIONING
Mounting
After you've set up the camera's parameters to your personal preferences at home, you're ready to take it outside. When setting up the camera for scouting game or other outdoor applications, you must be sure to mount it in place correctly and securely. We recommend mounting the camera on a sturdy tree with a diameter of about 6in. (15cm). To get the optimal picture quality, the tree should be about 16-17ft. (5m) away from the place to be monitored, with the camera placed at a height of 2.5-3.5ft. (0.75-1m). Also, keep in mind that you will get the best results at night when the subject is within the ideal flash range, no farther than 75ft and no closer than 10ft. (3m) from the camera.
There are two ways to mount the camera: using the provided adjustable web belt, or the tripod socket.
Using the adjustable strap: To use the strap on the camera, push one end of the strap through the two brackets on the back of the camera. Thread the end of the strap through the buckle. Fasten the strap securely around the tree trunk by pulling the end of the strap firmly so there is no slack left (Figure 17).
Using the tripod socket: The camera is equipped with a socket at the bottom end to enable mounting on a tripod or other mounting accessories with a standard UNC 1/4-20 thread screw (not included).
Figure 17: Mounting the Camera

Sensing Angle and Distance Test
To test whether the camera can effectively monitor the area you choose, this test is recommended to check the sensing angle and monitoring distance of the camera. To perform the test:
- Switch the camera to the ON mode.
- Press MENU button, go to "Motion Test". The camera will count down a max 60-second delay and be ready to capture motion. (Note: The delay time may be less than 60 seconds, depending on the actual time of the motion sensor to be activated. The delay time is 60 seconds minus the power-on time.)
- Close the camera door.
- Make movements in front of the camera at several positions within the area where you expect the game or subjects to be. Try different distances and angles from the camera.
- When the white motion indicator LED flashes in RED, it indicates that the camera is able to sense the position. However, if the LED doesn't blink, it means that the position lies beyond the sensing range.
- l In these sensing tests, the camera will take pictures once motion is captured. When you open the camera, the screen shows the number of times triggered, you can review the pictures on the screen.
The results of your testing will help you find the best placement when mounting and aiming the camera. The height above from the ground for placement of the device should vary with the size of animal you are hoping to see. In general, 3 to 6 feet is preferred.
You can avoid potential false triggers due to temperature and motion disturbances in front of the camera by not aiming it at a heat source or nearby tree branches or bush (especially on windy days).
Do NOT install the camera behind the glass window as that is not possible to sense any motion. Avoid aiming the camera toward to any glass objects.
Starting
The camera supports three working modes, "Motion Detection", "Time Lapse" and "Hybrid", press START button to enter surveillance mode.
- If you set the camera's working mode as "Motion detection" in the menu, the camera will count down a 30-second delay, and then will be ready to go into standby (surveillance) and capture. Any motion that is detected by it will trigger the capture of an image or video as programmed in the menu. Be sure you have read the descriptions of the Detection Delay, and PIR Sensitivity parameters.
- If you set the camera's working mode as "Time Lapse" in the menu, the camera will be ready to go into "Time Lapse" mode soon after the START button is pressed, and then will take images periodically according to your preset "Timelapse Interval" parameter, regardless of the settings "Detection Delay".
- If you set the camera's working mode as "Hybrid" in the menu, the camera will work according to the above two modes.
REVIEW PHOTOS OR VIDEOS
After you have setup, mounted and activated your CAMERA, you will of course be eager to return later and review the images it has captured for you. The camera stores photos and videos in the folder \DCIM\100MEDIA in the SD card. Photos are saved with file names like DSCF0001.JPG and videos like DSCF0001.MP4. The MP4 video files can be played back on most popular media players, such as Windows Media Player, QuickTime, VLC etc.
There are different ways this can be done.
You can review photos or videos directly on the camera screen or in the app's gallery bar.
Or when the camera is powered on, you can use the provided USB cable to download the files to a computer.
Or you can put the SD card into an SD card "reader" (not included), plug into a computer, and browse the files on the computer without downloading.
TECHNICAL SPECIFICATIONS
| Element | Description |
| Wi-Fi | 2.4GHz 802.11 b/g/n |
| Bluetooth | BLE 5.0 |
| App System Requirements | IOS 11.0 or later Android 7.0 or later |
| Working Mode | Motion detection, Time lapse or Hybrid |
| Max. Pixel Size | 32MP |
| Optics Lens | f/2.0, FOV=110°, Auto IR-Cut |
| IR Flash | 80ft. (25m) |
| LCD Screen | 2.4" Color screen |
| Memory | SD, SDHC or SDXC standard memory card (not included), maximum capacity 256GB |
| Picture Resolution | 32MP, 24MP, 16MP, 8MP, 4MP |
| Video Resolution | 2304 x 1296P@20fps (16:9), 1920 x 1080P@30fps (16:9), 1280 x 720P@30fps (16:9) |
| Image Format | Picture: JPEG, Video: H.264 MP4 / MOV |
| PIR Sensitivity | High/Normal/Low |
| PIR Sensing Distance | 75ft. (23m) (Below 77°F/25°C) |
| PIR Sensing Angle | 70° |
| Trigger Time | Approx. 0.2 seconds |
| Trigger Interval | 0sec.-60min, Programmable |
| Shooting Numbers | 1~5 |
| Video Length | 3sec ~ 5min., Programmable |
| Info Strip | On /Off |
| Operation Hours | On /Off, Specific working period of time |
| Password | 4-Digit Code |
| Camera Name | 4-Character (A-Z, 0-9) |
| Time Lapse Interval | 3 Seconds ~ 24 Hours |
| Power Supply | 8x1.5V AA Batteries (not included) |
| Stand-by Time | 8 Months in Stand-by |
| Auto Stand-by | Auto Stand-by (Surveillance mode) in 5 minutes while no operation in ON mode |
| Low Battery | 8V - Low Battery (Batteries die) 9V - Night vision is unavailable in low voltage (Almost die) |
| Interface | Mini-USB, Standard size SD card holder, External Power (DC 12V/1A, Plug 5.5x2.1mm) |
| Mounting | Strap, Tripod Base (1/4-20) |
| Waterproof | IP66 |
| Operation Temperature | -4~140°F/-20~60°C |
| Operation Humidity | 5% ~ 95% |
| Product Dimensions | 5.6 x 4.2 x 2.4 inch |
TROUBLESHOOTING
If your camera does not seem to be functioning properly or if you are having photo/video quality issues, please run these simple and quick checks:
- Make sure the camera is powered on and in the correct mode
- Format the SD card in the camera or replace the SD card, since the SD card is a storage media and sometimes it might be unstable
- Replace batteries if night vision seems not to be working as expected
- The dark background of night images is usually caused by strong reflections from the obstacles close to the camera. To get the best night image, please remove close-up obstacles (such as walls or tree trunks) in front of the camera as possible, or adjust the installation position of your camera to avoid these obstacles(Figure 18)
Figure 18: Avoid close-up obstacles in front of the camera

If your unit is still having trouble, please contact us, providing us with your order number, or check the website to determine that you are using the latest firmware and app. Please be assured we will make the things right for you.
Documents / Resources
References
Download manual
Here you can download full pdf version of manual, it may contain additional safety instructions, warranty information, FCC rules, etc.
Advertisement


Need help?
Do you have a question about the E6 and is the answer not in the manual?
Questions and answers