
Related Manuals for GardePro X60P MAX


Summary of Contents for GardePro X60P MAX
- Page 1 TRAIL CAMERA X60P X60P MAX INSTRUCTION MANUAL Doc V1.0 Applicable for Models: X60P (includes models: X60P, X60PCF, X60PWF), X60P Max (includes models: X60PMB, X60PMC, X60PMD)
- Page 2 Congratulations on your purchase of one of the best trail cameras on the market! We appreciate your business and want to earn your trust. Please refer to the notes below and the instructions in this manual to ensure that you are completely satisfied with this product.
-
Page 3: Table Of Contents
6.1. OFF Mode ..............9 6.2. ON Mode ..............9 6.3. SURVEILLANCE Mode .......... 10 7. CELLULAR CONNECTION ..........10 7.1. Download GardePro Mobile App ......10 7.2. Add Your Camera ........... 11 7.3. Login Your Account ..........11 7.4. Activate Camera ............. 12 7.5. - Page 4 6.2. ON-Modus ...............40 6.3. ÜBERWACHUNGS-Modus ........41 7. MOBILFUNK VERBINDUNG ..........41 7.1. Laden Sie die App "GardePro Mobile" herunter ..41 7.2. Ihre Kamera hinzufügen ......... 42 7.3. Melden Sie sich bei Ihrem Konto an ....... 42 7.4. Kamera aktivieren ...........43 7.5.
-
Page 5: In The Box
"Format SD Card" in the menu settings. The X60P Max model comes with a built-in memory card. Storage capacity varies from models. The model X60PMB has 32GB of storage, X60PMC has 64GB of storage, and X60PMD... -
Page 6: Introduction
3. INTRODUCTION 3.1. About the Camera The GardePro X60P series cameras are the new generation of 4G LTE cellular trail cameras. The cameras have a built-in cellular module, allows you remotely connect and operate the camera through a dedicated app ("GardePro Mobile"). The cameras will send pictures to cell phone according to the Transfer Schedule specified in the app. -
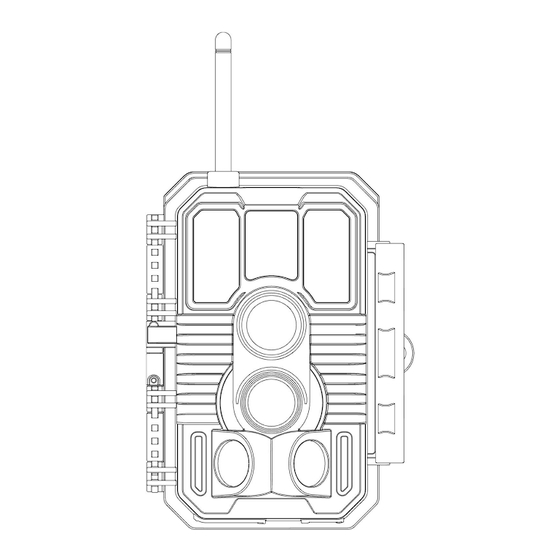
Page 7: Parts And Controls
High quality pictures (48MP still photos), 1296P 20fps or 1080P 30fps H.264 video clips with audio . Clear night vision. The X60P, X60PCF and X60P Max models are equipped with 36pcs high performance infrared no glow 940nm LEDs that function as a flash (invisible to eyes). - Page 8 (Figure 1). The X60P, X60PCF and X60P Max models are equipped with high-performance infrared no-glow 940nm LEDs, which serve as a flash (invisible to human and animal eyes).
- Page 9 The camera provides the following connections for external devices: Mini USB port and DC power slot etc. (Figure 2). Note: The X60P Max model comes with a built-in memory card, so there is no SD card slot. Tripod Base SD Card Slot 1/4"...
- Page 10 The camera has a 2.4-inch built-in LCD screen, which can be used for reviewing pictures or videos and menu displaying, and exclusive keypad design for easy program and operation, a rechargeable battery included (Figure 4). Color Rechargeable Screen Battery Operation Buttons Nano-SIM Card...
-
Page 11: Installing The Battery And Sd Card
in the surveillance mode, press the START button to wake up the camera. 5. INSTALLING THE BATTERY AND SD CARD The Nano-SIM card is preinstalled, please don’t remove it. Before you begin learning how to use your camera, you will first need to insert an SD card (for the X60P, X60PCF and X60PWF models). - Page 12 5.2. Inserting the SD Card For the X60P Max, you don't need to insert any SD card. For the X60P, X60PCF and X60PWF models: insert the SD card (with the camera powered off), before beginning to operate the camera. Don't insert or remove the SD card when...
-
Page 13: The Off, On, And Surveillance Modes
6. THE OFF, ON, AND SURVEILLANCE MODES The camera has three basic operational modes: OFF mode: Power switch in the OFF position (The camera is powered off). ON mode: Power switch in the ON position (The camera is powered on and its screen is on). -
Page 14: Surveillance Mode
TIP: You can press the START button again to wake up the camera and reprogram your camera if required. 7. CELLULAR CONNECTION 7.1. Download GardePro Mobile App Before using the cellular functionality, please download the "GardePro Mobile" app. -
Page 15: Add Your Camera
NOTES: The screenshots shown in this section are indicative only. The actual diagram on different versions of app, iOS and Android may differ. During the use of the app, please grant the app access to storage, location, camera and local network (if on iOS14 or later) of your device. -
Page 16: Activate Camera
Figure 8: Selecting Your Region (select "Germany” if in Germany) Note: Once you have signed up, the next time you log in, or if you forget your password and need to update your password, please make sure that the selected region is correct. Input your email, read and accept the Privacy Agreement. - Page 17 camera to scan QR code, please allow it to complete the process. At the final step of Quick Start, go to the "Activation Code" in the camera MENU settings, scan the QR code with the app. Once scanned, the camera starts activating the SIM card, you can press MENU to exit.
-
Page 18: Device Activation
Table 1 - Camera network icons Category Icon Description No SIM card detected. The camera is searching for available cellular network. No cellular network service available. Cellular "4G" indicates the camera is using 4G Signal cellular network, it may automatically change to "3G"... -
Page 19: App Navigation
In the app, once device is activated, the orange bar on the app will turn into a green bar (Figure 10- 11). Figure 10: Activating Figure 11: Activated The ID "864977049769601" (cellular ID, just for example) will turn into your camera name (e.g. you have programmed your camera name as "JOHN"). -
Page 20: Get The First Picture
Display or program camera settings, such as mode, Settings picture quality etc. Review or download the pictures or videos the Gallery camera has taken. 7.6. Get the First Picture After you successfully activate the camera, you would like to get the first picture from the camera: Open the app, go to Settings Tab, toggle Transfer on Each ... -
Page 21: Advanced Settings
8. ADVANCED SETTINGS The trail camera comes with preset manufacturer settings. You can change the settings to meet your requirements. Once the camera screen is on, press MENU key to enter/exit the menu. Press the UP/DOWN key to move the marker, Press the LEFT/RIGHT key to change the setting, and press the OK key to confirm the change. - Page 22 Signal, SIM, Network, Name, PIN, ICCID, IMSI, APN, PDP etc. Selecting On, the cellular network will Transfer send picture to phone after each capture on Each by the camera. IMPORTANT Note: Enabling it will significantly consume Capture: battery power due to frequent uploads. On/Off Set it to Off in most cases.
- Page 23 Select desired resolution for still photos. 48MP Higher resolution produces better quality 32MP photos, but creates larger files that take Photo 24MP more of the card capacity. Larger memory Quality 16MP files require longer time to write to the card, which will slightly slow the memory shutter speed.
- Page 24 pictures/videos. This prevents the memory card from filling up with too many redundant images. Note: This option is invalid if Mode is set as "Time Lapse". Select the sensitivity of the PIR sensor. Temperature affects the sensitivity. The High setting is suitable when you want to High, capture distant objects or capture more, Medium...
- Page 25 from 3s to or Hybrid, the camera will automatically take photos/videos according to the set interval, regardless of whether the PIR sensor has detected any game. This is helpful when observing cold-blooded animals like snakes, or the process of flowering, etc. Note: This option is invalid if Mode is set as "Motion Detection".
- Page 26 record the location in the photos (e.g. A123 for Yellow Stone Park). This helps multi-camera users identify the location when reviewing the photos. Select On to show date, time, temperature, Info Strip moon phase on each capture. Selecting On option will cause the oldest files to be overwritten with new captures Loop when the memory card reaches its...
-
Page 27: Mounting And Positioning
on the memory card have been backed up first! Factory Selecting Yes will return all your previous Reset settings back to the manufacturer default. Version Defined Display the version of the camera. 9. MOUNTING AND POSITIONING 9.1. Mounting After you've set up the camera's parameters to your personal preferences at home, you're ready to take it outside. -
Page 28: Sensing Angle And Distance Test
the back of the camera. Thread the end of the strap through the buckle. Fasten the strap securely around the tree trunk by pulling the end of the strap firmly so there is no slack left (Figure 12). Using the tripod socket: The camera is equipped with a socket at the bottom end to enable mounting on a tripod or other mounting accessories with a standard UNC 1/4-20 thread screw (not included). - Page 29 Make movements in front of the camera at several positions within the area where you expect the game or subjects to be. Try different distances and angles from the camera. When the white motion indicator LED flashes in RED, it ...
-
Page 30: Starting
9.3. Starting The camera supports three working modes, "Motion Detection", "Time Lapse" and "Hybrid", press START button to enter surveillance mode. (1) If you set the camera’s working mode as "Motion detection" in the menu, the camera will count down a 30-second delay, and then will be ready to go into standby (surveillance) and capture. -
Page 31: Technical Specifications
X60PCF: f/2.0, FOV=130°, Auto IR-Cut IR Flash or White 100ft. (30m) Flash LCD Screen 2.4" Color screen The X60P, X60PCF and X60PWF models require SD, SDHC or SDXC standard Memory memory card (Not included), max capacity 512GB. The X60P Max model comes with built-in... - Page 32 memory card, capacity varies from models: X60PMB with 32GB storage, X60PMC with 64GB storage, X60PMD with 128GB storage. Picture Resolution 48MP, 32MP, 24MP, 16MP, 8MP, 4MP 2304 x 1296P@20fps (16:9), Video Resolution 1920 x 1080P@30fps (16:9), 1280 x 720P@30fps (16:9) Picture: JPEG, Image Format Video: H.264 MP4 / MOV...
-
Page 33: Troubleshooting
Check battery power level if night vision seems not to be working as expected. For the X60P, X60PCF and X60P Max, the dark background of night images is usually caused by strong reflections from the obstacles close to the camera. To get the best night image,... - Page 34 Figure 13: Avoid close-up obstacles in front of the camera If your unit is still having trouble, please contact us, providing us with your order number, or check the website to determine that you are using the latest firmware and app. Please be assured we will make the things right for you .
-
Page 35: Inhalt Der Box
Preis-Leistungs-Verhältnis empfehlen wir SanDisk 32GB SDHC Klasse10 Speicherkarten. Vor der ersten Verwendung formatieren Sie bitte Ihre SD-Karte in der Kamera mit "Format" in den Menüeinstellungen. Die X60P Max-Kamera verfügt über eine integrierte Speicherkarte. Die Speicherkapazität variiert je nach Modell. -
Page 36: Einführung
Generation LTE-Mobilfunk-Wildkameras. Kameras verfügen über ein integriertes Mobilfunkmodul, mit dem Sie die Kamera über eine dedizierte App ("GardePro Mobile") aus der Ferne verbinden und bedienen können. Die Kameras senden Bilder gemäß dem in der App festgelegten Übertragungsplan an das Mobiltelefon. Die Kameras verfügen außerdem über die völlig neue innovative und ultraklare... - Page 37 Bilder ans Handy senden. Hochwertige Bilder (bis zu 48MP Fotos), 1296P 20fps oder 1080P 30fps H.264-Videoclips mit Audio. Deutliche Nachtsicht. Die Modelle X60P, X60PCF und X60P sind hochleistungsfähigen Infrarot-No-Glow-LEDs (940nm), die als Blitz fungieren (für das menschliche Auge unsichtbar), ausgestattet. Das Modell X60PWF hochleistungsfähigen...
-
Page 38: Komponenten Und Kontrollen
4. KOMPONENTEN UND KONTROLLEN Die Kamera ist mit einer Antenne, 36 Stück IR- oder weiße LEDs, Indikator, Lichtsensor, optische Linse, PIR Linse, Verriege-lungsloch in der Frontansicht ausgestattet (Abb. 1). TIPP: Dank des zuverlässigen Designs der PIR-Sensorlinse wird die PIR-Erkennungsleistung nicht durch Schmutz beeinträchtigt. Wenn eine Reinigung erforderlich ist, versuchen Sie bitte, den Schmutz abzublasen oder ihn ganz vorsichtig abzunehmen. - Page 39 Zubehörschlitz auf der rechten Seite der Verpackungsbox. Bitte installieren Sie es in der Schraubenbasis oben an der Kamera und ziehen Sie es fest (Abb. 1). Die Modelle X60P, X60PCF und X60P Max sind mit Hochleistungs-Infrarot-No-Glow-940-nm-LEDs ausgestattet, die als Blitz dienen (für menschliche und tierische Augen unsichtbar).
- Page 40 Gurtes fest, um die Kamera sicher um den Baumstamm zu befestigen. (Abb.3) Loch für das Sicherheits- kabel Gurtloch Verschluss Abb. 3: Ansicht von rechts / Rückseite Der integrierte 2,4-Zoll-LCD-Bildschirm der Kamera kann zum Betrachten von Bildern oder Videos und zur Anzeige des Menüs dienen.
-
Page 41: Batterie Und Sd-Karte Einlegen
Überwachungs modus Schalter Abb. 5: Bedienungstasten Betriebsschalter dient zum Einschalten (ON-Modus) oder Ausschalten der Kamera (OFF-Modus). Die START-Taste wird verwendet, Kamera schnell Überwachungsmodus zu versetzen (Bewegungserkennung) oder Zeitraffer gemäß Ihren Einstellungen (Abb.5). Wenn sich die Kamera im Überwachungsmodus befindet, drücken Sie die START-Taste, um die Kamera aufzuwecken. - Page 42 Installieren Sie die Batteri Abb. 6: 5.2. SD-KARTE Einstecken Beim X60P Max müssen Sie keine SD-Karte einlegen. Für die Modelle X60P, X60PCF und X60PWF: Legen Sie die SD-Karte ein (mit dem Netzschalter der Kamera in der Position OFF), bevor Sie die Kamera bedienen. Die SD-Karte darf nicht eingesetzt oder entfernt werden, wenn sich der Schalter in der Position ON oder im Überwachungsmodus.
-
Page 43: On-, Off- Und Überwachungs-Modus
Stecken Sie die SD-Karte mit der Etikettenseite nach oben in den Kartenschacht. Mit einem "Klick"-Geräusch wird angezeigt, dass die Karte erfolgreich installiert wurde. Wenn die falsche Seite der Karte nach oben zeigt, können Sie sie nicht ohne Gewalt einführen. Es gibt nur eine korrekte Weise, Karten einzulegen. -
Page 44: Off-Modus
6.1. OFF-Modus Der OFF-Modus ist der "sichere" Modus, wenn irgendwelche Maßnahmen ergriffen werden müssen, z. B. das Austauschen der SD-Karte (bei den Modellen X60P, X60PCF und X60PWF) oder der Batterie oder der Transport des Geräts. Auch wenn Sie die Kamera lagern oder nicht benutzen, schalten Sie sie auf OFF. -
Page 45: Überwachungs-Modus
TIPP: Sie können bei Bedarf die START-Taste erneut drücken, um die Kamera aufzuwecken und neu zu programmieren. 7. MOBILFUNK VERBINDUNG 7.1. Laden Sie die App "GardePro Mobile" herunter Vor der Verwendung der Mobilfunk-Funktionalität laden Sie bitte die 'GardePro Mobile' app herunter. -
Page 46: Ihre Kamera Hinzufügen
Bitte gewähren Sie der app während der Nutzung der app Zugriff auf Speicher, Standort, Kamera und lokales Netzwerk (wenn auf iOS 14 oder höher) Ihres Geräts. 7.2. Ihre Kamera hinzufügen Öffnen Sie die app, Bitte tippen Sie auf Mobilfunkkamera. Die app ist eine einheitliche app, die Mobilfunk kamera und Wi-Fi-Kamera (separat erhältlich) unterstützt. -
Page 47: Kamera Aktivieren
Abb.8: Auswahl Ihres Region (wählen Sie "Deutschland”, wenn Sie in Deutschland sind) Hinweis: Wenn Sie sich einmal angemeldet haben und sich das nächste Mal einloggen, oder wenn Sie Ihr Passwort vergessen haben und Ihr Passwort aktualisieren müssen, vergewissern Sie sich bitte, dass Sie das richtige Region ausgewählt haben. Geben Sie Ihre E-Mail-Adresse ein, lesen und akzeptieren Sie die Datenschutzvereinbarung. - Page 48 Bitte befolgen Sie die "Schnellstart"-Anweisungen (Schritte), die in der app angezeigt werden, um das Mobilfunknetz Ihrer Kamera zu konfigurieren. Während Einrichtung kann eine Zugriffsberechtigung anfordern, z. B. die Kamera bitten, den QR-Code zu scannen. Bitte erlauben Sie ihr, den Vorgang abzuschließen.
- Page 49 Status anzeigen (Tabelle 1): Tabelle 1 - Kamera Netzwerk Symbole Kategorie Symbol Beschreibung Keine SIM-Karte erkannt. Kamera sucht nach einem verfügbaren Mobilfunknetz. Kein Mobilfunknetzdienst verfügbar. "4G" zeigt an, dass die Kamera ein Mobilfunk- 4G-Mobilfunknetz verwendet, es kann signal automatisch zu "3G" oder "2G" wechseln (je nach lokalem Mobilfunknetz), und der weiße "Signalbalken"...
-
Page 50: App Navigation
Gerät- Die Kamera und die SIM-Karte stimmen nicht überein (z. B. war die Kamera zuvor eaktivierung mit einer anderen SIM-Karte verbunden). Die Kamera wurde erfolgreich aktiviert. In der app verwandelt sich der orangefarbene Balken in der app nach der Aktivierung des Geräts in einen grünen Balken (Abb. 10-11). -
Page 51: Holen Sie Sich Das Erste Bild
Tabelle 2 - App Navigation Tabulator Beschreibung Listenstatus Ihres aktuellen Datentarifs, z.B. insgesamt verbleibende effektive Tage und Plan verbleibende Datenmenge für diesen Zyklus. Sie können einen neuen Plan bestellen oder HD-Fotos und -Videos auf Anfrage bestellen. Kamerastatus, einschließlich Batteriestand, Speicherkartenkapazität und verwendete Größe, Temperatur im Inneren der Kamera, Anzahl der Status auf der Speicherkarte gespeicherten Fotos und... -
Page 52: Foto Oder Video Ansehen
Drücken Sie die START-Taste und warten Sie, bis die Kamera in den Überwachungsmodus wechselt. Machen Sie Bewegungen vor der Kamera. Überprüfen Sie die Registerkarte Galerie in der app. In der Regel erhalten Sie in wenigen Minuten das Bild von der Kamera. - Page 53 Änderung zu speichern. Andernfalls wird Ihre neue Einstellung nicht gespeichert. Außerdem können Sie Ihre Kamera in der app programmieren. Hinweis: Alle über programmierten Kameraeinstellungen werden erst beim nächsten "Mobilfunkübertragung"-Zyklus wirksam. Nachdem Einstellung wirksam wurde, verschwindet der orangefarbene Balken links neben den geänderten Einstellungen. In Anbetracht Übertragungsgeschwindigkeit Mobilfunknetzes und des Energiesparens begrenzt die app die...
- Page 54 Details zu Mobilfunkmodem und Netzwerk, wie Adapter, IMEI, Mobilfunk Konfigurieren, Status, Signal, SIM, Infos Netzwerk, Name, PIN, ICCID, IMSI, APN, PDP usw. Wenn Sie Ein auswählen, sendet das Mobilfunknetz nach jeder Aufnahme durch die Kamera ein Bild an das Übertragung Telefon.
- Page 55 Kamera in regelmäßigen Abständen Fotos oder Videos auf, je nach von Ihnen vorgenommenen Einstellungen des "Zeitrafferintervalls". Der "Hybrid" modus umfasst beide oben genannten. Foto, Foto oder Auswahl zwischen Standfotos und Video, Video Videoaufnahmen. Foto+Video Wählen Sie die gewünschte Auflösung für Standbilder aus. Eine höhere Auflösung erzeugt qualitativ 48MP 32MP...
- Page 56 Optional Hinweis: Es wird dringend von 3 empfohlen, die Länge des Nachtvideos Sekunden auf weniger als 30 Sekunden bis 5 einzustellen, da die IR-LEDs oder die Minuten. weißen Blitz-LEDs mehr Batteriestrom verbrauchen. Bei eingeschaltetem Mobilfunk ist die Videolänge auf max. 10 Sekunden. Video Wenn Sie EIN wählen, wird das Sound...
- Page 57 Einstellung "Hoch" ist geeignet, wenn die Umgebungstemperatur warm ist oder Sie ein entferntes Objekt erfassen oder mehr aufnehmen möchten, und die niedrige Einstellung ist gut für weniger Fehlauslöser. Hinweis: Diese Option ist ungültig, wenn der Modus auf "Zeitraffer" eingestellt ist. Bei der Auswahl von EIN werden die seitlichen Bewegungssensoren aktiviert.
- Page 58 Legen Sie die früheste Aufnahmezeit fest, nachdem der Zeitraffer- oder Erste Hybrid modus aktiviert wurde. Wenn Drehzeit: Sie früher Fotos aufnehmen möchten, hh:mm empfiehlt es sich, einen späteren Zeitpunkt als die aktuelle Zeit einzustellen. Stellen Sie das Zeitrafferintervall ein. Es wird NUR wirksam, wenn der Zeitraffer- Modus auf Zeitraffer oder Hybrid intervall...
- Page 59 M – Monat, T – Tage, J – Jahre, hh– Stunde, mm – Minute Hinweis: Mit den Tasten "LINKS/RECHTS" können Sie die Parameter umschalten, mit Datum und M/T/J "AUF/AB" stellen Sie das aktuelle Uhrzeit hh:mm Datum und die Uhrzeit ein. Das Format der Datumseingabe kann geändert werden.
- Page 60 Wenn Sie die Option Ein wählen, werden die ältesten Dateien mit neuen Schleifen- Aufnahmen überschrieben, wenn die Kapazität der Speicherkarte erreicht Aufzeich- ist. Wenn Sie die Option Aus wählen, nung hört die Kamera auf, Aufnahmen zu machen, sobald die Kapazität der Speicherkarte erreicht ist.
-
Page 61: Montage Und Positionierung
Speicherkarte zu formatieren, wenn sie zuvor in anderen Geräten verwendet wurde. Achtung! Bitte stellen Sie sicher, dass die benötigten Dateien auf der Speicherkarte vorher gesichert wurden! Wenn Sie Ja wählen, werden alle Werksein- vorherigen Einstellungen auf die stellungen Nein Standardeinstellungen des Herstellers zurückgesetzt. - Page 62 Hinweis: Das Modell X60PCF ist einzigartig und verfügt über ein Nahaufnahme-Objektiv, mit dem Objekte ab 20 cm Entfernung erfasst werden können. Es gibt zwei Möglichkeiten, die Kamera zu montieren: mit dem mitgelieferten verstellbaren Gurt oder mit dem Stativgewinde. Mit Verwendung des verstellbaren Gurtes: Bringen Sie den Gurt wie abgebildet an der Kamera an.
-
Page 63: Test Von Abtastwinkel Und Abstand
9.2. Test Von Abtastwinkel Und Abstand Um festzustellen, ob die Kamera den von Ihnen gewählten Bereich effektiv überwachen kann, wird dieser Test empfohlen, um den Abtastwinkel und den Überwachungsabstand der Kamera zu überprüfen. So führen Sie den Test durch: Schalten Sie die Kamera in den ON-Modus. ... -
Page 64: Umschalten Von Funktionen Der Kamera
einschalten, wird die Anzahl der Auslösungen angezeigt, Sie können die Fotos auf dem Bildschirm überprüfen. Die Ergebnisse der Tests helfen Ihnen, die beste Position bei der Montage und Ausrichtung der Kamera zu finden. Die Höhe über dem Boden, wo Sie die Ausrüstung anbringen, sollte entsprechend der Größe der Tiere variieren. -
Page 65: Fotos Oder Videos Ansehen
"PIR Intervall". (3) Wenn Sie den Arbeitsmodus der Kamera im Menü auf "Hybrid" einstellen, arbeitet die Kamera gemäß den beiden oben genannten Modi. 10. FOTOS ODER VIDEOS ANSEHEN Nachdem Sie Ihre Kamera eingerichtet, montiert und aktiviert haben, möchten Sie später sicher die von der Kamera aufgenommenen Bilder betrachten. -
Page 66: Die Technischen Daten
Die Modelle X60P, X60PCF und X60PWF erfordern eine SD-, SDHC- oder SDXC-Standardspeicherkarte (nicht im Lieferumfang enthalten), maximale Kapazität 512GB. Speicherung Das X60P Max-Modell verfügt über eine integrierte Speicherkarte. Die Kapazität variiert je nach Modell: X60PMB mit 32GB Speicher, X60PMC mit 64GB Speicher,... - Page 67 X60PMD mit 128GB Speicher. Größe der Fotos 48MP, 32MP, 24MP, 16MP, 8MP, 4MP 2304 x 1296P@20fps (16:9), Größe der Videos 1920 x 1080P@30fps (16:9), 1280 x 720P@30fps (16:9) PIR- Hoch/Normal/Niedrig Empfind-lichkeit PIR-Erken- 27m (Unter 25°C) nungsabstand 120° insgesamt (bei aktivierten seitlichen PIR-Abtastwin- Bewegungssensoren) Zentrale Zone: 60°, Linke Seite: 30°, Rechte...
-
Page 68: Fehlerbeseitigung
Standby-Zeit 8 Monate im Standby Auto Standby (Überwachungsmodus) in 3 Auto Stand-by Minuten, wenn keine Bedienung im ON-Modus erfolgt Mini-USB, SD-Kartenhalter in Standardgröße (für die Modelle X60P, Schnittstelle X60PCF und X60PWF), Externe Stromversorgung (DC 12V/1A, Stecker 5.5x2.1mm) Befestigung Gurt, Stativfuß (1/4-20) Wasserdicht IP66 Betrieb... - Page 69 Überprüfen Sie den Batterieladezustand, wenn die Nachtsicht nicht wie erwartet zu funktionieren scheint. Für die Modelle X60P, X60PCF und X60P Max, der dunkle Hintergrund von Nachtbildern wird in der Regel durch starke Reflektionen von Hindernissen in der Nähe der Kamera verursacht.
Need help?
Do you have a question about the X60P MAX and is the answer not in the manual?
Questions and answers