Table of Contents
Advertisement
Advertisement
Table of Contents

Related Manuals for GardePro E6


Summary of Contents for GardePro E6
- Page 1 E6 TRAIL CAMERA INSTRUCTION MANUAL V2.0...
- Page 2 Congratulations on your purchase of one of the best trail cameras on the market! We appreciate your business and want to earn your trust. Please refer to the notes below and the instructions in this manual to ensure that you are completely satisfied with this product.
-
Page 3: Table Of Contents
7.2. ON Mode ..............10 7.3. SURVEILLANCE Mode ......... 11 8. Wi-Fi CONNECTION ............12 8.1. Download GardePro Mobile App ......12 8.2. Enable Wi-Fi and Bluetooth ........12 8.3. Add Your Camera ..........13 8.4. Search Your Camera and Link ......13 8.5. -
Page 4: In The Box
1. IN THE BOX 1 x Camera, 1 x Mounting Strap, 1 x Instruction Manual, 1 x Mini USB Cord Note: Memory card and batteries are not included (user supplied). 2. IMPORTANT NOTE 2.1. About Batteries Require eight (8) 1.5V AA Alkaline or Lithium batteries. We recommend the use of Energizer AA Lithium batteries in this camera to obtain maximum battery life. -
Page 5: Introduction
Google LLC. 3. INTRODUCTION 3.1. About the Camera The GardePro E6 is a new generation of Wi-Fi trail camera. The camera has a built-in Wi-Fi and Bluetooth module, so that you can connect and operate the camera through a dedicated app ("GardePro Mobile"). -
Page 6: Parts And Controls
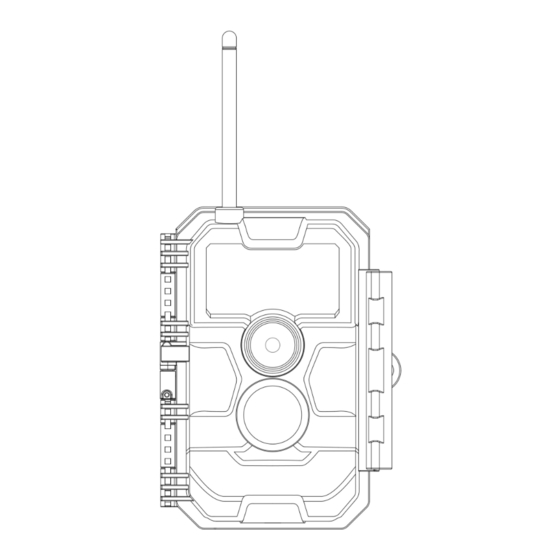
Easy to use/program with well-designed operation buttons and built-in 2.4-inch color screen, easy to program, review pictures and videos on the screen 3 working modes - Motion detection, Time lapse and Hybrid Fast trigger time - approx. 0.2s, Fast recovery time - 0.5s, Long ... - Page 7 Antenna Light IR LEDs Sensor Indicator Optics Lens Lock Hole Lock Lens Buckle Figure 1: Front View...
- Page 8 The camera provides the following connections for external devices: Mini USB port and SD card slot etc. (Figure 2). Tripod Base SD Card 1/4" - 20 Holder DC 12V/1A Microphone Plug 5.5x2.1mm Mini USB Port Figure 2: Bottom View The camera has one security cable hole and two strap holes on the back.
- Page 9 exclusive keypad design for easy program and operation, 8 AA batteries slot supported (Figure 4). Battery Color Compartment Screen and Cover Operation Buttons Figure 4: Inside View Surveillance Mode Power Switch Figure 5: Operation Buttons A power switch is used to power on (ON mode) or off the camera (OFF mode).
-
Page 10: Installing The Batteries And Sd Card
5. INSTALLING THE BATTERIES AND SD CARD Before you begin learning how to use your camera, you will first need to install a set of batteries and insert an SD card. Although that may only take you a minute, there are some important notes about both batteries and SD cards you should be aware of, so please take the time to read the following directions and cautions:... - Page 11 Figure 6: Loading the Batteries 5.2. Inserting the SD Card Insert the SD card (with the camera powered off), before beginning to operate the camera. Don't insert or remove the SD card when the camera is powered on or in the surveillance mode.
-
Page 12: Using The Camera
screen in ON mode. Formatting the SD card by using the camera's "Format SD Card" menu option before first use is recommended, especially when a card has been used in other devices. To take out the SD card, just gently push in the card (do not ... -
Page 13: The Off, On, And Surveillance Modes
7. THE OFF, ON, AND SURVEILLANCE MODES The camera has three basic operational modes: OFF mode: Power switch in the OFF position (The camera is powered off). ON mode: Power switch in the ON position (The camera is powered on and its screen is on). -
Page 14: Surveillance Mode
On the screen display, you will see an information screen that shows how many images have been taken, the battery level, camera or video mode, etc. ATTENTION PLEASE: In the ON mode, the camera will automatically enter SURVEILLANCE mode if there is no operation (key pressing) within 5 minutes. -
Page 15: Wi-Fi Connection
Android may differ. During the use of the GardePro app (Referred to as app), please grant the app access to Wi-Fi, Bluetooth, storage, location and camera of your device, and enable the Local Network (if on iOS14 or later), which are necessary to take pictures and videos. -
Page 16: Add Your Camera
8.3. Add Your Camera Ensure that your camera is in ON mode and in close proximity to you. To establish a stable connection, move within 45ft of the camera with no obstacles obstructing the signal, such as walls or glass doors. Open the app, tap Wi-Fi camera (Figure 9). - Page 17 By default, in the list the camera will be indicated as ID "NONAME_GardePro_E6" if the camera name is not assigned. After you set the camera name in settings, the camera ID will be updated as "XXXX_GardePro_E6" (XXXX is a 4-character choice, you can set your camera name). The app automatically searches for all Wi-Fi trail cameras nearby, please make sure your camera is within the Wi-Fi range.
-
Page 18: App Navigation
prefix CAM8Z6 is fixed, E9316A9F2066 is the internal camera identifier which may vary from different cameras. NOTE: On Android devices, there might be different system pop-up messages that ask for allowing app connection to camera since different mobile phone manufacturers may modify and customize this system message. - Page 19 Table 1 - App Navigation Features Details Refer to Preview, manual taking pictures or videos. Note: When your Wi-Fi camera is connected, motion detection will Camera Figure 13 be disabled. It will be enabled again when you disconnect your Wi-Fi camera or close the app for 90 seconds.
- Page 20 Figure 13: Camera Figure 14: Status Figure 15: Settings Figure 16: Gallery...
-
Page 21: Important Notes On App Wi-Fi Connection
8.6. Important Notes on App Wi-Fi Connection Notes When the camera’s Wi-Fi is connected, the camera will stop SURVEILLANCE (motion detecting or time lapse). Disconnect Wi-Fi to enable the camera to go back to SURVEILLANCE mode. TIP: How to re-enable the camera start motion detection? Tap the camera ID "JOHN_GardePro_E6"... -
Page 22: Advanced Settings
9. ADVANCED SETTINGS The trail camera comes with preset manufacturer settings. You can change the settings to meet your requirements. Once the camera screen is on, press MENU key to enter/exit the menu. Press the UP/DOWN key to move the marker, Press the LEFT/RIGHT key to change the setting, and press the OK key to confirm the change. - Page 23 01, 02, Photo Select the number of photos taken in 03, 04, Burst sequence per trigger. Select video resolution (pixels per 1296P frame). Higher resolution produces Video 1080P better quality videos, but creates larger Quality 720P files that take more of the SD card capacity.
- Page 24 set as "Time Lapse". Select the sensitivity of the PIR sensor. Temperature affects the sensitivity. The High setting is suitable when the High, ambient temperature is warm or you Medium want to capture distant objects or Sensitivity capture more, and the Medium/Low setting is helpful in cold weather.
- Page 25 Selecting On to set a specific working time period for your camera in Time Lapse mode or Hybrid mode. You can set up to 2 different time periods for Timelapse the camera, and it will not capture Period time-lapse photos or videos outside of those periods.
- Page 26 Select On to assign a name, 4-character long, in the form of Capital A-Z, 0-9 to record the location in the Camera photos (e.g. A123 for Yellow Stone Name Park). This helps multi-camera users identify the location when reviewing the photos. Select On to show date, time, Info Strip temperature, moon phase on each...
-
Page 27: Mounting And Positioning
All files will be deleted after formatting the SD card. It’s highly recommended that you format the SD Format card if it has been used previously in SD Card other devices. Caution: make sure wanted files on the SD card have been backed up first! Selecting Yes will return all your Factory... -
Page 28: Sensing Angle And Distance Test
adjustable web belt, or the tripod socket. Using the adjustable strap: To use the strap on the camera, push one end of the strap through the two brackets on the back of the camera. Thread the end of the strap through the buckle. Fasten the strap securely around the tree trunk by pulling the end of the strap firmly so there is no slack left (Figure 17). -
Page 29: Starting
depending on the actual time of the motion sensor to be activated. The delay time is 60 seconds minus the power-on time.) Close the camera door. Make movements in front of the camera at several positions within the area where you expect the game or subjects to be. Try different distances and angles from the camera. -
Page 30: Review Photos Or Videos
surveillance mode. (1) If you set the camera’s working mode as "Motion detection" in the menu, the camera will count down a 30-second delay, and then will be ready to go into standby (surveillance) and capture. Any motion that is detected by it will trigger the capture of an image or video as programmed in the menu. -
Page 31: Technical Specifications
Or you can put the SD card into an SD card "reader" (not included), plug into a computer, and browse the files on the computer without downloading. 12. TECHNICAL SPECIFICATIONS Element Description Wi-Fi 2.4GHz 802.11 b/g/n Bluetooth BLE 5.0 App System IOS 11.0 or later Requirements Android 7.0 or later... - Page 32 Trigger Time Approx. 0.2 seconds Trigger Interval 0sec.-60min, Programmable Shooting Numbers Video Length 3sec ~ 5min., Programmable Info Strip On /Off Operation Hours On /Off, Specific working period of time Password 4-Digit Code Camera Name 4-Character (A-Z, 0-9) Time Lapse Interval 3 Seconds ~ 24 Hours Power Supply 8x1.5V AA Batteries (not included)
-
Page 33: Troubleshooting
13. TROUBLESHOOTING If your camera does not seem to be functioning properly or if you are having photo/video quality issues, please run these simple and quick checks: Make sure the camera is powered on and in the correct mode Format the SD card in the camera or replace the SD card, ... -
Page 34: Warranty
14. WARRANTY ONE YEAR LIMITED WARRANTY Your GardePro Trail Camera warranty covers your trail camera for one year after the original purchase date. We warrant that your camera will be free from defects in materials and workmanship when operated in normal use and conditions.
Need help?
Do you have a question about the E6 and is the answer not in the manual?
Questions and answers