Table of Contents
Advertisement
Advertisement
Table of Contents

Related Manuals for GardePro A3S


Summary of Contents for GardePro A3S
- Page 1 A3S TRAIL CAMERA INSTRUCTION MANUAL V3.8...
- Page 2 Congratulations on your purchase of one of the best trail cameras on the market! We appreciate your business and want to earn your trust. Please refer to the notes below and the instructions in this manual to ensure that you are completely satisfied with this product.
-
Page 3: Table Of Contents
TABLE OF CONTENTS 1. IN THE BOX ..............1 2. IMPORTANT NOTE ............1 3. INTRODUCTION ............. 1 3.1. ABOUT THE CAMERA .........1 3.2. MAIN FEATURES ..........2 4. PARTS AND CONTROLS ..........3 5. INSTALLING THE BATTERIES AND SD CARD ..6 5.1. -
Page 4: In The Box
"Format SD Card" in the menu settings. 3. INTRODUCTION 3.1. ABOUT THE CAMERA The GardePro A3S trail camera is a new generation of digital scouting camera, it can be triggered by any movement of game in a location, detected by a highly sensitive Passive Infra-Red (PIR) motion sensor, and then take high quality pictures (up to 48MP still photos), 1296P 20fps or 1080P 30fps H.264 video... -
Page 5: Main Features
clips with audio. The camera features the all new innovative and ultra-clear Sony imaging technology. The camera encompasses all-new software innovations, smart illumination technology, blur reduction technology, auto noise reduction and dynamic exposure technology to deliver high resolution image quality, multi-zone detection, pre-activated technology and fast boot to deliver 0.1s fast trigger speed and 0.5s recovery time. -
Page 6: Parts And Controls
Operation Hours, Loop Recording, Time Lapse, Password Protected. Built for any climate - IP66 Waterproof designed for outdoor use and resistant against rain and snow. Operation Temperature -4~140°F (-20 ~ 60°C). Support SD/SDHC/SDXC memory card, maximum capacity 512GB (not included). - Page 7 The camera provides the following connections for external devices: Mini USB port and SD card slot etc. (Figure 2). Tripod Base SD Card 1/4" - 20 Holder DC 12V/1A Plug 4.0x1.7mm Mini USB Port Figure 2: Bottom View The camera has two strap holes on the back. The strap can be put through the strap holes and fastened securely around the tree trunk by pulling the end of the strap firmly (Figure 3).
-
Page 8: Installing The Batteries And Sd Card
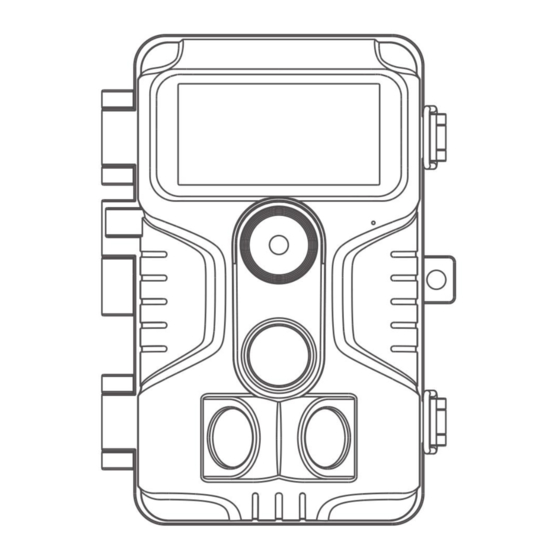
Color Screen Battery Operation Compartment Buttons and Cover Figure 4: Inside View UP Key as OK Key as Video Mode Playback Mode RIGHT Key as Manual Shutter DOWN Key as ("SHOT") Camera Mode Power Switch Figure 5: Operation Buttons and Shortcut A 3-way power switch is used to select the main operating modes: OFF, ON, and SET (Figure 5). -
Page 9: Loading Batteries
about both batteries and SD cards you should be aware of, so please take the time to read the following directions and cautions: 5.1. LOADING BATTERIES After opening the cover of the battery compartment, you will see that the camera has eight battery slots (Figure 6). A full eight batteries must be installed for the camera to operate. -
Page 10: Inserting The Sd Card
remove the SD card when the power switch is in the ON or SET position. The camera uses a standard-size memory card to save photos (in .jpg format) and/or videos (in .mp4 format). SD and SDHC (High Capacity)/SDXC cards up to a maximum 512GB capacity are supported (Figure 7). -
Page 11: The Off, On, And Set Modes
batteries and an SD card, you could simply take it outside, strap it to a tree (or not-according to your application scenario), switch it ON and leave-and you might get some great photos that are exactly what you wanted. However, we highly recommend that you first spend some additional time indoors with this manual and your camera until you know a bit more about what the 3-way switch and those control keys do. -
Page 12: On Mode
to capture images. If the Mode is set as "Time Lapse", there will be no 30-second counting down, and the camera will be ready to enter Time Lapse. Once in the ON mode, no manual controls are needed or possible (the control keys have no effect). The camera will take photos or videos automatically (according to its current parameter settings). -
Page 13: Advanced Settings
As mentioned earlier in "Parts & Controls", the keypads have secondary, "shortcut" functions when the camera is switched to SET mode: Press the UP key to quickly set the camera to shoot video clips. Press the DOWN key to quickly set the camera to take still ... - Page 14 “Timelapse Interval” parameter. Hybrid mode includes both above. Photo Photo or Video Select whether still photos or video clips are taken. Video Photo+Vide Select desired resolution for still 48MP photos. Higher resolution produces 32MP better quality photos, but creates Photo 24MP larger files that take more of the SD card capacity.
- Page 15 be working with videos in MOV format. Divided into daytime and night, from off, low to high, the degree of Daytime: overexposure suppression is Off/Low/ gradually increasing. The default Medium/ settings can be used for most scenes. High However, the settings can be Overexposur fine-tuned for different camera Suppression...
- Page 16 more, and the Medium/Low setting is helpful in cold weather. Note: this option is invalid if Mode is set as "Time Lapse". Selecting On will activate the side motion sensors. It brings faster trigger speeds and helps capture fast moving animals. When any of the Side two side motion sensors detects a Motion...
- Page 17 animals like snakes, or the process of flowering, etc. Note: This option is invalid if Mode is set as "Motion Detection". Selecting On to set a specific working time period for your camera in Time Lapse mode or Hybrid mode. You can set up to 2 different Timelapse time periods for the camera, and it Period...
- Page 18 This helps multi-camera users identify the location when reviewing the photos. Select On to show date, time, temperature, moon phase on each Info Strip capture. Selecting On option will cause the oldest files to be overwritten with new captures when the SD card Loop reaches its capacity.
-
Page 19: Mounting And Positioning The Camera
other devices. Caution: make sure wanted files on the SD card have been backed up first! Selecting Yes will return all your Factory previous settings back to the Reset manufacturer default. Version Display the version of the camera. Defined 9. MOUNTING AND POSITIONING THE CAMERA 9.1. -
Page 20: Sensing Angle And Distance Test
(Figure 8). Note: it is not possible to use a cable lock (in the upper part of the bracket) and the strap at the same time. Using the tripod socket: The camera is equipped with a socket at the bottom end to enable mounting on a tripod or other mounting accessories with a standard UNC 1/4-20 thread screw (not included). -
Page 21: Switching On The Camera
Try different distances and angles from the camera. When the white motion indicator LED flashes in RED, it indicates that the camera is able to sense the position. However, if the LED doesn't blink, it means that the position lies beyond the sensing range. - Page 22 standby (surveillance) and capture. Any motion detected by it will trigger the capture of images as programmed in the menu. Be sure you have read the descriptions of the Detection Delay and PIR Sensitivity parameters. (2) If you set the camera working mode as "Time Lapse" in the menu, once you switch to the ON mode, the camera will be ready to go into "Time Lapse"...
-
Page 23: Review Photos Or Videos
10. REVIEW PHOTOS OR VIDEOS After you have setup, mounted and activated your CAMERA, you will of course be eager to return later and review the images it has captured for you. The camera stores photos and videos in the folder \DCIM\100MEDIA in the SD card. Photos are saved with file names like DSCF0001.JPG and videos like DSCF0001.MP4. -
Page 24: Technical Specifications
11. TECHNICAL SPECIFICATIONS Element Description Working Mode Motion detection, Time lapse or Hybrid Max. Pixel Size 48MP Lens f/1.6, FOV=63°, Auto IR-Cut IR Flash 100ft. (30m) LCD Screen 2.4" Color screen Keypad 6 Keys, 1 Power switch SD, SDHC or SDXC standard-size memory card Memory (Not included), maximum capacity 512GB Picture... - Page 25 Operation On /Off, Specific working period of time Hours Password 4-Digit Code Camera Name 4-Character (A-Z, 0-9) Time Lapse 3 Sec. ~ 24 Hours Interval Power Supply 8x1.5V AA Batteries (Not included) Stand-by Time 8 Months in Stand-by Auto Stand-by (Surveillance mode) in 5 minutes Auto Stand-by while no operation in SET mode 8V - Low Battery (Batteries die)
-
Page 26: Troubleshooting
12. TROUBLESHOOTING If your camera does not seem to be functioning properly or if you are having photo/video quality issues, please run these simple and quick checks: Make sure the camera is powered on and in the correct mode Format the SD card in the camera or replace the SD card, ... -
Page 27: Warranty
13. WARRANTY ONE YEAR LIMITED WARRANTY Your GardePro trail camera warranty covers your trail camera for one year after the original purchase date. We warrant that your camera will be free from defects in materials and workmanship when operated in normal use and conditions.
Need help?
Do you have a question about the A3S and is the answer not in the manual?
Questions and answers