Advertisement
Product Descriptions

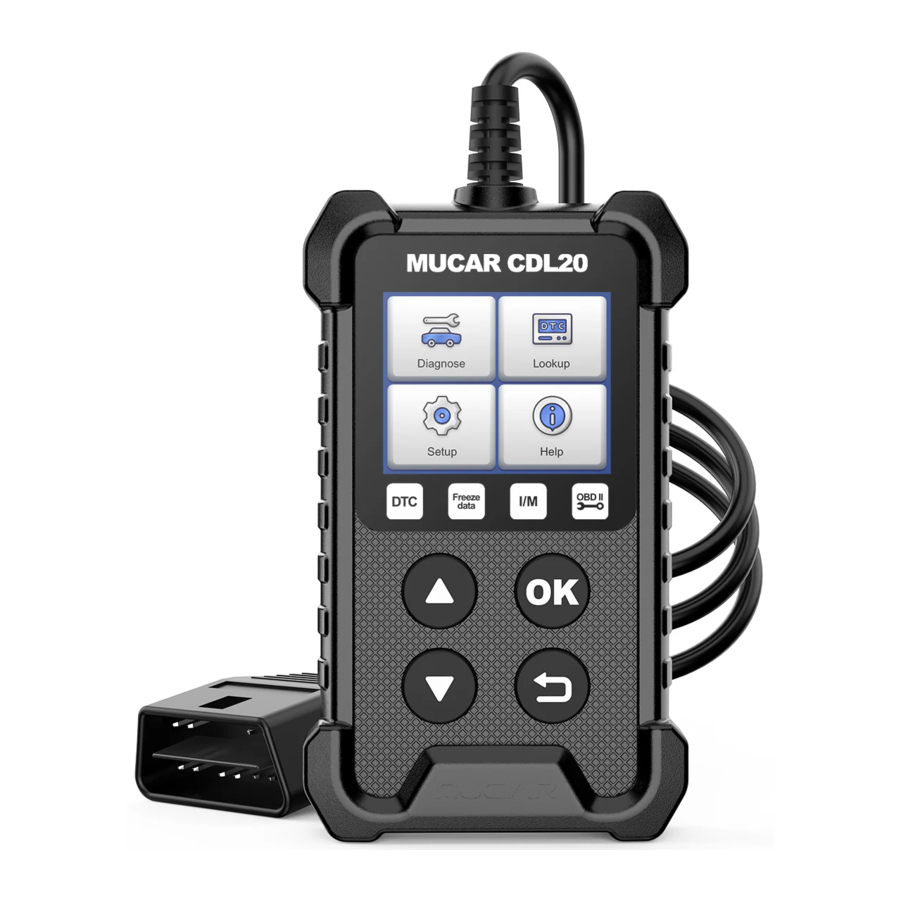
- Diagnostic Cable: Standard OBDII TXGA Diagnostic
- LCD Display: 1.77 inch display (128*160)
- Up, down keys: used to select interactive functions
- Return key: Return to upper function
- OK Return: Confirm button
Technical Specifications
Display: 1.7 inch display
Working Environment: 0~50℃ (32~122℉)
Storage Environment: -20~60℃ (-4~140℉)
Power Supply: 9-18V vehicle power
Supported Protocols: ISO9141, KWP2000 (ISO 14230), J1850PWM,J1850VPM and CAN OBD II protocol
How To Use
Data Link Connector (DLC) Location
The DLC (Data Link Connector or Diagnostic Link Connector) is typically a 16pin connector where diagnostic code readers interface with the vehicle's onboard computer. The DLC is usually located 12 inches from the center of the instrument panel (dash), under or around the driver's side for most vehicles. If Data Link Connector is not located under dashboard, a label should be there telling location. For some Asian and European vehicles, the DLC is located behind the ashtray and the ashtray must be removed to access the connector. If the DLC cannot be found, refer to the vehicle's service manual for the location.
 Note: Turn on the ignition of the vehicle, the voltage range of the device should be 9-18V, and the throttle should be in the closed position.
Application Overview
When the code reader boots up, the Home screen opens. This screen shows all applications loaded on the unit. Following applications are preloaded into the code reader:
- Diagnosis: leads to OBDII screens for all 9 generic OBD system tests.
- Lookup: leads to screens for diagnostic trouble code lookup.
- Help: You will find the device OBD function and system instructions
- Set up: You can set the system language of this machine, and you can set the display unit to meet your preference when using the code reader.
- Select "Diagnosis", click "OK" to enter the system diagnosis, click "OK" and enter the diagnosis function list.
- Select "READ CODE" and click "OK" to select vehicle type to view DTC diagnostic data.
- Select "ERASE CODES" to clear the fault code.
- Select" I/M READINESS" and click "OK" to view the I/M data flow.
- Select "DATA STREAM" View all data streams, Next click "OK", and finally you can view the graphics data flow.
- Select "FREEZE FRAME" and click "OK" to view the freeze frame data stream.
- Select "O2 SENSOR TEST" and click "OK" to view O2 Sensor data Stream.
- Select "ON-BOARD MONITORING" and click "OK" to view On-Board Monitor data streams.
- Select "EVAP SYSTEM" and click "OK" to view EVAP data streams.
- Select "DTC LOOKUP" and click "OK" to query fault code analysis.
- Select "Help" and click "OK". You will find the device OBD function and system instructions.
- Select "Set up" and click "OK" to set the native language, unit of measure, record mode and sound.
Customer Service
Customer Service Email: support@mythinkcar.com
Official Website: https://www.mythinkcar.com
Products tutorial, videos, FAQ and coverage list are available on MUCAR official website.
Documents / Resources
References
Download manual
Here you can download full pdf version of manual, it may contain additional safety instructions, warranty information, FCC rules, etc.
Advertisement


Need help?
Do you have a question about the CDL20 and is the answer not in the manual?
Questions and answers