ClosetMaid 6-Cube Organizer Manual
- Installation instructions manual (11 pages)
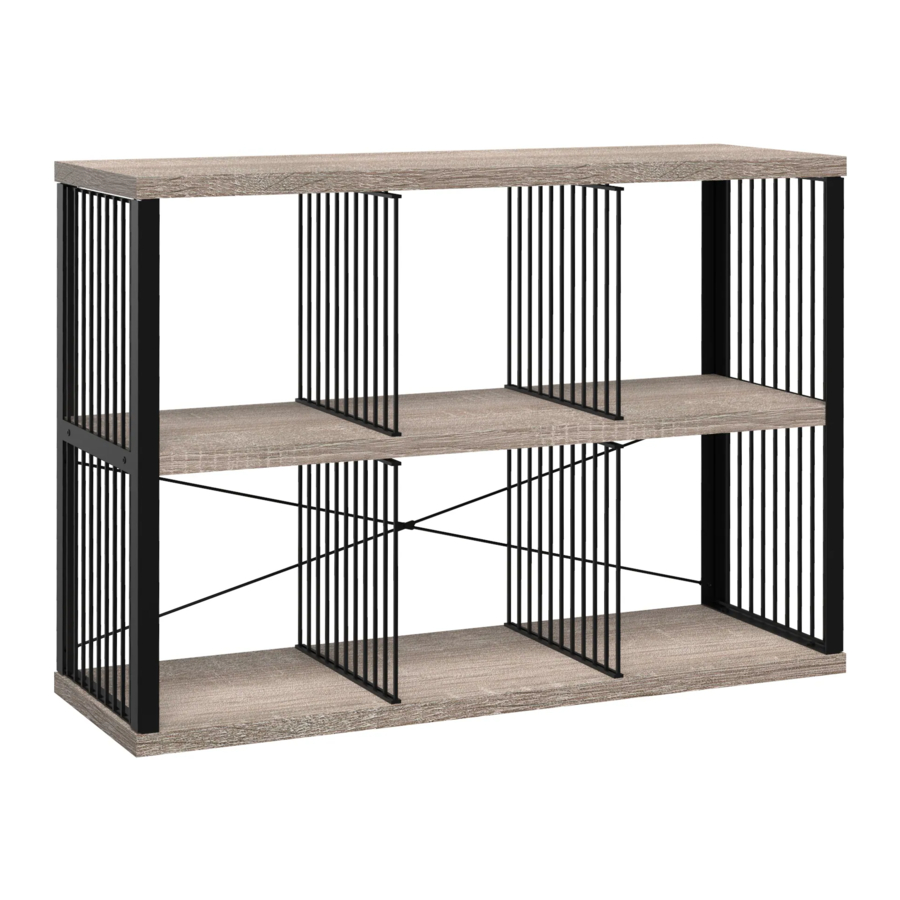
Advertisement
SAFETY PRECAUTIONS
BEFORE BEGINNING
- Please read all instructions carefully.
- Familiarize yourself with all parts (see "PARTS") and check quantities.
- Follow all safety precautions (see "SAFETY PRECAUTIONS").

- CHOKING HAZARD FOR SMALL CHILDREN. This unit contains small parts which could be a choking hazard for small children. Children should be under adult supervision at all times or serious injury could occur.
- ALWAYS UNLOAD UNIT PRIOR TO MOVING THE UNIT. The weight of personal belongings can cause the unit to become unstable and either tip or collapse. Serious bodily injury and/or damage to personal belongings may occur.
- DO NOT OVERLOAD UNIT. If any shelf, top, or bottom of unit bows or bends, it is overloaded. The shelf, top, or bottom could collapse and cause serious bodily injury and/ or damage to personal belongings.
- DO NOT CLIMB OR STEP ON THE UNIT. The unit may become unstable and either tip or collapse. Serious bodily injury and/or damage to personal belongings may occur.
- DO NOT USE THIS UNIT AS A TELEVISION STAND. Serious bodily injury and/or damage to personal belongings may occur.
- DO NOT MOUNT OR ATTACH ANYTHING TO THE SIDES, REAR, OR FRONT OF THE UNIT. This can create a force which can cause the unit to tip. Serious bodily injury and/or damage to personal belongings may occur.
- DO NOT STACK UNITS. Stacking of units can cause an unsafe tip-over hazard which may cause serious bodily injury and/or damage to personal belongings.
- DO NOT HANG THIS UNIT ON THE WALL. The product structure is not designed for wall hanging. Serious bodily injury, damage to personal belongings, and/or damage to the wall may occur.
- FOLLOW PROPER SAFETY PROCEDURES WHEN USING POWER TOOLS AND LADDERS.
- PROTECT YOUR WORK SURFACE DURING ASSEMBLY. This can prevent scratching or damage to table tops, wood floors, etc.
| FOLLOW INSTRUCTIONS STOP CAREFULLY Manufacturer Warranty Please have proof of purchase for warranty claims. |
|
We recommend you hand-tighten screws. Please note location of predrilled holes.
PARTS
Call us for parts and service. For faster service, have the style number ready when calling.
TOOLS REQUIRED

HARDWARE PROVIDED
| Name Size (Qty) | Part Number | ||
| AA | Allen Wrench | 4 mm. (1) | 65649 |
| BB | Hex Screw | M6 x 15 mm. (8) | 65629 |
| CC | Long Screw | M7 x 48 mm. (4) | 65624 |
| DD | X Brace Screw | M4 x 9 mm. (4) | 62284 |
| EE | X Brace Cap Nut | M4 x.7 mm. (4) | 62285 |
| FF | Stamped Wrench | M4 (1) | 73498 |
| GG | L-Bracket | 51 mm. (2) | 62280 |
| HH | L-Bracket Screw | M4 x 15 mm. (2) | 62281 |
| II | Wall Mount Screw | M4 x 35 mm. (2) | 62283 |
Call us for parts and service. For faster service, have the style number ready when calling.
PRODUCT

| Name | Qty | Part Number | |||
| A | Left Metal Side Panel | 1 | 62391 | ||
| B | Right Metal Side Panel | 1 | 62301 | ||
| C | Top/Bottom Wood Panel | 2 | 61156 | 61157 | 61158 |
| D | Vertical Divider | 4 | 62393 | ||
| E | Wood Shelf | 1 | 61197 | 61198 | 61199 |
| F | X Brace | 1 | 62306 | ||
*Please note location of predrilled holes on each part.
INSTALLATION INSTRUCTIONS
STEP 1
Connect metal side panels to bottom wood panel.
Align both metal side panels (A & B) with the bottom wood panel (C) as shown. The top/bottom wood panels (C) will only have holes on one side. Make sure the horizontal bars on each metal side panel are below the screw holes and facing toward the inside of the assembly (fig. 1). The two X brace holes on the side of each panel should be facing toward the back of the assembly.
Use the supplied allen wrench (AA) to secure both metal side panels (A & B) to the bottom wood panel (C) using two hex screws (BB) per side.

*Please note location of predrilled holes on each part.
STEP 2
Place bottom vertical dividers.
Align two vertical dividers (D) with the holes on the bottom wood panel (C) as shown. Push dividers into place.

STEP 3
Attach wood shelf.
Align the holes on the bottom of the wood shelf (E) with the top of the vertical dividers (D). The wood shelf (E) should rest on the lower horizontal bars of the metal side panels (A & B).
Push wood shelf into place.
Use the supplied allen wrench (AA) to secure both metal side panels (A & B) to the wood shelf (E) using two long screws (CC) per side.

STEP 4
Place top vertical dividers.
Align two vertical dividers (D) with the holes on the top of the wood shelf (E) as shown. Push dividers into place.

STEP 5
Connect metal side panels to top wood panel.
Align the holes on the bottom of the top wood panel (C) with the top of the vertical dividers (D).
Use the supplied allen wrench (AA) to secure both metal side panels (A & B) to the top wood panel (C) using two hex screws (BB) per side.

STEP 6
Secure X brace to back of unit.
Align the X brace (F) with the predrilled holes on the left metal side panel (A).
Secure the X brace to the left metal side panel (A) by using the stamped wrench (FF) to attach two X brace cap nuts (EE) to two X brace screws (DD).
Align the X brace (F) with the predrilled holes on the right metal side panel (B).
Secure the X brace to the right metal side panel (B) by using the stamped wrench (FF) to attach two X brace cap nuts (EE) to two X brace screws (DD).

STEP 7
Secure to wall using stud mounting.
Align top of unit with wall studs. Position L-bracket (GG) on wall stud and bottom of the top wood panel (C). The longer side of the bracket will connect to the top wood panel and the shorter side will connect to the stud.
Secure the bracket (GG) to the top wood panel (C) using one L-bracket screw (HH). The screw should be mounted 1/2 in. from the back edge of the top wood panel to ensure stability.
Secure the bracket to the stud using one wall mount screw (II).
Repeat steps for the other stud.

Documents / ResourcesDownload manual
Here you can download full pdf version of manual, it may contain additional safety instructions, warranty information, FCC rules, etc.
Advertisement


Need help?
Do you have a question about the 6-Cube Organizer and is the answer not in the manual?
Questions and answers