Advertisement
Quick Links
Advertisement

Related Manuals for ClosetMaid 6-Cube Organizer


Summary of Contents for ClosetMaid 6-Cube Organizer
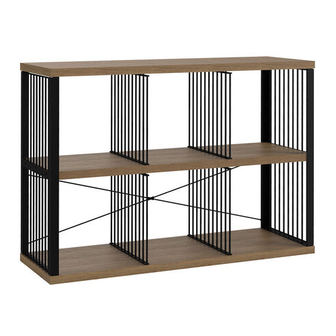
- Page 1 6-Cube Organizer INSTALLATION INSTRUCTIONS...
-
Page 2: Before Beginning
SAFETY PRECAUTIONS BEFORE BEGINNING • Please read all instructions carefully. • Familiarize yourself with all parts (see “PARTS”) and check quantities. • Follow all safety precautions (see “SAFETY PRECAUTIONS”). WARNING • • CHOKING HAZARD FOR SMALL CHILDREN. This unit DO NOT MOUNT OR ATTACH ANYTHING TO THE SIDES, REAR, OR FRONT OF THE UNIT. -
Page 3: Tools Required
PARTS Call us for parts and service. For faster service, have the style number ready when calling. TOOLS REQUIRED HARDWARE PROVIDED Name Size (Qty) Part Number Allen Wrench 4 mm. (1) 65649 Hex Screw M6 x 15 mm. (8) 65629 Long Screw M7 x 48 mm. - Page 4 PARTS Call us for parts and service. For faster service, have the style number ready when calling. PRODUCT Name Part Number Left Metal Side Panel 62391 Right Metal Side Panel 62301 61156 61157 61158 Top/Bottom Wood Panel Vertical Divider 62393 61197 61198 61199...
- Page 5 STEP 1 Connect metal side panels to bottom wood panel. Align both metal side panels (A & B) with the bottom wood panel (C) as shown. The top/bottom wood panels (C) will only have holes on one side. Make sure the horizontal bars on each metal side panel are below the screw holes and facing toward the inside of the assembly (fig.
- Page 6 STEP 2 Place bottom vertical dividers. Align two vertical dividers (D) with the holes on the bottom wood panel (C) as shown. Push dividers into place. *Please note location of predrilled holes on each part.
- Page 7 STEP 3 Attach wood shelf. Align the holes on the bottom of the wood shelf (E) with the top of the vertical dividers (D). The wood shelf (E) should rest on the lower horizontal bars of the metal side panels (A & B). Push wood shelf into place.
- Page 8 STEP 4 Place top vertical dividers. Align two vertical dividers (D) with the holes on the top of the wood shelf (E) as shown. Push dividers into place. *Please note location of predrilled holes on each part.
- Page 9 STEP 5 Connect metal side panels to top wood panel. Align the holes on the bottom of the top wood panel (C) with the top of the vertical dividers (D). Use the supplied allen wrench (AA) to secure both metal side panels (A & B) to the top wood panel (C) using two hex screws (BB) per side.
- Page 10 STEP 6 Secure X brace to back of unit. Align the X brace (F) with the predrilled holes on the left metal side panel (A). Secure the X brace to the left metal side panel (A) by using the stamped wrench (FF) to attach two X brace cap nuts (EE) to two X brace screws (DD).
- Page 11 STEP 7 Secure to wall using stud mounting. Align top of unit with wall studs. Position L-bracket (GG) on wall stud and bottom of the top wood panel (C). The longer side of the bracket will connect to the top wood panel and the shorter side will connect to the stud. Secure the bracket (GG) to the top wood panel (C) using one L-bracket screw (HH).
Need help?
Do you have a question about the 6-Cube Organizer and is the answer not in the manual?
Questions and answers