Vulcan-Hart 148L Installation And Operation Manual
Gas restaurant ranges 90 series and vg series
Hide thumbs
Also See for 148L:
- Installation & operation manual (32 pages) ,
- Replacement parts manual (21 pages) ,
- Service manual (52 pages)
Table of Contents
Advertisement
GAS RESTAURANT RANGES
90 SERIES AND VG SERIES
MODEL
24L
36L
481L
148L
60L
260L
VG24
VG36
VG60
VG260
PRIOR MLS COVERED
IN THE CATALOG
48L
160L
VG48
VG160
For additional information on Vulcan-Hart or to locate an authorized parts
and service provider in your area, visit our website at www.vulcanhart.com
VULCAN-HART
DIVISION OF ITW FOOD EQUIPMENT GROUP, LLC
WWW.VULCANHART.COM
ML-52947
ML-52948
ML-52950
ML-52951
ML-52952
ML-52954
ML-114553
ML-114554
ML-114555
ML-114557
ML-52949
ML-52953
ML-114957
ML-114556
INSTALLATION &
OPERATION MANUAL
MODEL VG36
P.O. BOX 696, LOUISVILLE, KY 40201-0696
MODEL 36L
TEL. (502) 778-2791
F-31055 Rev. E (04-05)
Advertisement
Table of Contents

Related Manuals for Vulcan-Hart 148L


Summary of Contents for Vulcan-Hart 148L
- Page 1 ML-114957 VG160 ML-114556 MODEL 36L For additional information on Vulcan-Hart or to locate an authorized parts and service provider in your area, visit our website at www.vulcanhart.com VULCAN-HART P.O. BOX 696, LOUISVILLE, KY 40201-0696 DIVISION OF ITW FOOD EQUIPMENT GROUP, LLC TEL.
-
Page 2: Important For Your Safety
IMPORTANT FOR YOUR SAFETY THIS MANUAL HAS BEEN PREPARED FOR PERSONNEL QUALIFIED TO INSTALL GAS EQUIPMENT, WHO SHOULD PERFORM THE INITIAL FIELD START-UP AND ADJUSTMENTS OF THE EQUIPMENT COVERED BY THIS MANUAL. POST IN A PROMINENT LOCATION THE INSTRUCTIONS TO BE FOLLOWED IN THE EVENT THE SMELL OF GAS IS DETECTED. -
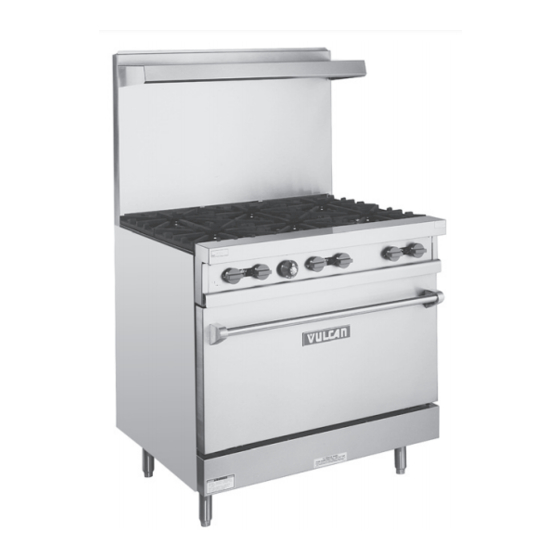
Page 3: Gas Restaurant Range Models
160L, 160LC 260L, 260LC, 260LCC VG60 VG160 VG260 48L/VG48 481L, 481LC 148L, 148LC 36L, 36LC VG36 VG24 PL-53007 NOTE: References to 90 Series Convection Ovens will include only the following models: 36LC, *148LC, 481LC, 60LC, 60LCC, *160LC, 260LC or 260LCC. -
Page 4: Installation
Vulcan ranges and ovens are produced with quality workmanship and material. Proper installation, usage and maintenance of your range will result in many years of satisfactory performance. Vulcan-Hart suggests that you thoroughly read this entire manual and carefully follow all of the instructions provided. -
Page 5: Installation Codes And Standards
Ranges Mounted on Casters Ranges mounted on casters must use a flexible connector (not supplied by Vulcan) that complies with the Standard for Connectors for Movable Gas Appliances, ANSI-Z21.69 • CSA 6.16 and a quick-disconnect device that complies with the Standard for Quick-Disconnect Devices for Use With Gas Fuel, ANSI-Z21.41 •... - Page 6 Bumper Bars (Convection Oven Ranges Only) CAUTION: Failure to install bumper bars may cause motor damage and will void the warranty. Remove existing #10 screws. Position bumper bars (supplied) as shown. Replace #10 screws and secure bumper bars (Fig. 2). REAR VIEW OF RANGE NOTES: 1.
- Page 7 NOTE: If a brick has been broken into two pieces, it can still be used. Just place the pieces into position as shown in Fig. 4. However, if a brick is broken into more than two pieces, it will need to be replaced. Contact your local Vulcan servicer. Fig. 4 2.
- Page 8 Installation of Thermostat Bulb and Capillary The thermostat bulb and capillary are located underneath the griddle plate. 1. Uncoil a few turns (only enough to reach into the V-baffle) of the bulb and capillary assembly for each griddle thermostat (Fig. 5). Fig.
- Page 9 NOTE: If a brick has been broken into two pieces, it can still be used. Just place the pieces into position as shown in Fig. 4. However, if a brick is broken into more than two pieces, it will need to be replaced. Contact your local Vulcan servicer. 2. Rest the hot top plate in a secure area.
- Page 10 Backsplash Component Parts MODELS *48L, 481L, & *148L 60L & *160L 24L/VG24 36L/VG36 *VG48 VG60/*160 260L/VG260 Std. 23" (584 mm) High Std. 23" (584 mm) High Std. 23" (584 mm) High Std. 23" (584 mm) High Std. 23" (584 mm) High...
- Page 11 6. Install eight #10 sheet metal screws (4 to each channel leg) (Fig. 12). Fig. 12 7. From the front, install four -20 x 2 " (59 mm) long machine screws and secure bolts with locknuts. Do not tighten the screws all the way down. Leave about "...
-
Page 12: Gas Connections
LEVELING Check the leveling of the range. Place a carpenter’s level inside the oven cavity across the oven rack(s). Level front-to-back and side-to-side. To adjust the leveling, tilt the range to one side and, using channel locks, unscrew the adjustable leg insert as required. -
Page 13: Testing The Gas Supply System
Fig. 15 WARNING: PRIOR TO LIGHTING, CHECK ALL JOINTS IN THE GAS SUPPLY LINE FOR LEAKS. USE SOAP AND WATER SOLUTION. DO NOT USE AN OPEN FLAME. After piping has been checked for leaks, all piping receiving gas should be fully purged to remove air. Before operation, verify thermocouple is securely seated in the safety valve. - Page 14 ELECTRICAL CONNECTIONS (CONVECTION OVEN MODELS [90 SERIES] ONLY) WARNING: ELECTRICAL AND GROUNDING CONNECTIONS MUST COMPLY WITH THE APPLICABLE PORTIONS OF THE NATIONAL ELECTRICAL CODE AND/OR OTHER LOCAL ELECTRICAL CODES. WARNING: DISCONNECT THE ELECTRICAL POWER TO THE MACHINE AND FOLLOW LOCKOUT / TAGOUT PROCEDURES. WARNING: APPLIANCES EQUIPPED WITH A FLEXIBLE ELECTRIC SUPPLY CORD ARE PROVIDED WITH A THREE-PRONG GROUNDING PLUG.
-
Page 15: Operation
OPERATION WARNING: THE RANGE AND ITS PARTS ARE HOT. BE VERY CAREFUL WHEN OPERATING, CLEANING OR SERVICING THE RANGE. CONTROLS THERMOSTAT DIAL - STANDARD OVEN — Allows operator to regulate oven temperature from low to 500°F (260°C). THERMOSTAT DIAL - CONVECTION OVEN — Snap-acting type control which allows operator to regulate oven temperature from 150°F to 500°F (65.5°C to 260°C). -
Page 16: Lighting And Shutting Down Pilots
LIGHTING AND SHUTTING DOWN PILOTS All adjustment procedures associated with pilot lighting must be performed by an authorized Vulcan-Hart installation or service person. HOT TOP AND GRIDDLE TOP BURNERS 1. Turn main gas supply ON. 2. Wait 30 seconds and, using a taper, light the hot top or griddle top pilot (Fig. 16). -
Page 17: Open Top Burners
OPEN TOP BURNERS 1. Turn main gas supply ON. 2. Wait 30 seconds and, using a taper, light the open top pilot (Fig. 17). Fig. 17 3. If pilot fails to light, turn main gas supply OFF. Wait 5 minutes and repeat the above procedures. 4. -
Page 18: Standard Oven
STANDARD OVEN Light open top/griddle pilots before lighting oven pilot. 1. Open kick panel and lift up the pilot lighting hole cover (Fig. 18). Fig. 18 Fig. 19 2. Light pilot by depressing the reset button located behind the kick panel (Fig. 19). Continue to hold reset button in for 1 minute. - Page 19 CONVECTION (SNORKEL ® ) OVEN (90 SERIES ONLY) Light open top/griddle pilots before lighting oven pilot. 1. Open the kick panel and lift up the pilot lighting hole cover (see Fig. 18). 2. Turn red gas valve ON (located behind the kick panel), purging the gas line of all air (Fig. 21). Turn gas valve and power switch OFF.
- Page 20 ® CONVECTION (SNORKEL ) OVEN WITH SPARK IGNITION (FIG. 23) THERMOSTAT ROCKER KNOB SWITCH TOP SECTION THERMOSTAT BURNER KNOB LIGHT OVEN "ON" OVEN READY PL-53530 LIGHT LIGHT Fig. 23 1. Move rocker switch to ON position (oven ON light will illuminate). The oven pilot will automatically light.
- Page 21 The standard oven has two rack positions and is supplied with one oven rack. Additional racks may be obtained through a Vulcan-Hart parts depot. For best results when baking cakes and pastries, it is recommended that only a single rack position be utilized.
-
Page 22: Inserting And Removing Standard And Convection Oven Racks
INSERTING AND REMOVING STANDARD AND CONVECTION OVEN RACKS The oven rack has a stop to keep the rack from being pulled all the way out when unloading product. To install rack, place rack along side of top of side liner runners and slide rack completely to the rear of the oven compartment until rack drops into place (Fig’s. -
Page 23: Loading And Unloading Standard And Convection Ovens
PREHEATING Standard Oven Turn thermostat control to the desired cooking temperature and preheat oven for 25 minutes. To save on gas consumption, do not operate oven at maximum heat when it is not necessary. Turn thermostat down to 250°F (121°C) or OFF when oven is not in use or during idle cooking periods. Convection Oven (90 Series Only) With power switch in the ON position, turn oven thermostat knob to the proper cooking temperature and allow oven to preheat for 15 minutes. -
Page 24: Cooking Chart
COOKING CHART Recommended temperatures and times are intended as a guide only. Adjustments must be made to compensate for elevation, variations in recipes, ingredients, preparation and personal preference on product appearance. Meat roasting is most satisfactory at temperatures of 225°F to 325°F (107°C to 162.7°C) for beef, lamb, poultry and ham, and 325°F (162.7°C) for fresh pork as recommended by USDA and American Meat Institute. - Page 25 APPROXIMATE TIME PRODUCT TEMPERATURE (MIN.) Angel or Sponge Cakes Sheet pans 18 x 26 x 1" (457 x 660 x 25 mm) Scaled 5-6 lbs. (2.3-2.7 kg) per pan 300 to 325°F/148.9 to 162.8°C 15 to 20 315 to 340°F/157.2 to 171°C 20 to 30 Loaf or Tube Pans 350 to 400°F/176.7 to 204.4°C...
- Page 26 OVEN BROILING OR FRYING APPROXIMATE TIME PRODUCT TEMPERATURE (MIN.) Hamburger Patties 8 per lb. (0.5 kg) - Med. well done 400 to 450°F/204.4 to 232.2°C 5 to 6 6 per lb. (0.5 kg) 400 to 450°F/204.4 to 232.2°C 7 to 10 4 per lb.
- Page 27 MISCELLANEOUS PRODUCTS APPROXIMATE TIME PRODUCT TEMPERATURE (MIN.) Baked Potatoes 120 count per 50 lbs (22.7 kg) 400 to 450°F/204.4 to 232.2°C 25 to 35 100 count per 50 lbs. (22.7 kg) 400 to 450°F/204.4 to 232.2°C 35 to 45 80 count per 50 lbs. (22.7 kg) 400 to 450°F/204.4 to 232.2°C 40 to 60 Pizzas...
- Page 28 ® Do not use scouring powder. It is extremely difficult to remove completely. It can build up accumulations that will damage the oven. Vulcan painted surfaces may be cleaned using a soft cloth and mild detergent solution. RANGES Daily Remove nickel-plated racks and clean in a sink.
-
Page 29: Griddle Plate
CONVECTION OVENS (90 SERIES) ONLY The Snorkel tube opening must be kept clear from blockage. If usage of aluminum foil is a common practice during the operation of this oven, be sure to periodically check the Snorkel tube for foil particles. Clean this tube with standard oven cleaner at least once a week. -
Page 30: Maintenance
When cool, the vent should be checked every six months for obstructions. SERVICE AND PARTS INFORMATION To obtain service and parts information concerning this model, contact the Vulcan-Hart Service Agency in your area (refer to our website, www.vulcanhart.com for a complete listing of Authorized Service and Parts depots). -
Page 31: Troubleshooting Guide
TROUBLESHOOTING GUIDE STANDARD AND CONVECTION OVEN RESTAURANT RANGE OVEN PROBLEM CAUSES 1. Too much bottom heat a) Insufficient ventilation b) Improper fluing 1a. Too low temperature c) Improper thermostat bypass setting 1b. Side burning d) Thermostat out of calibration 1c. Too much top heat e) Fluctuating gas pressure 2. - Page 32 — 32 — F-31055 Rev. E (04-05) PRINTED IN U.S.A.
- Page 33 — — É.-U. IMPRIMÉ (04-05) Rév. F-31055...
- Page 34 — — obstruée principal brûleur d’allumage Lumière obstrué veilleuse Injecteur réglé air-gaz Rapport insuffisante Entrée allumage Mauvais grandes trop marmites Casseroles ouverte restée four Porte figés cuisson surface Robinets ajustée Porte chaude excessivement robinet Poignée ventilation Mauvaise brûleur combustion Mauvaise CUISSON SURFACE BRÛLEURS...
-
Page 35: Entretien
Lors www.vulcanhart.com) l’adresse à site notre visiter autorisées, pièces l’entretien service succursales complète liste (pour près plus Vulcan-Hart l’entretien service avec communiquer rechange, pièces renseignements obtenir pour l’appareil l’entretien Pour RECHANGE PIÈCES L’ENTRETIEN SERVICE obstrué. n’est d’évacuation conduit s’assurer... - Page 36 — — surface. toute graisse couche épaisse d’une l’enduire prolongée, période pour frire à plaque d’éteindre Avant adhèrent. aliments éviter pour rouille qu’elle pour d’huile l’aide à cuisson surface nouveau à apprêter détergent, tout enlevé avoir Après surface. demeure détergent trace qu’aucune important...
- Page 37 Enlever évier. dans laver nickelées grilles Sortir quotidien Nettoyage CUISINIÈRES doux. détergent d’un chiffon d’un moyen nettoie Vulcan appareils peinte surface four. d’endommager risque s’accumuler, peut difficilement très s’enlève Elle récurer. à poudre utiliser cuisinière. intérieurs extérieurs...
- Page 38 — — savoureuse. apparence leur conservent produits réduits trouvent s’en inférieures grilles tartes débordement risques manipuler, à faciles plus sont tartes mieux, cuisent tarte fonds Ainsi, brioches. à moule dans tôle dans quatre trois groupe mettre pulsé, à four dans tartes cuisson Pour...
- Page 39 — — à 400) à (350 204,4 à 176,7 Surgelés à 400) à (350 204,4 à 176,7 profondeur Jusqu’à aluminium plats Ramequins à 375) à (325 190,5 à 162,8 profondeur à à à 375) à (325 190,5 à 162,8 profondeur à...
- Page 40 — — à 385) à (335 à 168,3 maïs farine à Muffins à 400) à (335 204,4 à 168,3 à à Poids à 400) à (335 204,4 à 168,3 à à Poids: Moule maïs Pain à 375) à (325 190,5 à...
- Page 41 — — plaque Poids (350) 176,7 gâteaux à Plaque plaque Poids (350) 176,7 gâteaux à Plaque conventionnel) (Four Gâteaux MINUTES (°F) °C TEMPÉRATURE PRODUIT CUISSON APPROX. TEMPS PÂTISSERIES POUR RECOMMANDÉS QUANTITÉS CUISSON TEMPS TEMPÉRATURES, à (350) 176,7 à à – viande Pain (300)
- Page 42 — — lot. prochain préchauffage temps réduire chaleur conserver permettra four rapide déchargement four. décharger pour cuisinière autour d’espace suffisamment Prévoir requis. cuisson temps pour recette consulter porte Fermer liquide. déverser soin bien Prendre chaleur. conserver pour possible rapidement plus four charger porte...
- Page 43 — — Fig. 26). (Fig. tirer ensuite pour glissière retrouve crochet pour l’arrière soulevant soit inverse, l’ordre dans procéder grille, enlever Pour Fig. Fig. 25). (Fig. place tombe qu’elle jusqu’à cuisson l’enceinte fond glisser glissière chaque grille placer installer, Pour chargement.
- Page 44 à c’est Toutefois, fournée. grille seule qu’une n’utiliser recommandé pâtisseries, gâteaux cuisson lors résultats meilleurs obtenir Pour Vulcan-Hart. pièces service auprès additionnelles grilles procurer possible grille. comporte four Chaque cuisson. enceinte d’aliments grilles deux maximum cuire peut...
- Page 45 — — principal. robinet Fermer (arrêt). position à bascule à l’interrupteur Pousser complet Arrêt (arrêt). position à bascule à l’interrupteur Pousser nocturne Arrêt chaleur. l’arrivée commande qu’il (marche) à être doit pulsé à four thermostat s’allume, four veilleuse Pour chaleur.) l’arrivée commande thermostat...
- Page 46 — — d’alimentation. cordon Débrancher principal. robinet Fermer inférieur). panneau (derrière rouge robinet Fermer tension. hors général l’interrupteur Mettre complet Arrêt degré. à thermostat régler général l’interrupteur Éteindre nocturne Arrêt désirée. température à thermostat régler général l’interrupteur allumer allumée, veilleuse fois étapes reprendre...
- Page 47 — — Fig. principal. robinet Fermer (MARCHE) «ON» (PRÊT) «READY» (arrêt). position à bascule à l’interrupteur Pousser PL-53531 FOUR VOYANT FOUR VOYANT LIGHT LIGHT "READY" OVEN "ON" OVEN complet Arrêt (arrêt). position à bascule à l’interrupteur Pousser nocturne Arrêt désirée. température à...
- Page 48 — — principal. robinet Fermer allumée. demeure veilleuse brûleur; robinet Fermer complet Arrêt allumée. demeure veilleuse brûleur; robinet Fermer nocturne Arrêt circuler. à commence dès robinet Fermer gaz. conduite dans contenu l’air évacuer pour brûleurs d’un robinet Ouvrir étapes reprendre minutes cinq Attendre...
- Page 49 Ancien 16). (Fig. bougie d’une l’aide à bouillir à frire à plaque veilleuse allumer puis secondes, Attendre principal. robinet Ouvrir BOUILLIR À FRIRE À PLAQUES veilleuses. l’allumage à trait ayant réglages procéder doit autorisé Vulcan-Hart technicien Seul VEILLEUSES EXTINCTION ALLUMAGE...
- Page 50 — — miroitante. lisse soit surface jusqu’à soit reprises, trois deux à manoeuvre Reprendre d’huile. surplus essuyer puis film, mince obtenir à manière plaque surface toute l’étendre isolé, chiffon d’un l’aide À carré. pied cuisson d’huile once verser température basse à...
- Page 51 — — faits. été n’auront raccordements tous tant électrique l’alimentation établir moteur. près châssis l’arrière apposé été câblage schéma ci-joint). câblage schéma (voir rigides fils raccordement d’un fonction fabriqués sont électriques systèmes Tous fin. cette à fournie cosse l’aide à terre à...
- Page 52 — — 02269. Quincy, Park, Batterymarch Association, Protection Fire National auprès exemplaire procurer peut dont cuisson appareils provenant fumée graisse chargées vapeurs dispersion à relative édition) (dernière n° NFPA norme dans comprises sont ventilation hottes l’installation construction informations ventilation. hotte filtres l’appareil d’évacuation...
- Page 53 — — fonctionnement. à nuire pour pression régulateur fuites limiteur obstruer gaz. pression l’excès l’échappement permettant fuites limiteur d’un muni régulateur Chaque l’appareil. approprié fonctionnement assurer pour d’échappement pression nouveau à régler position, autre dans trouve S’il appropriée. d’échappement pression s’assurer pour l’horizontale...
- Page 54 — — Fig. Fig. place. tablette fixer pour quatre Serrer 14). (Fig. têtes l’accrocher pour tablette Lever 13). (Fig. chaque pour (1/4 d’environ Maintenir maximum. serrer contre-écrous. moyen boulons solidement fixer longueur 5/16 1/4-20 métaux à quatre poser l’appareil, l’avant Fig.
- Page 55 (48L) thermique Écran thermique Écran thermique Écran dosseret Profilé d’évacuation conduit Profilé dosseret Profilé dosseret Profilé dosseret Profilé hauteur hauteur hauteur hauteur hauteur Dosseret Dosseret Dosseret Dosseret Dosseret 260L/VG260 VG60/*160 *VG48 36L/VG36 24L/VG24 *160L *148L 481L *48L, MODÈLES dosseret Composants...
- Page 56 Mettre sécuritaire. endroit dans bouillir à plaque Ranger près. plus Vulcan pièces service avec Communiquer remplacée. être devra elle morceaux, plusieurs cassée brique Cependant, Fig. à qu’illustrés tels morceaux simplement Placer utilisée.
- Page 57 — — l’appareil. fonctionner faire avant frire à plaque apprêter Nettoyer (Fig. brique déflecteur surface sous trouve capillaire excès tout S’assurer cuisinière. plat à bien repose qu’elle jusqu’à frire à plaque abaisser soigneusement aligner capillaire, bulles briques installé avoir Après Fig.
- Page 58 Mettre sécuritaire. endroit dans ranger frire à plaque Soulever Fig. près. plus Vulcan pièces service avec Communiquer remplacée. être devra elle morceaux, plusieurs cassée brique Cependant, Fig. à qu’illustrés tels morceaux simplement Placer utilisée.
- Page 59 — — Fig. l’étape à décrit centraux brûleurs 1/16 briques l’installation pour manière même Procéder (Fig. brique dernière facilement déposer pouvoir afin l’arrière vers possible plus brique chaque Pousser rebords. mêmes reposent qu’elles pour plat à déposer brûleur. chaque rebord entre glisser puissent...
- Page 60 • ANSI-Z21.41 norme exigences satisfaisant CONDUITE RETENUE rapide débranchement à raccord d’un CSA6.16 • ANSI-Z21.69 DISPOSITIF FIXER norme à conforme Vulcan) fourni (non flexible raccordement tuyau d’un pourvus être doivent roulettes appareils roulettes Appareils ASSEMBLAGE 5N6. Canada Ontario, Mississauga, 100,...
- Page 61 Lors appareil. proximité à trouver doit combustible substance Aucune EMPLACEMENT Vulcan-Hart. Compagnie détaillant avec tarder sans communiquer l’appareil installer pas, correspondent S’ils inférieur. panneau l’intérieur trouvant signalétique plaque spécifications correspondent l’immeuble...
- Page 62 260LC *160LC, 60LCC, 60LC, 481LC, *148LC, 36LC, modèles pour série pulsé à fours Références NOTA PL-53007 VG24 VG36 36LC 36L, 148LC 148L, 481LC 481L, 48L/VG48 VG260 VG160 VG60 260LCC 260LC, 260L, 160LC 160L, 60LCC 60LC, 60L, RESTAURANTS POUR CUISINIÈRES MODÈLES...
- Page 63 — — APPAREIL. FONCTIONNER FAIRE COURANT, PANNE ENTRETIEN. TOUT INSTALLATION TOUTE À PROCÉDER AVANT D’ENTRETIEN FONCTIONNEMENT D’INSTALLATION, INSTRUCTIONS LIRE MORT. MÊME BLESSURES MATÉRIELS, DOMMAGES CAUSER PEUVENT APPAREIL INCORRECTS L’ENTRETIEN MODIFICATION RÉGLAGE, L’INSTALLATION, AVERTISSEMENT APPAREIL. AUTRE TOUT APPAREIL PROXIMITÉ À INFLAMMABLE VAPEUR LIQUIDE AUTRE...
- Page 64 ML-114957 VG48 ML-52953 160L ML-52949 VG36 MODÈLE CATALOGUE DANS INCLUS ÉTAIENT SUIVANTS MODÈLES ANCIENNEMENT, ML-114557 VG260 ML-114555 VG60 ML-114554 VG36 ML-114553 VG24 ML-52954 260L ML-52952 ML-52951 148L ML-52950 481L ML-52948 ML-52947 MODÈLES SÉRIES RESTAURANTS POUR CUISINIÈRE D’EMPLOI MODE D’INSTALLATION MODE...
Need help?
Do you have a question about the 148L and is the answer not in the manual?
Questions and answers