
Related Manuals for Viliv X70EX


Summary of Contents for Viliv X70EX
- Page 1 Mobile Internet Device User’s Manual This guide may be changed for product improvement without prior notice.
- Page 2 Thanks for purchasing viliv. Please read the precautions throughly before using the product.
- Page 3 Grade B Device (Broadcast Communication Device for Residential Area) Registered Trademark viliv is the registered trademark of Yukyung Technologies Corp. Windows 2000, Windows XP and Windows CE are the registered trademarks of Microsoft Corporation. Liability Disclaimer...
-
Page 4: Table Of Contents
Contents Safety Precautions for Use ‥‥‥‥‥‥‥‥‥‥‥‥‥ 4 Names of Parts ‥‥‥‥‥‥‥‥‥‥‥‥‥‥‥‥‥‥ 7 Basic Components ‥‥‥‥‥‥‥‥‥‥‥‥‥‥‥‥‥‥‥‥‥7 Top/Front Side ‥‥‥‥‥‥‥‥‥‥‥‥‥‥‥‥‥‥‥‥‥ 8 Left/Right View ‥‥‥‥‥‥‥‥‥‥‥‥‥‥‥‥‥‥‥‥‥ 9 Rear View ‥‥‥‥‥‥‥‥‥‥‥‥‥‥‥‥‥‥‥‥‥‥‥ 10 Installation and Cable Connection ‥‥‥‥‥‥‥‥‥‥ 11 Power Connection (Charging Adaptor) ‥‥‥‥‥‥‥‥‥‥‥ 11 USB Data Link Connection ‥‥‥‥‥‥‥‥‥‥‥‥‥‥‥‥ 12 USB Connection ‥‥‥‥‥‥‥‥‥‥‥‥‥‥‥‥‥‥‥‥‥... -
Page 5: Safety Precautions For Use
Safety Precautions for Use The precautions below are provided to prevent bodily injury or property damage by using this product correctly. Please observe the precautions. Precautions on Power Do not touch the power adapter with wet hands. ■ Plug the power cord into an outlet with grounded jack. ■... - Page 6 Safety Precautions for Use Warning Please observe the instructions below. Failure to do may cause heating, fire, explosion, etc. If the battery can be seen to be swollen, there may be space. ■ imminent danger. Immediately contact the manufac- Do not allow metal products, such as a necklace, coil, ■...
- Page 7 Safety Precautions for Use The device functions vary depending on model. Read the relevant precautions for the provided function before using the device. Precautions for GPS When initially operating this device, it is recommended you warm it up for over 15 ■...
-
Page 8: Names Of Parts
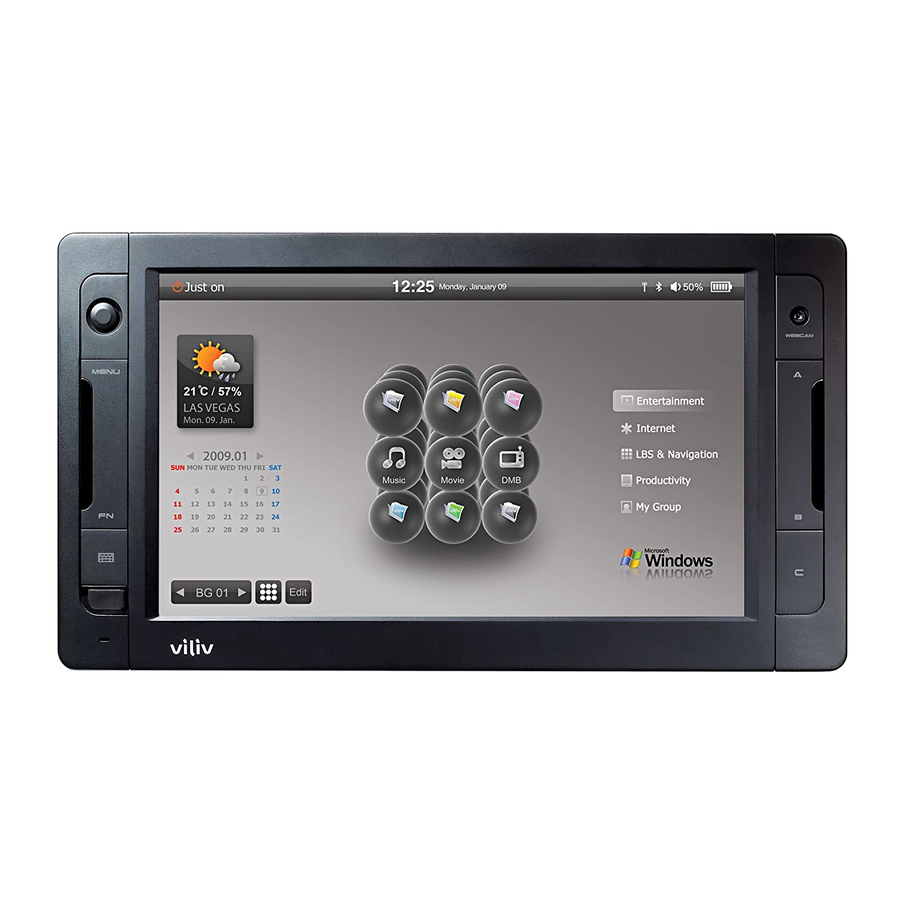
Names of Parts The appearance of the components below may differ from the actual components and some components are subject to change. Basic Components Main Body Standard Removable Battery AC/DC Power Adapter Stylus Pen (embedded in the main body) USB Cable User’s Manual English... -
Page 9: Top/Front Side
Jog Dial It is used to move in Up↑/Down↓/Left←/Right→ direction on screen. Menu Button Moves to main menu. BIOS Mode F8 (Advance Win XP Mode) Win XP Mode Virtual Keyboard Activates viliv virtual keyboard. WEBCAM Equipped with a web camera. BIOS Mode Win XP Mode OK (Left mouse button) -
Page 10: Left/Right View
Names of Parts Left/Right View USB Data Link It is used to connect a terminal computer. USB Port It is used to connect another external device with a USB cable. SD Card Slot It is used to insert an SD/SDHC card. Multi I/O Port It is used with external video out (Component, composite and S-Video) and to connect an extension I/O pack. -
Page 11: Rear View
Names of Parts Rear View The figure below shows the rear side of the main body without the battery. (Refer to Page 13 for Separating/Attaching battery.) RESET DC 9.5V Rack Connection It is used to connect a device rack. Battery Charging Port Connection part of battery terminal. Connection Part of Battery Terminal Mounting slot for USIM card (Refer to Page 14 for inserting/extracting an USIM card.) Separating/Attaching Battery Push the battery downward to separate the battery, as shown... -
Page 12: Installation And Cable Connection
Installation and Cable Connection The connections of external devices may vary in accordance with products. Power Connection (Charging Adaptor) The charger is connected to the power adapter terminal on the left side of the station. Notice Power Status Indicator: Power Off / Standby Mode / Max. Power Saving Mode ... -
Page 13: Usb Data Link Connection
Installation and Cable Connection The connections of external devices may vary in accordance with products. USB Data Link Connection A USB cable is connected to the USB Data Link port on the right side of the station. USB Connection This is used for the connection of external devices, such as digital camera, external HDD, etc. English... -
Page 14: Separating·attaching Battery
Separating · Attaching Battery Separating Battery Depress the Battery Separation/Lock button on the rear of the station in direction as shown in the figure. Slightly push the battery up in the battery separation groove and then separate the battery. Notice Separate the charger after turning the power of the station off. -
Page 15: Inserting·extracting Usim Card
Separating · Attaching Battery Inserting · Extracting USIM Card How to Insert Let the front of a USIM card face the USIM card slot and then push it in the arrow direction until a click sound is heard. (If, however, you push the USIM card using too much force, the card may be damaged.) How to Extract Since this device adopts a one-touch method, you may gently press on the... -
Page 16: Basic Operation
Basic Operation Turning the Power On/Off Turning the Power On To turn the power on, move the Power button on the top of the station to the left. The LCD screen turns on and the main screen is displayed. Turning the Power Off If Windows OS is running, turn the power off with the Turn the Power menu on the Start menu. -
Page 17: Jog And Function Buttons
Basic Operation Jog and Function Buttons The Jog key has different functions in accordance with the program functions. Up↑/Down↓/Left←/Right→ Move ( / / / ) This is the button to move in Up↑/Down↓/Left←/Right→ direction on screen. Selection (Center Key of the Direction Keys) Enter button MENU It is used to move to the main menu. -
Page 18: Running Virtual Keyboard
Press the Virtual Keyboard button on the device to exit the Virtual Keyboard. Set Up for villv Manager viliv Manager is executed by double touching vilivManager on the screen. Wireless LAN Power Turn on/off self-powered wireless LAN function. Camera Power Turn on/off self-powered Camera function. -
Page 19: Using For The First Time
Using for the First Time Using for the First Time For each Windows installation process, the installation time may vary depending on the process. Please wait until the installation is complete. Along with the start of Microsoft Windows XP Home, the preparation screen for starting Windows appears as in the following figure. - Page 20 Using for the First Time The screen related to automatic update appears. After the selection, click next. The screen to assign the computer name appears. To do this, an external keyboard is needed. If you don’t have an external keyboard, you can click next to assign the computer name, or you can open the video keyboard on Microsoft Utility Manager by pressing the menu...
-
Page 21: Recovery Solution (Ami Rescue) Guide
HDD of user cannot be booted from OS or it has problems. Way to Use Recovery Solution (AMI Rescue) Execution of Recovery Solution (AMI Rescue) If viliv logo appears when booting the system (BIOS POST), press the C key 1-2 times or F10 key if external keyboard is connected. -
Page 22: Specifications
Specifications The specifications below may be changed for enhancement of product performance without prior notice. General Specifications Product Name X70 EX CPU & Chipset Intel ® Atom 1.2 (Z515) / 1.33 (Z520) GHz + SCH US15W 7-type WSVGA (1024 x 600) / Touch panel Storage SSD 16GB / 32GB / 64GB / 128GB WWAN (Optional) - Page 23 Memo English...
- Page 24 Memo English...
- Page 25 Memo English...
- Page 26 Rev. 1.0...
Need help?
Do you have a question about the X70EX and is the answer not in the manual?
Questions and answers