Advertisement
Getting started
- Charge the Elvie Stride 2 Hub
Plug in the Hub for five minutes to wake it up before first use. Please note, Elvie Stride 2 does not turn on while it is charging. For more details, please read the charging section of this booklet. - Download the Pump with Elvie app
Download the Pump with Elvie app on your smartphone to make use of your pump's smart features:- Track sessions.
- Control Elvie Stride 2 remotely.
- Tailor to your pumping preferences.
The Pump with Elvie app can be downloaded from the Apple App Store (for iPhone)

or Google Play Store (for Android)

For the most up-to-date information on what devices the app can be used with please visit elvie.com/compatibility.
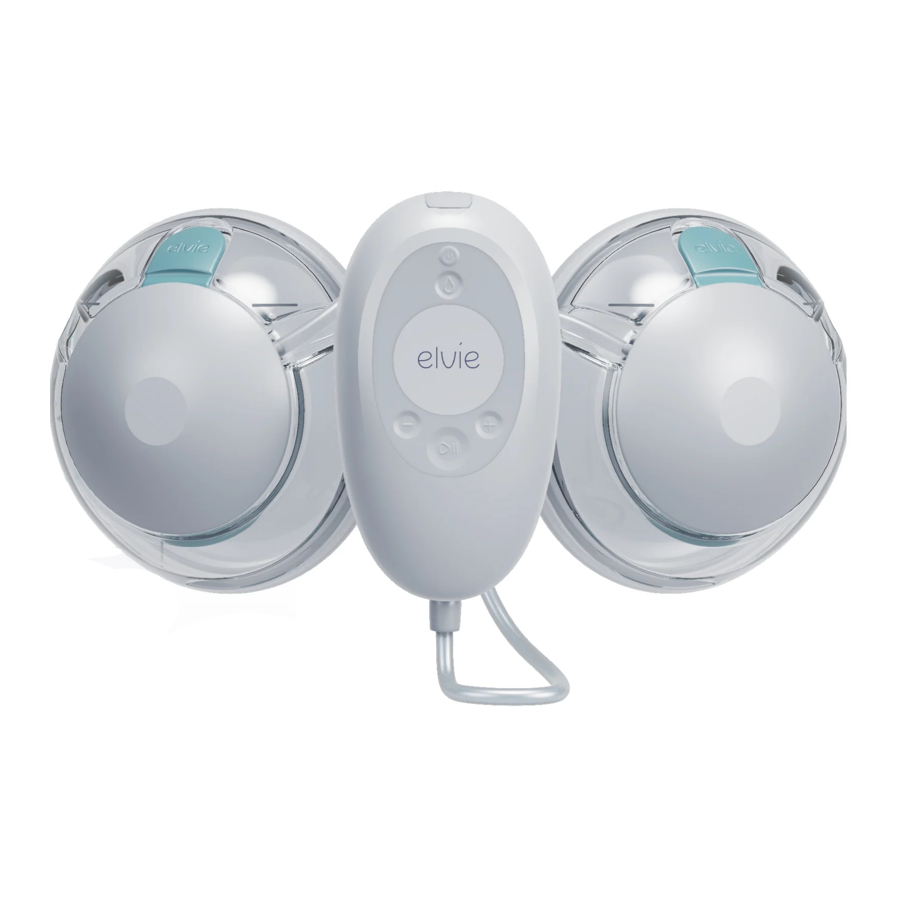
Parts
Product description
Elvie Stride 2 comprises of the parts and accessories shown below.
Non-washable components
Common components
*Neck Strap is also included in some models of Elvie Stride 2.

Elvie Stride 2 (Double) only
Contains 1 Cap and 1 Extra-long Tube

Contains 2 Caps, 1 Long Tube and 2 Short Tubes

Washable components
*2 included with Elvie Stride 2 (Double)
**5 sizes included

Controls

Intended use
Indications for use
Elvie Stride 2 is a powered breast pump to be used by lactating women to express and collect milk from their breasts. Elvie Stride 2 is intended for a single user.
Operating life
The expected operating life of the replaceable, washable components is six months. It is recommended that you replace the washable components after long-term storage or before pumping for your next child.
Contraindications
Elvie Stride 2 is designed for a single user and should not be rented or shared.
Safety
Read all instructions before using. Elvie Stride 2 is not provided sterile. It must be cleaned and disinfected before first use (see the Cleaning section).
It is recommended that you consult with a licensed healthcare professional before using Elvie Stride 2 if you have an active implanted device that would be affected by a magnetic field (e.g. pacemaker, implantable cardioverter defibrillator).
When using electrical products, especially when children are present, basic safety precautions should always be maintained, including the following:
![]()
If you are a mother who is infected with Hepatitis B, Hepatitis C or Human Immunodeficiency Virus (HIV), expressing breast milk will not reduce or remove the risk of transmitting the virus to your baby through your breast milk.- Only use Elvie Stride 2 for its intended use as described in this manual.
- This is a single-user product. Use by more than one person may present a health risk and voids the warranty.
- Always ensure you are using the right sized Breast Shield or Nipple Insert. For assistance with correct sizing, please see the Pump with Elvie app section, or talk to a lactation consultant or breastfeeding specialist.
- Only use Elvie manufactured parts with Elvie Stride 2, including the Charging Cable; do not substitute. Use of accessories or cables other than those specified could result in irreversible damage to your Hub.
- Always break the seal between the Cup and your nipple before removing Elvie Stride 2 from your breast.
- Do not pump until after giving birth, as breast pumping can induce labor. If you become pregnant while breastfeeding or breast pumping, consult with a licensed healthcare professional before continuing.
- Using a breast pump should not cause pain. If excessive discomfort or pain is felt during pumping, stop pumping, use your finger to break the seal between your nipple and the pump, and discontinue the session.
- Do not try to express yourself with an intensity setting that is too high or uncomfortable. Contact your healthcare professional if you express minimal or no milk, or if expression is painful.
- If your breast becomes swollen, hot and/or painful, please seek immediate advice from your healthcare professional.
- If the package appears damaged, the tamper-proof tear strip is removed and/or otherwise tampered with before use, do not use and contact our Customer Care team via elvie.com.
- Never operate an Elvie Stride 2 if it has been damaged, is not working properly, or has been dropped into water. If damage is found, immediately discontinue use and contact our Customer Care team using the details at the front of the guide. In case of damage or wear, please replace parts.
- Always inspect all parts before use for damage, liquid and cleanliness and disinfect washable components that come into contact with your breast and breast milk prior to first use.
- Wash your hands thoroughly with soap and water before touching Elvie Stride 2, its components or your breasts. Avoid touching the inside of the Cup Fronts, the Breast Shields and Nipple Inserts.
- Regularly check that there is no residue or condensation in the Tubes. The Tubes must be completely dry before assembly; residue or condensation can be drawn into the Elvie Stride Hub, which could cause product failure. If there is milk in the Tubes discontinue use, check the Diaphragm for damage and contact Customer Care. If mold develops in the Tubes, discontinue use and replace.
- Only use drinking-quality tap water or bottled water for cleaning components that come into contact with milk.
- Do not immerse the Hub, Tubes, Tube Splitter or Cap in water or other liquids. It may be difficult to dry and may risk liquid being sucked into the Hub. Instead wipe with a clean paper towel or soft cloth after each use. The Hub should be disinfected with a low-level disinfectant such as ethyl or isopropyl alcohol (70-90%).
- Do not use harsh chemicals to clean the Breast Shield, Cup Front, Cup Seal, Valve, Diaphragm, or Nipple Inserts.
- Do not store wet or damp parts, as mold may develop.
- Clean all parts that come into contact with your breast and breast milk, and inspect for damage after every use.
- Do not drop or insert any foreign object into any openings on the Hub and always close the Charging Cap after charging.
- Elvie Stride 2 uses Bluetooth technology. Please follow airline rules for the use of portable electronic devices when flying. Furthermore, high altitudes, including while in a pressurized aircraft cabin, will affect the performance of Elvie Stride 2.
- Elvie Stride 2 operates within the 2.402-2.480GHz unlicensed ISM frequency band(s) and is limited to a maximum of 3dBm output power transmitted in the frequency band(s) in which the radio equipment operates.
- Portable and mobile frequency communications equipment can affect the breast pump.
- Elvie Stride 2 must only be used with chargers that are fully compliant with the relevant USB Specifications: USB 2.0 (5V, 500mA), USB 3.0/3.1 (5V, 900mA), USB Battery Charging (BC) 1.2 (5V, 1.5A). If you already have a charging adapter at home, we recommend checking that the output voltage / current or power is in the range stated above. The charging adapter should also contain a country specific standards mark such as:
![]()
- It is recommended to use an adapter compatible with both IEC 60601-1 and your regional power source and that it is double insulated (Class 2 electrical certification).
- Do not use flammable materials while using Elvie Stride 2 or connecting Elvie Stride 2 to a Charger.
- Elvie Stride 2 will not work when connected to the charger; always disconnect Elvie Stride 2 from the charger and close the Charging Port.
- Discontinue use if you notice a loss of power or if the fully charged battery lasts for less than two hours of continuous use. The battery is not replaceable.
- It is recommended that you keep your Elvie Stride 2 up to date by periodically switching it on and connecting to the Pump with Elvie app when not in regular use.
- Elvie Stride 2 and its components are not heat resistant. Keep away from heat sources.
- Do not expose Elvie Stride 2 or its components to direct sunlight.
- Do not place the Hub in the fridge or freezer.
- If stored at minimum or maximum storage temperature (see Product specifications), when removing from storage, please allow 24 hours for the pump to reach normal operating temperature before use.
- Do not use Elvie Stride 2 while sleeping or overly drowsy.
- Elvie Stride 2 is not to be used when lying down or sleeping to ensure proper orientation during use, whilst engaging in strenuous activities or performing activities with risk of harm such as operating heavy machinery. Do not pump while driving. Do not wear Elvie Stride 2 when not pumping.
- Do not attempt to reset the Hub during use.
- Close supervision is necessary when the breast pump or accessories are used in the vicinity of children. Parts of the breastpump may pose a risk of strangulation when being played with and small parts may be swallowed by children. Keep out of reach of children.
- Cup Front markings are for indication only.

Please visit elvie.com for troubleshooting advice, including alerts, warnings and how to factory reset Elvie Stride 2. Please keep a copy of these instructions for future reference.
Getting ready
This guide will show you how to assemble your pump and how to customize it to fit your body.
Charging
The Hub will not turn on while it is charging. It takes approximately two hours to fully charge the Hub, although this can vary depending on your charging set up. A full charge lasts approximately five 30 minute sessions. Only use the Charging Cable provided in the box.
Charge immediately after finishing your pumping session if low battery is indicated.
 Tip: Press the Mode button when the Hub is off; the Intensity Lights will show how much battery is left.
Tip: Close the Charging Port before use to ensure the Hub is as discreet as possible.
Disassembling Elvie Stride 2
 Note: The Hub, Tubes and Cap must be kept away from water.
- Remove the Cap.
- Pull the Breast Shield away from the Cup Front and remove the Nipple Insert.
- Pull the Valve out of the Cup Front, unplug the Stopper and remove the Diaphragm.
![]()

Cleaning
Before first use
Elvie Stride 2 is not provided sterile. It must be cleaned and disinfected before first use. Always disassemble the components before cleaning or disinfecting.
Non-washable components
The Hub, Cap, Tubes, Tube Splitter, Cover and Clip are non-washable components and should be kept dry. They must not be microwaved. They can be wiped clean with a clean paper towel or soft cloth after each use. The Hub should be disinfected with a low-level disinfectant such as ethyl or isopropyl alcohol (70-90%), but should not be submerged in water. If the tubes become moldy due to liquid entering them, discard and replace immediately.
Washable components
*2 included with Elvie Stride 2 (Double) only

Cleaning washable components that come into contact with milk, as soon as possible after pumping, prevents the build-up of dry milk residue. Residue can cause the growth of bacteria that may be harmful to you and your baby.
Cleaning (before first use and after every use)
Note: Do not place any of the parts directly in the kitchen sink for rinsing and washing. Please use a dedicated wash basin and brush for infant feeding.
- Rinse in cold, clear water.
- Wash in warm water using mild dishwashing soap.
- Rinse with cold, clear water for 10 to 15 seconds OR place on the top shelf of the dishwasher.
Tip: Ensure the small hole in the top of the Cup Front is kept clean and clear of milk build up at all times.
Disinfecting (before first use and subsequently once daily)
Cold water disinfection methods are known to preserve the longevity of your washable parts. Alternatively, you can place parts in boiling water for 5 minutes. Do not use microwave or steam disinfection methods.
Drying
Place parts on a clean surface and air dry completely before assembly.
Nipple Insert sizing
The Breast Shield and Nipple Insert creates a seal between your nipple and the pump so it's very important it fits well. Elvie Stride 2 (Single and Double) come with 28mm Breast Shield(s). If required for a better fit there are 15mm, 17mm, 19mm, 21mm and 24mm Nipple Inserts included.
To check your nipple size, use our Nipple Sizing Tool, which is included. Ensure your nipple is erect before measuring. Simply place your erect nipple in the hole so that it fits snugly.
You will need to repeat this process separately for each nipple. This ensures you have the correct sizing on each side. You might find that your nipple could fit two different sizes. If that's the case, it's a good idea to try pumping with each size to see which one works best for you.
Note: Do not measure directly after pumping or feeding. Always measure before.

Assembling Elvie Stride 2
Wash hands thoroughly before you begin. Once the parts have been cleaned and disinfected, make sure they are dry and not moldy before putting them together. Pay extra attention to the Diaphragm and Stopper, ensure it is completely dry.
- Push the Hub Connector firmly into the Hub, ensuring that it is fully inserted.
![]()
- Push the Valve into the Cup Front.
- Push the Diaphragm with Stopper onto the Cup Front then close the stopper.
![]()
- Use your fingers to work the Diaphragm rim over the Cup Front lip.
Take a moment to check the Diaphragm is sitting flush and on securely.

- Fit the Breast Shield over the Cup Front. Ensure it's sealed tightly all the way around and there are no gaps. The Cup Front should be fully covered by the lip of the Breast Shield. You can use a Nipple Insert here if needed.
![]()
- Check that the Diaphragm is completely dry as moisture can be sucked into the Hub. This affects the performance of your pump.
![]()
- Push the Cap over the Diaphragm onto the Cup Front, ensuring that the tube is aligned with either the left or the right channel.
- Attach the Hub to your clothing using the clip.


Single-side pumping with Elvie Stride 2 (Double)
To pump on one side with Elvie Stride 2 (Double), you only need one Short Tube that connects to one Cup. Remove the unused Short Tube from the Tube Splitter. Seal the opening with the Tube Splitter Stopper to ensure consistent suction on the one Cup in use.

Tip: Make sure the Tubes are not kinked or pinched flat
Using Elvie Stride 2
Turning on Elvie Stride 2
Once fully assembled, press Power to turn the Hub on. The intensity lights will begin to flash and will show the intensity setting that stimulation mode Breast Shield correctly aligned will start on. You can adjust the intensity setting before you start your session.
Aligning your nipple
All nipples are different and change throughout your pumping journey. We recommend resizing regularly for the best fit.
To ensure a comfortable and efficient pump you'll need to correctly align your nipples with the Nipple Insert/Breast Shield. Follow the direction of your nipples when putting the Breast Shield on.
To avoid discomfort, your nipple must also be positioned correctly in the Nipple Tunnel before pumping. To do this:
- Align your nipple to the centre of the assembled Cup, making sure that your nipple isn't touching the side of the tunnel and that the tip isn't obstructed.
Breast Shield incorrectly aligned:
![]()
Breast Shield correctly aligned:
![]()


- Bend over forwards whilst supporting your breast underneath with your hand. Bring the Cup to your breast, paying attention to the direction of your nipple.
![]()

Finding the right in-bra fit
Elvie Stride 2 needs to be firmly pressed against your breast. There should be no gaps between the Cups and your breasts.
Every bra has a different level of support, so make sure to get the pressure and fit right before each session. This is important because it can have an impact on milk volumes.
Starting your session
Once the Hub is turned on and the Cups are positioned in your bra, press Play/Pause to start pumping. If you need to pause pumping for any reason, press Play/Pause again.
Modes and intensity settings
Modes
Elvie Stride 2 has two modes: Stimulation and Expression. Elvie Stride 2 will always start in Stimulation mode. This is a faster pumping rhythm to stimulate milk let-down.
Elvie Stride 2 will automatically switch to Expression mode after approximately two minutes. You can also change modes in the app or on the Hub using the Mode button. When the Mode Light is illuminated, the pump is in Expression mode. This is a slower, stronger pumping rhythm for efficient milk expression.
Intensity settings
Elvie Stride 2 has ten intensity settings in Stimulation mode and ten intensity settings in Expression mode. This means you can adjust the pump to find a setting that feels comfortable and works efficiently in both Stimulation and Expression modes. Once you can feel the suction on your nipples, use the increase intensity and decrease intensity buttons to adjust the intensity to find your preferred setting in both modes. The Intensity Lights will illuminate to show your chosen setting.
You can save the intensity settings that you would like your pump to start in for both Stimulation and Expression mode by using the Personalize feature in the Pump with Elvie app. The app is free to download from the Apple App Store or Google Play Store.
Tip: A higher intensity setting does not always mean a higher volume of milk. Putting your nipple under excess stress or pumping if you are in pain can reduce milk production.
Tip: Make sure the Tubes are not kinked or pinched flat.
Automatic functions
- The Hub will automatically switch from Stimulation mode to Expression mode after two minutes.
- When the Hub is pumping, it will automatically pause after 40 minutes. It is recommended that you leave Elvie Stride 2 for 60 minutes before using it again.
- When the Hub is paused, it will automatically turn off if a button has not been pressed for five minutes.
- The Hub will automatically turn off if the battery is empty.
- The Hub will automatically turn off if a technical error occurs.
Ending your session
- While leaning forward, press Play/Pause to stop pumping. Turn off the pump by pressing and holding Power.
- Unclip your bra and use your finger to break the seal around your nipple to avoid nipple damage.
- Remove the Cap from the Cup.
- Remove the entire Cup from your bra.
- Keep the Cup upright.
- Unplug the Stopper to decant your milk.
- Pour milk out as shown below, sideways through the Pour Hole.
![]()
- Refer to the Cleaning section of this booklet for cleaning and disinfecting instructions.
- Please wait at least 60 minutes before pumping with Elvie Stride 2 again.

Storing your milk
- Do not store your milk in the Cup. Pour your milk into a breast milk storage bag or clean, food-grade, tightly sealed container made of glass or plastic, leaving an inch of space at the top of the container.
- Before storage, label storage container with the date the milk was expressed and child's name if delivering to childcare. Gently swirl the container to mix the cream part of the breastmilk that may rise to the top back into the rest of the milk. Do not shake the milk. This can make some of the milk's valuable parts break down.
- Place in the back of the fridge or freezer immediately after pumping if possible, or in an insulated cooler bag with ice packs for up to 24 hours if traveling. Freshly expressed or pumped milk is okay to use without being refrigerated for up to 4 hours. It should be frozen right away if it's not planned to be used within 4 days. Freeze milk in small amounts of 2-4 ounces to avoid wastage.
- Please see the latest CDC Guidelines for more information.
How to store Elvie Stride 2
Short-term storage
- Recharge immediately after finishing your pumping session if the Battery Light is on.
- Between sessions, please store your Elvie Stride 2 out of direct sunlight, away from sharp objects, and ensure that washable parts are kept clean and dry. Keep out of reach of children.
Tip: It's important that the components are kept dry in storage because mold may develop if moisture is present.
Long-term storage
- The washable parts will require cleaning and drying before long-term storage and should be stored away from direct sunlight to avoid discoloration.
- If stored at minimum or maximum storage temperature (see Product specifications), please allow 24 hours for the pump to reach normal operating temperature before use after removing it from storage.
- Fully charge before storing away and recharge every 6 months to increase the lifespan of your Elvie Stride 2.
Storage Conditions
- Temperature: -20°C to < 25°C or -4°F to 77°F.
- Relative humidity: 15 to 90%.
- Ambient pressure: 90 to 106 kPa.
Troubleshooting
Alerts and warnings
- Intensity Lights flashing – Elvie Stride 2 is paused.
- Battery Light flashes red four times – battery empty.
- All Intensity Lights illuminated – maximum intensity level reached.
- All lights flash then turn off – technical error (Contact Customer Care).
Factory reset
To perform a factory reset:
- Turn Elvie Stride 2 on.
- Press and hold both
![]() simultaneously for five seconds.
simultaneously for five seconds. - Play/Pause and Intensity Lights will flash while Elvie Stride 2 is resetting.
- All of the lights on your Hub will then turn off.
 simultaneously for five seconds.
Warranty
Elvie Stride 2 Limited Warranty
Please visit elvie.com/warranty or contact our Customer Care team for full warranty information.
Product specifications
Technical specifications


Additional help and support
The Pump with Elvie app can be downloaded from the Apple App Store (for iPhone)
or Google Play Store (for Android).
If you need any help with your Elvie Stride 2, please get in touch with our Customer Care team.
Visit elvie.com for their details.
Documents / Resources
References
![www.apple.com]() App Store - Apple
App Store - Apple![play.google.com]() Google Play
Google Play![elvie.com]() Compatibility
Compatibility![elvie.com]() Smarter technology for women | Elvie Trainer and Elvie Pump | Elvie
Smarter technology for women | Elvie Trainer and Elvie Pump | Elvie![elvie.com]() Warranty
Warranty
Download manual
Here you can download full pdf version of manual, it may contain additional safety instructions, warranty information, FCC rules, etc.
Advertisement


Need help?
Do you have a question about the Stride 2 and is the answer not in the manual?
Questions and answers