Advertisement
- 1 IMPORTANT SAFETY INFORMATION
- 2 EXPLANATION OF SYMBOLS USED
- 3 CHARGER SAFETY RULES
- 4 BATTERY CARE
- 5 EXTENSION CORDS
- 6 IMPORTANT CHARGING NOTES
- 7 BATTERY / CHARGER LIST
- 8 CHARGING BATTERY PACK
- 9 HEAT TOOL COMPONENTS
- 10 INTRODUCTION
- 11 SPECIFICATIONS
- 12 USING THE HEAT TOOL
- 13 USES
- 14 CLEANING AND MAINTENANCE
- 15 ACCESSORIES
- 16 PRODUCT REGISTRATION / DATE CODE LOCATION
- 17 PPODUCT SUPPORT
- 18 Documents / Resources
IMPORTANT SAFETY INFORMATION
Read all instructions and product labels. When using electrical tools, follow all precautions to reduce the risk of fire, electric shock, and other personal injury.
Read all safety information before operating the equipment.
SAVE THESE INSTRUCTIONS
To reduce the risks of fire or explosion, electrical shock and the injury to persons, read and understand all instructions included in this manual. Be familiar with the controls and proper usage of the equipment.
EXPLANATION OF SYMBOLS USED
 This symbol indicates a potential hazard that may cause serious injury or loss of life. Important safety information will follow.
Attention
This symbol indicates a potential hazard to you or to the equipment. Important information that tells how to prevent damage to the equipment or how to avoid causes of minor injuries will follow.
 Notes give important information which should be given special attention.
HAZARD: POISON
Extreme care should be taken when stripping paint. The peelings, residue and vapors of paint may contain lead, which is poisonous. Any paint applied to homes before 1950 is likely to contain lead. Any paint manufactured before 1977 may contain lead. Once the paint is deposited on surfaces, hand-to-mouth contact can result in the ingestion of lead. Exposure to even low levels of lead can cause irreversible brain and nervous system damage. Young and unborn children are particularly vulnerable to lead poisoning.
Before beginning any paint removal process you should determine whether the paint you are removing contains lead. This can be done by your local health department or by a professional who uses a paint analyzer to check the lead content of the paint to be removed. Lead-based paint should only be removed by a professional and should not be removed using a heat gun.
PREVENTION:
- Move the work piece outdoors. If this is not possible, keep the work area well ventilated. Open the windows and put an exhaust fan in one of them. Be sure the fan is moving the air from inside to outside.
- Remove or cover any carpets, rugs, furniture, clothing, cooking utensils and air ducts.
- Place drop cloths in the work area to catch any paint chips or peelings. Wear protective clothing such as gloves and safety glasses.
- Work in one room at a time. Furnishings should be removed or placed in the center of the room and covered. Work areas should be sealed off from the rest of the dwelling by sealing doorways with drop cloths.
- Children, pregnant or potentially pregnant women and nursing mothers should not be present in the work area until the work is done and all cleanup is complete.
- Wear a dust respirator mask or a dual filter respirator mask for dust and fumes which has been approved by the Occupational Safety and Health Administration (OSHA) the National Institute of Safety and Health (NIOSH), or the United States Bureau of Mines. These masks and replaceable filters are readily available at major hardware stores. Be sure that the mask fits properly. Beards and facial hair may keep masks from sealing properly. Change the filters often. Disposable paper masks are not adequate.
- Use caution when operating the heat gun. Keep the heat gun moving as excessive heat will generate fumes which can be inhaled by the operator.
- Keep food and drink out of the work area. Wash hands, arms and face and rinse mouth before eating or drinking. Do not smoke or chew gum or tobacco in the work area.
- Clean up all removed paint and dust by wet mopping the floors. Use a wet cloth to clean all walls, sills and any other surface where paint dust is clinging. Do not sweep, dry dust or vacuum. Use a high phosphate detergent of trisodium phosphate (TSP) to wash and mop areas.
- At the end of each work session, put the paint chips and debris in a double plastic bag, close it with tape or twist ties and dispose of properly.
- Remove protective clothing and work shoes in the work area to avoid carrying dust into the rest of the building. Wash work clothes separately. Wipe shoes off with a wet rag and then wash it with the work clothes. Wash hair and body thoroughly with soap and water.
HAZARD: EXPLOSION OR FIRE
This heat gun produces extremely high temperatures (as high as 1000˚ F). It must be used with caution to prevent combustible material from igniting.
PREVENTION:
- Keep the gun in constant motion. Do not stop or dwell in one spot.
- Use extreme caution if the other side of the material being scraped is inaccessible, such as house siding. Hidden areas such as behind walls, ceilings, floors, soff it boards and other panels may contain flammable materials that could be ignited by the heat gun when working in these locations. The ignition of these materials may not be readily apparent and could result in property damage and injury to persons. When working in these locations, keep the heat gun moving in a back-and-forth motion. Lingering or pausing in one spot could ignite the panel or the material behind it.
- Do not use near surfaces with cracks or near metal pipes or flashing. Heat may be conducted behind the work surface and ignite hidden material. The ignition of hidden materials may not be readily apparent and can result in property damage and injury.
- Do not use electric tools in the presence of flammable liquids or gases.
- Do not use near combustible materials such as dry grass and leaves which can scorch and catch fire.
- Use extreme caution when working near paper.
- The nozzle becomes very hot. Do not lay the heat gun on flammable surfaces when operating the gun or immediately after shutting the gun off. Always set the gun on a flat, level surface so that the nozzle tip is directed upwards and away from the supporting surface.
- Do not touch the nozzle until the tool has cooled.
- Do not use the heat gun as a hair dryer.
- Tools and paint scrapings become very hot. To avoid burns, use work gloves and eye protection when scraping.
- Always treat the heat gun with the same respect as an open flame.
- A fire may result if the appliance is not used with care, therefore:
- be careful when using the appliance in places where there are combustible materials;
- do not apply to the same place for a long time;
- do not use in presence of an explosive atmosphere;
- be aware that heat may be conducted to combustible materials that are out of sight;
- place the appliance on its stand after use and allow it to cool down before storage;
- do not leave the appliance unattended when it is switched on.
HAZARD: ELECTRIC
May cause property damage, severe injury or loss of life.
PREVENTION:
- Do not disassemble the heat gun.
- Do not work in wet areas or expose the heat gun to rain.
- Guard against electric shock by preventing body contact with grounded surfaces such as pipes, radiators, ranges, aluminum ladders or other grounded devices.
![]()
To reduce the risk of electric shock, do not expose this product to rain or moisture. Store indoors. Read instruction manual before using.
HAZARD: GENERAL
May cause property damage or severe injury.
PREVENTION:
- ALWAYS disconnect the heat gun from the power supply when not in use. Store indoors in a dry place and out of the reach of children.
- Keep your work area well lit and clean.
- Do not overreach, especially when working on ladders. Keep proper footing and balance at all times. Be certain any ladders being used are sturdy, stable, on a firm surface, or on firm ground and erected at safe working angles.
- Avoid power lines.
- Keep moveable items secured and steady while scraping.
- Always use protective eyewear when working.
- Stay alert and use common sense when operating any tool.
- NEVER use to thaw pipes through walls or near combustibles.
- This appliance is not intended for use by persons (including children) with reduced physical, sensory or mental capabilities, or lack of experience and knowledge, unless they have been given supervision or instruction concerning use of the appliance by a person responsible for their safety.
- Children should be supervised to ensure that they do not play with the appliance.
- Never point the heat tool at yourself, others or animals.

Some dust, peelings, residue, and vapors caused by paint removal activities contain chemicals known to the state of California to cause birth defects or other reproductive harm. An example of a chemical would be lead from lead-based paints (do not use a heat tool to remove lead-based paint). Your risk from exposure varies, depending on how often you do this type of work. To reduce your exposure to these chemicals: work in a ventilated area, and work with approved safety equipment, such as those dust masks that are specially designed to filter out microscopic particles. For more information, go to www.P65warnings.ca.gov
CHARGER SAFETY RULES
- SAVE THESE INSTRUCTIONS – This manual contains important safety and operating instructions for battery charger model GAL18V-40. Do not substitute any other charger.
- Before using battery charger, read all instructions and warning markings on (1) battery charger, (2) battery pack, and (3) product using battery.
- To reduce the risk of injury and fire, charge only rechargeable batteries listed on the Battery/ Charger List. Other types of batteries may burst causing personal injury and damage.
- Charge battery pack in temperatures above +32 degrees F (0 degrees C) and below +113 degrees F (45 degrees C). Store tool and battery pack in locations where temperatures will not exceed 120 degrees F (49 degrees C). This is important to prevent serious damage to the battery cells.
- Do not recharge battery in damp or wet environment. Do not expose charger to rain or snow. Water entering battery charger may result in electric shock or fire.
- Never submerge battery pack, tool or charger in fluid of any kind or allow fluid to enter them. Corrosive or conductive fluid (such as seawater or industrial chemical or bleach containing products, etc.) can cause short circuit which may result in fire, personal injury and property damage.
- Battery leakage may occur under extreme usage or temperature conditions. Avoid contact with skin and eyes. The battery liquid is caustic and could cause chemical burns to tissues. If liquid comes in contact with skin, wash quickly with soap and water. If the liquid contacts your eyes, flush them with water for a minimum of 10 minutes and seek medical attention.
- Place charger on flat nonflammable surfaces and away from flammable materials when recharging battery pack. Carpeting and other heat insulating surfaces block proper air circulation which may cause overheating of the charger and battery pack. If smoke or melting of the charger or battery pack is observed, unplug the charger immediately and do not use the battery pack or charger. Contact customer service immediately.
- Make sure cord is located so that it will not be stepped on, tripped over, or otherwise subjected to damage or stress. Damaged plug and cord may result in electric shock or fire.
- Disconnect the charger by pulling the plug rather than the cord. Do not operate charger with damaged cord or plug; have them replaced immediately. Damaged plug or cord may result in electric shock or fire.
- Do not insert battery pack in charger if battery pack case is cracked. Using damaged battery pack may result in electric shock or fire.
- Do not disassemble charger or operate the charger if it has received a sharp blow, been dropped or otherwise damaged in any way. Incorrect reassembly or damage may result in electric shock or fire.
- Before each use, check the battery charger, cable, plug and battery pack. Do not use if damage is detected. Never open the battery charger or battery pack yourself, take it to a qualified serviceman only using original replacement parts. Incorrect reassembly or using damaged product may result in electric shock or fire.
- Do not use attachments not recommended or sold by Wagner. Using attachments not recommended may result in electric shock or fire.
- Do not store battery pack in charger. Battery pack stored in charger over a long period of time could lead to battery pack damage and fire.
- Unplug charger from outlet before storage, attempting any maintenance or cleaning. Such preventive safety measures reduce the risk of electric shock or fire.
- Keep the battery charger clean by wiping the charger housing with a damp cloth. Contamination may result in electric shock or fire.
- Replace battery pack if a substantial drop in operating time per charge is observed. Battery pack may be nearing the end of its life.
BATTERY CARE
When batteries are not in tool or charger, keep them away from metal objects. For example, to protect terminals from shorting DO NOT place batteries in a tool box or pocket with nails, screws, keys, etc. Fire or injury may result.
DO NOT PUT BATTERIES INTO FIRE or expose to high heat. They may explode.
EXTENSION CORDS
AN EXTENSION CORD SHOULD NOT BE USED UNLESS ABSOLUTELY NECESSARY. Use of improper extension cord could result in risk of fire and electrical shock. If an extension cord is used, make sure:
- The pins on plug of extension cord are the same number, size, and shape as those of plug on charger.
- The extension cord is properly wired and in good electrical condition.
- The wire size is large enough for AC ampere rating of charger as specified below:
| Length of Cord, Feet | 25 | 50 | 100 | 150 |
| AWG Size of Cord | 18 | 16 | 16 | 14 |
- An extension cord is a temporary solution. Move the charger to a standard receptacle as soon as the job has been completed.
IMPORTANT CHARGING NOTES
- The charger was designed to fast charge the battery only when the battery temperature is between 32˚F (0˚C) and 113˚F (45˚C). If the battery pack is too hot or too cold, the charger will not begin charging the battery. (This may happen if the battery pack is hot from heavy use). Once the battery temperature returns to its safe charging temperature, between 32°F (0°C) and 113°F (45°C), the charger will automatically begin charging.
- A substantial drop in operating time per charge may mean that the battery pack is nearing the end of its life and should be replaced.
- Remember to unplug charger during storage period.
- If battery does not charge properly:
- Check for voltage (power) at outlet by plugging in some other electrical device.
- Check to see if outlet is connected to a light switch which turns power "off" when lights are turned off.
- Check battery pack terminals and charger connectors for dirt. Clean with cotton swab and rubbing alcohol if necessary.
- If you still do not get proper charging, call Wagner Customer Service at 1-800-727-4023.
Use of chargers or battery packs not sold by Wagner will void the warranty.
BATTERY / CHARGER LIST
For this product, use only the Wagner model batteries and charger listed below:
| Brand | Model | Spec | Part Number | |
| Battery: | Wagner | BAT612 | 18V | 2422707 |
| Charger: | Wagner | GA18V-40 | 18V | 2422706 |
A charger that may be suitable for one type of battery may create a risk of fire when used with another battery.
Use of chargers or battery packs not sold by Wagner will void the warranty.
CHARGING BATTERY PACK

Plug charger cord into your standard power outlet.
With no battery pack inserted, the charger's green indicator light will go ON. This indicates the charger is receiving power and the charger is ready for operation.
When you insert the battery pack (1) into the charger (2). The charger's green indicator light (4) will begin to "BLINK". This indicates that the battery is receiving a fast charge.

Once approximately 80% battery capacity has been reached, the blinking of green light will slow down, indicating that fast charging is now complete. If battery remains in charger, the charging process is completed in Long Life charging mode.
The purpose of the rapidly "BLINKING" green light is to indicate that the battery pack is fast-charging. It does not indicate the exact point of full charge. The light will stop blinking when battery is fully charged.
Continuous green battery charger light (4) indicates that the battery is fully charged.
However, the battery pack may be used at any time, even if the green light is still blinking.

A steady red indicator light (3) means that the battery pack is outside the proper temperature ranges (too hot or too cold) so the charger will not begin the charging process. Charging (Fast or long Life Charging Mode) is only possible when the temperature range of the battery pack is between 32°F (0°C) and 113°F (45°C).
As soon as the battery pack reaches the correct temperature range, the battery charger will automatically switch to fast charging.

If the red indicator light (3) is "BLINKING", the battery pack cannot accept a charge. This may be due to the contacts on the charger or battery pack is contaminated, the battery pack itself may be defective, or battery may be wrong type for this charger.

- Confirm battery compatibility with charger by checking Battery/Charger List.
- If applicable, insert another compatible battery pack into charger to verify charger is working properly.
- Clean the contacts of the charger or battery pack (e. g. by using a cotton swab and rubbing alcohol on battery and charger terminals or inserting and removing the battery several times) or replace the battery pack, as required.
When the battery pack is fully charged, unplug the charger (unless you're charging another battery pack) and slip the battery pack back into the tool.
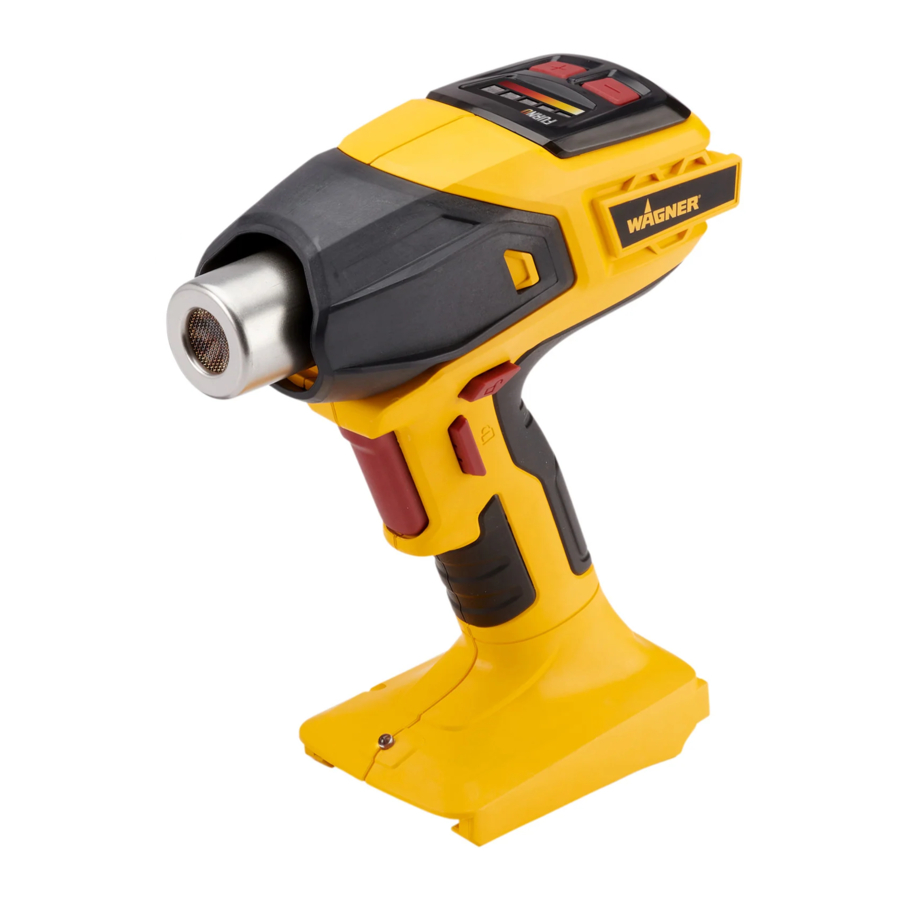
HEAT TOOL COMPONENTS

| # | Item | Description |
| 1 | Variable temperature switch | Approximately 1000°F on high, approximately 500°F on low. Refer to the Heating Guidelines to determine the appropriate heat setting for the task you are doing. |
| 2 | Lock OFF button | Prevents accidental activation of the trigger. This must be pushed at the same time as the trigger is pulled in order for the tool to work. |
| 3 | Lock ON button | Will lock the trigger in the ON position to reduce fatigue and for hands-free jobs. To release, pull the trigger. |
| 4 | Trigger | Activates the heat tool. Heat will not be generated until the trigger is pulled. |
| 5 | Battery | Provides power to the heat tool. Full charge in 35 minutes. |
| 6 | Battery release button | Press this to release the battery from the heat tool. |
| 7 | Bumpers | Allows the heat tool to be placed flat on a surface (nozzle pointing up) for hands-free operation or cool down. |
| 8 | Flare nozzle | Directs a long, narrow heat pattern to the work surface. Ideal for removing paint or varnish from large, flat surfaces. It should be used in conjunction with a flat scraper. |
| 9 | Curved deflector | Disperses the heat flow evenly around the whole work surface. Ideal for thawing frozen pipes, solder pipe work, bending plastics or heat shrinking electrical insulating tubing. |
INTRODUCTION
This versatile heat tool is designed for smaller repair jobs like tube shrink wrapping for electrical repair of game consoles and other electronic devices; automotive jobs such as applying/removing window tint; Do-It-Yourself jobs like scraping paint, drying paint or spackle; and/or craft-related jobs like making ornaments, embossing or repairing candles.
SPECIFICATIONS
| Wattage | 350 Watts on high, 170 Watts on low. Operates on 18VDC. |
| Heat Output | Approximately 1000°F on high, approximately 500°F on low |
| Weight | 2.06 pounds |
| Charger input voltage | 120 V~ 60 Hz |
| Battery charging current | 4.0A |
| Battery Run Time | approximately 15 minutes on Low, 7 minutes on High. |
 | This tool is listed by the Canadian Standards Association, to United States and Canadian Standards. |
USING THE HEAT TOOL
Always read the safety information included in this manual before using the heat tool.
Tools and paint scrapings become very hot. To avoid burns, use work gloves and eye protection when scraping.
ATTACHING THE BATTERY

- Make sure battery is completely charged per steps.
- Insert the battery into the front of the heat gun until you hear it click into place.
- The indicator light will show that the battery is properly installed into the heat tool. If the light does not turn on, the battery is not properly installed or needs to be charged.
- To remove the battery, make sure the heat tool has properly cooled (see Cool Down Procedure). Press the battery release button on the front of the battery and pull out of the heat tool.
VARIABLE TEMPERATURE SETTINGS
The temperature of the heat tool ranges from 500˚F on its lowest setting to 1000˚F on its highest setting. See the chart on the next page to determine the appropriate temperature for the project you are doing.
Press the (+) button to increase the temperature setting. Press the (-) button to decrease the temperature setting. The lights will light up sequentially (left to right) and indicate the current temperature setting of the heat tool.

When starting up a new task, the heat tool will "remember" the last temperature setting being used when it was shut down the last time.
STARTUP
Smoke may appear during the initial start up due to the burning of manufacturing oils. The smoke should disappear in less than a minute.
Heat tool use is safe if all safety guidelines are used, but always keep either a container of water or an ABC fire extinguisher (suitable against Class A, B and C type fires) within reach.
- Make sure the battery is charged and install it into the bottom of the heat tool.
- Press the variable temperature buttons ( + or - ) to the desired setting, push the lock OFF button and pull the trigger. The motor driven fan noise will indicate that the unit is running.
![warning]()
Attention
If the blower motor in the heat gun does not turn on when the trigger is pulled immediately let go of the trigger. The heating element will burn out if it is not cooled by the blower. - To use in hands-free position, tilt the heat tool on its back and activate the Lock ON button.
- When done using the tool, or in between projects, release the trigger and follow the Cool Down procedure, below).
HANDS FREE OPERATION / COOL DOWN PROCEDURE

- Carefully set the gun backwards on the bumpers. DO NOT touch the nozzle.
- For hands-free operation, pull the trigger and lock the trigger into place by pressing the lock ON button (A).
- For cool down mode, press the lock OFF button (B). Allow the nozzle 20 minutes to cool.
Always use gloves when handling the heat tool.
Keep the nozzle pointed up after shutdown until it fully cools.
SUGGESTED HEAT SETTINGS
Attention
Always protect glass when working near windows.
| Use | Setting | Nozzle* | |
| DIY | Drying paint | HIGH | Flare |
| Drying spackle | HIGH | Curved | |
| Soften paint, caulking and putty for easier removal | LOW/HIGH | N/A | |
| Shrink plastic film for wrapping | LOW | Flare | |
| Thawing frozen pipes | LOW | N/A | |
| Arts & Crafts | Embossing | LOW | Curved |
| Creating greeting cards and invitations | LOW | N/A | |
| Shrink wrapping presents | LOW | Flare | |
| Making jewelry | LOW/HIGH | N/A | |
| Repairing candles | LOW | Curved | |
| Popping bubbles in resin | LOW | Flare | |
| Making ornaments | LOW/HIGH | Curved | |
| Forming foam | LOW/HIGH | Flare | |
| Making soap | LOW | N/A | |
| Decorating cookies | LOW | Curved | |
| Melting glue | LOW | N/A | |
| Creating model planes and cars | HIGH | N/A | |
| Automotive | Removing stickers and decals | LOW/HIGH | Flare |
| Applying and removing window tint | LOW/HIGH | Flare | |
| Electronics | Repairing smartphone and tablets | LOW | N/A |
| Repairing gaming consoles | LOW | Curved | |
| Shrinking heat shrink tubes for electrical repair | LOW | Curved | |
* Not included with all models.
NOZZLE ATTACHMENT
To attach a nozzle to the gun:
- Set the heat tool upright on a level surface until the tip is cool.
- Set the nozzle onto the tip of the heat tool and push firmly into place by hand.
To remove a nozzle:
- Set the heat tool upright on a level surface until the tip is cool.
- Pull the nozzle off of the tip.
For more details on multiple projects and 'how to' videos please visit: www.wagnerspraytech.com.
STORAGE
Allow the heat tool nozzle to cool to room temperature before placing in storage.
Store the unit only after the nozzle is cool to touch. Press the lock OFF button and remove the battery to prevent accidental start up.
The nozzle will turn dark over time because of the high heat. This is normal and will not affect the performance or life of the unit.
USES
EMBOSSING
When using the heat tool to activate embossing powder, remove excess powder by dusting the powder off with a clean, dry paint brush. Hold the heat tool approximately 3 inches (77 MM) from the work surface. To prevent the paper from becoming too hot, move the nozzle end around in a circular fashion until the embossing powder is raised and shiny.
When you have completed one area, switch the hot tool off and return the tool to its built-in stand while preparing another area.
STRIPPING PAINT
The heat tool heats up the surface and causes the paint to soften, at which time it can be scraped off easily without damaging the surface.
When working with several layers of paint, it speeds up the scraping process to heat the surface thoroughly, all the way to the wood. Then all the layers can be scraped at one time.
A soft wire brush may be the best tool to use for very intricate surfaces.
Some paints such as mineral paints and finishes, and cement paint and porcelain, do not soften with heat, so using a heating tool will not work for paint removal. Test the results by trying it first in a hidden part of the project.
Do not use the heat tool on surfaces that can be damaged by heat, such as vinylcoated paneling, siding or window frames.
When removing paint from window frames, the heat gun will soften the putty. Be careful not to gouge the putty with the scraper. The putty will firm up after it cools.
Do not use the heat tool on insulating laminated window glass. The glass edge expansion may break the edge seal.
When scraping fascia, do not overheat the edges of the asphalt shingles protruding over the edge of the sheathing. Too much heat will melt the asphalt.
SHRINK TUBING
Slide heat shrink tubing onto the wire so that it covers the damaged/exposed section.
Select either the low or high temperature setting based on heat shrink tubing's recommended temperature.
Keep the heat gun moving back and forth along the length of tubing and rotate the wire for even heat distribution.
If covering a long length of wire with tubing, begin shrinking at one end, and gradually work your way to the other end.
When the shrink tube is uniformly tightened immediately stop applying heat. Do not overheat the heat shrink tubing. Allow the tubing to cool slowly before applying physical stress to it.
SHRINK WRAPPING
Wrap the object with heat-shrinkable plastic film. Begin to heat the film from a safe distance while keeping the heat tool moving. Move the heat tool closer to the film until the film starts to shrink and tightens around the object.
CLEANING AND MAINTENANCE
Make sure the trigger has been locked OFF, the battery is removed, and the heat tool has sufficiently cooled before cleaning.
Keep the intake openings on the housing clean and free of obstructions. Us a soft, dry brush to clean the openings periodically. Use only mild soap and a damp cloth to clean the heat gun. Many household cleaners contain chemicals which could seriously damage the housing.
Do not use gasoline, turpentine, lacquer or paint thinner, dry cleaning fluids or similar products when cleaning the heat gun. Never allow any liquid to get inside the tool or immerse any part of the tool into a liquid.
ACCESSORIES
The following accessories may come with the heat gun or may be purchased separately by calling 1-800-727-4023.
| Name | Description | Name | Description |
Concentrator P/N 2366222 | Directs a concentrated heat flow to the work surface. Ideal for removing paint in awkward corners, crevices, or mouldings. | Glass Protector P/N 2366224 | Deflects the heat away from glass or other fragile areas. Ideal for window sills, ledges, frames and skirting boards. |
Flare P/N 2366223 | Directs a long, narrow heat pattern to the work surface. Ideal for removing paint or varnish from large, flat surfaces such as skirting boards, doors, stairs, etc. It should be used in conjunction with a flat scraper. | Curved Deflector P/N 2366225 | Disperses the heat flow evenly around the whole work surface. Ideal for thawing frozen pipes, solder pipe work, bending plastics or heat shrinking electrical insulating tubing. |
| Name | Description | ||
5-in-1 tool P/N 2366227 | The blade (1) is used to scrape paint and spread compound. The gouge point (2) is used to remove putty/caulk and the curved area (3) is used to clean roller covers. Flat side (4) can also be used to open paint cans. | ||
| Spare battery Wagner - 2422707  | Allows the user to keep working in the event that the battery runs out of charge. | ||
| Spare charger Wagner - 2422706  | Allows the user to charge multiple batteries at once. | ||
PRODUCT REGISTRATION / DATE CODE LOCATION
Register your product online at www.wagnerspraytech.com

PPODUCT SUPPORT
1-800-727-4023
Documents / Resources
References

Download manual
Here you can download full pdf version of manual, it may contain additional safety instructions, warranty information, FCC rules, etc.
Advertisement


Need help?
Do you have a question about the FURNO 550 18V and is the answer not in the manual?
Questions and answers