Wacom One, CTH-471, CTH-671 Manual
- Instruction manual (92 pages) ,
- Quick start manual (12 pages) ,
- User manual (51 pages)
Advertisement
- 1 ABOUT THE MANUAL
- 2 GETTING STARTED
- 3 SETTING UP YOUR TABLET
- 4 USING YOUR TABLET
- 5 CUSTOMIZING YOUR TABLET
- 6 TROUBLESHOOTING
- 7 TECHNICAL SUPPORT OPTIONS
- 8 OBTAINING DRIVER DOWNLOADS
- 9 PRODUCT INFORMATION
- 10 CARING FOR YOUR TABLET
- 11 REPLACING THE PEN NIB
- 12 UNINSTALLING
- 13 MANAGING PREFERENCES
- 14 PEN AND DIGITAL INK CAPABILITIES IN WINDOWS
- 15 ORDERING PARTS AND ACCESSORIES
- 16 GLOSSARY
- 17 Documents / Resources
ABOUT THE MANUAL
This manual provides quick access to information about your tablet. The information is common to Windows and Mac computers and Windows screen captures are shown, unless otherwise noted.
- SMALL CAPITAL LETTERS are used to identify the names of keyboard keys, dialog boxes, and control panel options.
- Be sure to see also the Important Product Information guide for the tablet, located on the tablet Installation CD. The guide includes product safety precautions, specifications, and your license agreement.
- The following information is not included with this product: information about your specific computer hardware or operating system, or information about your application software. Your best source for this information is the set of manuals and discs that came with your hardware, operating system, or application.
- In addition to the built-in inking support found within Microsoft Windows 8, Windows 7 and Vista, many graphics applications also support pressure sensitivity and the pen eraser. You can find a listing of applications that support these features on Wacom's website (see product information).
- For information on how best to use tablet features within a specific application, see the instructions in that application's manuals.
Note: This manual does not describe how to install your tablet. Please refer to your product Quick Start Guide, and use the automated software installer (located on the tablet Installation CD).
Wacom's philosophy is to continually improve all of its products. As a result, engineering changes and improvements are made from time to time. Therefore, some changes, modifications, and improvements may not be covered in this manual.
GETTING STARTED
This section introduces you to your tablet, and helps you become familiar with its appearance and features.
- Not all product models are available in all regions.
- Your tablet can only be used with compatible pens or input devices. Wacom cannot guarantee compatibility with older tablets or pens. You cannot use pens or input devices from a previous version of the tablet. A pen from your new tablet cannot be used with other tablets.
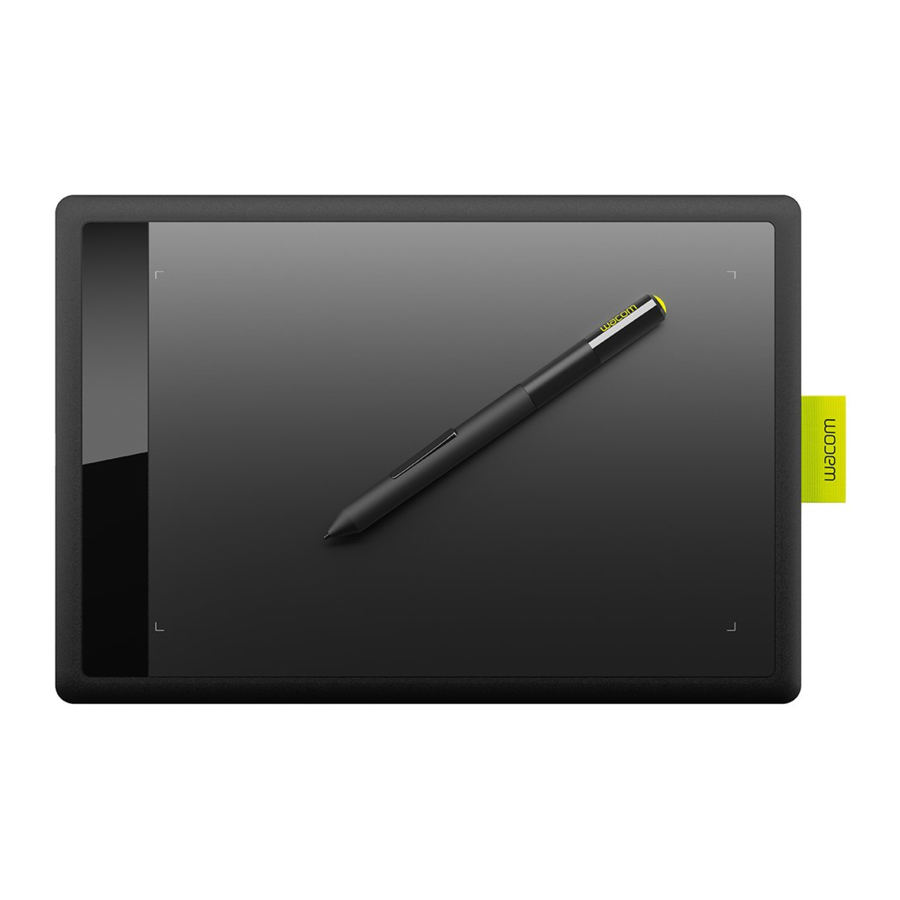
YOUR PEN TABLET

PEN
Cordless, battery-free, and pressure sensitive. Use this freehand tool for image editing and creating natural-looking pen strokes. It is also an efficient tool for document annotation and taking notes in applications that support handwriting recognition.
You will find the pen ideally suited to enhance your workflow by enabling the pen and digital ink features found within Microsoft Windows 8, Windows 7, Vista, and Office 2007 or later. Take advantage of digital mark-up for collaborative editing and use digital ink to take notes in applications that support handwriting recognition.


When not in use, place the pen in the pen holder or lay it flat on your desk. When equipped, the eraser end of the pen should be inserted first into the loop. To maintain the sensitivity of your pen, do not store it in a container where it will rest on the tip or eraser.
Leaving the pen on the tablet may interfere with screen cursor positioning when using other pointing devices, or may prevent your computer from going to sleep.
PEN HOLDER
When not in use, store the pen in the pen holder.

- Insert the eraser end of the pen into the loop.
- Do not wedge the pen buttons inside the loop. Doing so may cause the buttons to be continually depressed and possibly fail.
You can also lay the pen flat on your desk. Leaving the pen on the tablet may interfere with screen cursor positioning when using other pointing devices, or may prevent your computer from going to sleep.
Do not store the pen in a holder or stand other than the one provided with your tablet or purchased from Wacom. The pen may be damaged if it falls out of an unsuitable stand. The sensitivity of your pen may be affected if stored in a container where it rests on the tip or eraser.
SETTING UP YOUR TABLET
To minimize fatigue, comfortably organize your work area. Position your tablet, pen, and keyboard for easy access without unnecessary reaching. Adjust your monitor so you can view it comfortably with minimum eyestrain. For best results, position the tablet so the screen cursor follows the same direction as your hand movements on the tablet.
ERGONOMICS

- Maintain a good posture at all times.
- Use a gentle grip when working with the pen.
- Periodically shift your gaze from your computer and focus on other objects in the room. This will help to relax your eyes.
- Take short breaks between tasks to stretch and relax your muscles.
- Alternate tasks and tools throughout the day. Minimize awkward postures and repetitive movements that cause discomfort.
- Change your position if you feel any discomfort due to your work position.
- If you are using the tablet as a primary pointing device and mouse replacement, try placing it to the side of the keyboard nearest to your dominant hand (for example, to the right of the keyboard if you are right-handed).
- If you are using the tablet primarily as a creative tool, try placing the tablet below the keyboard, centered with respect to your monitor.
Note regarding RSI: Wacom makes no representation, promise or guarantee that Wacom products will cure or prevent, in whole or in part, mouse-induced repetitive stress symptoms, injuries or conditions. Individual results may vary. Always obtain competent medical advice to determine the most appropriate treatment for your specific situation.
CONFIGURING TABLET ORIENTATION
When you first installed the tablet, you were prompted to choose a default tablet orientation. The orientation you chose was used to determine the tablet default settings. However, you can easily reconfigure the tablet for left- or right-handed users at any time.
Right-handed operation:

- Open the tablet control panel and select the TABLET tab. Choose RIGHT HANDED. The tablet driver automatically configures all aspects of the tablet for correct right-handed use. See Opening the control panel
- Physically rotate your tablet.
Left-handed operation:

- Open the tablet control panel and select the TABLET tab. Choose LEFT HANDED. The tablet driver automatically configures all aspects of the tablet for correct left-handed use.
- Physically rotate your tablet.
Note: This procedure does not affect the default orientation. At the system log on and user switching screens, the tablet uses the default orientation you chose during the install process. To change the default orientation, you must re-install the tablet driver.
WORKING WITH MULTIPLE MONITORS
If your computer is equipped with more than one monitor, the tablet will map to your monitors based upon how they are configured in the display properties control panel.
- If more than one monitor is in use and you are in extended monitor mode, the tablet maps to all monitors as if they were one large display.

- If your monitors are in mirror mode (both monitors display the same content), the tablet maps to the entire space on each monitor and the screen cursor is displayed on each monitor simultaneously.

See your hardware and operating system documentation for details on configuring your computer and operating system for use with multiple monitors.
You can customize the tablet to map to a single monitor, or to a portion of the monitor area. See setting the tablet mapping.
CONTROL PANEL BASICS
After mastering the basics of using your tablet, you may want to customize the way your pen input works. The tablet control panel is where you customize your tablet settings.
USING YOUR TABLET
If you are new to using the tablet, read the following sections.
As you work, you will discover many ways of interacting with your tablet. For example:
Photo editing
Use the pressure-sensitive pen to edit images within a photo or image editing application.

Annotation
Simplify document reviews by using the pen to digitally mark-up and annotate documents.

For details on these and other ways to work with your tablet, see The pen experience with the tablet.
Pen input
The pen works only on the active area of the tablet.
Wherever you place the pen on the tablet, the screen pointer will jump to the corresponding point on the screen. The screen pointer indicates pen position, and follows the movement of the pen across the tablet surface.
Note: The active area is a mapped representation of your computer screen(s). By default it uses the entire screen or all screens if you have multiple displays. You can customize the mapping relationship for pen input by setting the tablet mapping.
THE PEN EXPERIENCE WITH THE TABLET
Your tablet is designed to enhance the way you work. Tablet models equipped for pen input enable you to interact with a computer using the pen on the active area of the tablet.
Hold the pen like you would hold a normal pen or pencil. Make sure the pen buttons are in a convenient location where you can toggle them with your thumb or forefinger, but not accidentally press them while drawing or positioning with the pen. Tilt the pen in any way that feels most comfortable.
When you are not using the pen, store it in the pen holder. When equipped, the eraser end of the pen should be inserted first into the loop.

When not in use, place the pen in the pen holder or lay it flat on your desk. To maintain the sensitivity of your pen, do not store it in a container where it will rest on the tip or eraser. Leaving the pen on the tablet may interfere with screen cursor positioning when using other pointing devices, or may prevent your computer from going to sleep.
USING THE PEN ON THE TABLET
There are four basic techniques for using the pen: positioning, clicking, double-clicking, and dragging. If you are unfamiliar with using the pen, try the exercises on the following pages.
POSITIONING
Use the pen to position the pointer (or cursor) on your screen.
Lift the pen and place the pen tip on the tablet active area. The cursor jumps to the new location.
Move the screen cursor by hovering the pen over the tablet surface. Do this without touching the tablet surface, but while still keeping the pen tip within proximity of the tablet.

To select an icon or folder, use your pen to position the screen cursor over the object. Press down to select.

Tips:
If you find using a pen to be somewhat difficult, try the eye-hand coordination exercise.
Pointing is easier when you orient the tablet square to the computer monitor so the screen cursor follows the same direction as your hand movements on the tablet.
You can set the pen to position the screen cursor two different ways (see setting the tablet mapping).
- In pen mode, wherever you place the pen on the tablet, the screen cursor will jump to a corresponding point on the display screen. The screen pointer indicates pen position, and follows the movement of the pen across the tablet surface. This is the default setting for the pen.
When positioning the screen cursor and operating a pen button, the pen tip needs to be within 7 mm (0.28 inch) of the tablet surface. The pen tip does not need to touch the tablet in order to move the screen cursor or use a pen button.

- In mouse mode, move the cursor with a "pick up and slide" motion similar to using a mouse.

CLICKING
Click to highlight or select an item on the screen. Double-click to open it.
Clicking. Tap the pen tip once on the tablet, or press the pen tip on the tablet with enough force to register a click. Try clicking on a folder icon by moving the screen cursor over the icon and pressing down on the pen tip. The folder should highlight when you press.
If CLICK SOUND is selected in the tablet control panel and your computer speakers are on, then you will hear a "click" sound when the pen tip is pressed hard enough to generate a button click. Adjust your speaker volume as necessary.

Tip:
Configure Windows to select when hovering the pen over an icon and to launch the icon with a single click. To turn on this feature, first open a folder.
Windows 8, Windows 7 and Vista: From the ORGANIZE pull-down menu choose FOLDER AND SEARCH OPTIONS.... From the GENERAL tab select SINGLE-CLICK TO OPEN AN ITEM (POINT TO SELECT).
Windows XP: From the TOOLS pull-down menu choose FOLDER OPTIONS.... From the GENERAL tab select SINGLE-CLICK TO OPEN AN ITEM (POINT TO SELECT).
Double-clicking. Quickly tap the tablet twice in the same place with the pen tip. This is like clicking twice with a mouse button. Try double-clicking on a folder icon to open it.

Tip:
Set a pen button to DOUBLE CLICK. This is easier than tapping twice with the pen tip, and is the preferred method of doubleclicking with a pen.
DRAGGING
Dragging is used to select and move objects on the monitor screen.
First point to an object. Then press the pen tip to the tablet and slide it across the tablet surface. The selected object will move across the display screen.
To select text within a document, move the screen cursor to the beginning of a text line. Then drag the pen across the tablet to highlight the text.

USING THE PEN BUTTONS
The pen comes equipped with two buttons. Each button has a programmable function that is selected when you press the button. You can use a pen button whenever the pen tip is within 7 mm (0.28 inch) of the tablet active area. You do not have to touch the pen tip to the tablet in order to use a button.
The default button positions are:
Upper: RIGHT CLICK
Lower: PAN/SCROLL
Tip:
Set a pen button to DOUBLE CLICK. This is easier than tapping twice with the pen tip.

Use RIGHT CLICK to bring up application-specific or icon-specific menus.

PAN/SCROLL lets you position a document or image in any direction within the active window simply by pressing the pen button and moving the pen tip across the tablet. As you move the pen tip, the document or image is repositioned to follow the direction of pen movement on the tablet. Release the pen button or lift the pen tip from the tablet surface when done.
In some application windows the document will precisely follow the screen cursor as you move the pen tip. In others it will simply move in the same general direction as the screen cursor.

To assign new button functions, see setting the pen button functions.
WRITING AND DRAWING WITH PRESSURE SENSITIVITY
The pen responds to your hand movements, enabling you to create natural-looking pen and brush strokes within applications that support this feature. The digital ink tools in Microsoft Windows 8, Windows 7, Vista, and Office 2007 or later, as well as the drawing tools in many graphics applications, respond to the pressure you place on the pen. For example, sliders are used in some applications to vary line characteristics such as width, color, and opacity. These characteristics can be controlled much better by the pen's pressure sensitivity. You can vary line width, blend colors, and change opacity with the pressure you exert upon the pen.
To write, ink, or draw with pressure sensitivity, move the pen along the surface of the tablet while applying various amounts of pressure downward on the tip of the pen.

- Press hard for thick lines or dense color.
- Press gently for thin lines or softer color.
Note that some applications require you first select a pressure-sensitive tool from the application tool palette.
To adjust the tip feel, see setting the tip and eraser feel, and double-click distance.
Visit the Wacom website to learn about applications that support pressure. See product information.
ERASING
The pen eraser (when equipped) works like the eraser on a pencil.
You can erase intuitively and naturally in graphics applications that support the pen eraser. When you use the pen eraser, the application will automatically switch to the eraser tool.
In applications that support pressure sensitivity, you can select pressure-sensitive tools in the application tool palette to vary the width and depth of your erasures as you change the amount of pressure exerted upon the pen.
See setting the tip and eraser feel, and double-click distance.

Use the pen eraser in Windows 8, Windows 7, and Vista to erase notes or sketches made with Pen and digital ink capabilities in Windows, and to select and delete text or spreadsheet cells within an application. In supporting text applications use the eraser to select text, then lift the eraser from the tablet to delete the text.

Visit the Wacom website to learn about applications that support the eraser. If the eraser is not supported in an application, you can still use the eraser for positioning, drawing, or annotation.
EYE-HAND COORDINATION EXERCISE
This exercise is designed to retrain your eye-hand coordination for using the pen:
- Open any graphics application. Use the line tool to draw a rectangular grid with line spacings of about 20-25 mm (3/4 to 1 inch). You can use a standard mouse to do this.
- Choose a free-hand tool in your application and use the pen to draw a dot at each grid intersection.
- Draw an X at each grid intersection.
- Clear your screen and make a simple drawing of your own. The more you use your pen, the easier writing, drawing, and navigation will become.
CUSTOMIZING PEN INPUT
You can easily customize the pen. Use the pen to open the tablet control panel. Then select the PEN tab to choose from the available options.
CUSTOMIZING YOUR TABLET
Use the tablet control panel to customize your tablet for the way you like to work.
OPENING THE CONTROL PANEL
To open the control panel:
- Windows 8: From the Windows 8 Start screen, click the WACOM PREFERENCES tile. If you are using the Windows 8 Classic Desktop, press the Windows key on your keyboard, or select the Windows icon in the Charms bar, to access the Start screen.
- Windows 7, Vista and XP. Click on the Windows START button and choose ALL PROGRAMS. Then select WACOM and the WACOM PREFERENCES option.
- Mac. Open SYSTEM PREFERENCES from the Apple menu, or from the APPLICATIONS folder. Then click on the WACOM TABLET icon.
You can begin customizing your tablet after opening the control panel. The control panel displays only those tabs and options that apply to your tablet model and configuration. See control panel overview.
Note: User-specific preferences are supported. After logging on, each user can customize their personal settings in the tablet control panel. Switching to another user will automatically load the settings for that user.
CONTROL PANEL OVERVIEW
After opening the control panel, you can begin customizing the tablet.
Customizable settings are found on each tab. The tabs that apply to your tablet model and configuration are displayed when you open the control panel.

Experiment with different settings to find what works best for you. Any changes you make will take effect immediately. Click DEFAULT to return a tab to the factory settings.
Tool Tips are available for most control panel items. Position the screen cursor over an item and let it rest there. The appropriate Tool Tip will pop up in a few moments.
Your keyboard tab and arrow keys can also be used to navigate the control panel.
The following sections provide detailed information about each control panel tab and some of the more advanced concepts. Many of the sections also contain useful customizing tips.
CUSTOMIZE YOUR PEN EXPERIENCE
You can easily customize the pen. Use the pen to open the tablet control panel. You can then customize your tablet for the way you like to interact with your tablet and computer when using the pen or eraser (when equipped).
Note: If you have more than one pen (for example, a standard pen and a premium pen), any changes you make to the pen settings will apply to both pens.

SETTING THE TIP AND ERASER FEEL, AND DOUBLE-CLICK DISTANCE
Select the PEN tab. To create broad brush strokes or to click with a light touch, use a soft tip setting. For maximum control while drawing thin lines, use a firm tip setting. To erase with a broad stroke or to click with a light touch, use a soft eraser setting (when equipped with eraser). For maximum control while erasing, use a firm eraser setting.

Tips:
Use a soft TIP FEEL to reach the full pressure range with a lighter touch.
In some applications a soft pressure setting can make the pen overreact, causing any small press on the pen to be magnified on the screen. If you experience this, try a firmer TIP FEEL setting.
To make double-clicking easier, expand the tap area that accepts a double-click (the double-click distance).
A large double-click distance may cause a delay at the beginning of brush strokes in some drawing applications. This may also cause a delay at the beginning of a drag action or inking stroke. If you notice such effects, try setting a smaller double-click distance and using a pen button set to double-click (see setting the pen button functions).
SETTING THE PEN BUTTON FUNCTIONS
Select the PEN tab. Each pen button can be set to simulate a variety of mouse functions.
Tip:
To make double-clicking easier, set a pen button to double-click automatically by selecting DOUBLE CLICK.

- Choose HOVER CLICK to perform click functions without touching the pen tip to the tablet surface.
![]()
- Choose CLICK & TAP to enable the precise placement of click functions. When selected, you must first press the pen button and then touch the pen tip to the tablet surface in order to perform the click function.
![]()


SETTING THE TABLET MAPPING
Select the PEN tab. The tablet TRACKING options enable you to define the relationship between pen movement on the tablet surface and cursor movement on the monitor screen.
By default the entire active area of the tablet maps to the entire monitor. If more than one monitor is in use the tablet will map to all monitors. See working with multiple monitors.

Note: If you frequently switch between pen mode and mouse mode, you can assign the MODE TOGGLE... function to one of your pen buttons.
In the tablet control panel PEN tab, click on the PEN MODE MAPPING... button to display the PEN MODE DETAILS dialog box.

Use the SCREEN AREA options to select a screen area for tablet to screen mapping.
- ALL SCREENS. The entire monitor(s) area is mapped. This is the default setting. See working with multiple monitors.
- MONITOR. The entire area of a single monitor that you choose is mapped.
- PORTION. A portion of the desktop area is mapped. Click SET... to define the portion of screen area.
Use the TABLET AREA options to select a tablet area for tablet to screen mapping.
- FULL. The entire active area of the tablet is mapped. This is the default setting.
- PORTION. A portion of the tablet area is mapped. Click SET... to define the portion of tablet area.
Note: Although the tablet is optimized for use with 16: 10 aspect ratio displays, the default settings automatically adjust for use with other aspect ratio displays.
PORTION OF SCREEN AREA
To define which portion of the display screen your tablet will map to, click on the PEN tab PEN MODE MAPPING... button to display the PEN MODE DETAILS box. Choose SCREEN AREA PORTION and click SET....
In the dialog that appears, choose a method for defining a portion of the display.

- Drag corners of the foreground graphic to select the screen area.
- Select the CLICK TO DEFINE SCREEN AREA button and move the screen cursor to select the screen area. Be sure to follow any MESSAGE prompts.
After defining a portion of the screen, you may need to use a different input device to access other portions of the screen area.
PORTION OF TABLET AREA
To define the tablet area that will be mapped to the screen area, click on the PEN tab PEN MODE MAPPING... button to display the PEN MODE DETAILS box. Choose TABLET AREA PORTION and click SET....
In the dialog that appears, choose a method for defining a portion of the tablet:

- Drag corners of the foreground graphic to select the tablet area that will be mapped to your selected screen area.
- Select the CLICK TO DEFINE TABLET AREA button and use your pen on the tablet to select the tablet area. Be sure to follow any MESSAGE prompts.
SETTING THE PEN SPEED IN MOUSE MODE
To change the screen cursor acceleration and speed when using the pen in mouse mode, click on the PEN tab MOUSE MODE DETAILS... button. A dialog box will be displayed where you can make your adjustments.

Notes:
The dialog box will also appear when you set a button to MODE TOGGLE.... Only one acceleration and speed setting can be made.
The mouse mode acceleration and speed settings are independent of system settings. Changes you make to these settings in the tablet control panel do not affect similar system settings. However, changes made to similar system settings may affect your tablet settings.
CUSTOMIZING TABLET ORIENTATION
Choose the TABLET tab to set the tablet orientation.
ORIENTATION: Change how your tablet is oriented by selecting RIGHT HANDED or LEFT HANDED input. The tablet driver automatically configures all aspects of the tablet for the selected option. Next, physically rotate the tablet to match your selection.

Note: At the system log on and user switching screens, the tablet will use the default orientation that was selected when the driver was installed. If you want to change the default orientation, you must reinstall the driver. See configuring tablet orientation.
BUTTON FUNCTIONS
Customize your tablet for the way you like to work. Simply use the tablet control panel to change the button function that is assigned to a pen button. Button function options may vary depending on your tablet model.

| FUNCTION | DESCRIPTION |
CLICKS
|
|
| BACK | Simulates the B ACK command in browser applications. |
| FORWARD | Simulates the F ORWARD command in browser applications. |
| ERASE | Pen only. Sets a button so that when the button is pressed, the pen tip will act like the eraser (when equipped) in applications that support the E RASE function. See erasing. |
| KEYSTROKE... | Enables you to simulate keystrokes. Select this option to display the DEFINE KEYSTROKE dialog box. Enter a keystroke or keystroke combination in the K EYS entry box. Keystroke combinations can include letters, numbers, function keys (such as F3) and modifier keys (such as SHIFT, ALT, or CTRL for Windows, or SHIFT, OPTION, COMMAND, and CONTROL for Mac). You can also choose special keystrokes or keystroke combinations from the ADD SPECIAL pull-down menu. After defining a keystroke or keystroke sequence, click OK. Because the ENTER (Windows) and RETURN (Mac) keys can be selected as a defined keystroke, they cannot be used to select OK. You must use your pen to click on the OK button. Enter a name for the keystroke definition. The name will be displayed with the respective control.  To learn which keystroke shortcuts are supported by a particular application, see the documentation that came with the application. |
| MODIFIER... | Enables you to simulate modifier key(s) (such as SHIFT, ALT, or CTRL for Windows, or SHIFT, OPTION, COMMAND, and CONTROL for Mac). Many applications use modifier keys to constrain the size or placement of objects. Choose one or more modifier key options. Choose a CLICKS option to simulate pressing a button of the selected type on a mouse.  |
| PAN/SCROLL | Pen only. Enables you to position a document or image in any direction within the active pane. Do this by pressing a pen button set for PAN/SCROLL and then dragging with the pen tip across the tablet active area. When you select PAN/SCROLL, you are prompted to set a scrolling speed for use in applications that do not support grabber hand (pixellevel) panning. A slower setting reduces the scroll rate and is useful for close-up and detail work where you need precise control of the image. As you move the pen tip, the document or image is repositioned to follow the direction of pen movement on the tablet. Release the button or lift the pen tip from the tablet surface when you are done.  |
| WACOM PREFERENCES | Opens the tablet control panel. |
| SHOW DESKTOP | Minimizes all open windows to display a clean desktop. |
| SWITCH APPLICATIONS | Brings up the application switching dialog with focus on the next open application. On Windows 8, Windows 7 or Vista systems running Aero, Flip 3D will be activated with focus on the next open application. |
| OPEN/RUN... | Opens the RUN APPLICATION dialog box. Click BROWSE... to locate an application, file, or script to launch. Your selection appears in the APPLICATION TO RUN box. Click OK to accept the selection.  The dialog box will close and the OPEN/RUN... option you have selected will be assigned as your tool button option. Press the tool button to launch the assigned option. If your selection is for the Pop-up Menu, it will be displayed in the Pop-up Menu list. |
| INK TOGGLE | (Mac.) Toggles the "ink in any application" function of Ink on and off. Ink automatically recognizes and converts your handwriting into text and inserts it into a document. Handwriting recognition must be turned on for this function to work. See your Mac help for information on working with Ink. |
| TABLET PC | |
| (Tablet PCs and Windows systems that support the Tablet PC Input Panel.) Opens the Tablet PC Input Panel when you press a tool button set to this function. |
| (Windows 8, Windows 7 and Vista, and Tablet PC systems that include Microsoft Journal.) Opens Microsoft Journal. |
| (Tablet PCs and Windows systems that support the Tablet PC Input Panel.) Sets the button function according to settings found in the:
|
| EXPOSÉ | (Mac.) Tiles all open windows. To access this option, first choose KEYSTROKE... and then click on the ADD SPECIAL menu within the dialog box. |
| PRESSURE HOLD | Locks the pressure at the current pressure level until the button is released. For example, you can paint with pressure sensitivity until you reach the brush size that you like. You can then press the button and continue painting with the same size brush until the button is released. |
| MODE TOGGLE... | Toggles pen input between pen mode and mouse mode. See setting the pen speed in mouse mode. |
| DISABLED | Disables the button function. |
| DEFAULT | Returns a button to its default setting. |
TESTING YOUR TABLET
- Turn on your computer and wait until the system has fully loaded.
- Check the USB connection. The tablet status LED should glow whenever the tablet is properly connected and your computer has registered it as a USB device. If not:
- Make sure the tablet USB cable is securely connected to an active USB port on your computer.
- Check the tablet USB cable for damage.
- If you are connecting the tablet to a USB hub (or hub device such as a keyboard with USB ports), be sure the USB hub is properly connected to your computer and is active.
- If the status LED does not illuminate after your computer is on and has finished booting up, your USB port may be disabled. Verify that you have connected the tablet to an active USB port.
- Connect the tablet to a different USB port or try connecting to the USB port on another computer.
- Check pen input:
- Check pen input. If the tablet driver does not load properly, pen input will not be available. (If you have a pen-only tablet model, you will be able to use the pen tip to move the screen cursor and click. You will also be able to use the pen buttons to CLICK and RIGHT CLICK, but there will be no other pen functionality.) Install the tablet driver software. See also testing a pen.
- If any of these tests fail you may have defective hardware. See technical support options.
After testing, use the tablet control panel to reconfigure your tablet for any custom settings you may originally have been using.
TESTING A PEN
- First perform the procedures for testing your tablet.
- Check the pen by opening the tablet control panel and selecting the PEN tab. Click on the DEFAULT button to return the pen to its default settings. Next:
- Touch the pen tip and then the eraser (when equipped) to the tablet active area. Each time the tip or eraser makes contact with the tablet surface, the status LED should brighten.
- Without applying pressure to the pen tip, hold the pen tip within approximately 7 mm (0.28 inch) of the tablet surface and press each pen button in turn. For each button press, the status LED should brighten.
- While still within proximity, but without touching the tablet surface, move your pen across the active area of the tablet. The screen cursor should move in the corresponding direction on your monitor or display screen.
- If any of these tests fail you may have defective hardware. See technical support options.
- After testing, use the control panel to reconfigure your tablet and pen for any custom settings you may originally have been using.
TROUBLESHOOTING
If you encounter problems with your tablet or pen, see the following tables. Your problem may be described here, and you can try the solution offered.
For additional information, visit the Wacom website at http://www.wacom.com.
GENERAL PROBLEMS
| The computer does not have an available USB port. | Check if there is an available USB port on a USB hub. If not available you will need to add a USB hub or USB card. |
| The tablet status LED does not illuminate. | Verify that your tablet USB cable is properly connected to an active USB port. If you are connecting to a USB hub, make sure the hub is connected to an active USB port and that the hub is active. |
| The computer does not go to sleep. | When you are not using the pen, remove it from the tablet surface or the tablet will continue to send data, keeping the computer awake. Note: Because some metallic or other conducting objects can also cause the tablet to send data, it is best to keep the tablet surface clear of all objects when not in use. |
| The screen cursor is very erratic or jumps around when using the tablet. | On rare occasions the tablet may receive interfering radio frequencies from a computer monitor or nearby AM radio station. If you notice interference from a monitor, try moving the tablet at least six (6) inches away from the monitor, or change the monitor refresh rate or monitor resolution. |
| The tablet is set for RIGHT HANDED (or LEFT HANDED ), but at the log on screen the tablet seems to work upside down. | Reinstall the tablet driver software and change the default orientation of the tablet. See configuring tablet orientation. |
PEN INPUT PROBLEMS
| The pen does not position the screen cursor, or otherwise does not work. | If the tablet driver does not load properly, pen input will not be available. You will be able to use the pen tip to move the screen cursor and click. You will also be able to use the pen buttons to C LICK (lower button) and RIGHT CLICK (upper button), but there will be no other pen functionality. Install the driver software for the tablet. |
| The pen does not draw or ink with pressure sensitivity. | Some applications require that you turn on the pressure capabilities within the application or selected tool before the pen will respond as a pressure-sensitive tool. Verify also that your application supports pressure sensitivity. |
| Clicking is difficult. | Open the tablet control panel and go to the PEN tab. Try using a lighter TIP FEEL. Select the CLICK SOUND option (the check box should be checked). This will enable you to hear when the pen registers a mouse click. Your computer speakers must be turned on and the volume audible before you can hear a click sound. |
| Double-clicking is difficult. | Be sure you are quickly tapping the tablet twice in the same place on the tablet active area. Using a pen button set to double-click is recommended (review the techniques in clicking). Open the tablet control panel and go to the PEN tab.
|
| The pen selects everything, or will not stop selecting. | Open the tablet control panel and go to the PEN tab. Move the TIP FEEL slider toward F IRM. If this does not help, see testing a pen. |
| The eraser (when equipped) selects everything or will not stop erasing. | Open the tablet control panel and go to the PEN tab. Move the ERASER FEEL slider toward FIRM. If this does not help, see testing a pen. |
| You notice a screen delay at the beginning of pen or inking strokes. | Open the tablet control panel and go to the PEN tab. Try decreasing the DOUBLE CLICK DISTANCE. |
| You have to press hard with the pen when clicking, drawing, or writing. | Open the tablet control panel and go to the PEN tab. Move the TIP FEEL slider toward SOFT. |
| The pen tip does not function. | Depending on your tablet model, the status LED should brighten or change color when the pen tip is pressed to the tablet. Be sure you are using the pen that originally came with your product. Other pens may not function properly on the tablet. See testing a pen to verify pen operation. If any of the tests fail you may have defective hardware. |
| The screen cursor jumps back. | Do not place the pen on the tablet when it is not in use or when you are using another pointing device. Leaving your pen on the tablet may interfere with screen cursor positioning when using other input devices. |
| The upper or lower pen button does not work. | Be sure you press the pen button when the pen tip is within 7 mm (0.28 inch) of the tablet active area. Do this without pressing down on the pen tip. From the tablet control panel, verify that the pen button is set to the function you are expecting to occur. In the tablet control panel, click on the PEN tab ADVANCED button. If CLICK & TAP is selected, you will need to first press the pen button and then touch the pen tip to the tablet surface in order to perform a click function. See setting the pen button functions. See testing a pen to verify pen operation. If any of the tests fail you may have defective hardware. |
| Cannot move the cursor where you want to on the screen, or the line you are drawing does not line up with the location of the pointer in paint applications. | Open the tablet control panel. Verify that PEN MODE is selected. If this does not help, click on the DEFAULT button to reestablish the default tablet to screen mapping. If you are still having difficulty, remove the tablet preferences (see Windows-specific problems or Mac-specific problems for details). |
WINDOWS-SPECIFIC PROBLEMS
| You suspect the tablet preferences may be corrupted, or want to make certain that all settings are at their factory defaults. | Use the Wacom Tablet Preference File Utility to work with preferences. Close any open applications. Windows 8: From the Windows 8 Start screen, click the WACOM TABLET PREFERENCE FILE UTILITY tile. If you are using the Windows 8 Classic Desktop, press the Windows key on your keyboard, or select the Windows icon in the Charms bar, to access the Start screen. Windows 7, Vista and XP: Click START and select ALL PROGRAMS. Select WACOM TABLET, then WACOM TABLET PREFERENCE FILE UTILITY.
|
MAC-SPECIFIC PROBLEMS
| At startup, a dialog box appears telling you that either the driver failed to load or the tablet preferences have not yet been created. | The tablet was not detected at startup. If connected with the provided USB cable:
If this does not help, contact Wacom for Technical Support. See technical support options. |
| You suspect the tablet preferences may be corrupted, or want to make certain that all settings are at their factory defaults. | Use the Wacom Tablet Utility to work with preferences. Close any open applications. Open the main APPLICATIONS folder. Then open the WACOM TABLET folder and run the W ACOM TABLET UTILITY.
Note: Do not manually remove the WACOM TABLET. PREFPANE file from the main LIBRARY PREFERENCE PANES folder. This file is only to be removed when uninstalling the tablet software driver, and then only when using the WACOM TABLET UTILITY. |
| Ink does not work correctly with the tablet. | There may be a problem with the Ink preferences. Remove the damaged preference files as follows. They will be re-created when you enable handwriting recognition.
|
TECHNICAL SUPPORT OPTIONS
If you have a problem with your tablet, first check the tablet Quick Start Guide to be sure the unit is installed correctly. Then review the Troubleshooting and procedures.
If you cannot find the answer in this manual, you can check the product FAQs (Frequently Asked Questions) on the Wacom Support website for your region.
Wacom periodically updates the tablet software driver to maintain compatibility with new products. If you are having a compatibility problem between the tablet and a new hardware or software product, it may be helpful to download a new software driver (when available) from the Wacom Support website for your region.
If you cannot solve the problem and you think your tablet is not working properly, contact the Wacom support staff for the area where your product was purchased.
When you call, you should be at your computer with the following information available:
- This manual.
- Tablet serial and model number. (Look on the bottom of the tablet.)
- Driver version number. (See the tablet Installation CD or click on the tablet control panel A button.)
- The make and model of your computer, and operating system version number.
- A list of peripheral devices attached to your computer.
- The software application and version you were using when the problem occurred.
- The exact wording of any error message that appeared on your screen.
- What happened and what you were doing when the problem occurred.
- How you tried to solve the problem.
You can also contact Wacom Support by visiting the Wacom website for your region and completing an Email Inquiry form.
OBTAINING DRIVER DOWNLOADS
Wacom periodically updates the tablet software driver to maintain compatibility with new products. If you are having a compatibility problem between the tablet and a new hardware or software product, it may be helpful to download a new software driver (when available) from the Wacom Support website for your region.
PRODUCT INFORMATION
To learn more about your tablet, visit the Wacom website for your region. You can also discover which software applications are currently tablet enhanced to support the pressure sensitivity and other special functionality of your tablet by checking the software applications
Specifications for your tablet are provided in the Important Product Information document included on your product CD.
| USA, Canada, Central and South America | https://store.wacom.com/us |
| Europe, Middle East and Africa | www.wacom.eu |
| Japan | www.tablet.wacom.co.jp |
| Asia Pacific (English) | www.wacom.asia |
| China (Simplified Chinese) | www.wacom.com.cn |
| Korea | www.wacom.asia/kr |
| Taiwan | www.wacom.asia/tw |
| Thailand | www.wacom.asia/th |
CARING FOR YOUR TABLET
Keep your tablet surface and pen clean. Dust and dirt particles can stick to the pen and cause excessive wear to the tablet surface. Regular cleaning with a soft, damp cloth will help to prolong the life of your tablet surface and pen. You can also dampen the cloth using a very mild soap diluted with water. Do not use volatile liquids, such as paint thinner or benzene, as they may damage the plastic case.
Keep the tablet in a clean, dry place and avoid extremes in temperature. Room temperature is best. Also, your tablet and pen are not made to come apart. Twisting the pen case can break the pen. Taking apart the product will void your warranty.
Take care to never spill liquids onto the tablet or pen. Be especially careful not to get the tablet, pen buttons, tip, and eraser wet. They contain sensitive electronic parts that will fail if liquid enters them.
REPLACING THE PEN NIB
The pen nib (tip) will wear with normal use. Excessive pressure will cause it to wear sooner. Replace the nib when it gets too short or develops a flat point.
- Clasp the old nib and pull it straight out of the pen. Use the nib removal tool, pair of tweezers, needlenosed pliers, or similar instrument.

- Slide the end of the new nib straight into the barrel of the pen. Firmly push the nib until it stops.


Choking hazard. Prevent children from swallowing the pen nib or button part. The pen nib or button part may accidentally be pulled out if children are biting on them.
For replacement parts, see ordering parts and accessories.
When not in use, place the pen in the pen holder or lay it flat on your desk. When equipped, the eraser end of the pen should be inserted first into the loop. To maintain the sensitivity of your pen, do not store the pen in a container where it will rest on the tip or eraser.
UNINSTALLING
Follow the appropriate procedure below to remove the tablet driver software from your system.
When you remove the tablet software, your tablet will no longer operate with full tablet functionality but will continue to function as a mouse device.
Windows 8: From the Windows 8 Start screen, click the WACOM PREFERENCES tile, and click Uninstall from the task bar. If you are using the Windows 8 Classic Desktop, press the Windows key on your keyboard, or select the Windows icon in the Charms bar, to access the Start screen.
Windows 7 and Vista: Click on the Windows START button and open the CONTROL PANEL. In the CONTROL PANEL window click on UNINSTALL A PROGRAM. In the dialog box that appears, choose WACOM TABLET and click UNINSTALL. Follow the prompts to remove the tablet driver. If prompted, enter your administrator log on name and password. Restart your computer after uninstalling the software.
Windows XP: Click on the Windows START button and open the CONTROL PANEL. In the CONTROL PANEL window select ADD OR REMOVE PROGRAMS. In the ADD OR REMOVE PROGRAMS window, choose WACOM TABLET and click REMOVE. Follow the prompts to remove the tablet driver. Restart your computer after uninstalling the software.
Mac: From the GO menu, choose APPLICATIONS and open the WACOM TABLET folder. Double-click on the WACOM UTILITY icon and select the TABLET SOFTWARE: REMOVE button. Enter your administrator login name and password. After the removal is completed, click OK. Restart your computer after uninstalling the software.
MANAGING PREFERENCES
Use the preference file utility to manage your tablet preferences for single or multiple users.
Close any open applications.
Windows 8: From the Windows 8 Start screen, click the WACOM PREFERENCE FILE UTILITY tile. If you are using the Windows 8 Classic Desktop, press the Windows key on your keyboard, or select the Windows icon in the Charms bar, to access the Start screen.
Windows 7: Open the utility by clicking the START icon and selecting ALL PROGRAMS. Select WACOM and WACOM PREFERENCE FILE UTILITY.
- To remove preferences for the current user, click REMOVE under MY PREFERENCES.
- To delete preferences for multiple users, click REMOVE under ALL USER PREFERENCES. Administrator rights are required to delete preferences for all users. Relaunch any currently open tablet-aware applications that you may be running.
- To back up your preferences, click BACKUP... under MY PREFERENCES.
- To restore preferences that you had previously backed up, click RESTORE... under MY PREFERENCES.
- Carefully follow any prompts that may appear.
Mac: Open the main APPLICATIONS folder. Then open the WACOM folder and run the WACOM UTILITY.
- To remove preferences, select CURRENT USER or ALL USERS. Then click REMOVE. Log out, then log back in. When the tablet driver loads it will create a new preferences file with the factory defaults.
- To back up your preferences, select CURRENT USER or ALL USERS. Then click BACKUP....
- To restore preferences that you had previously backed up, select CURRENT USER or ALL USERS. Then click RESTORE....
- Carefully follow any prompts that may appear.
PEN AND DIGITAL INK CAPABILITIES IN WINDOWS
Microsoft Windows 8, Windows 7 and Vista provide extensive support for pen input. Pen features are supported in all versions of Windows 7 and Vista except Windows 7 Starter and Home Basic, and Windows Vista Home Basic. Use your tablet and pen for quick, intuitive results.
- Note taking. Jot notes and capture quick sketches in Windows Journal. Use the Journal search engine to locate your handwritten content.
- Handwriting recognition. Quickly enter handwritten information anywhere the computer accepts typed input. Convert your handwritten content to typed text at any time.
- Gestures. Make simple gestural movements on the tablet to trigger customizable actions. To customize gestures, select the FLICKS tab in the Windows 7 PEN AND TOUCH or Windows Vista PEN AND INPUT DEVICES control panel.
- Digital Ink in Microsoft Office 2007. Utilize the enhanced digital mark-up and inking tools found on the REVIEW tab within applicable applications.
The Windows 8, Windows 7 or Vista Input Panel enables you to use handwriting or an on-screen keyboard to directly enter text with your pen.
There are different ways to launch the Input Panel:
- Click on the Input Panel icon which appears when you move the screen cursor into a text entry area.
- Click on the Input Panel tab, located by default on the left edge of the display screen.
- Click on the Tablet PC Input Panel icon located on the Windows Taskbar. If the icon is not visible, rightclick on the Taskbar, select TOOLBARS, and TABLET PC INPUT PANEL.
To disable the Input Panel:
- Open the Tablet PC Input Panel.
- Select TOOLS and OPTIONS.
- Choose the OPENING tab and uncheck the following boxes:
- FOR TABLET PEN INPUT, SHOW THE ICON NEXT TO THE TEXT BOX
- SHOW THE INPUT PANEL TAB.
- Click OK.
Note: The following workarounds in the software driver improve performance in Windows 8, Windows 7 and Vista:
- To improve performance, the Pen Flicks and 'press-and-hold-to-right-click' features are disabled in some graphics applications such as Photoshop.
- There is no pressure sensitivity in Journal and other Ink features when both the Flicks and 'press-and-hold-to-right-click' features are disabled in the Windows 8, Windows 7 PEN AND TOUCH, or Windows Vista PEN AND INPUT DEVICES control panel.
ORDERING PARTS AND ACCESSORIES
To purchase available accessories, see the Wacom website for your region.
You can also do the following:
- In the USA or Canada, call 1.888.884.1870 (toll-free) or visit Wacom's website at http://direct.wacom.com (USA only).
- In Europe, call +49 (0)180.500.03.75 or visit http://shop.wacom.eu. You can also contact your local dealer, distributor, or technical support using the appropriate number for your region.
- In Australia, Singapore, Taiwan and Korea, please visit: www.BuyWacom.com.au, www.BuyWacom.com.sg, www.BuyWacom.com.tw and www.BuyWacom.co.kr, respectively.
- In other countries, please contact your local dealer or distributor.
Some parts and accessories may not be available in all regions.
AVAILABLE ACCESSORIES
| DESCRIPTION | PART NUMBER |
| Pen, standard, without eraser | LP-170 |
| Pen, premium, with eraser | LP-170E |
| Pen nibs, black, qty 5 | ACK-204-01K |
GLOSSARY
Active area. The navigation and drawing area of your tablet where pen input is detected.
Aspect. The ratio between the vertical and horizontal dimension of the tablet or display.
Click force. The amount of force you must apply to the pen tip for a click to occur.
Digital Ink. A broad category that typically describes handwritten content which has been created using pen-based input on a computer. This handwritten content takes the form of sketches, ink mark-up, or handwriting. The handwriting can optionally be converted to typewritten text or simply left alone for use in its original format. Depending on your system and application settings, the handwritten text you make with digital ink can be converted on-the-fly or at another time.
Double-click distance. The maximum distance (in screen pixels) that the screen cursor can move between clicks and still be accepted as a double-click. Increasing the double-click distance makes double-clicking easier, but may cause a delay in brush strokes in some applications.
Eraser-aware application. A software application that has built-in support for the pen eraser. These applications take advantage of the eraser in different ways, depending on what makes sense for the application.
Journal. A Microsoft Windows application that electronically simulates a physical journal pad, but with the advantages of digital note taking. For example, you can create quick sketches and jot handwritten notes that can be converted to text and sent on to colleagues for digital mark-up. Journal includes a variety of pen, marker, and highlighter tools, plus an eraser that is easily activated by the eraser of the pen. Additionally, your handwritten content is searchable within Journal.
Mapping. The relationship between the pen position on your tablet and the cursor position on the monitor screen.
Modifier. Modifier keys include SHIFT, ALT, and CTRL for Windows, or SHIFT, CONTROL, COMMAND, and OPTION for Mac.
Mouse acceleration. A setting that allows you to adjust the screen cursor acceleration when using mouse mode.
Mouse mode. A method for positioning the screen cursor. When you place the pen on your tablet, you can move the screen cursor with a "pick up and slide" motion similar to using a standard mouse. This is known as relative positioning.
Mouse speed. A setting that allows you to adjust the speed at which your screen cursor moves when using mouse mode.
Nib. The replaceable pen tip.
Pairing. A method of creating a virtual cable link between to devices.
Pen input. A method of controlling a computer using the pen on your tablet.
Pen mode. A pen input method of positioning the screen cursor. Wherever you place the pen on your tablet, the screen cursor will jump to the corresponding point on the screen. This is known as absolute positioning, and is the default setting for the pen. Pen mode allows you to quickly position the screen cursor without having to first find it and then move it across the desktop. See also Mouse mode.
Pixel. The smallest unit of measure on your monitor screen.
Pressure sensitive. A quality of the pen tip and eraser that senses the amount of pressure being applied. This is used to create natural-looking pen, brush, and eraser strokes in applications that are pressure sensitive.
Pressure-sensitive application. Any application that supports pressure-sensitive input.
Proximity. The height above the tablet where pen detection occurs. See also positioning.
Screen cursor. The pointer on the display screen. Screen cursors come in different shapes (such as an Ibeam, arrow, or box), depending on which application you are running.
Tablet PC Input Panel (TIP). The Microsoft Windows Tablet PC Input Panel enables you to use your pen to create handwritten notes or work with an on-screen keyboard. The Input Panel dynamically converts your handwriting to text. The information you create can then be inserted into other documents, spreadsheets, or illustrations.
USB. Universal Serial Bus. A hardware interface standard for connecting computer peripheral devices. USB ports support hot-plugging, which allows you to connect or disconnect a USB device without turning off your computer.
Wintab. An interface standard used by Windows applications for receiving tablet information. Your tablet supports all Wintab-compatible applications under Windows.
Documents / Resources
References
![www.wacom.com]() Wacom | Interactive pen displays , pen tablets and stylus products.
Wacom | Interactive pen displays , pen tablets and stylus products.Wacom eStore | Pen displays and tablets for every need
![www.wacom.asia]() Untitled Document
Untitled Document![www.wacom.com.cn]() Wacom | Interactive pen displays , pen tablets and stylus products.
Wacom | Interactive pen displays , pen tablets and stylus products.![www.buywacom.com.au]() Buy With All Computers
Buy With All ComputersThis store is unavailable

Download manual
Here you can download full pdf version of manual, it may contain additional safety instructions, warranty information, FCC rules, etc.
Advertisement


Need help?
Do you have a question about the One and is the answer not in the manual?
Questions and answers