Epson FastFoto FF-680W Manual
Also See for FastFoto FF-680W:
- User manual (140 pages) ,
- Start here (2 pages) ,
- User manual (4 pages)
Advertisement
Table of Contents
Epson FastFoto FF-680W Manual
Disclaimer: The FastFoto scanner is not recommended for delicate photos, or photos with torn/damaged edges. If you have delicate materials you want to digitize, speak to a staff member about using the Epson Perfection scanner.
Ready to Scan
- Open the scanner cover, pull up the input tray extension, extend the output tray, and open the stopper.
![]()
- Note: Make sure you adjust the position of the stopper to correctly fit the size of the ejected photos.
- Slide the input tray edge guides all the way out.

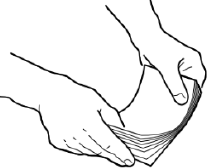
- Fan your stack of photos and tap them gently on a flat surface to even the edges.
Note: If you are loading a Polaroid or other instant photo, a photo that is longer than 12.1 inches, or a photo inside the carrier sheet, load only one photo at a time.
![]()
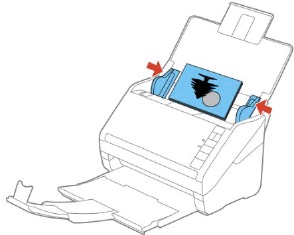
- Load your photos in the center of the input tray faceup, in landscape orientation and top edge first, then slide them in until they meet resistance.

- Slide the edge guides against the edges of the photos.
![]()


Note: If you are scanning a photo that is longer than 12.1 inches (307.3 mm), support the photo as it enters into and ejects from the scanner as shown.
- If necessary during scanning, adjust the position of the stopper and the output tray extension to fit the ejected photos.
- Once your photos are loaded, open the FastFoto software on the computer.
- Click the Settings button in the top right corner of the app.
- Choose your file destination by clicking on the manila folder icon next to the Folder bar.
- Change the prefix if you want.
- Under Enhancements, select or deselect the options you want applied to your photos.
- It is recommended that you direct the software to make an enhanced copy of the original, rather than applying changes to the original. Having both copies allows you to choose between them later.
- Scan settings:
- Specify the DPI you want your photos at.
- In testing, there was not much of a difference noted between photos scanned at 600 dpi and 1200 dpi. 600 dpi photos will be a more manageable file size, and is recommended.
- Specify the file format you want.
- JPG/JPEG are appropriate for most uses.
- TIFF is recommended only for archival preservation.
- You can also choose to have it scan the back of your photo, a useful tool if they are labeled.
- Specify the DPI you want your photos at.
- Advanced settings:
- Auto rotation: the software does not always accurately interpret orientation, however it is easy to fix later.
- Curled photo correction: recommended.
- Reduce lines and streaks: recommended.
- Upload: disregard this setting. Please save your files to a portable device such as a flash drive.
- Ignore Scanner Settings and Other Settings.
- Click Start Scanning in the software.
- Describe your photos
- You can set a year, month/season, and subject. This will replace the prefix that was created in Settings.
- For organization, it is recommended that you select "create a subfolder" for each batch of photos.
- When you're ready, click start scanning.
- The photos scan from the bottom of the pile to the top.
- If you want to keep scanning, you can add another batch and click "Scan Next Batch." If you're done, click done scanning.
Documents / ResourcesDownload manual
Here you can download full pdf version of manual, it may contain additional safety instructions, warranty information, FCC rules, etc.
Advertisement


Need help?
Do you have a question about the FastFoto FF-680W and is the answer not in the manual?
Questions and answers