Advertisement
GETTING TO KNOW YOUR MULTI COOKER
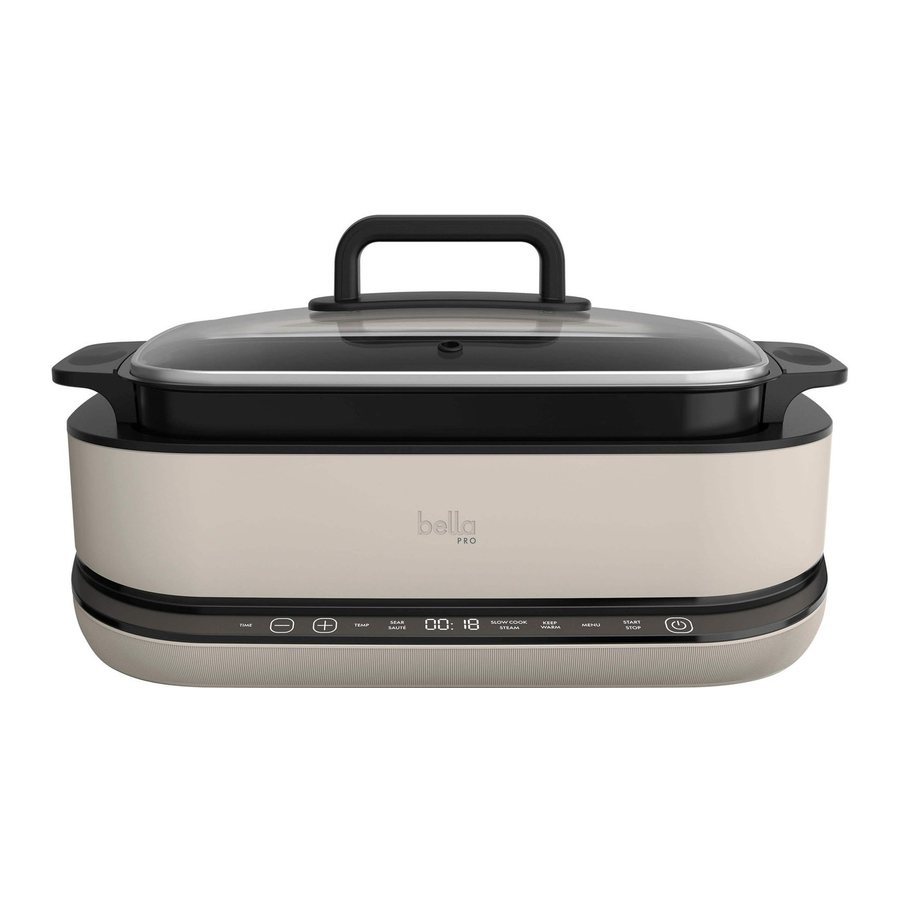
Product may vary slightly from illustration.

- Glass Lid
- Steamer Tray
- Cook Pot
- Cook Pot Handle
- Multi Cooker Body
- Heater
- Control Panel
BEFORE USING FOR THE FIRST TIME
- Remove all packaging from the Multi Cooker. Remove any labels from the outer surfaces.
- Be aware of glass lid. Remove and discard packaging.
- Wash cooking pot and steamer tray in warm, soapy water. Never use abrasive cleansers or scouring pads as they can damage the finish of both the cooking pot and base unit. Rinse and dry well.
DO NOT IMMERSE THE BASE UNIT OF THE MULTI COOKER IN WATER OR ANY OTHER LIQUID!
![]()
Be careful not to dent the bottom of the cooking pot. To work properly and produce the best cooking results, the cooking pot must fit snugly on top of the thermostat. - Never place liquid in the base unit. Place liquids into the cooking pot only.
- Never plug in the Multi Cooker without first placing the cooking pot inside the base unit.
NOTE: Do not use metal spatulas inside the pot, use silicon or wood spatulas to avoid damage on ceramic coating pot.

OPERATING INSTRUCTIONS
- Open the Multi Cooker lid.
- Following recipe directions, add ingredients to the cooking pot. Make sure cooking pot is well seated on the thermostat.
- Close the lid.
- Plug the Multi Cooker into a 120V AC electrical outlet. The Multi Cooker will sound 1 tone, the control panel indicator lights will illuminate briefly, then darken. 4 dashes (- - - -) and the power button will appear and remain on the digital display until further action.
CONTROL PANEL FUNCTIONS

POWER
- Plug in and beep, LED will display - - - -, menu buttons turn on for 1 second. Then all turn off except power button and LED display.
- Press the power button, the menu and keep warm buttons light on and LED displays - - - -.
- Press the power button again to turn off all other functions. Press the POWER button to turn off power anytime.
START/STOP
After selecting the function by pressing MENU, press to confirm or hold 2 seconds to cancel.
MENU
- Press to select the menu.
- Press the MENU button, SEAR will flash by default and other functions will remain on, press to select in sequence cyclically: SEAR -> SAUTE -> SLOW COOK -> STEAM.
- Under the selecting mode, appliance will sleep in 2 min without any operation.
KEEP WARM
- After SLOW COOK is completed, it will automatically enter to the keep warm function. Press and hold STOP button 2 seconds to cancel the keep warm function.
- Press KEEP WARM, the button will flash and other functions remain on. Press START STOP button to start KEEP WARM and hold this button 2 seconds to cancel this function.
TIME
Press TIME button, the LED will flash and display the time, which can be adjusted by pressing the + button and - button.
NOTE: Cooking time can be adjusted during cooking mode. The cooker will enter new time after flashing 5 times and a beep.
PLUS
When adjusting time and temperature, increase the time or temperature by pressing plus button.
MINUS
When adjusting time and temperature, decrease the time or temperature by pressing minus button.
TEMP
Press the button, LED displays temperature and starts flashing, then to adjust the temperature.
NOTE: Temperature can be adjusted during cooking mode for SEAR and SAUTE. The cooker will enter desired temperature after flashing 5 times and a beep.
MENU WORKING MODES
SEAR/SAUTE/STEAM working mode
 ATTENTION: Preheat is needed in SEAR and SAUTE. The multi cooker will have 5 beepers as soon as it reaches pre-set temperature and begins to countdown.
SEAR working mode
- Select the SEAR function by pressing the menu button. Then adjust desired temperature and time.
- Press START to start working. The LED screen displays PRE.
- You can adjust the temperature by pressing the TEMP button, it will adjust by 10 degrees Fahrenheit with pressing +/- button each time.
You can adjust the time by pressing the TIME button. - Press the start button to start working and the timer starts counting down after preheated.
Sear time can be adjusted form 10min to 3 hours. Temperature for sear function can be adjusted from 1500F to 4500F.
SAUTE working mode
- Select the SAUTE function by pressing the menu button.
- Press START to start working. The LED screen displays PRE.
- You can adjust the temperature by pressing the TEMP button and to adjust 10 degrees Fahrenheit with pressing +/- button each time; You can adjust the time by pressing the TIME button.
- Press the start button to start working and the timer starts counting down after preheated.
Saute time can be adjusted form 10min to 2.30 hours. Temperature for sear function can be adjusted from 1500F to 4500F.
STEAM working mode
IMPORTANT NOTE: When operating the steam function, the maximum water volume cannot exceed 1.2L.
- Select the STEAM function by pressing the menu button.
- Press START to start working. The LED screen displays RUNNING.
- You can adjust the time by pressing the TIME button.
- Press the start button to start preheating and the timer begins to count down as soon as it reaches default temperature with 5 beeping sounds. Steam time can be adjusted from 10 minutes to 1 hour.
SLOW COOK working mode:
- Press the MENU button to select the slow cook function. The LED screen displays the default time of 04:00.
- You can adjust the time by pressing the TIME button.
- Press the "Start" button to start and the timer start counting down.
- After the slow cook is completed, the buzzer will beep 5 times, and switch to KEEP WARM function automatically for 4 hours. KEEP WARM light will turn on and display the timer countdown from 04:00.
Slow cook time can be adjusted form 30min to 12hours.
KEEP WARM function:
- Press the KEEP WARM button to directly enter to the KEEP WARM function, the KEEP WARM light will flash.
- You can adjust the time by pressing the TIME button.
- Press the "Start" button to start and the timer start counting down.
Keep warm time can be adjusted form 30min to 12hours. The maximum KEEP WARM time is 12 hours. If the time exceeds 12 hours, it will enter to the standby situation.
TIME/TEMP working mode:
TIME:
Time adjustment, press +/- buttons, adjusted by 1 minute within 1 hour and by 10 minutes when over 1 hour. The longest adjustable time is 12 hours.
TEMP:
Temperature adjustment, after the function is selected, press the TEMP button, to adjust 10 degrees Fahrenheit by pressing +/- buttons once.
During the cooking process, time and temperature can be adjusted at any time.
FUNCTION TIME REFERENCE TABLE
| Function | Default Time | Default Temperature | Temperature Adjustable Range | Adjustable Time |
| SEAR | 1 hour | 4000F | 150-4500F | 00:10-03:00 |
| SAUTE | 1 hour and 30 minutes | 4000F | 150-4500F | 00:10-02:30 |
| SLOW COOK | 4 hours | / | / | 00:30-12:00 |
| STEAM | 45 minutes | / | / | 00:10-01:00 |
| KEEP WARM | Countdown from 02:00 | / | / | 00:30-12:00 |
USER MAINTENANCE INSTRUCTIONS
This appliance requires little maintenance. It contains no user-serviceable parts. Any servicing requiring disassembly This appliance requires little maintenance. It contains no user serviceable parts. Do not try to repair it yourself. Any servicing requiring disassembly other than cleaning, must be performed by a qualified appliance repair technician.
- Be careful not to dent the cooking pot, especially the bottom. To work properly and produce the best cooking results, the cooking pot must fit snugly on top of the thermostat.
- DO NOT let any food particles fall into the bottom of the base unit because they might prevent the thermostat from fitting tightly against the bottom of the cooking pot and cause inadequate cooking.
- Use plastic rice paddle or wooden spoon to stir and remove food from the cooking pot. NEVER use any metal utensils.
- Never use abrasive cleansers or scouring pads because they can damage the finish of both the cooking pot and base unit.
- Never pour liquid into the base unit or immerse it in water.
CARE & CLEANING INSTRUCTIONS

NEVER IMMERSE THE RICE COOKER BODY OR CORD IN WATER OR OTHER LIQUID.
- Unplug the Multi Cooker from the wall outlet. Allow the unit to cool before cleaning or storing.
- Clean the Multi Cooker after every use. NEVER immerse the base unit or power cord in water.
- Fill the cooking pot with warm water and allow to soak. Wash the cooking pot and steamer tray in warm, soapy water.
- Rinse and dry well.
- Wipe the Multi Cooker base unit with a soft, slightly damp cloth or sponge.
IMPORTANT SAFEGUARDS
When using electrical appliances, basic safety precautions should always be followed, including the following:
- READ ALL INSTRUCTIONS.
- Do not touch hot surfaces. Use handles or knobs.
- To protect against electrical shock, do not immerse cord, plugs or base unit in water or other liquid.
- This appliance is not intended for use by persons (including children) with reduced physical, sensory or mental capabilities, or lack of experience and knowledge, unless they have been given supervision or instruction concerning use of the appliance by a person responsible for their safety.
- Close supervision is necessary when any appliance is used by or near children.
- To disconnect, press POWER, then remove plug from the wall outlet.
- Unplug from outlet when not in use and before cleaning. Allow to cool before cleaning or storing this appliance.
- Do not operate any appliance with a damaged cord or plug or after the appliance malfunctions or has been damaged in any manner.
- The use of accessory attachments not recommended by the appliance manufacturer may cause injuries.
- Do not use outdoors.
- Do not let the cord hang over edge of table or counter, or touch hot surfaces, as you may trip and fall or cause the hot contents of the rice cooker to spill and possibly cause burns or injuries.
- Do not place on or near a hot gas or electric burner, or in a heated oven.
- Extreme caution must be used when moving an appliance containing hot oil or other hot liquids.
![]()
Use caution when opening lid. Steam escapes as soon as the lid is opened. Never place your face or hands over the Multi Cooker when opening the lid. Always hold cook pot handles when moving a hot cooking pot. - Never yank the cord to disconnect the appliance from the outlet, it could damage the cord. Instead, grasp the plug and pull to disconnect.
- Do not use appliance for other than intended use.
- Intended for countertop use only.
![]()
Spilled food can cause serious burns. Keep appliance and cord away from children. Never drape cord over edge of counter, never use outlet below counter, and never use with an extension cord.

FOR HOUSEHOLD USE ONLY SAVE THESE INSTRUCTIONS
ADDITIONAL IMPORTANT SAFEGUARDS
HOT SURFACES: This appliance generates heat and escaping steam during use.
Proper precautions must be taken to prevent the risk of burns, fires or other injury to persons or damage to property.
- A person who has not read and understood all operating and safety instructions is not qualified to operate this appliance. All users of this appliance must read and understand this instruction manual before operating or cleaning this appliance.
- If this appliance falls or accidentally becomes immersed in water, unplug it from the wall outlet immediately. Do not reach into the water!
- Unplug from outlet when not in use and before cleaning. To avoid electric shock, never immerse or rinse this appliance in water or any other liquid.
- When using this appliance, provide adequate air space above and on all sides for air circulation. Do not operate this appliance while it is touching or near curtains, wall coverings, clothing, dishtowels or other flammable materials.
- Do not place this Multi Cooker directly under kitchen wall cabinets when in use as it produces steam. Avoid reaching over the steam valve while in use.
- To reduce the risk of fire, do not leave this appliance unattended during use.
- If this appliance begins to malfunction during use, press POWER, then immediately unplug the cord. Do not use or attempt to repair the malfunctioning appliance!
- The cord to this appliance should only be plugged into a 120V AC electrical outlet.
- Do not use this appliance in an unstable position.
- Do not use the cooking pot if dented, bent, or damaged.
- Avoid electric shock by unplugging the Multi Cooker before washing or adding water.
- Never use the cooking pot on a gas or electric cooktop or on an open flame.
![]()
Never operate the Multi Cooker when the cooking pot is empty.- Do not leave any plastic accessories in the cooking pot while the Multi Cooker is in use.
- To avoid burns, stay clear of the steam vent during cooking.
![]()
Use caution when opening lid. Steam escapes as soon as the lid is opened. Never place your face or hands over the Multi Cooker when opening the lid. Always use oven mitts when handling the hot cooking pot.- To reduce the risk of electric shock, cook only in the cooking pot. Do not pour liquid directly into the Multi Cooker body.
- Do not use while standing in a damp area.
- Never use sharp objects inside the cooking pot as this will damage the ceramic coating.
NOTES ON THE CORD
A short power-supply cord (or detachable power-supply cord) is to be provided to reduce the risk resulting from becoming entangled in or tripping over a longer cord. Do not use an extension cord with this product.
NOTES ON THE PLUG
This appliance has a polarized plug (one blade is wider than the other). To reduce the risk of electric shock, this plug will fit in a polarized outlet only one way. If the plug does not fit fully into the outlet, reverse the plug. If it still does not fit, contact a qualified electrician. Do not modify the plug in any way.
PLASTICIZER WARNING
To prevent plasticizers from migrating to the finish of the countertop or tabletop or other furniture, place NON-PLASTIC coasters or place mats between the appliance and the finish of the countertop or tabletop.
Failure to do so may cause the finish to darken, permanent blemishes may occur, or stains can appear.
ELECTRIC POWER
If the electrical circuit is overloaded with other appliances, your appliance may not operate properly. It should be operated on a separate electrical circuit from other appliances.
Documents / ResourcesDownload manual
Here you can download full pdf version of manual, it may contain additional safety instructions, warranty information, FCC rules, etc.
Advertisement


Need help?
Do you have a question about the Pro Series6QT and is the answer not in the manual?
Questions and answers