Table of Contents
Advertisement
Quick Links
Technical Support and E-Warranty Certificate
www.vevor.com/support
SPIT ROTISSERIE ROASTER GRILL
MODEL: JY-MY-KYLQG-46-120
JY-MY-KYLQG-46-220
We continue to be committed to provide you tools with competitive price.
"Save Half", "Half Price" or any other similar expressions used by us only
represents an estimate of savings you might benefit from buying certain tools
with us compared to the major top brands and does not necessarily mean to cover
all categories of tools offered by us. You are kindly reminded to verify carefully
when you are placing an order with us if you are actually Saving
Half in comparison with the top major brands.
1
Advertisement
Table of Contents

Related Manuals for VEVOR JY-MY-KYLQG-46-120


Summary of Contents for VEVOR JY-MY-KYLQG-46-120
- Page 1 Technical Support and E-Warranty Certificate www.vevor.com/support SPIT ROTISSERIE ROASTER GRILL MODEL: JY-MY-KYLQG-46-120 JY-MY-KYLQG-46-220 We continue to be committed to provide you tools with competitive price. "Save Half", "Half Price" or any other similar expressions used by us only represents an estimate of savings you might benefit from buying certain tools with us compared to the major top brands and does not necessarily mean to cover all categories of tools offered by us.
- Page 2 This is the original instruction, please read all manual instructions carefully before operating. VEVOR reserves a clear interpretation of our user manual. The appearance of the product shall be subject to the product you received. Please forgive us that we won't inform you again if...
-
Page 3: Correct Disposal
Warning-To reduce the risk of injury, user must read instructions manual carefully. Pay attention to high temperatures to prevent burns. CORRECT DISPOSAL This product is subject to the provision of European Directive 2012/19/EC. The symbol showing a wheelie bin crossed through indicates that the product requires separate refuse collection in the European Union. -
Page 4: Fcc Information
FCC INFORMATION CAUTION: Changes or modifications not expressly approved by the party responsible for compliance could void the user's authority to operate the equipment! This device complies with Part 15 of the FCC Rules. Operation is subject to the following two conditions: 1) This product may cause harmful interference. -
Page 5: Important Safeguards
IMPORTANT SAFEGUARDS Thank you for using this product. In order to make sure that you can operate the machine correctly, read this instruction carefully before operating it and keep it properly for future reference. Please read this page's precautions and safety rules to ensure your safe use. - Page 6 come into contact with any hot surfaces. 12. Do not place the unit on or near hot air, electric burners or heaters. 13. Always switch off the power before plugging in or unplugging. Hold the plug instead of pulling on the cord. 14.
-
Page 7: Product Parameters
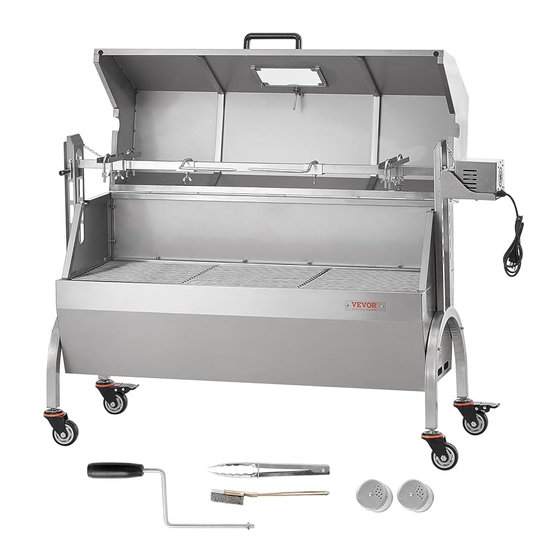
ATTENTION! This article is intended for outdoor use. Do not use indoors! PRODUCT PARAMETERS Model No. Region Voltage Power Plug Type JY-MY-KYLQG-46-120 North AC120 American America PLUG 60Hz JY-MY-KYLQG-46-220 Europe AC220V... - Page 8 PRODUCT COMPONENTS 1. Check all parts for completeness before beginning assembly. 2. To avoid accidents or sharp edges injuries please assemble and use carefully. For assembly you need a screwdriver and different screw wrenches. 2 persons are needed to assemble the product. Wear safety work gloves during assembly. Note: the quantity of parts shown in the manual is the actual usage and the unused parts are spare parts.
- Page 9 M8*51 M8*10 M8*15 M6*10 M4*16 M8*15 M8*45 STEP1 Install four casters on the support foot, rotate and tighten them in the direction of the arrow, and install casters 2 (with brake) on the same support foot.
- Page 10 STEP2 F:M8*15-4PCS G:M8*45-4PCS H:M8-8PCS Fix the support foot and grill body with M8*45, M8*15 hexagon screws and M8 flange nuts. STEP3 D:M6*8-4PCS E:M4*16-4PCS The motor support plate is aligned with the bracket hole position, adjusted to the appropriate height, and fixed with M6*8 hexagon screws. And put the barbecue fork bracket in the corresponding position of the other bracket.Attach the left and right windshields to the support feet with M4*16 cross large flat head screws.
- Page 11 STEP4 Place the charcoal tray on the grill body support. STEP5 I:M8*10-2PCS...
- Page 12 Fix the top cover and handle with M8*10 cross large flat head screws, and install chains on both sides of the top cover. STEP6 E:M4*16-6PCS Fix the top cover and grill body with M4*16 cross large flat head screws . STEP7 A:M8*51-4PCS B:M8*40-4PCS C:M8-8PCS...
- Page 13 STEP8 Put the food and barbecue fork together on the motor support plate and spit bracket. STEP9 D:M6*10-2PCS Put the motor on the motor support plate, and lock it with M6*10 hexagon screw. Put the slag plate on the bottom slot of the grill body. The installation is complete.
- Page 14 STEP10 The grills are placed on the grill body to roast meat and other food at the same...
- Page 15 First level: Second level: Max diameter of food: φ220mm Max diameter of food: φ360mm Max length of food: 1030mm Max length of food: 1030mm...
- Page 16 Third level: Fourth level: Max diameter of food: φ290mm Max diameter of food: φ430mm Max length of food: 1030mm Max length of food: 1030mm OPERATING INSTRUCTIONS Before using the appliance for the first time, peel off any promotional materials and packaging materials, and check that the cooking plates are clean and free of dust.
- Page 17 1. Do not move while the appliance is hot. 2. Due to safety reasons do not use this appliance with liquid fuels. 3. We strongly recommend that the bbq rotisserie grill shall be heated up and the fuel kept red-hot for at least 30 min prior to the first cooking; 4.
- Page 18 COOKING TIPS & HINTS 1. Always wash your hands before and after handling uncooked meat and before eating. 2. Always keep raw meat away from cooked meat and other foods. 3. Before cooking, ensure grill surfaces and tools are clean and free of old food residues.
- Page 19 5. After cooking on your grill always clean the cooking surfaces and utensils. CLEAING MAINTENANCE AND STORAGE 1. For cleaning, wipe the surface with a damp (not wet) cloth or wipe dry with a clean lint free cotton cloth. 2. Window cleaning liquid or a similar cleaning liquid can be used to clean the surface.
- Page 20 Technical Support and E-Warranty Certificate www.vevor.com/support...
- Page 21 Technique Assistance et certificat de garantie électronique www.vevor.com/support RÔTISSOIRE À BROCHE MODÈLE : JY-MY-KYLQG-46 -120 JY-MY-KYLQG- 46-220 Nous continuons à nous engager à vous fournir des outils à des prix compétitifs. "Économisez la moitié", "Moitié prix" ou toute autre expression similaire utilisée uniquement par nous représente une estimation des économies dont vous pourriez bénéficier en achetant...
- Page 22 Il s'agit des instructions originales, veuillez lire attentivement toutes les instructions du manuel avant de l'utiliser. VEVOR se réserve une interprétation claire de notre manuel d’utilisation. L'apparence du produit dépend du produit que vous avez reçu. Veuillez nous pardonner que nous...
- Page 23 logicielles sur notre produit. Avertissement : Pour réduire le risque de blessure, l'utilisateur doit lire attentivement le manuel d'instructions. Faites attention aux températures élevées pour éviter les brûlures. ÉLIMINATION CORRECTE Ce produit est soumis aux dispositions de la directive européenne 2012/19/CE.
-
Page 24: Fcc Information
FCC INFORMATION ATTENTION : Changements ou modifications non expressément approuvés par la partie responsable de la conformité pourrait annuler le droit de l'utilisateur à utiliser l'équipement ! Cet appareil est conforme à la partie 15 des règles FCC. L’exploitation est soumise aux deux conditions suivantes : 1) Ce produit peut provoquer des interférences nuisibles. -
Page 25: Important Safeguards
l'aide. L'appareil a été évalué pour répondre aux normes RF générales exigence d’exposition. L'appareil peut être utilisé en portable exposition état sans restriction . IMPORTANT SAFEGUARDS Merci d'avoir utilisé ce produit. Afin de vous assurer que vous pouvez utiliser la machine correctement, lisez attentivement ces instructions avant de l'utiliser et conservez-la correctement pour référence future. - Page 26 8. N'utilisez pas l'appareil avec un cordon ou une fiche endommagée, un dysfonctionnement ou un dommage mécanique. Envoyez-le à votre centre de service agréé le plus proche pour examen et réparation (SEULS les techniciens doivent ouvrir l'appareil). 9. L'utilisation d'accessoires ou d'accessoires non fournis ou recommandés par le fabricant peut provoquer des blessures.
-
Page 27: Product Parameters
contenant de l'huile chaude ou d'autres liquides chauds. 23. N'utilisez pas la machine dans un garage pour appareils électroménagers ou sous une armoire murale. Débranchez toujours l'appareil de la prise électrique lorsque vous le rangez dans un garage pour appareils électroménagers. Dans le cas contraire, cela entraînerait un risque d'incendie, notamment si la machine touche le mur du garage ou si la porte le touche en se fermant. -
Page 28: Loading Capacity
ATTENTION! La tension utilisée pour cet appareil doit être la même que la tension d'alimentation LOADING CAPACITY Numéro de modèle. Capacité de chargement JY-MY-KYLQG- 46-120 Max 132 lb (60 kg) JY-MY-KYLQG- 46-220 Max 132 lb (60 kg) ATTENTION! 3. Ne dépassez pas la capacité de poids indiquée. Soyez conscient du chargement dynamique ! Le mouvement soudain de la charge peut créer brièvement une charge excessive, provoquant une défaillance du produit. - Page 29 Non . Nom de la pièce Qté Non . Nom de la pièce Qté Cracher Roue avec frein Plaque de Corps de gril localisation Le couvercle Bac à charbon supérieur Poignée Roue sans frein Fourchette à rôtir Support de broche Moteur Chaîne Plaque support...
- Page 30 M8* 1 5 M8*45 Ô ÉTAPE 1 Install four casters on the support foot, rotate and tighten them in the direction of the arrow, and install casters 2 (with brake) on the same support foot. ÉTAPE 2 F:M8*15-4 PIÈCES G:M8*45-4 PIÈCES H:M8-8 PIÈCES...
- Page 31 Fix the support foot and grill body with M8*45, M8*15 hexagon screws and M8 flange nuts. ÉTAPE 3 D : M6*8-4 pièces E : M4*16-4 pièces The motor support plate is aligned with the bracket hole position, adjusted to the appropriate height, and fixed with M6*8 hexagon screws. And put the barbecue fork bracket in the corresponding position of the other bracket.Attach the left and right windshields to the support feet with M4*16 cross large flat head screws.
- Page 32 Place the charcoal tray on the grill body support. ÉTAPE 5 I : M8*10-2 pièces Fix the top cover and handle with M8*10 cross large flat head screws, and install chains on both sides of the top cover. ÉTAPE 6 E : M4*16-6 pièces...
- Page 33 Fix the top cover and grill body with M4*16 cross large flat head screws . ÉTAPE 7 A : M8*51-4 pièces B : M8*40-4 pièces C : M8-8 pièces Displayed in the above image, secure the food onto the barbecue fork or positioning plate.
- Page 34 ÉTAPE8 ÉTAPE9 D:M6*10-2 PIÈCES Put the motor on the motor support plate, and lock it with M6*10 hexagon screw. Put the slag plate on the bottom slot of the grill body. The installation is complete.
- Page 35 ÉTAPE10 The grills are placed on the grill body to roast meat and other food at the same...
- Page 36 First level: Second level: Max diameter of food: φ220mm Max diameter of food: φ360mm Max length of food: 1030mm Max length of food: 1030mm Third level: Fourth level: Max diameter of food: φ290mm Max diameter of food: φ430mm Max length of food: 1030mm Max length of food: 1030mm...
- Page 37 OPERATING INSTRUCTIONS Avant d'utiliser l'appareil pour la première fois, décollez tout matériel promotionnel et matériel d'emballage et vérifiez que les plaques de cuisson sont propres et exemptes de poussière. Si nécessaire, essuyez-les avec un chiffon humide. Étalez-la avec un torchon absorbant et essuyez tout excès d’huile. Lorsque votre produit est chauffé...
- Page 38 16. Ne faites pas cuire avant que le combustible ne soit recouvert d'une couche de cendre. 17. Si le moteur se bloque soudainement, si un bruit anormal, de la fumée ou d'autres phénomènes indésirables se produisent pendant le processus du barbecue, coupez immédiatement l'alimentation électrique et redémarrez-la une fois la maintenance terminée.
- Page 39 COOKING TIPS & HINTS 6. Lavez-vous toujours les mains avant et après avoir manipulé de la viande crue et avant de manger. 7. Gardez toujours la viande crue à l’écart de la viande cuite et d’autres aliments. 8. Avant la cuisson, assurez-vous que les surfaces et les outils du gril sont propres et exempts de vieux résidus alimentaires.
- Page 40 CLEAING MAINTENANCE AND STORAGE 6. Pour le nettoyage, essuyez la surface avec un chiffon humide (non mouillé) ou essuyez-la avec un chiffon en coton propre et non pelucheux. 7. Du liquide de nettoyage pour vitres ou un liquide de nettoyage similaire peut être utilisé...
- Page 41 Technique Assistance et certificat de garantie électronique www.vevor.com/support...
- Page 42 Technisch Support und E-Garantie-Zertifikat www.vevor.com/support SPIEß-ROTISSERIE-RÖSTER-GRILL MODELL: JY-MY-KYLQG-46 -120 JY-MY-KYLQG-46 -220 Wir sind weiterhin bestrebt, Ihnen Werkzeuge zu wettbewerbsfähigen Preisen anzubieten. "Sparen Sie die Hälfte", "Halber Preis" oder andere ähnliche Ausdrücke, die wir nur verwenden stellt eine Schätzung der Einsparungen dar, die Sie durch den Kauf bestimmter Werkzeuge erzielen können...
- Page 43 Dies ist die Originalanleitung. Bitte lesen Sie alle Anweisungen sorgfältig durch, bevor Sie das Gerät in Betrieb nehmen. VEVOR behält sich eine klare Auslegung unserer Bedienungsanleitung vor. Das Erscheinungsbild des Produkts richtet sich nach dem Produkt, das Sie erhalten haben. Bitte...
- Page 44 Technologie- oder Software-Updates für unser Produkt gibt . Warnung: Um das Verletzungsrisiko zu verringern, muss der Benutzer die Bedienungsanleitung sorgfältig lesen. Achten Sie auf hohe Temperaturen, um Verbrennungen zu vermeiden. KORREKTE ENTSORGUNG Dieses Produkt unterliegt den Bestimmungen der europäischen Richtlinie 2012/19/EU. Das Symbol einer durchgestrichenen Mülltonne weist darauf hin, dass das Produkt in der Europäischen Union einer getrennten Müllentsorgung unterliegt.
-
Page 45: Fcc Information
FCC INFORMATION ACHTUNG: Änderungen oder Modifikationen, die nicht ausdrücklich von der Partei genehmigt wurden Die für die Einhaltung der Vorschriften verantwortliche Person kann zum Erlöschen der Berechtigung des Benutzers zum Betrieb des Geräts führen! Dieses Gerät entspricht Teil 15 der FCC-Bestimmungen. Der Betrieb unterliegt den folgenden zwei Bedingungen: 1) Dieses Produkt kann schädliche Störungen verursachen. -
Page 46: Important Safeguards
den, an den der Empfänger angeschlossen ist. · Wenden Sie sich an den Händler oder einen erfahrenen Radio-/Fernsehtechniker. Das Gerät wurde auf die Einhaltung der allgemeinen HF- Belichtungsanforderung. Das Gerät kann in tragbaren Belichtung Zustand ohne Einschränkung . IMPORTANT SAFEGUARDS Vielen Dank für die Verwendung dieses Produkts. - Page 47 einbauen oder entfernen und bevor Sie es reinigen. 7. Die heißen Teile vor dem Betrieb abkühlen lassen. 8. Betreiben Sie das Gerät nicht mit beschädigtem Kabel oder Stecker, Fehlfunktionen oder mechanischen Schäden. Senden Sie es zur Überprüfung und Reparatur an Ihr nächstgelegenes autorisiertes Servicecenter (NUR Techniker sollten das Gerät öffnen).
-
Page 48: Product Parameters
Heizgeräte läuft. 21. Vermeiden Sie die Verwendung in der Nähe von brennbaren Flüssigkeiten, Gasen, Staub oder anderen explosiven Situationen. 22. Beim Bewegen eines Geräts, das heißes Öl oder andere heiße Flüssigkeiten enthält, ist äußerste Vorsicht geboten. 23. Betreiben Sie die Maschine nicht in einer Garage oder unter einem Wandschrank. -
Page 49: Loading Capacity
JY-MY-KYLQG-46 -220 Europa Wechselstr Europa om 220 V STECKER 50 Hz JY-MY-KYLQG-46 -2 2 0 Australien Wechselstr Australien om 240 V STECKER 50 Hz AUFMERKSAMKEIT! für dieses Gerät verwendete Spannung muss Versorgungsspannung übereinstimmen LOADING CAPACITY Modell Nr. Ladekapazität JY-MY-KYLQG-46 -120 Max. - Page 50 NEIN NEIN Meng Teilname Teilname Spucke Rad mit Bremse Fixierplatte Grillkörper Obere Abdeckung Holzkohleschale Handhaben Rad ohne Bremse Bratengabel Spießhalterung Motor Kette Motorträgerplatte Grill Stützfuß Teilname Teilname M8*51 M8 *10 M8* 15...
- Page 51 M6* 10 M 4*16 M8* 1 5 M8*45 Ö SCHRITT Install four casters on the support foot, rotate and tighten them in the direction of the arrow, and install casters 2 (with brake) on the same support foot. SCHRITT 2 F: M8*15-4 STK. G: M8*45-4 STK. H: M8-8 STK.
- Page 52 Fix the support foot and grill body with M8*45, M8*15 hexagon screws and M8 flange nuts. SCHRITT 3 D: M6*8-4 STK. E: M4*16-4 STK. The motor support plate is aligned with the bracket hole position, adjusted to the appropriate height, and fixed with M6*8 hexagon screws. And put the barbecue fork bracket in the corresponding position of the other bracket.Attach the left and right windshields to the support feet with M4*16 cross large flat head screws.
- Page 53 Place the charcoal tray on the grill body support. SCHRITT 5 I: M8 * 10-2 STK Fix the top cover and handle with M8*10 cross large flat head screws, and install chains on both sides of the top cover. SCHRITT 6 E: M4 * 16-6 STK...
- Page 54 Fix the top cover and grill body with M4*16 cross large flat head screws . SCHRITT 7 A: M8*51-4 STK. B: M8*40-4 STK. C: M8-8 STK. Displayed in the above image, secure the food onto the barbecue fork or positioning plate. When using the positioning plate, use U-bolts to secure the food;...
- Page 55 SCHRITT 8 SCHRITT 9 D: M6 * 10-2 STK Put the motor on the motor support plate, and lock it with M6*10 hexagon screw. Put the slag plate on the bottom slot of the grill body. The installation is complete.
- Page 56 SCHRITT10 The grills are placed on the grill body to roast meat and other food at the same...
- Page 57 First level: Second level: Max diameter of food: φ220mm Max diameter of food: φ360mm Max length of food: 1030mm Max length of food: 1030mm Third level: Fourth level: Max diameter of food: φ290mm Max diameter of food: φ430mm Max length of food: 1030mm Max length of food: 1030mm...
- Page 58 OPERATING INSTRUCTIONS Entfernen Sie vor der ersten Inbetriebnahme des Geräts sämtliche Werbematerialien und Verpackungsmaterialien und prüfen Sie, ob die Kochplatten sauber und staubfrei sind. Wischen Sie sie bei Bedarf mit einem feuchten Tuch ab. Verteilen Sie sie mit einem saugfähigen Küchentuch und wischen Sie überschüssiges Öl ab.
- Page 59 26. Wenn der Motor während des Grillvorgangs plötzlich stecken bleibt oder ungewöhnliche Geräusche, Rauch oder andere unerwünschte Erscheinungen auftreten, unterbrechen Sie sofort die Stromzufuhr und starten Sie ihn nach Abschluss der Wartung neu. 27. Schalten Sie den Drehspießmotor immer auf „ AUS “ , bevor Sie den Grill öffnen.
- Page 60 COOKING TIPS & HINTS 11. Waschen Sie Ihre Hände immer vor und nach dem Umgang mit rohem Fleisch und vor dem Essen. 12. Halten Sie rohes Fleisch immer von gekochtem Fleisch und anderen Lebensmitteln fern. 13. Stellen Sie vor dem Grillen sicher, dass die Grilloberflächen und -werkzeuge sauber und frei von alten Speiseresten sind.
- Page 61 CLEAING MAINTENANCE AND STORAGE 11. Zum Reinigen die Oberfläche mit einem feuchten (nicht nassen) Tuch abwischen oder mit einem sauberen, fusselfreien Baumwolltuch trockenreiben. 12. der Oberfläche kann Fensterreiniger oder eine ähnliche Reinigungsflüssigkeit verwendet werden . 13. Ziehen Sie vor der Lagerung immer den Stecker aus der Maschine. 14.
- Page 62 Technisch Support und E-Garantie-Zertifikat www.vevor.com/support...
- Page 63 Tecnico Supporto e certificato di garanzia elettronica www.vevor.com/support GRIGLIA PER GIRARROSTO ALLO SPIEDO MODELLO: JY-MY-KYLQG-46 -120 JY-MY-KYLQG-46 -220 Continuiamo a impegnarci per fornirvi strumenti a prezzi competitivi. "Risparmia la metà", "Metà prezzo" o qualsiasi altra espressione simile utilizzata solo da noi rappresenta una stima del risparmio che potresti trarre dall'acquisto di determinati strumenti con noi rispetto ai principali marchi più...
- Page 64 Supporto tecnico e certificato di garanzia elettronica www.vevor.com/support Queste sono le istruzioni originali, leggere attentamente tutte le istruzioni del manuale prima dell'uso. VEVOR si riserva una chiara interpretazione del nostro manuale d'uso. L'aspetto del prodotto sarà soggetto al prodotto...
-
Page 65: Corretto Smaltimento
ricevuto. Ti preghiamo di perdonarci se non ti informeremo più se sono presenti aggiornamenti tecnologici o software sul nostro prodotto. Avvertenza: per ridurre il rischio di lesioni, l'utente deve leggere attentamente il manuale di istruzioni. Fare attenzione alle alte temperature per evitare ustioni. CORRETTO SMALTIMENTO Questo prodotto è... -
Page 66: Fcc Information
FCC INFORMATION ATTENZIONE: Variazioni o modifiche non espressamente approvate dalla parte responsabile della conformità potrebbe invalidare il diritto dell'utente a utilizzare l'apparecchiatura! Questo dispositivo è conforme alla Parte 15 delle norme FCC. Il funzionamento è soggetto alle seguenti due condizioni: 1) Questo prodotto può... -
Page 67: Important Safeguards
esposizione. Il dispositivo può essere utilizzato in portatile esposizione condizione senza restrizioni . IMPORTANT SAFEGUARDS Grazie per aver utilizzato questo prodotto. Per essere sicuri di poter utilizzare correttamente la macchina, leggere attentamente queste istruzioni prima di utilizzarla e conservarle adeguatamente per riferimento futuro. Si prega di leggere le precauzioni e le regole di sicurezza di questa pagina per garantire un utilizzo sicuro. - Page 68 9. L'utilizzo di accessori o accessori non forniti o consigliati dal produttore può causare lesioni. 10. Se si prevede di non utilizzare la macchina per un lungo periodo di tempo, scollegarla, pulirla, coprirla e conservarla in un luogo asciutto e sicuro. 11.
-
Page 69: Product Parameters
chiude. 24. Attacco di tipo Y : Se il cavo di alimentazione è danneggiato, deve essere sostituito con un cavo o un gruppo speciale disponibile presso il produttore o il suo agente di assistenza. 25. Questo apparecchio può essere utilizzato da bambini di età pari o superiore a 8 anni e da persone con ridotte capacità... -
Page 70: Product Components
Modello numero: Capacità di carico JY-MY-KYLQG-46 -120 Massimo 132 libbre (60 kg) JY-MY-KYLQG-46 -220 Massimo 132 libbre (60 kg) ATTENZIONE! 7. Non superare la capacità di peso indicata. Fai attenzione al caricamento dinamico! Il movimento improvviso del carico potrebbe creare per breve tempo un carico in eccesso, causando il guasto del prodotto. - Page 71 NO . Parte da me Qtà NO . Parte da me Qtà Sputo Ruota con freno e Piastra di Corpo della griglia posizionamento Coperchio Vassoio per carbone superiore Maniglia Ruota senza freno e Forchetta per Staffa per spiedo arrostire Il motore Catena Piastra supporto Griglia...
- Page 72 PASSO 1 Install four casters on the support foot, rotate and tighten them in the direction of the arrow, and install casters 2 (with brake) on the same support foot. PASSO2 F:M8*15-4PZ G:M8*45-4PZ H:M8-8PZ Fix the support foot and grill body with M8*45, M8*15 hexagon screws and M8 flange nuts.
- Page 73 PASSO3 D:M6*8-4PZ E:M4*16-4PZ The motor support plate is aligned with the bracket hole position, adjusted to the appropriate height, and fixed with M6*8 hexagon screws. And put the barbecue fork bracket in the corresponding position of the other bracket.Attach the left and right windshields to the support feet with M4*16 cross large flat head screws.
- Page 74 PASSO5 I:M8*10-2PZ Fix the top cover and handle with M8*10 cross large flat head screws, and install chains on both sides of the top cover. PASSO6 E:M4*16-6PZ Fix the top cover and grill body with M4*16 cross large flat head screws .
- Page 75 PASSO7 A:M8*51-4PZ B:M8*40-4PZ C:M8-8PZ Displayed in the above image, secure the food onto the barbecue fork or positioning plate. When using the positioning plate, use U-bolts to secure the food; and use M8 butterfly nuts for fixation. Then attach the grill fork or positioning plate to the grill fork rod with M8*15 butterfly screws.
- Page 76 PASSO9 D:M6*10-2PZ Put the motor on the motor support plate, and lock it with M6*10 hexagon screw. Put the slag plate on the bottom slot of the grill body. The installation is complete. PASSO10 The grills are placed on the grill body to roast meat and other food at the same...
- Page 77 First level: Second level: Max diameter of food: φ220mm Max diameter of food: φ360mm Max length of food: 1030mm Max length of food: 1030mm...
- Page 78 Third level: Fourth level: Max diameter of food: φ290mm Max diameter of food: φ430mm Max length of food: 1030mm Max length of food: 1030mm OPERATING INSTRUCTIONS Prima di utilizzare l'apparecchio per la prima volta, rimuovere eventuali materiali promozionali e di imballaggio e verificare che le piastre di cottura siano pulite e prive di polvere.
- Page 79 5 . Ungete la griglia con un po' di olio vegetale e iniziate a grigliare. 6 . Posizionare il cibo sulla griglia solo dopo che il combustibile è coperto da uno strato di cenere. 7 . Collegare il cavo alla presa a muro. 8 .
- Page 80 ATTENZIONE! Indossare sempre i guanti quando si regola la griglia, le maniglie della griglia possono diventare molto calde durante il processo di cottura alla griglia. IMPORTANTE! Non versare acqua nell'apparecchio mentre è ancora caldo. IMPORTANTE! Chiudere il cursore di ventilazione per spegnere l'apparecchio. (Applicabile solo per apparecchi con cursore di ventilazione) COOKING TIPS &...
- Page 81 20. Assicurarsi che tutta la carne sia cotta bene prima di mangiarla. ATTENZIONE: 16. Mangiare crudo o sotto la carne cotta causerà un'intossicazione alimentare (ad es. ceppi batterici come l'Escherichia coli). 17. Per ridurre il rischio di sotto carne cotta, tagliare la carne per assicurarsi che sia completamente cotta.
- Page 82 19. Assicurarsi sempre che la macchina sia fresca e asciutta prima di infilarla. 20. Conservare l'apparecchio in un luogo asciutto e pulito.
- Page 83 Tecnico Supporto e certificato di garanzia elettronica www.vevor.com/support...
- Page 84 Técnico Certificado de soporte y garantía electrónica www.vevor.com/support ASADOR ASADOR ASADOR MODELO: JY-MY-KYLQG-46 -120 JY-MY-KYLQG-46 -220 Seguimos comprometidos a proporcionarle herramientas a precios competitivos. "Ahorre a mitad de precio", "A mitad de precio" o cualquier otra expresión similar utilizada únicamente por nosotros representa una estimación de los ahorros que podría beneficiarse al comprar ciertas...
- Page 85 Estas son las instrucciones originales; lea atentamente todas las instrucciones del manual antes de operar. VEVOR se reserva una interpretación clara de nuestro manual de usuario. La apariencia del producto estará sujeta al producto que recibió. Perdone que no le...
-
Page 86: Eliminación Correcta
informaremos nuevamente si hay actualizaciones de tecnología o software en nuestro producto. Advertencia: para reducir el riesgo de lesiones, el usuario debe leer atentamente el manual de instrucciones. Preste atención a las altas temperaturas para evitar quemaduras. ELIMINACIÓN CORRECTA Este producto está sujeto a las disposiciones de la Directiva Europea 2012/19/CE. -
Page 87: Fcc Information
FCC INFORMATION PRECAUCIÓN: Cambios o modificaciones no aprobados expresamente por la parte responsable del cumplimiento podría anular la autoridad del usuario para operar el equipo. Este dispositivo cumple con la Parte 15 de las normas de la FCC. La operación está... -
Page 88: Important Safeguards
ayuda. El dispositivo ha sido evaluado para cumplir con las normas generales de RF. requisito de exposición. El dispositivo se puede utilizar en forma portátil. exposición condición sin restricciones . IMPORTANT SAFEGUARDS Gracias por usar este producto. Para asegurarse de que puede operar la máquina correctamente, lea atentamente estas instrucciones antes de operarla y consérvelas adecuadamente para consultarlas en el futuro. - Page 89 para su examen y reparación (SÓLO los técnicos deben abrir la unidad). 9. El uso de accesorios o aditamentos que no sean proporcionados o recomendados por el fabricante puede causar lesiones. 10. Si la máquina no se va a utilizar durante un período prolongado, desenchúfela, límpiela, cúbrala y guárdela en un lugar seco y seguro.
-
Page 90: Product Parameters
23. No opere la máquina en un garaje de electrodomésticos o debajo de un gabinete de pared. Desenchufe siempre la unidad del tomacorriente cuando la guarde en un garaje para electrodomésticos. De lo contrario, se produciría riesgo de incendio, especialmente si la máquina toca la pared del garaje o la puerta al cerrar. -
Page 91: Loading Capacity
LOADING CAPACITY N º de Modelo. Capacidad de carga JY-MY-KYLQG-46 -120 Máximo 132 libras (60 kg) JY-MY-KYLQG-46 -220 Máximo 132 libras (60 kg) ¡ATENCIÓN! 9. No exceda la capacidad de peso indicada. ¡ Tenga en cuenta la carga dinámica! El movimiento repentino de la carga puede crear brevemente un exceso de carga, provocando fallas en el producto. - Page 92 Canti No . parte de mi No . parte de mi Escupir Rueda con freno Placa de Cuerpo de parrilla localización La cubierta Bandeja de carbón superior Manejar Rueda sin freno tenedor para asar soporte para asador Motor Cadena Placa de soporte Parrilla del motor Pie de apoyo...
- Page 93 nort M8* 1 5 M8*45 PASO 1 Install four casters on the support foot, rotate and tighten them in the direction of the arrow, and install casters 2 (with brake) on the same support foot. PASO 2 F:M8*15-4PCS G:M8*45-4PCS H:M8-8PCS...
- Page 94 Fix the support foot and grill body with M8*45, M8*15 hexagon screws and M8 flange nuts. PASO 3 D:M6*8-4PCS E:M4*16-4PCS The motor support plate is aligned with the bracket hole position, adjusted to the appropriate height, and fixed with M6*8 hexagon screws. And put the barbecue fork bracket in the corresponding position of the other bracket.Attach the left and right windshields to the support feet with M4*16 cross large flat head screws.
- Page 95 Place the charcoal tray on the grill body support. PASO 5 I:M8*10-2PCS Fix the top cover and handle with M8*10 cross large flat head screws, and install chains on both sides of the top cover. PASO 6 E:M4*16-6PCS...
- Page 96 Fix the top cover and grill body with M4*16 cross large flat head screws . PASO 7 A:M8*51-4PCS B:M8*40-4PCS C:M8-8PCS Displayed in the above image, secure the food onto the barbecue fork or positioning plate. When using the positioning plate, use U-bolts to secure the food;...
- Page 97 PASO8 PASO 9 D:M6*10-2PCS Put the motor on the motor support plate, and lock it with M6*10 hexagon screw. Put the slag plate on the bottom slot of the grill body. The installation is complete.
- Page 98 PASO 10 The grills are placed on the grill body to roast meat and other food at the same...
- Page 99 First level: Second level: Max diameter of food: φ220mm Max diameter of food: φ360mm Max length of food: 1030mm Max length of food: 1030mm Third level: Fourth level: Max diameter of food: φ290mm Max diameter of food: φ430mm Max length of food: 1030mm Max length of food: 1030mm...
- Page 100 OPERATING INSTRUCTIONS Antes de utilizar el aparato por primera vez, retire todos los materiales promocionales y de embalaje y compruebe que las placas de cocción estén limpias y libres de polvo. Si es necesario, límpielos con un paño húmedo. Extender con un paño de cocina absorbente y limpiar el exceso de aceite. Cuando su producto se calienta por primera vez, puede emitir un ligero humo u olor, lo cual es normal en muchos aparatos de calefacción y no afectará...
- Page 101 44. Si el motor se atasca repentinamente, se encuentran ruidos anormales, humo y otros fenómenos indeseables durante el proceso de barbacoa, corte inmediatamente el suministro de energía y reinícielo después de completar el mantenimiento. 45. Siempre apague el motor del asador antes de abrir la parrilla. ¡ADVERTENCIA! Este producto asador se calienta mucho, no lo haga.
- Page 102 COOKING TIPS & HINTS 21. Lávese siempre las manos antes y después de manipular carne cruda y antes de comer. 22. Mantenga siempre la carne cruda alejada de la carne cocida y otros alimentos. 23. Antes de cocinar, asegúrese de que las superficies y herramientas de la parrilla estén limpias y libres de residuos de alimentos viejos.
- Page 103 CLEAING MAINTENANCE AND STORAGE 21. Para la limpieza, limpie la superficie con un paño húmedo (no mojado) o séquela con un paño de algodón limpio y sin pelusa. 22. la superficie se puede utilizar líquido limpiacristales o un líquido limpiador similar .
- Page 104 Técnico Certificado de soporte y garantía electrónica www.vevor.com/support...
- Page 105 Techniczny Certyfikat wsparcia i e-gwarancji www.vevor.com/support GRILL Z ROŻNEM NA ROŻNIE MODEL: JY-MY-KYLQG-46 -120 JY-MY-KYLQG-46 -220 Nadal dokładamy wszelkich starań, aby zapewnić Państwu narzędzia w konkurencyjnej cenie. „Zaoszczędź pół ceny”, „Zaoszczędź połowę ceny” lub inne podobne wyrażenia używane wyłącznie przez nas reprezentuje szacunkową...
- Page 106 Wsparcie techniczne i certyfikat e-gwarancji www.vevor.com/support To jest oryginalna instrukcja. Przed przystąpieniem do obsługi prosimy o dokładne zapoznanie się ze wszystkimi instrukcjami. VEVOR zastrzega sobie jasną interpretację naszej instrukcji obsługi. Wygląd produktu zależy od produktu, który otrzymałeś. Proszę wybaczyć nam, że nie...
- Page 107 aktualizacje technologii lub oprogramowania naszego produktu. Ostrzeżenie — aby zmniejszyć ryzyko obrażeń, użytkownik musi uważnie przeczytać instrukcję obsługi. Uważaj na wysokie temperatury, aby zapobiec poparzeniom. PRAWIDŁOWA UTYLIZACJA Ten produkt podlega przepisom Dyrektywy Europejskiej 2012/19/EC. Symbol przekreślonego kosza na śmieci oznacza, że produkt wymaga selektywnej zbiórki śmieci na terenie Unii Europejskiej.
-
Page 108: Fcc Information
FCC INFORMATION UWAGA: Zmiany lub modyfikacje, które nie zostały wyraźnie zatwierdzone przez stronę odpowiedzialny za zgodność może unieważnić uprawnienia użytkownika do obsługi urządzenia! To urządzenie jest zgodne z częścią 15 przepisów FCC. Działanie podlega następującym dwóm warunkom: 1) Ten produkt może powodować szkodliwe zakłócenia. 2) Ten produkt musi akceptować... -
Page 109: Important Safeguards
radiowo-telewizyjnym w celu uzyskania pomocy. Urządzenie zostało ocenione pod kątem zgodności z ogólnymi wymaganiami RF wymóg ekspozycji. Urządzenie może być używane w wersji przenośnej narażenie stan bez ograniczeń . IMPORTANT SAFEGUARDS Dziękujemy za skorzystanie z tego produktu. Aby mieć pewność, że będziesz mógł... - Page 110 8. Nie używaj urządzenia z uszkodzonym przewodem lub wtyczką, wadliwym działaniem lub jakimkolwiek uszkodzeniem mechanicznym. Wyślij go do najbliższego autoryzowanego centrum serwisowego w celu sprawdzenia i naprawy (urządzenie powinni otwierać WYŁĄCZNIE technicy). 9. Używanie jakichkolwiek akcesoriów lub przystawek, które nie są dostarczone lub zalecane przez producenta, może spowodować...
-
Page 111: Product Parameters
22. Należy zachować szczególną ostrożność podczas przenoszenia urządzenia zawierającego gorący olej lub inne gorące płyny. 23. Nie używaj urządzenia w garażu ze sprzętem AGD lub pod szafką ścienną. Zawsze odłączaj urządzenie od gniazdka elektrycznego podczas przechowywania w garażu. W przeciwnym razie może to spowodować ryzyko pożaru, zwłaszcza jeśli maszyna dotknie ściany garażu lub brama dotknie jej podczas zamykania. -
Page 112: Loading Capacity
UWAGA! Napięcie stosowane w tym urządzeniu musi być takie samo jak napięcie zasilania LOADING CAPACITY Model nr. Ładowność JY-MY-KYLQG-46 -120 Maks. 132 funty (60 kg) JY-MY-KYLQG-46 -220 Maks. 132 funty (60 kg) UWAGA! 11. Nie przekraczaj podanego udźwigu. Uważaj na ładowanie dynamiczne! Nagły ruch ładunku może na krótko spowodować... - Page 113 Iloś NIE . Częściowe imię NIE . Częściowe imię Ilość ć Pluć Koło z hamulcem e Płytka lokalizująca Korpus grillowy Górna obudowa Taca na węgiel Uchwyt Koło bez hamulca e Widelec do Wspornik na rożen pieczenia Silnik Łańcuch Płyta podtrzymująca Grill silnik Stopa podporowa...
- Page 114 M8* 1 5 M8*45 KROK 1 Install four casters on the support foot, rotate and tighten them in the direction of the arrow, and install casters 2 (with brake) on the same support foot. KROK 2 F:M8*15-4SZT G:M8*45-4SZT H:M8-8SZT...
- Page 115 Fix the support foot and grill body with M8*45, M8*15 hexagon screws and M8 flange nuts. KROK 3 D:M6*8-4 SZT. E:M4*16-4 SZT The motor support plate is aligned with the bracket hole position, adjusted to the appropriate height, and fixed with M6*8 hexagon screws. And put the barbecue fork bracket in the corresponding position of the other bracket.Attach the left and right windshields to the support feet with M4*16 cross large flat head screws.
- Page 116 Place the charcoal tray on the grill body support. KROK 5 I: M8*10-2 SZT Fix the top cover and handle with M8*10 cross large flat head screws, and install chains on both sides of the top cover. KROK 6 E: M4*16-6 SZT...
- Page 117 Fix the top cover and grill body with M4*16 cross large flat head screws . KROK 7 A:M8*51-4szt B:M8*40-4szt C:M8-8szt Displayed in the above image, secure the food onto the barbecue fork or positioning plate. When using the positioning plate, use U-bolts to secure the food;...
- Page 118 KROK 8 KROK 9 D:M6*10-2 SZT Put the motor on the motor support plate, and lock it with M6*10 hexagon screw. Put the slag plate on the bottom slot of the grill body. The installation is complete.
- Page 119 KROK 10 The grills are placed on the grill body to roast meat and other food at the same...
- Page 120 First level: Second level: Max diameter of food: φ220mm Max diameter of food: φ360mm Max length of food: 1030mm Max length of food: 1030mm Third level: Fourth level: Max diameter of food: φ290mm Max diameter of food: φ430mm Max length of food: 1030mm Max length of food: 1030mm...
- Page 121 OPERATING INSTRUCTIONS Przed pierwszym użyciem urządzenia usuń wszelkie materiały promocyjne i opakowania oraz sprawdź, czy płyty grzewcze są czyste i wolne od kurzu. W razie potrzeby przetrzyj je wilgotną szmatką. Rozłóż na chłonnym ręczniku kuchennym i zetrzyj nadmiar oleju. Kiedy produkt jest podgrzewany po raz pierwszy, może wydzielać...
- Page 122 OSTRZEŻENIE! Ten produkt z rożnem będzie bardzo gorący nie przesuwaj go podczas pracy. OSTRZEŻENIE! Trzymaj dzieci i zwierzęta z daleka. OSTRZEŻENIE ! W przypadku niebezpieczeństwa zatrucia tlenkiem węgla nie należy używać grilla rożnowego w pomieszczeniach zamkniętych. OSTRZEŻENIE ! Nie używaj grilla w zamkniętych i/lub mieszkalnych przestrzeniach, np.
- Page 123 COOKING TIPS & HINTS 26. Zawsze myj ręce przed i po kontakcie z surowym mięsem oraz przed jedzeniem. 27. Zawsze trzymaj surowe mięso z dala od gotowanego mięsa i innych produktów spożywczych. 28. Przed rozpoczęciem gotowania upewnij się, że powierzchnie grilla i narzędzia są...
- Page 124 CLEAING MAINTENANCE AND STORAGE 26. Do czyszczenia należy przetrzeć powierzchnię wilgotną (nie mokrą) szmatką lub wytrzeć do sucha czystą, niestrzępiącą się, bawełnianą szmatką. 27. powierzchni można użyć płynu do mycia okien lub podobnego płynu czyszczącego . 28. Zawsze odłączaj maszynę od prądu przed przechowywaniem. 29.
- Page 125 Techniczny Certyfikat wsparcia i e-gwarancji www.vevor.com/support...
- Page 126 Technisch Ondersteuning en e-garantiecertificaat www.vevor.com/support SPIT ROTISSERIE ROASTER-GRILL MODEL: JY-MY-KYLQG-46 -120 JY-MY-KYLQG- 46-220 We blijven ons inzetten om u gereedschap tegen een concurrerende prijs te bieden. "Bespaar de helft", "Halve prijs" of andere soortgelijke uitdrukkingen die alleen door ons worden gebruikt...
- Page 127 Dit is de originele instructie. Lees alle instructies in de handleiding zorgvuldig door voordat u ermee aan de slag gaat. VEVOR behoudt zich een duidelijke interpretatie van onze gebruikershandleiding voor. Het uiterlijk van het product is afhankelijk van het product dat u heeft...
- Page 128 technologie- of software-updates zijn voor ons product. Waarschuwing-Om het risico op letsel te verminderen, moet de gebruiker de handleiding zorgvuldig lezen. Let op hoge temperaturen om brandwonden te voorkomen. CORRECTE VERWIJDERING Dit product valt onder de bepalingen van de Europese richtlijn 2012/19/EG.
-
Page 129: Fcc Information
FCC INFORMATION LET OP: Wijzigingen of aanpassingen die niet uitdrukkelijk door de partij zijn goedgekeurd die verantwoordelijk is voor naleving kan de bevoegdheid van de gebruiker om de apparatuur te bedienen ongeldig maken! Dit apparaat voldoet aan Deel 15 van de FCC-regels. De werking is onderworpen aan de volgende twee voorwaarden: 1) Dit product kan schadelijke interferentie veroorzaken. -
Page 130: Important Safeguards
· Raadpleeg de dealer of een ervaren radio-/tv-technicus voor hulp. Het apparaat is geëvalueerd om te voldoen aan algemene RF blootstellingseis. Het apparaat kan draagbaar worden gebruikt blootstelling voorwaarde zonder beperking . IMPORTANT SAFEGUARDS Bedankt voor het gebruik van dit product. Om er zeker van te zijn dat u de machine correct kunt bedienen, dient u deze instructie aandachtig te lezen voordat u de machine gebruikt en bewaart u deze op de juiste wijze voor toekomstig gebruik. - Page 131 7. Laat de HETE onderdelen afkoelen voordat u ze gebruikt. 8. Gebruik het apparaat niet als het snoer of de stekker beschadigd is, als het niet goed werkt of als er mechanische schade is. Stuur het naar het dichtstbijzijnde erkende servicecentrum voor onderzoek en reparatie (ALLEEN technici mogen het apparaat openen).
-
Page 132: Product Parameters
verwarmingsapparaten loopt. 21. Vermijd gebruik in de aanwezigheid van ontvlambare vloeistoffen, gassen, stof of andere explosieve situaties. 22. Uiterste voorzichtigheid is geboden bij het verplaatsen van een apparaat dat hete olie of andere hete vloeistoffen bevat. 23. Gebruik de machine niet in een garage voor apparaten of onder een wandkast. Haal altijd de stekker van het apparaat uit het stopcontact als u het in een garage voor apparaten opbergt. -
Page 133: Loading Capacity
50 Hz PLUG AANDACHT! De spanning die voor dit apparaat wordt gebruikt, moet hetzelfde zijn als de voedingsspanning LOADING CAPACITY Modelnr. Laadcapaciteit JY-MY-KYLQG-46 -120 Maximaal 60 kg (132 pond) JY-MY-KYLQG- 46-220 Maximaal 60 kg (132 pond) AANDACHT! 13. Overschrijd het vermelde draagvermogen niet. Let op dynamisch laden! De plotselinge beweging van de lading kan kortstondig een overmatige belasting veroorzaken, waardoor het product defect raakt. - Page 134 Aant Nee . Onderdeel van mij Nee . Onderdeel van mij ntal Spit Wiel met rem e Locatieplaat Grilllichaam Bovenklep Houtskool lade Hendel Wiel zonder rem e Braadvork Spits beugel Motor Ketting Motorsteunplaat Grill Steunvoet Aant Onderdeelnaam Onderdeelnaam M8*51 M8 *10 M8* 15 M6* 10 M4 *16...
- Page 135 M8* 1 5 M8*45 STAP 1 Install four casters on the support foot, rotate and tighten them in the direction of the arrow, and install casters 2 (with brake) on the same support foot. STAP2 F:M8*15-4STUKS G:M8*45-4STUKS H:M8-8STUKS...
- Page 136 Fix the support foot and grill body with M8*45, M8*15 hexagon screws and M8 flange nuts. STAP3 D:M6*8-4 STUKS E:M4*16-4 STUKS The motor support plate is aligned with the bracket hole position, adjusted to the appropriate height, and fixed with M6*8 hexagon screws. And put the barbecue fork bracket in the corresponding position of the other bracket.Attach the left and right windshields to the support feet with M4*16 cross large flat head screws.
- Page 137 Place the charcoal tray on the grill body support. STAP5 IK: M8*10-2 STUKS Fix the top cover and handle with M8*10 cross large flat head screws, and install chains on both sides of the top cover. STAP6 E: M4 * 16-6 STUKS...
- Page 138 Fix the top cover and grill body with M4*16 cross large flat head screws . STAP7 A:M8*51-4STUKS B:M8*40-4STUKS C:M8-8STUKS Displayed in the above image, secure the food onto the barbecue fork or positioning plate. When using the positioning plate, use U-bolts to secure the food;...
- Page 139 STAP 8 STAP9 D:M6*10-2 STUKS Put the motor on the motor support plate, and lock it with M6*10 hexagon screw. Put the slag plate on the bottom slot of the grill body. The installation is complete.
- Page 140 STAP 10 The grills are placed on the grill body to roast meat and other food at the same...
- Page 141 First level: Second level: Max diameter of food: φ220mm Max diameter of food: φ360mm Max length of food: 1030mm Max length of food: 1030mm Third level: Fourth level: Max diameter of food: φ290mm Max diameter of food: φ430mm Max length of food: 1030mm Max length of food: 1030mm...
- Page 142 OPERATING INSTRUCTIONS Voordat u het apparaat voor de eerste keer gebruikt, dient u al het promotiemateriaal en verpakkingsmateriaal te verwijderen en te controleren of de kookplaten schoon en stofvrij zijn. Veeg ze indien nodig af met een vochtige doek. Verspreid met een absorberende keukendoek en veeg overtollige olie weg. Wanneer uw product voor de eerste keer wordt verwarmd, kan er een lichte rook of geur vrijkomen, wat normaal is voor veel verwarmingsapparaten, en dit heeft geen invloed op de veiligheid van uw apparaat.
- Page 143 62. Als de motor plotseling vastloopt, abnormaal geluid, rook en andere ongewenste verschijnselen worden geconstateerd tijdens het barbecueproces, schakel dan onmiddellijk de stroomtoevoer uit en start deze opnieuw nadat het onderhoud is voltooid. 63. Zet de motor van het draaispit altijd op “ OFF ” voordat u de grill opent. WAARSCHUWING! Deze product- rotisserie-grill wordt erg heet Verplaats hem niet tijdens het gebruik.
- Page 144 COOKING TIPS & HINTS 31. Was altijd uw handen voor en na het hanteren van ongekookt vlees en vóór het eten. 32. Houd rauw vlees altijd uit de buurt van gekookt vlees en ander voedsel. 33. Zorg er vóór het koken voor dat de grilloppervlakken en gereedschappen schoon zijn en vrij van oude voedselresten.
- Page 145 CLEAING MAINTENANCE AND STORAGE 31. Voor het reinigen het oppervlak afnemen met een vochtige (niet natte) doek of droogwrijven met een schone, pluisvrije katoenen doek. 32. het oppervlak raamreinigingsvloeistof soortgelijke reinigingsvloeistof worden gebruikt . 33. Haal altijd de stekker uit het stopcontact voordat u de machine opbergt. 34.
- Page 146 Technisch Ondersteuning en e-garantiecertificaat www.vevor.com/support...
- Page 147 Teknisk Support och e-garanticertifikat www.vevor.com/support SPIT ROTISSERIE ROASTER GRILL MODELL: JY-MY-KYLQG-46 -120 JY-MY-KYLQG-46 -220 Vi fortsätter att vara engagerade i att ge dig verktyg till konkurrenskraftiga priser. "Spara hälften", "Halva priset" eller andra liknande uttryck som endast används av oss representerar en uppskattning av besparingar du kan dra nytta av att köpa vissa verktyg...
- Page 148 Detta är den ursprungliga instruktionen, läs alla instruktioner noggrant innan du använder den. VEVOR reserverar sig för en tydlig tolkning av vår användarmanual. Utseendet på produkten är beroende av den produkt du fått. Ursäkta oss att vi inte kommer att informera dig igen om det finns...
- Page 149 Varning - För att minska risken för skada måste användaren läsa instruktionerna noggrant. Var uppmärksam på höga temperaturer för att förhindra brännskador. KORREKT AVFALLSHANTERING Denna produkt omfattas av bestämmelserna i det europeiska direktivet 2012/19/EC. Symbolen som visar en soptunna korsad anger att produkten kräver separat sophämtning i EU.
- Page 150 FCC INFORMATION VARNING: Ändringar eller modifieringar som inte uttryckligen godkänts av parten ansvarig för överensstämmelse kan ogiltigförklara användarens behörighet att använda utrustningen! Denna enhet uppfyller del 15 av FCC-reglerna. Driften är föremål för följande två villkor: 1) Denna produkt kan orsaka skadliga störningar. 2) Denna produkt måste acceptera alla mottagna störningar, inklusive störningar som kan orsaka oönskad funktion.
- Page 151 IMPORTANT SAFEGUARDS Tack för att du använder den här produkten. För att vara säker på att du kan använda maskinen korrekt, läs denna instruktion noggrant innan du använder den och förvara den på rätt sätt för framtida referens. Vänligen läs den här sidans försiktighetsåtgärder och säkerhetsregler för att säkerställa din säker användning.
- Page 152 11. Låt inte nätsladden hänga över kanten på bordet eller bänken och låt den inte komma i kontakt med heta ytor. 12. Placera inte enheten på eller nära varmluft, elektriska brännare eller värmare. 13. Stäng alltid av strömmen innan du ansluter eller kopplar ur. Håll i kontakten istället för att dra i sladden.
- Page 153 med maskinen ensamma. Rengöring och användarunderhåll får inte utföras av Husdjur bör hålla sig borta från produkten. barn utan tillsyn. UPPMÄRKSAMHET! Denna artikel är avsedd för utomhusbruk. Använd inte inomhus! PRODUCT PARAMETERS modell nr. Område Spänning Kraft Pluggtyp JY-MY-KYLQG-46 -120 Nordamer AC120 Amerikansk...
-
Page 154: Product Components
PRODUCT COMPONENTS 1. Kontrollera att alla delar är fullständiga innan monteringen påbörjas. 16. För att undvika olyckor eller skador på vassa kanter, vänligen montera och använd försiktigt. För montering behöver du en skruvmejsel och olika skruvnycklar. 2 personer behövs för att montera produkten. Använd skyddshandskar vid montering. - Page 155 Stödfot Anta Delnamn Delnamn M8*51 M8 *10 M8* 15 M6* 10 M 4*16 M8* 1 5 M8*45 STEG 1 Install four casters on the support foot, rotate and tighten them in the direction of the arrow, and install casters 2 (with brake) on the same support foot.
- Page 156 STEG 2 F:M8*15-4PCS G:M8*45-4PCS H:M8-8PCS Fix the support foot and grill body with M8*45, M8*15 hexagon screws and M8 flange nuts. STEG3 D:M6*8-4ST E:M4*16-4ST The motor support plate is aligned with the bracket hole position, adjusted to the appropriate height, and fixed with M6*8 hexagon screws. And put the barbecue fork bracket in the corresponding position of the other bracket.Attach the left and right windshields to the support feet with M4*16 cross large flat head screws.
- Page 157 STEG 4 Place the charcoal tray on the grill body support. STEG5 I:M8*10-2ST...
- Page 158 Fix the top cover and handle with M8*10 cross large flat head screws, and install chains on both sides of the top cover. STEG6 E:M4*16-6ST Fix the top cover and grill body with M4*16 cross large flat head screws . STEG7 A:M8*51-4PCS B:M8*40-4PCS C:M8-8PCS Displayed in the above image, secure the food onto the barbecue fork or positioning plate.
- Page 159 STEG 8 Put the food and barbecue fork together on the motor support plate and spit bracket. STEG9 D:M6*10-2ST...
- Page 160 Put the motor on the motor support plate, and lock it with M6*10 hexagon screw. Put the slag plate on the bottom slot of the grill body. The installation is complete. STEG 10 The grills are placed on the grill body to roast meat and other food at the same...
- Page 161 First level: Second level: Max diameter of food: φ220mm Max diameter of food: φ360mm Max length of food: 1030mm Max length of food: 1030mm...
- Page 162 Third level: Fourth level: Max diameter of food: φ290mm Max diameter of food: φ430mm Max length of food: 1030mm Max length of food: 1030mm OPERATING INSTRUCTIONS Innan du använder apparaten för första gången, skala av allt reklammaterial och förpackningsmaterial och kontrollera att kokplattorna är rena och fria från damm. Vid behov, torka av dem med en fuktig trasa.
- Page 163 64. Rör dig inte när apparaten är varm. 65. Av säkerhetsskäl, använd inte denna apparat med flytande bränslen. 66. Vi rekommenderar starkt att grillspettgrillen värms upp och bränslet hålls glödhett i minst 30 minuter före den första tillagningen; 67. Lämna inte apparaten utan uppsikt under användning. 68.
- Page 164 COOKING TIPS & HINTS 36. Tvätta alltid händerna före och efter hantering av okokt kött och innan du äter. 37. Håll alltid rått kött borta från tillagat kött och annan mat. 38. Innan du lagar mat, se till att grillytor och verktyg är rena och fria från gamla matrester.
- Page 165 CLEAING MAINTENANCE AND STORAGE 36. För rengöring, torka av ytan med en fuktig (inte våt) trasa eller torka torr med en ren luddfri bomullstrasa. 37. Fönsterputsvätska eller liknande rengöringsvätska kan användas för att rengöra ytan . 38. Koppla alltid ur maskinen innan förvaring. 39.
- Page 166 Teknisk Support och e-garanticertifikat www.vevor.com/support...
Need help?
Do you have a question about the JY-MY-KYLQG-46-120 and is the answer not in the manual?
Questions and answers