
Related Manuals for VEVOR KY22022C


Summary of Contents for VEVOR KY22022C
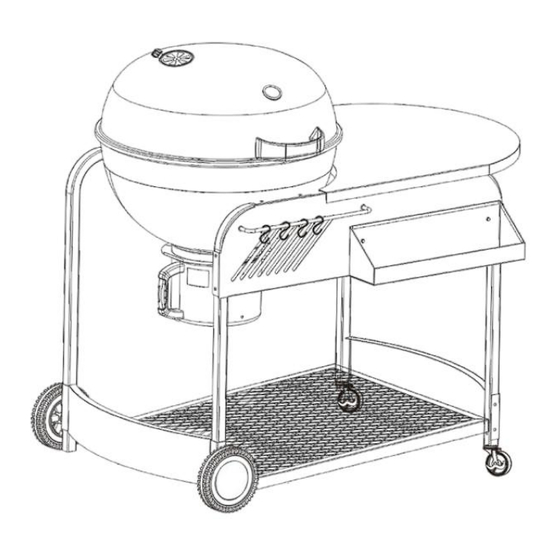
- Page 1 Technical Support and E-Warranty Certificate www.vevor.com/support DELUXE 22.5 KETTLE GRILL WITH PARTY CART MODEL: KY22022C...
- Page 2 We continue to be committed to provide you tools with competitive price. "Save Half", "Half Price" or any other similar expressions used by us only represents an estimate of savings you might benefit from buying certain tools with us compared to the major top brands and doses not necessarily mean to cover all categories of tools offered by us.
- Page 3 CustomerService@vevor.com This is the original instruction, please read all manual instructions carefully before operating. VEVOR reserves a clear interpretation of our user manual. The appearance of the product shall be subject to the product you received. Please forgive us that we won't inform you again if...
-
Page 4: Important Safeguards
Warning-To reduce the risk of injury, user must read instructions manual carefully. IMPORTANT SAFEGUARDS Thank you for using this product. In order to make sure that you can operate the machine correctly, read this instruction carefully before operation and keep it properly for future reference. Please be sure to read the precautions and safety rules in this page to ensure your safe use. - Page 5 5. Using any accessories or attachments that are not provided or recommended by the manufacturer may cause injury. 6. If the machine is not to be used for a long period of time, unplug it, clean and cover it and store it in a dry and safe place. 7.
- Page 6 20. DO NOT use the barbeque in high wind. Do NOT store the barbeque until the fire is completely out and surfaces are cold; also do not store the barbeque with ashes or combustible materials inside. 22. Do NOT overload or use this barbeque to burn leaves, household waste, or paper.
-
Page 7: Product Components
WARNING! Failure to follow instructions could result in death, serious bodily injury and/or property loss. ATTENTION! Always wear gloves when adjusting the grill, the handles of the grill can become very hot during the grilling process. IMPORTANT! Do not pour water into the product while it is still hot. ATTENTION AGAIN! This article is intended for outdoor use. - Page 8 Parts List...
- Page 9 Explosion Diagram...
- Page 10 STEP1- Constructing the left 1. Attach one of the side panels (15) to the left front pole (13) and the left rear pole(12),using 4 each of the "A"bolts legs. STEP2- Constructing the right legs 2. Attach the other side panel (15) to the right front pole (17) and the right rear pole (16), using 4...
- Page 11 STEP3- Attaching the storage shelf 3.1 Attach the storage shelf (18) to the legs that were assembled in steps 1 & 2, using 4 each of the "J" bolts. 3.2 The right legs should now slot inside the spaces in the left legs.
- Page 12 STEP5- Securing the legs 5. Secure the legs together using 2 each of the "A" bolts. STEP6- Attaching the front panel and casters 6.1 Attach the front panel(20),to the left front pole(13)and the right front pole(17),using 4 each of the"A"bolts and“F”washers. ...
- Page 13 STEP7- Attaching the side shelf 7. Attach the side shelf (10) to the right front pole (17) and the right rear pole (16), using 6 each of the "A" bolts. NOTE: The side shelf (10) may become scratched when assembling. Please take care.
- Page 14 STEP9- Attaching the hooks 9. Place the hooks (25) onto the front panel bar (21), and then attach the front panel bar (21) onto the front panel (20) using 2 each of the "F" washers and "B" nuts; tighten and secure with a wrench.
- Page 15 STEP11- Attaching the support frames 11. Attach the support frames (27) to the bottom of the bowl (7) using 6 each of the "B" nuts and "J" bolts; tighten and secure with a wrench. STEP12- Attaching the bowl 12. Attach the bowl (7) to the bowl supports (11) using 4 each of the "J"...
- Page 16 STEP13- Attaching the ash cup support 13. Attach the ash cup support (8) to the bottom of the bowl (7) using 3 each of the "D" bolts and "E" nuts; tighten and secure with a wrench. STEP14 - Assembling the lid 14.1 Align the stopper on the lid air vent assembly (2) with the groove on the lid (3), and then attach the lid air vent assembly (2) to the lid...
- Page 17 STEP15 - Attaching the lid and racks 15.1 Attach the lid (3) to the bowl (7), using 1 "H" bolt and 2 T' nuts; tighten and secure with a wrench. 15.2 Place the charcoal grid inside the bowl (7), followed by the cooking grid (4).
- Page 18 OPERATING INSTRUCTIONS Before using the appliance for the first time, peel off any promotional materials and packaging materials, and check that the cooking plates are clean and free of dust. If necessary, wipe them over with a damp cloth. Spread over with an absorbent kitchen towel and wipe off any excess oil. When your product is heated for the first time, it may emit slight smoke or odor, which is normal for many heating appliances, and will not affect the safety of your appliance.
- Page 19 COOKING TIPS & HINTS Please read and follow this advice when cooking on your product. 1. Always wash your hands before and after handling uncooked meat and before eating. 2. Always keep raw meat away from cooked meat and other foods. 3.
-
Page 20: Food Safety
FOOD SAFETY 1. Thoroughly defrost frozen meat and poultry in the refrigerator before cooking. Keep raw meat and poultry separate from cooked foods. 2. Always wash hands after handling raw meat and poultry, before handling any ready to eat foods. 3. - Page 21 STORAGE 1. Always make sure the machine is cool and dry before string. 2. Store the appliance in a dry and clean area. Made in China...
- Page 22 Support and E-Warranty Certificate https://www.vevor.com/support...
Need help?
Do you have a question about the KY22022C and is the answer not in the manual?
Questions and answers