Advertisement
Quick Links
Technical Support and E-Warranty Certificate www.vevor.com/support
SPIT ROTISSERIE ROASTER GRILL
We continue to be committed to provide you tools with competitive price.
"Save Half", "Half Price" or any other similar expressions used by us only represents an
estimate of savings you might benefit from buying certain tools with us compared to the major
top brands and doses not necessarily mean to cover all categories of tools offered by us. You
are kindly reminded to verify carefully when you are placing an order with us if you are
actually saving half in comparison with the top major brands.
MODEL: JY-MY-KYL46DB-120
JY-MY-KYL46DB-220
JY-MY-KYL46DB-240
Advertisement

Related Manuals for VEVOR JY-MY-KYL46DB-120


Summary of Contents for VEVOR JY-MY-KYL46DB-120
- Page 1 Technical Support and E-Warranty Certificate www.vevor.com/support SPIT ROTISSERIE ROASTER GRILL MODEL: JY-MY-KYL46DB-120 JY-MY-KYL46DB-220 JY-MY-KYL46DB-240 We continue to be committed to provide you tools with competitive price. "Save Half", "Half Price" or any other similar expressions used by us only represents an estimate of savings you might benefit from buying certain tools with us compared to the major top brands and doses not necessarily mean to cover all categories of tools offered by us.
- Page 2 CustomerService@vevor.com This is the original instruction, please read all manual instructions carefully before operating. VEVOR reserves a clear interpretation of our user manual. The appearance of the product shall be subject to the product you received. Please forgive us that we won't inform you again if...
-
Page 3: Important Safeguards
Warning-To reduce the risk of injury, user must read instructions manual carefully. This device complies with Part 15 of the FCC Rules. Operation is subject to the following two conditions:(1)This device may not cause harmful interference, and (2)this device must accept any interference received, including interference that may cause undesired operation. - Page 4 2. Do not let children and minors get close to or touch the machine. 3. Do not touch the hot surface directly with your hands. Always operate with handle or knob. 4. To prevent electrical shock, do not immerse the cord or plug into water or other liquids.
- Page 5 properly grounded. If not, you must install a grounded outlet. Have the work performed only by a certified electrician who is properly qualified to meet local safety and electrical codes. 20. Ensure that the power outlet, plug and cord being used are in good working condition.
-
Page 6: Product Parameters
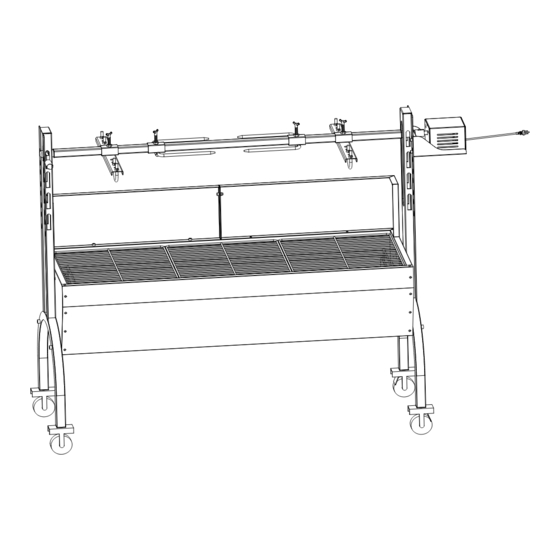
PRODUCT PARAMETERS Model No. Region Voltage Power Plug Type JY-MY-KYL46DB-120 North AC120 American America PLUG 60Hz JY-MY-KYL46DB-220 Europe AC220V Europe 50Hz PLUG JY-MY-KYL46DB-240 Australia AC240V Australia 50Hz PLUG ATTENTION! 1. The voltage used for this device must be the same as the power supply voltage. - Page 7 2. To avoid accidents or sharp edges injuries please assemble and use carefully. For assembly you need a Phillips screwdriver and different screw wrenches. 2 persons are needed to assemble the product. Part name Part name Spit bracket Right windshield Grill Support foot Spit...
- Page 8 M8*40 M6*8 M8*15 M8*45 STEP1 Install four casters on the support foot, rotate and tighten them in the direction of the arrow, and install casters 2 (with brake) on the same support foot.
- Page 9 STEP2 F:M8*15-4PCS G:M8*45-4PCS H:M8-8PCS Fix the support foot and grill body with M8*45, M8*15 hexagon screws and M8 flange nuts . STEP3 D:M6*8-7PCS E:M6-1PCS The left and right windshields and grill body are fixed with M6*8 hexagon screws, and the left and right windshields are fixed with M6*12 hexagon screws and M6 flange nuts.
- Page 10 STEP4 D:M6*8-4PCS The motor support plate is aligned with the support foot hole position, adjusted to the appropriate height, and fixed with M6*8 hexagon screws. And put the barbecue fork bracket in the corresponding position of the other support foot. STEP5 Place the charcoal tray on the grill body support.
- Page 11 STEP6 A:M8*51-4PCS B:M8*40-4PCS C:M8-8PCS Fix the food in the proper position of the barbecue fork as shown above, and use M8 * 40 to lock the positioning plate and the baking fork with dished screws, then lock the U-shaped bolts passing through the positioning plate with M8 butterfly nuts.
- Page 12 STEP8 D:M6*8-2PCS Place the motor on the motor support plate and lock it with M6*8 hexagon screws. The installation is complete. Put charcoal on the charcoal tray, ignition, can roast sheep and other large pieces of food.
- Page 13 STEP9 Simultaneous grilling and rotating barbecue motor mounting position. The grills are placed on the grill body to roast meat and other food at the same time.
- Page 14 OPERATING INSTRUCTIONS Before using the appliance for the first time, peel off any promotional materials and packaging materials, and check that the cooking plates are clean and free of dust. If necessary, wipe them over with a damp cloth. Spread over with an absorbent kitchen towel and wipe off any excess oil. When your product is heated for the first time, it may emit slight smoke or odor, which is normal for many heating appliances, and will not affect the safety of your appliance.
- Page 15 WARNING! This product rotisserie grill will become very hot, do not move it during operation. WARNING! Keep children and pets away. WARNING! In case of the danger of carbon monoxide poisoning, do not use the product rotisserie grill indoors. WARNING! Do not use the barbecue in a confined and/or habitable space e.g.
- Page 16 4. Cooking larger pieces of meat and joints is recommended before finally cooking on the grill. 5. After cooking on your grill always clean the cooking surfaces and utensils. CLEAING MAINTENANCE AND STORAGE 1. For cleaning, wipe the surface with a damp (not wet) cloth or wipe dry with a clean lint free cotton cloth.
- Page 17 Support and E-Warranty Certificate https://www.vevor.com/support...
Need help?
Do you have a question about the JY-MY-KYL46DB-120 and is the answer not in the manual?
Questions and answers
notice en francais est un minimum broche pour cuisson des poulets merci de votre reponse