Merging ANUBIS Manual
- User manual (111 pages) ,
- Manual (39 pages) ,
- Appendix (33 pages)
Advertisement
OVERVIEW
To ensure the safe operation of your Anubis please read the instructions, important safety information and warnings carefully before installation and use.
For all details in regards to the MERGING ANUBIS hardware please refer to the main user manual.
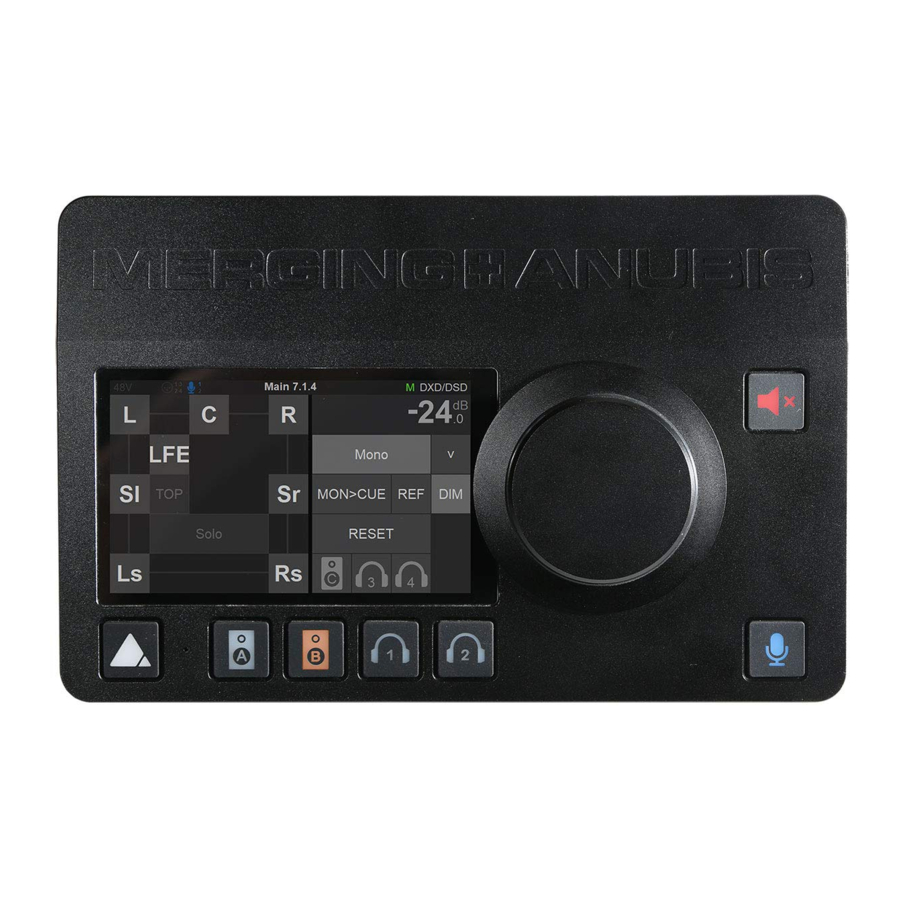
MERGING ANUBIS is a ground-breaking new audio interface incorporating the Swiss expertise of Merging Technologies in analogue and digital, networked audio and DSP technology. More significantly, it offers unique features to any engineer or musician looking for a compact AD/DA unit with the quality you would expect from Merging, and a fully featured monitor controller that integrates with any DAW.
MERGING ANUBIS was designed in Switzerland, where it is assembled and tested to the same exacting standards as our complete line of professional products and is intended to deliver the same high level of performance and reliability.
MERGING ANUBIS VARIANTS AND KEY FEATURES
VARIANTS
MERGING ANUBIS SPS PRO: Seamless Protection Switching. ST2022-7 class C and NMOS compliance and built-in switch mode. Supports sample rates from 44.1kHz to 192kHz PCM at a 32-bit resolution
MERGING ANUBIS SPS PREMIUM: Seamless Protection Switching. ST2022-7 class C and NMOS compliance and built-in switch mode.
Supports sample rates from 44.1kHz to 352.8kHz (DXD) and 384kHz PCM at a 32-bit resolution. Premium High Samplling rates formats DSD64, DSD128 and DSD256 are not supported in Dante mode.

When running in Dante mode the maximum sampling rate is 192kHz.
KEY FEATURES
- Modular by software. Evolving long life product with multiple missions (upcoming)
- Merging class of its own sound quality
- Ethernet with RAVENNA/AES67 or DANTE interface allows asynchronous data transfer with computer audio systems and allows cable runs up to 100m with Cat5e/Cat6 cable
- Standalone or central part of a highly scalable and expandable network. Multiple MERGING ANUBIS, RAVENNA/AES67 or DANTE compliant interfaces can be connected to the network and Anubis can remotely and locally: Control, Mix, Monitor multichannel content and route those I/O's.
- Full 32 bit signal path from analog Input to Output, via Mixer
- TFT LCD capacitive multi-touch screen
- Web based remote control accessible via smartphone, tablet or computer.
- Rotary Control knob allowing easy adjustment of volume level. The rotary knob provides also access to comprehensive and intuitive menu within the Anubis software
- FPGA-based DSP mixer with effects with ultra-low latency for the performer foldback/Cues
- Up to 4 x 128 x 8 Mix engines
- Redundant power supply with PoE and DC Power Supply
- RAVENNA/AES67 mode (firmware)
- 256 IO channels supported
- SMPTE 2110-30 support: Audio transport is built on AES67 uncompressed 48kHz PCM audio. Up to 8 channels can be bundled in one stream, 16- and 24-bit depth are supported.
- SMPTE 2110-10 support: PTP v2 (IEEE 1588)
- ST2022-7 Support with new Anubis SPS (Seamless Protection Switching) and as of firmware 1.1.X and above.
- NMOS Support as of firmware 1.1.X and above. Refer to the link below for more details.https://merging.atlassian.net/wiki/spaces/PUBLICDOC/pages/4819466/NMOS+Implementation+Notes
- Peering Support
- Stream Listener Support
- DANTE Mode (firmware)
- 8 IO or 64 IO supported channels (varies with purchased plan)
- Dante Redundancy support
- AES67 support with fixed sampling rate at 48kHz
- Anubis Settings include a Dante Routing page for the Music and Monitor Missions. Other missions must use the Advanced Dante Pages.
ABOUT RAVENNA
RAVENNA is a solution for real-time distribution of audio and other media content in IP-based network environments. Utilizing standardized network protocols and technologies, RAVENNA can operate in existing network infrastructures and is fully AES67 compliant. The RAVENNA protocol manages the data transfer between the MERGING ANUBIS and a computer or other hardware when the Ethernet interface is used. This open and published IP network technology had been created to meet the demands of national broadcasters and focused on the essential requirements of extremely accurate clocking, high resistance to packet loss and very low latency i.e. getting the data to where it needs to be, intact and at the right time.
ABOUT DANTE
Dante by Audinate is one of the leading closed AoIP ecosystems, offering a comprehensive set of software, hardware and network protocols to deliver uncompressed networked audio.
Dante is the product name for a combination of software, hardware, and network protocols that delivers uncompressed, multi-channel, low-latency digital audio over a standard Ethernet network using Layer 3 IP packets. Developed in 2006 by the Sydney-based Audinate, Dante builds on previous audio over Ethernet and audio over IP technologies.
Like most other audio over Ethernet technologies, Dante is primarily for professional, commercial applications. Most often, it is used in applications where a large number of audio channels must be transmitted over relatively long distances or to multiple locations.
The Anubis is a Dante Ready device delivered without a Dante license, the license must be purchased separately.
In order to operate in Dante mode it requires that the Anubis Dante firmware is updated in the unit. Refer to the Dante Set Up guidelines for all details.
About Dante Ready™ and Dante Activator
A Dante Ready™ device allows you to purchase and add audio channels to a device after initial purchase using the Dante Activator feature in Dante Controller.
Dante Controller route's AV signals between all Dante-enabled audio and video devices on your network. Configurations are saved directly to the devices themselves, ensuring the stability of your network through power cycles, device disconnection and system reconfiguration.
Dante Setup Guidelines

Detailed procedure on how to setup the Anubis Dante AoIP operation mode.
- The MERGING ANUBIS is delivered without a Dante license, the license must be purchased separately.
- The MERGING ANUBIS are always delivered with the RAVENNA/AES67 firmware
- In order to operate in Dante mode it requires that the MERGING ANUBIS Dante firmware is updated in the unit and that an IO license plan is purchased.
Requirements
- MERGING ANUBIS latest hardware revision Dante Ready* (Anubis SPS Made in Hungary with serials 10000 and above). Refer to the Dante FAQ for all details.
- MERGING ANUBIS Dante Firmware 1.7.0 and above
- Applications installed
- MT Discovery 20.0.0 and above
- Anubis Toolkit 1.7.0 and above
- MT Portal 1.2 and above
- Dante Controller
- Creation of an Audinate account
- License purchasing plan is an additional cost
*All Anubis SPS models can be serviced to be Dante Ready, refer to the Merging website for all details.
Procedure
- Download and Install the Anubis Toolkit or MT Discovery application, those can be the Neumann website.
- Connect the MT 48 via the network to your system
- The MERGING ANUBIS should be detected, please open the Maintenance Page

- Update the Firmware to the Dante firmware version
The MT Portal will display the Dante firmware please select Download & Update, otherwise downloaded the Dante firmware from the Neumann website.
![warning]() Note: The firmware update will take more than 15min, please do not abort at anytime.
Note: The firmware update will take more than 15min, please do not abort at anytime.

- Once the Dante Firmware has been updated reboot the unit.
- Make sure you have downloaded and installed the Dante Controller application from the Audinate site. The Dante Virtual Sound Card is also recommend for operating in Dante mode.https://www.audinate.com
- With the MERGING ANUBIS connected to the system running Dante Controller launch the Dante Activator from the view menu

- The MERGING ANUBIS should be detected into the Dante Activator

- Select a license plan. 8 x 8 IO are offered or 64 x 64 IO
![warning]() Note: License plans are upgradable and current paid amount deducted from the upgrade cost.
Note: License plans are upgradable and current paid amount deducted from the upgrade cost.

- Go to Cart and Check out
You will be asked Login to your Audinate account, create one if you do not have one.
![]()
- Activate your license plan upon entering the purchase details (e.g. credit card)

- Wait for the confirmation of the Activation

- The MERGING ANUBIS is now ready for Dante operations.z
- It will be discovered into the Dante Controller and can be used with the Dante Virtual Sound Card

![warning]() Note: Dante Virtual Sound card and/or Dante VIA come at extra cost.
Note: Dante Virtual Sound card and/or Dante VIA come at extra cost.


Dante operation modes
Dante Network integration

Dante Redundancy

Anubis RAVENNA/AES67 vs Dante specifications
ANUBIS FIRMWARES SPECIFICATIONS
| FIRMWARE RUNNING | RAVENNA AES67 FIRMWARE | DANTE FIRMWARE | |
| Features | RAVENNA & AES67 | DANTE | AES67 |
| Drivers and Utilities | Free of charge | Requires a Dante IO licence plan purchase | |
| IO Count | 256 IO | 8 IO or 64 IO | |
| Integration | Merging: MAD (Windows) - VAD (macOS) - ANEMAN | Dante Controller - DVS - VIA | |
| Sampling Rate | *Max 352.8kHz (DXD), 384kHz and DSD (premium) | up to 192kHz | 48kHz Only |
| latency | 6-12-16-32-48-64 samples | 0.25ms - 0.5ms - 1ms - 2ms - 5ms | 1ms - 2ms - 5ms |
| Additional Protocols supported | NMOS, LAWO HOME | NA | |
| Network redundancy | ST2022-7 | Redundant mode (Dante) | |
| WDM Support (Windows) | Merging Audio Device (MAD) | Dante VIA | |
| PTP Clocking | Flexible (from interface) - PTPv2 | Dante Controller - PTPv1 | |
| AoIP listener disabled | Available with Monitor Mission | Not Available | |
| ASIO Clock | Available | Not Available | |
| Advanced Pages | Full advanced features | Limited Advanced options | |
| Peering Support | Available | Not Available | |
| Generic AES67 input streams | Available | Not Available | |
| Sound ID Room Correction | Available | Available | |
| Plugins (EQ, Dynamics, Reverb) | Available | Available | |
| Plugins (Deesser, Blackhole*) | Available | Available | |
| MIDI PreAmps remote control | Available | Not Available | |
| Neumann KH AES67 Support | Available | Available | 48kHz only |
HOW TO CONNECT MERGING ANUBIS
Connecting the Ethernet cable to the Network for Dante or RAVENNA use
The Network connection uses an RJ45 female receptacle with an EtherCon locking connector. A standard Cat5e, Cat6 or higher cable can be used. Anubis is supplied with a 3 meters Ethernet Cat6 cable, if a longer cable is required, it can be ordered from your Merging Technologies dealer.
If using an EtherCon align this one to the Network connector so that the small slot in the
EtherCon connector body is facing upwards, then push the connector home until the lock clicks.
To remove the cable, grasp the EtherCon cable connector body and push the tab above the Network input connector to release the lock, then withdraw the connector. Do not pull on the cable. If the lock release tab is not pushed sufficiently, the cable cannot be removed.

Figure 1 Cat5e or Cat6 Ethernet cable
 Note: A network interface adaptor might be required to connect the Anubis RJ-45 cable to a USB Type A, B or C port or to a Thunderbolt port of your notebook/computer. Merging recommends the Sonnet Thunderbolt Gigabit Ethernet Adaptor.
For Dante Networks
If you have more than one Anubis or if you have another Dante device such as a Hapi, or a second system running Dante over the same network it is highly recommended to use a Merging certified Dante switch and follow our configuration guidelines.
Merging's recommended Switches and Configurations:
RAVENNA/AES67 and Dante Certified Switches
https://merging.atlassian.net/wiki/spaces/PUBLICDOC/pages/4818859/Dante+devices+Multica_st+Groups+configuration+-+Cisco+switches
Installed applications
Anubis Toolkit 1.7.0 and above
For latest package of installers, firmware and remote control tools
MT Discovery 15.0.10 and above
For Dante access to Web App, Remote App, Dante Advanced Pages and Firmware updates
MT Portal 1.2 and above
For automatic software and firmware updates
ANUBIS HOME PAGE
Select the Mission you plan to use

Missions
All missions are supported in Dante mode. For details refer to the Anubis User Manual or the Mission Appendix.
LOGS MESSAGES
Select if log message are preset (yellow toolbar envelop blinking).
PREAMPS CONTROL
Opens the Anubis PreAmps page (refer to Mission Manual)
Note: Peering is not supported in Dante mode.
STATUS BAR
Displays information and notifications about the Anubis status

48V: Will light up red if 48 Phantom power is active on an input channel
CLP: Clipping peak detected, clear the clipping by either tapping the meters section (PreAmps & Meters page) or use the Peak clear option available
OV: Overload detected in the Anubis built-In Mixer.
Input Cut: When lit it will indicate that one or more Preamp channel is cut (muted) 1-2-3-4-TB
Talkback: Built-in and/or routed input to the Talk 1 or 2. Active talkback will light up if engaged
Page title: Information related to the selected page
GPIO: GPIO indicator for input and output, will lit if GPIO is received or transmitted
MIDI IO: MIDI indicator for input and output, will lit if MIDI is received or transmitted
Log: Lights up when a message or error has been received. Check message in Home page Log
Dante: Icon indicator that the Anubis is Running in Dante mode
Power Over Ethernet: (PoE) when active, the icon will be highlighted green
Synchronization status: M Master PTP or S Slave PTP clock
Sampling Rate indication: e.g. 192kHz
SETTINGS
The Settings layout may vary with the Mission running.
Open the Anubis Settings from the Anubis home page, with a long press on the Anubis Home button.

The Dante mode Settings option will differ from the RAVENNA/AES67 Settings. In this section we will aim a describing the difference. For details on the RAVENNA/AES67 setting please refer to the User Manual or Mission Manual.

SETTINGS CATEGORIES DESCRIPTION
GENERAL SETTINGS
![]()
Note: The General Settings are displayed on a Black Background as of Firmware 1.4.4 and above Sample Rate
![]() Sampling Rate
Sampling Rate
Selector to the different sampling rates, available from a drop down menu. Dante mode highest supported sampling rate is 192kHz.
Anubis Pro: 44.1kHz, 48kHz, 88.2kHz, 96kHz, 176.4kHz, 192kHz
Anubis Premium: 44.1kHz, 48kHz, 88.2kHz, 96kHz, 176.4kHz and 192kHz
Note: 384kHz, DXD and DSD are supported with the RAVENNA/AES67 firmware only.
CLOCK
Internal: Dante
Optical: Synchronize to external Optical clock.
About Dante Clock
All Dante-enabled devices use the IEEE 1588 Precision Time Protocol (PTP) across the network to synchronize their local clocks to a leader clock, providing sample-accurate time alignment throughout the network. One Dante device will be elected as the PTP Leader Clock for the network; all other Dante devices act as a PTP Follower Clocks to the elected leader clock. Although many Dante devices may be capable of becoming PTP
Leader Clock, only one device will win the election. Devices with clock inputs (e.g. Word Clock or AES3) will be preferred in the election process. A gigabit connected device is preferred over a device connected via 100Mbps. A tie-breaker rule of the lowest MAC address is used if several equivalent candidate leader clocks are available. The election process may be overridden by manually setting 'Preferred Leader' on a device.
Dante Clock Types
Each Dante hardware device can derive its clock from either its high-quality onboard clock circuit, or an externally connected word clock. In the case of Dante Virtual Soundcard, the computer's clock will be used.
About Dante Latency
For Dante audio devices, variation in latency in the network is compensated for at the receiver. Each receiver has a device latency setting. This setting defines the latency between the timestamps on the incoming audio samples and when those samples are played out.
The typical default latency for a Dante audio device is 1 msec. This is sufficient for a very large network, consisting of a Gigabit network core (with up to 10 hops between edge switches) and 100 megabit links to Dante devices. Smaller, Gigabit-only networks can use lower values of latency (down to 150 µsec for very fast devices, such as PCIe cards). Recommended latency settings are displayed in Dante Controller, and may also be found in the documentation accompanying the product.
Refer to the Dante Controller Manual for all details
MONITORING Settings
The Monitoring settings are the central part of the Monitoring Mission, this is where you can configure the incoming Sources and outgoing Monitor sets and configure their routing.
SOURCES
![]()

The first step is to configure your Sources (e.g. DAW or External DANTE Device) prior to deciding how you will monitor those. By default, Anubis comes with pre-created sources that consist of the current Anubis physical inputs: Mic/Line (Back Panel Inputs 1-2) and INST/LINE (Front Panel inputs 3-4), with an additional DAW Source ready to listen to your DAW Playout, upon a first connection within Dante Controller.
The internal Sources are already patched to the Anubis mix engine, so that you can immediately use them for monitoring purpose. You are free to remove any of those pre-configured and/or to create your own additional Sources at any time.
Anubis ex-factory comes with some pre-configured Sources (such as DAW 1-2). Users are free add and create their own sources or edit the present ones. 128 channels @ 1FS (44.1/48kHz) are available to connect those Sources.
![]() Channels
Channels

Number: Channel numbering of the Source
Type: The channel type is predefined in accordance with the selected Source Type
Patch: Configure the Source routing by patching each of the source channels. Scroll to view the entire listing.

Figure 2 Example: Dante Patched Source
Note: Stream Listener Sources are not supported in Dante Mode.
MONITORS
![]()

Configure your Monitoring sets, whether you plan to use the Anubis hardware output sets for your Studio Monitor Speaker, Headphones, Cue Mix or to Remotely control the outputs of an external compatible device Dante device.
![]() Patches
Patches

Figure 3 Example: Configured Patch Monitor
Patch: Configure the Monitor routing. Users can patch an Anubis Hardware Output Monitor, an external source (e.g. Paired device) or Dante Stream. The Patch list starts with the Anubis Hardware inputs followed by the Dante Stream. Scroll to view the entire listing.

DANTE IO Settings
Assign the DANTE IO channel from within the Anubis Settings. Allowing the operator to patch by example Microphone inputs of the Anubis directly to the Dante channels in order to record those within the DAW.

The Venue Mission and Commentary Unit Mission do not have the Dante IO settings page. to perform the Dante routing open the Dante Advanced pages from MT Discovery.

Routing Example of the Venue Mission in the advanced.
Refer to the online Dante Advanced Pages online information for all details https://merging.atlassian.net/wiki/spaces/PUBLICDOC/pages/257392641/Merging+DANTE+Advanced+Pages.
Refer to the Use Case here for all details on the Venue Mission https://merging.atlassian.net/wiki/spaces/PUBLICDOC/pages/665649153/COMMON+SETUP+DANTE .
SoundID REFERENCE ROOM CORRECTION
![]()
![]() OUTPUTS Settings
OUTPUTS Settings
![]() TRIGGERS Settings
TRIGGERS Settings
Refer to Main Manual for all details.
INFO Settings
![]() Info
Info
Find all information about the Anubis Name, Type, Firmware version, Maintenance mode and
Serial Number along with additional information on the Anubis status: Temperature, CPU,
Memory usage and the AoIP Running Firmware (Dante) as well as the Dante license plan (8 IO or 64 IO)

Note: Anubis users should regularly check if a new firmware is available. It is important to update to the latest firmware in order to benefit from the latest improvements and fixes.
Follow the firmware update procedure for all details.
EXIT Settings

![]() Reboot
Reboot
Reboot the Anubis
Note: To turn OFF Anubis, press on the POWER button to switch it to the released state.
![]() Save
Save
Save the current Anubis configuration
Note: The Anubis entire configuration is saved every 2 minutes, and as well every time you exit the Anubis Settings. If changes are applied when in the Anubis Settings and you plan to power off the Anubis while in the Settings, it is recommended to first perform a Save configuration.
![]() Reboot to Factory
Reboot to Factory
Reboot your Anubis to factory settings will recall to the default factory settings.

All Sources, Monitors and Settings will be lost.
Since the saved Presets will not be erased we recommend that you first back up your Anubis Configuration by saving it to a Preset.
Dante Redundancy
The Merging Anubis fully supports (2) RJ45 connectors, that can be configured in two different modes of operations.
- Dante Redundancy:
Dante offers a full-time redundancy option with permanent primary and secondary audio transmission. Redundancy requires a second network, either using a second physical switch (recommended) or via a VLAN isolating the network traffic.
Audio data is transmitted on both the primary and secondary networks simultaneously. In the event of a failure on one network, audio will still continue to be transmitted via the other network
Can be activated from the TFT under Settings>General
 .
. - Network Switch mode (default)
Allowing the daisy changing of one extra network interface connected directly to one of the Hapi MKIII RJ45 port.
![warning]() Notice: We do not support multiple daisy chained devices from the Hapi second ethernet port in switch port. A properly configured Network switch is recommended in order to daisy chain more than one additional hardware audio interface.
Notice: We do not support multiple daisy chained devices from the Hapi second ethernet port in switch port. A properly configured Network switch is recommended in order to daisy chain more than one additional hardware audio interface.
 .
.BASIC DANTE MONITORING SETUP (Monitor Mission)
")
SetUp:
Using a Main Speaker Set and headphones in order to Monitor the DAW Main playout Source.
Prerequisites:
Make sure you have Dante Controller and Dante Virtual Sound Card installed and running Properly connect and powered up your Anubis.
Connect your Active Monitors (or Power Amp) to the Anubis physical Outputs XLR 1 and 2 and/or TRS outputs 3-4 if you have alternate Monitors in your setup.
Procedure:
- In order to connect your DAW playback to Anubis you must first have a Source available to host your DAW Playout Stream 1-2 (if stereo)
![warning]() Note: Ex-factory Anubis comes with a DAW 1-2 Source. If this one is not available in the Sources page, create it, refer to the Settings>Sources manual section.
Note: Ex-factory Anubis comes with a DAW 1-2 Source. If this one is not available in the Sources page, create it, refer to the Settings>Sources manual section. - Launch your DAW making sure it is loading the Dante Driver
- Open Dante Controller and connect Streams between your Anubis and your system

- Patch your DAW 1-2 Source to the Dante Streams 1-2

- Patch your Monitor Set. Ex- Factory Speaker Sets: A, B, and Headphones 1, 2 should already be patched to their respective physical outputs. This can be verified and changed if desired under the Settings>Monitors Patch section.
Default Patching under the respective Sources and Monitors settings
Settings>Monitor Main 1-2 Speaker A Patched to the Physical Anubis XLR 1-2

Settings>Monitor Main 1-2 Speaker A Patched to the Dante Streams 1-2

![]()
If the Dante Streams auto-disconnect make sure that under Settings>Dante IO page you do not have channels already mapped to those Dante channels - Return to the Main Anubis Source page in order select which source and from which Monitor set you will monitor. First select the Monitor Set (e.g. Anubis A or B button), then select the DAW 1-2 Source to monitor it.


Select DAW 1-2 Source - In order to monitor multiple sources simultaneously enable the SUM option and sum your Sources selections.
To control the Headphones volume, simply select the Headphone 1 button and use the Anubis Rotary knob to adjust its Volume.


Note: The Speakers Set mode and Headphones mode listen to the same Sources selection. In order to listen to different Sources, a Monitoring Cue must be configured (refer to the Settings>Monitors Cue mode section)
You are ready to start your Anubis Monitoring Mission and have full control over your DAW monitoring.
MUSIC MISSION DANTE SETUP

Setup:
Adding Microphones and Instruments for recording while monitoring your DAW Main outputs along with an ultra-low monitoring Cue routed to the Headphones 1. Providing CUE Mixes to Artists over a Dante Network.
Prerequisites:
Install Dante Controller and Dante Virtual Soundcard.
Connect your microphones to the XLR combo inputs 1-2 located at the back of the Anubis, your Guitar or Bass can be directly connected to the Hi-Z instrument input at the front Input 3. Stereo inputs 3-4 can be used, but in this case under Settings>Sources>Inst/Line the source mode has to be changed to Stereo mode, and patched to Jack 3 and Jack 4.
Note: Using Input 4 will override the built-in Talkback microphone as both share the same circuitry.
Procedure:
- Launch Dante Virtual Sound Card (DVS) and Dante Controller.
- In Dante Controller establish connections between the Anubis and your system

- Configure your DAW to use the Dante Virtual Sound Card and make sure it is configured to use the Dante Outputs 1-2 by example
- Playback your DAW
The DAW signal will be coming into the Dante inputs channels of the Anubis.

It is recommended for Stereo DAW inputs to Pan the channels left and right. - Open the Bus Routing Page and patch the Mixer and Mixer-ALT to the outputs you wish to monitor from.

Bus Routing
You can map the Mixers outputs to local Anubis hardware outputs (e.g. XLR 1-2 or HP1 or HP2), but can also map your Bus Routing to Dante devices over your network (scroll down the page). Note: For Dante Multichannel Monitoring we recommend using the Anubis Monitor Mission - To record the Physical Preamps of the MT 48 over Dante and your DAW, make sure you route them properly under Settings>Dante IO.
In the image below we have Routed the Analog inputs 1-4 of the Anubis to the Dante channels 1-4 in order to record those channels within your DAW inputs.

You are ready to Record and Monitor Software applications (DAW) using the Anubis Music Mission in which you can now Mix the Anubis Inputs channels in ultra-low latency as well.


MORE ANUBIS USE CASES HERE
https://merging.atlassian.net/wiki/spaces/PUBLICDOC/pages/4818957
WEB USER INTERFACE
Remote control your Anubis Monitoring through any tablet or web browser by opening the Web User page. The Anubis Monitoring Web User Interface combines all three pages of the Monitoring Mission into a single web page.
Peer to Peer Remote Access:

Network/Tablet Remote Access:

How to Open the Remote Web User Interface
MT Discovery:
Make sure that MT Discovery 15.0.10 and above is installed on your system.
Once Anubis is properly connected to your PC or Mac launch MT Discovery and double mouse click on the Anubis entry. This will open the Monitoring Web Access page into your default web browser (Google Chrome recommended).

ANEMAN, VAD and MAD are RAVENNA/AES67 utilities and driver and do not support Dante operating mode nor will they discover your Anubis. If running in Dante we recommend using MT Discovery for interface access and management and Dante Controller for connectivity.
Dante Appendix available from the Web Access
Once the remote Web Access is opened in your browser (Chrome recommended). From the main Menu, see options with Settings access and also the Dante Appendix access.

Identify Device
Dante Controller incorporates support for device identification. Double click any device in the Network View to open the Device View, the click on the "Identify" button. This will Display the device Name/Serial in Overlay on the Anubis TFT display.

You have now identified an Anubis over the network.
ANUBIS FIRMWARE UDPATE PROCEDURE
PREREQUISITES
- MT Discovery 15.0.10 and above and MT Portal 1.2 and above.
Download from https://www.merging.com/download - An internet connection to download the latest Firmware
- Connecting the ethernet interface of the Anubis to a Mac or PC system for the update procedure
- Google Chrome is the recommended browser
PROCEDURE – MT Portal
- Install MT DISCOVERY and MT Portal
- Download the latest Anubis Toolkit / Firmware from https://www.merging.com/anubis/download
- Connect your Anubis network port to the system where you have downloaded the latest firmware
- Launching MT Discovery, it will discover your Anubis within seconds.
- Perform a Mouse + Right Click and select either "Show Available updates"
![warning]() Note: For manual Firmware updates refer to the Main User Manual.
Note: For manual Firmware updates refer to the Main User Manual.

- This will open the MT Portal.
- Under the Dante tab of the Anubis, select "Download & Update"

![]()
Never about a Firmware update. - Reboot the Anubis once the update is successful. It will then be Running in Dante mode.
The Dante IO License is not included, follow procedure at the beginning of this guide for details.


PROCEDURE – Manual
Update from the Maintenance Page (alternative)
Users can update the firmware from the Maintenance Mode page. This is supported from a network AoIP connection to your system (mac or PC).
OPEN MAINTENANCE PAGE from the Anubis form the MT Discovery Right Click menu
A browser window opens. Click SELECT FILE and locate the firmware file you downloaded.
(The RAVENNA-AES67 or DANTE firmware/toolkits can be the Merging site)
Click UPDATE and wait for the procedure to end. Make sure your computer does not enter sleep mode during the update process. The updating procedure takes about 10 minutes. Don't panic if the process appears to get stuck. Do not abort, just wait.
Once the update is completed, the message REBOOT DEVICE appears. Confirm.
After rebooting the device, your Merging Anubis will be updated to the latest firmware.
Never abort an ongoing firmware update
Documents / Resources
References
https://merging.atlassian.net/wiki/spaces/PUBLICDOC/pages/4819466/NMOS+Implementation+Notes
https://merging.atlassian.net/wiki/spaces/PUBLICDOC/pages/4818859/Dante+devices+Multica_st+Groups+configuration+-+Cisco+switches
https://merging.atlassian.net/wiki/spaces/PUBLICDOC/pages/4818859/Dante+devices+Multicast+Groups+configuration+-+Cisco+switches.
https://merging.atlassian.net/wiki/spaces/PUBLICDOC/pages/257392641/Merging+DANTE+Advanced+Pages
https://merging.atlassian.net/wiki/spaces/PUBLICDOC/pages/665649153/COMMON+SETUP+DANTE
https://merging.atlassian.net/wiki/spaces/PUBLICDOC/pages/4818957
![www.merging.com]() Merging Technologies - Interfaces
Merging Technologies - Interfaces
Download manual
Here you can download full pdf version of manual, it may contain additional safety instructions, warranty information, FCC rules, etc.
Advertisement


Need help?
Do you have a question about the ANUBIS and is the answer not in the manual?
Questions and answers