HP USB Docking Station Manual
- Maintenance and service manual (70 pages) ,
- User manual (39 pages) ,
- Specification (1 page)
Advertisement
Getting started
This chapter identifies the visible hardware features of the HP USB Docking Station and provides the instructions for setting up the docking station.
Identifying components
Top components

| Component | Description | |
| 1 | Power light | On: The docking station is on. |
Front components

| Component | Description | |
| 1 | USB port | Connects the USB cable to the computer. |
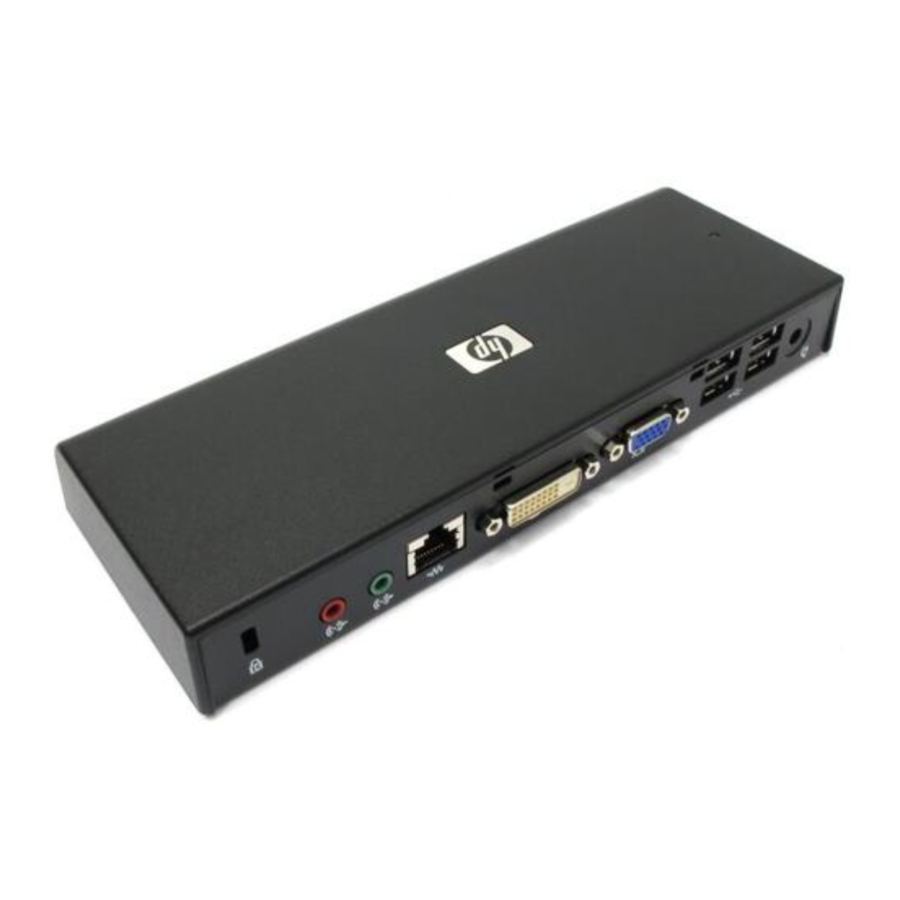
Rear components

| Component | Description | |
| 1 | Security cable slot | Attaches an optional security cable to the docking station. NOTE: The security cable is designed to act as a deterrent, but it may not prevent the docking station from being mishandled or stolen. |
| 2 | Audio-in (microphone) jack | Connects an optional computer headset microphone, stereo array microphone, or monaural microphone. |
| 3 | Audio-out (headphone) jack | Produces computer sound when connected to optional powered stereo speakers, headphones, ear buds, a headset, or television audio. |
| 4 | RJ-45 (network) jack | Connects a network cable. |
| 5 | DVI external monitor port | Connects an optional external DVI monitor or projector. |
| 6 | VGA external monitor port | Connects an optional external VGA monitor or projector. |
| 7 | USB ports (4) | Connect optional USB devices. |
| 8 | Power connector | Connects the docking station AC adapter. |
Setting up the USB Docking Station
- Connect to AC power
![]()
To reduce the risk of electric shock or damage to your equipment:
Plug the power cord into an AC outlet that is easily accessible at all times.
Disconnect power from the product by unplugging the power cord from the AC outlet.
If provided with a 3-pin attachment plug on the power cord, plug the cord into a grounded (earthed) 3-pin outlet. Do not disable the power cord grounding pin, for example, by attaching a 2-pin adapter. The grounding pin is an important safety feature. It is possible to receive an electric shock from a system that is not properly grounded.
To ensure the correct performance of all docking station features, connect the docking station to an AC power source using the docking station power cord.

- Connect the docking station power cord to the power connector (1).
- Connect the power cord to an AC outlet (2). The power light (3) on the top of the docking station turns on.


NOTE:
The docking station power cord provides power to the docking station only. To provide power to the computer, connect the computer to external power using the computer AC adapter and power cord.
- Connect the computer
To connect the computer to the docking station:- Connect one end of the USB cable to the USB port on the front of the docking station.

- Connect the other end of the USB cable to the USB port on the computer.

- Connect one end of the USB cable to the USB port on the front of the docking station.


Setting up the software
Windows XP initial setup
This section describes how to install the docking station software on a computer running the Windows® XP operating system.
- With the computer on and Windows running, connect the USB cable from the docking station to the computer. The Choose Setup Language dialog box opens.
- To select a language different from the language of the operating system, choose a language from the list, and then click OK.
- To install the requirements, click Install.
- To install the DisplayLink driver, choose a language, and then click I Accept.
- To install the other drivers, click Next, and then click Install.
- To complete the installation process, click Finish. The USB docking station icon is added to the notification area, at the far right of the taskbar.
Windows Vista initial setup
This section describes how to install the docking station software on a computer running the Windows Vista® operating system.
- With the computer on and Windows running, connect the USB cable from the docking station to the computer. The AutoPlay dialog box opens.
- Select Always do this for software and games checkbox, and then click Run loaderw.exe.
- In the User Account Control dialog box, click Allow.
- To select a language different from the language of the operating system, choose a language from the list, and then click OK.
- To install the requirements, click Install.
- In the User Account Control dialog box, click Allow.
- To install the DisplayLink driver, choose a language, and then click I Accept.
- To install the other drivers, click Next, and then click Install.
- To complete the installation process, click Finish. The USB docking station icon is added to the notification area, at the far right of the taskbar.
After initial software installation, whenever you connect the docking station to the computer while Windows is running, the User Account Control dialog box opens.
Using the software
DisplayLink™ is an official software development partner.

Using DisplayLink
Use DisplayLink to configure the display of an extra monitor:
- In the notification area, click the DisplayLink icon.
- To extend the Windows desktop, click Extend.
– or –
To mirror the primary monitor, click Mirror.
Using Windows Display properties
Use Windows Display properties to configure the display of an extra monitor:
- If the computer is running Windows® XP, right-click on the desktop, click Properties, and then click the Settings tab.
– or –
If the computer is running Windows Vista®, right-click on the desktop, click Personalize, and then click Display Settings. - To extend the Windows desktop, select the Extend the desktop onto this monitor check box.
– or –
To mirror the primary monitor, select the This is my main monitor check box.
Using additional software features
The DisplayLink software offers additional features for configuring extra monitors:
- Updates — Configure DisplayLink software automatic updates.
- Resolution — Changes the resolution of the extra monitor.
- Color quality — Changes the color depth of the extra monitor to 16 or 32 bit.
- Screen rotation — Rotates the display of the extra monitor 90, 180, or 270 degrees.
- Off — Turns the extra monitor off.
- Advanced — Opens the Windows Display properties box.
Standby, Sleep, Hibernation, shutdown, and restart
If the computer connected to the docking station initiates Standby (XP) or the Sleep state (Vista) or Hibernation, the monitor turns off. When the computer exits Standby, Sleep, or Hibernation, the connected monitor returns to the previous monitor settings.
If the computer is restarted or shut down and then turned back on, the connected monitor returns to the previous monitor settings.
Using the docking station
Docking station guidelines
- Operating systems — For optimal performance, use the docking station with HP or Compaq computers running the Windows® XP or Windows Vista® operating system.
- Power — To use docking station features, AC power must be connected to the docking station.
- Connecting and disconnecting — The docking station can be connected to or disconnected from the computer whether the computer is on or off.
- External devices — External devices connected to the rear panel of the docking station work only when the docking station is connected to a computer.
Connecting to a network
NOTE: To communicate using the modem on your computer and an analog telephone line, connect one end of a modem cable to the RJ-11 (modem) jack on your computer and the other end to an RJ-11 telephone jack. Refer to your computer user guide for more information.
You can connect your computer through the docking station to a network. This requires an Ethernet cable (purchased separately).
NOTE: The RJ-45 (network) jack on the computer is disabled when the computer is connected to the docking station.
- Connect the docking station to your computer.
- Connect one end of the Ethernet cable to the RJ-45 (network) jack on the docking station (1) and the other end to an RJ-45 wall jack (2) or router.


Connecting USB devices
The docking station has 5 USB ports: 1 port on the front and 4 ports on the back. Use the port on the front to connect the docking station USB cable to the computer. Use the ports on the back to connect optional external USB devices, such as a keyboard and mouse.

Connecting to a DVI or VGA display device
The docking station can also be connected to an external DVI or VGA display device, such as a monitor or a projector, through the external monitor ports.
NOTE: If 2 display devices are connected, one to the DVI external monitor port and another to the VGA external monitor port, only the device connected to the DVI external monitor port works.

Connecting audio
The docking station can also be connected to an audio device, such as a microphone or headphones, through the audio ports.
NOTE: If 2 audio devices are connected, one to the docking station and another to the computer, only the audio device connected to the docking station produces sound.

Connecting an optional security cable
NOTE: The security cable is designed to act as a deterrent, but it may not prevent the docking station from being mishandled or stolen.
To install a security cable:

- Loop the security cable around a secured object.
- Insert the key (1) into the cable lock (2).
- Insert the cable lock into the security cable slot on the docking station (3), and then turn the key.
Disconnecting the computer
- To disconnect the computer from the docking station, remove the USB cable from the computer.


Troubleshooting
Solving common problems
The following tables list possible problems and the recommended solutions.
General use and connection problems
| Problem | Possible cause | Solution |
| The power light is off. | The docking station is not connected to AC power. | Connect the power cord to the docking station and to an AC outlet. |
| The ports or jacks on the docking station are not working. | The docking station is not connected to AC power. | Connect the power cord to the docking station and to an AC outlet. |
| The docking station is not connected to the computer correctly. | Disconnect the USB cable from the computer, and then reconnect it. | |
| The error message The requested allocation size was too large is displayed. | The screen resolution is set higher than the maximum limit. | Set the screen resolution to no higher than 1600 x 1200 or 1680 x 1050. |
Audio problems
| Problem | Possible cause | Solution |
| An audio device connected to the audioout (headphone) jack on the computer does not produce sound. | An audio device is connected to the headphone jack on the docking station. Using the headphone jack on the docking station mutes sound through the computer. | Disconnect the audio device from the docking station. |
| A microphone connected to the audio-in (microphone) jack on the computer does not work. | A microphone is connected to the docking station. Using the microphone jack on the docking station mutes sound through the computer. | Disconnect the microphone from the docking station. |
Video problems
| Problem | Possible cause | Solution |
| A video device connected to the VGA external monitor port on the docking station does not work. | Video devices are connected to both the DVI external monitor port and to the VGA external monitor port. | Disconnect the video device from the DVI external monitor port. |
Getting more information
- For comprehensive information about your computer, as well as governmental agency and safety information about the use of your computer, access Help and Support by clicking Start, and then clicking Help and Support.
- The HP Web site (http://www.hp.com) provides product news and software updates.
Technical support
If you cannot solve a problem using the troubleshooting tips in this chapter, you may need to contact technical support.
For the fastest possible resolution of your problem, have the following information available when you call or e-mail:
- Model name and number for the computer and for the docking station
- Serial numbers for the computer and docking station
- Dates the computer and docking station were purchased
- Conditions under which the problem occurred
- Error messages that have been displayed
- Hardware and software you are using
- The manufacturer and model of components connected to the computer and docking station
To contact technical support, click Start, click Help and Support, and then click Contact support to start a chat session with a support specialist. You can also refer to the Worldwide Telephone Numbers booklet, included with the computer, for contact information.
NOTE: When technical support chat is not available in a particular language, it is available in English.
Documents / Resources
References
Download manual
Here you can download full pdf version of manual, it may contain additional safety instructions, warranty information, FCC rules, etc.
Advertisement


Need help?
Do you have a question about the USB Docking Station and is the answer not in the manual?
Questions and answers