Table of Contents
Advertisement
Advertisement
Table of Contents

Related Manuals for McIntosh MA6400


Summary of Contents for McIntosh MA6400
- Page 1 MA6400 INTEGRATED AMPLIFIER...
- Page 3 MA6400 INTEGRATED AMPLIFIER...
- Page 4 1. Read all instructions - Read the safety and operating instructions before operating the instrument. 2. Retain Instructions - Retain the safety and operating instructions for future reference. IMPORTANT 3. Heed warnings - Adhere to warnings and operating instructions. SAFETY 4.
-
Page 5: Table Of Contents
Purchase Date Service Contract Number SERVICE CONTRACT INTRODUCTION TABLE OF CONTENTS HOW TO INSTALL THE MA6400 FRONT PANEL CONTROLS SWITCHES AND PUSHBUTTONS 6, 7. 8. 9 HAND HELD REMOTE CONTROLLER 11, 12 THE REAR PANEL AND HOW TO MAKE CONNECTIONS... -
Page 6: Service Contract
4. The service contract is issued to you as the original purchaser. To protect you from misrepresentation this contract cannot be transferred to a second owner. 5. Units in operation outside the United States and Canada are not covered by the Mcintosh Factory Service Contract, irrespective of the place of purchase. Nor are units acquired outside the USA and Canada, the purchasers of which should consult with their dealer to ascertain what, if any, service contract or warranty may be available locally. -
Page 7: Introduction
Controller. Refer to the Manual section TECHNICAL DESCRIPTION for further circuit and feature information. The MA6400 can be installed upright on a table or shelf, standing on its own plastic feet. It INSTALLATION can also be custom installed in furniture or cabinet of your choice. The required panel cutout and unit dimensions are shown on a page near the back of this manual. -
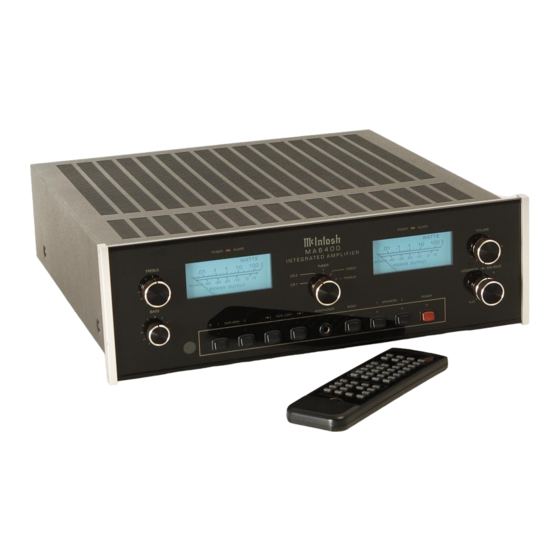
Page 8: Front Panel Controls Switches And Pushbuttons
The MA6400 can be remotely controlled. Most of the operating functions performed at FRONT PANEL the front panel, also can be done by the MA6400 Hand Held Remote Controller. The CONTROLS, following Information refers only to the front panel. Other sections of this manual explains... - Page 9 HEADPHONES. The TAPE 1 and 2 OUTPUTS are not affected by the VOLUME control. A Red MUTE LED Just to the right of the VOLUME control turns ON to indicate the MA6400 output is MUTED. Activate the MUTE mode by pressing the MUTE pushbutton on the Hand Held Remote Controller.
- Page 10 Plug in a pair of dynamic headphones to this jack for headphone listening. Press MUTE on the MA6400 Remote Controller to mute the SPEAKERS 1 and 2 outputs and the MAIN OUTPUTS to allow private headphone listening. MUTE does not affect the HEADPHONES or the TAPE 1 and TAPE 2 OUTPUTS.
-
Page 11: Front Panel
M. POWER Press the red POWER button to turn the MA6400 system ON. Press again to turn it OFF. The rear panel SWITCHED AC Outlet turns ON and OFF with the POWER switch. The RED LED above the POWER switch stays ON continuously whenever the MA6400 is connected to a live AC outlet. - Page 12 You can listen to previously recorded tapes, or monitor tape from a three-head tape recorder during the recording process. A Red LED will turn ON above either of the MA6400 front panel pushbuttons to indicate whether (Tape) MON 1 or MON 2 has been selected.
- Page 13 HAND HELD REMOTE CONTROLLER 6. Press the POWER pushbutton to turn the MA6400 system ON. Press again to turn the system OFF. 7. The ACC (Accessory) ON or OFF pushbuttons function when the optional RCT-2 Remote Control Translator is being used with the MA6400. They can be programmed to turn on and off the AC power of an accessory component.
-
Page 14: Hand Held Remote Controller
The TAPE 1 and 2 OUTPUTS are not affected by the remote VOLUME pushbuttons HOW TO INSTALL BATTERIES IN THE MA6400 HAND HELD REMOTE CONTROLLER Slide open the battery compartment. Insert two type AAA batteries into the compartment, making sure to observe the battery polarities indicated in the battery compartment. -
Page 15: The Rear Panel And How To Make Connections
The SUM DATA port is used for connecting to the optional Mclntosh Model RCT-2 Remote Control Translator. Any IR signal transmitted to the MA6400 sensor results in data signals at this port. The RCT-2 is a learning device that will allow the MA6400 to remotely control most major brands of accessory components. - Page 16 The TAPE COPY Switches also affect the signals at the TAPE OUTPUTS. Connect a cable from the MA6400 Left channel TAPE 1 OUTPUT to the left channel high level input of a tape recorder. Connect a cable from the MA6400 Right channel TAPE 1 OUTPUT to the right channel high level input of the tape recorder.
- Page 17 TV receiver. TO MAKE Connect a cable from the left channel audio output of the video unit to the MA6400 L (Left) CONNECTIONS channel VIDEO INPUT. Connect a cable from the right channel audio output of the video unit to the MA6400 R (Right) VIDEO INPUT.
- Page 18 16. UNSWITCHED AC RECEPTACLE This AC receptacle will stay on at all times as long as the MA6400 power cord is connected to a live 120V, 50/60Hz power outlet. For example, this outlet could be used for a VCR that is programmed to record a TV show when the main stereo system is turned off.
- Page 19 Controller to send control signals to the MA6400 without aiming it at the front panel. One example of a need for this feature would be if the MA6400 were installed behind a cabinet door that would block the front panel IR sensor.
-
Page 20: Hookup Diagram
HOOKUP DIAGRAM... -
Page 21: Technical Description
Five different types of protection circuits are incorporated in the MA6400 to insure it a long, safe and trouble free operating life. This is just one of the characteristics of Mclntosh power amplifiers that have made them world famous. - Page 22 Mclntosh MA6400 amplifier with POWER GUARD. LOGIC DRIVEN CONTROL All Inputs, Outputs, CD, and Data Ports are controlled by logic circuits in the MA6400. This logic is changed by front panel switches or by the microprocessor IR decoder. This microprocessor is programmed with exclusive Mclntosh software.
- Page 23 High level signals feed into the preamplifier past the input and mode switching, through the volume control and then into the loudness amplifier. The MA6400 uses an active loudness control circuit design. An integrated circuit operational amplifier is used with two separate feedback circuits.
-
Page 24: Specifications
it possible to select any degree of frequency response from flat, to full loudness compensation. SPECIFICATIONS The overall gain of the loudness circuit is 14dB, which remains constant at mid frequencies, regardless of the position of the loudness control. The frequency compensation increases from the reference gain, and the desired amount of loudness compensation can be selected at any volume control setting. - Page 25 STEREO POWER OUTPUT SPECIFICATIONS 100 watts into 4 ohm loads minimum sine wave continuous average power output per channel, both channels operating. The output RMS voltage is: 20 V across 4 ohms RATED POWER BAND 20 Hz to 20,000Hz FREQUENCY RESPONSE +0.
- Page 26 INPUT IMPEDANCE SPECIFICATIONS Phono: 47K ohms and 65pF Capacitance High Level: 22K ohms TONE CONTROLS Bass and Treble, variable 12dB boost to 12dB cut AC POWER OUTLETS 1 Switched 1 Unswitched POWER REQUIREMENTS 120 volts. 50/60, Hz. 5 Amps UL/CSA DIMENSIONS Front panel, 17-1/2 inches (44.5cm) wide.
-
Page 27: Custom Installation Diagram
CUSTOM INSTALLATION DIAGRAM SUPPORT SHELF VENTILATION MOUNTING SURFACE CUTOUT IN MOUNTING SHELF OUTLINE OF UNIT... - Page 28 The letters and numbers correspond to the paragraphs on pages 6-10 and 13-18.
Need help?
Do you have a question about the MA6400 and is the answer not in the manual?
Questions and answers