Table of Contents
Advertisement
Quick Links
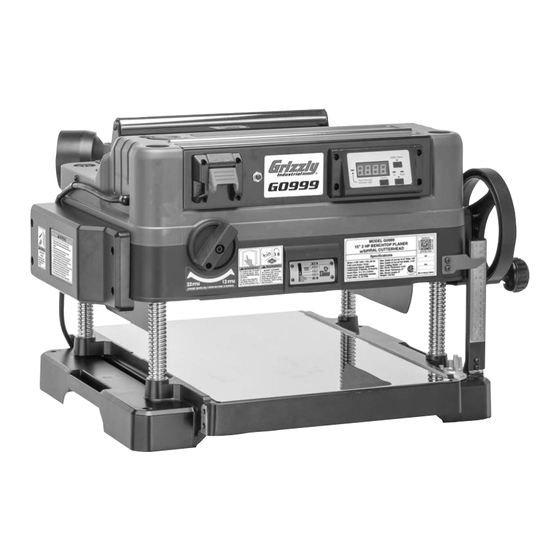
MODEL G0999
15" 2 HP BENCHTOP PLANER
w/SPIRAL CUTTERHEAD
OWNER'S MANUAL
(For models manufactured since 01/25)
COPYRIGHT © MARCH, 2025 BY GRIZZLY INDUSTRIAL, INC.
WARNING: NO PORTION OF THIS MANUAL MAY BE REPRODUCED IN ANY SHAPE
OR FORM WITHOUT THE WRITTEN APPROVAL OF GRIZZLY INDUSTRIAL, INC.
#JALW23448 PRINTED IN TAIWAN
V1.03.25
***Keep for Future Reference***
Advertisement
Table of Contents

Related Manuals for Grizzly G0999


Summary of Contents for Grizzly G0999
- Page 1 (For models manufactured since 01/25) COPYRIGHT © MARCH, 2025 BY GRIZZLY INDUSTRIAL, INC. WARNING: NO PORTION OF THIS MANUAL MAY BE REPRODUCED IN ANY SHAPE OR FORM WITHOUT THE WRITTEN APPROVAL OF GRIZZLY INDUSTRIAL, INC. #JALW23448 PRINTED IN TAIWAN V1.03.25...
- Page 2 This manual provides critical safety instructions on the proper setup, operation, maintenance, and service of this machine/tool. Save this document, refer to it often, and use it to instruct other operators. Failure to read, understand and follow the instructions in this manual may result in fire or serious personal injury—including amputation, electrocution, or death.
-
Page 3: Table Of Contents
Table of Contents INTRODUCTION ..........2 SECTION 5: ACCESSORIES ......26 Contact Info ........... 2 SECTION 6: MAINTENANCE ......27 Manual Accuracy ........... 2 Schedule ............27 Identification ........... 3 Cleaning & Protecting ........27 Controls & Components ......... 4 Removing/Installing Headstock Cover .. -
Page 4: Introduction
Use this and other machinery with caution and respect. Failure to do so could result in serious per- sonal injury, damage to equipment, or poor work results. Model G0999 (Mfd. Since 01/25) -
Page 5: Identification
ON/OFF Switch Cutterhead Height Scale Feed Rate Dial Headstock Height Stop Dial Headstock 4" Dust Port Depth-of-Cut Gauge Cutterhead Adjustment Port To reduce your risk of serious injury, read this entire manual BEFORE using machine. Model G0999 (Mfd. Since 01/25) -
Page 6: Controls & Components
C. 4" Dust Port: Connects to dust collection Page 6). system to extract shavings and dust during operation. Feed Rate Dial: Controls speed at which workpiece moves past cutterhead. Selects 22 FPM when turned clockwise and 12 FPM when turned counterclockwise. Model G0999 (Mfd. Since 01/25) - Page 7 O. Display Button: Turns display ON and OFF. Figure 3. Digital readout controls. K. Stock Removal Indicator Light: Illuminates when planing operation completes and stock is ready to be removed from machine. Model G0999 (Mfd. Since 01/25)
-
Page 8: Internal Components
H. Planer Table: Provides a smooth, flat surface for workpiece to slide against as it moves D. Chip Breaker: Breaks off chips created by through planer. cutterhead to prevent tear out and diverts chips to dust port. Model G0999 (Mfd. Since 01/25) -
Page 9: Machine Data Sheet
Machine Data Sheet MACHINE DATA SHEET Customer Service #: (570) 546-9663 · To Order Call: (800) 523-4777 · Fax #: (800) 438-5901 MODEL G0999 15" 2 HP BENCHTOP PLANER WITH SPIRAL CUTTERHEAD Product Dimensions: Weight................................133 lbs. Width (side-to-side) x Depth (front-to-back) x Height............... 28-1/2 x 24 x 18-1/2 in. - Page 10 The information contained herein is deemed accurate as of 3/3/2025 and represents our most recent product specifications. Model G0999 PAGE 2 OF 2 Due to our ongoing improvement efforts, this information may not accurately describe items previously purchased. Model G0999 (Mfd. Since 01/25)
-
Page 11: Section 1: Safety
Never operate under the influence of drugs or injury or blindness from flying particles. Everyday alcohol, when tired, or when distracted. eyeglasses are NOT approved safety glasses. Model G0999 (Mfd. Since 01/25) - Page 12 EXPERIENCING DIFFICULTIES. If at any time debris. Make sure they are properly installed, you experience difficulties performing the intend- undamaged, and working correctly BEFORE ed operation, stop using the machine! Contact our operating machine. Technical Support at (570) 546-9663. -10- Model G0999 (Mfd. Since 01/25)
-
Page 13: Additional Safety For Planers
GRAIN DIRECTION. Planing across grain is hard on planer and may cause kickback. Plane in same direction or at a slight angle with wood grain. -11- Model G0999 (Mfd. Since 01/25) -
Page 14: Section 2: Power Supply
-12- Model G0999 (Mfd. Since 01/25) - Page 15 Do not modify or use an adapter on the plug provided—if it will not fit the outlet, have a qualified electrician install the proper outlet with a verified ground. -13- Model G0999 (Mfd. Since 01/25)
-
Page 16: Section 3: Setup
Grizzly or the shipping agent. You MUST have the original pack- aging to file a freight claim. It is also extremely helpful if you need to return your machine later. -
Page 17: Inventory
Figure 7. Minimum working clearances. Children and visitors may be seriously injured if unsuper- vised around this machine. Lock entrances to the shop or disable start switch or power connection to prevent unsupervised use. Figure 6. Boxed inventory. -15- Model G0999 (Mfd. Since 01/25) -
Page 18: Bench Mounting
Bench Mounting Stand Mounting The Model G0999 can be mounted to an optional Number of Mounting Holes ......4 stand: Model T33204 (see Accessories on Diameter of Mounting Hardware Needed ... ⁄ " Page 26). The base of this machine has mounting holes... -
Page 19: Assembly
Port ered or coated in heavy-duty rust preventative (if applicable). The Model G0999 comes partially assembled. The handwheel and dust chute must be installed before operating the planer. To assemble machine:... -
Page 20: Dust Collection
Congratulations! The Test Run is complete. Figure 13. 4" dust hose attached to dust port. Tug hose to make sure it does not come off. Note: A tight fit is critical for proper performance. -18- Model G0999 (Mfd. Since 01/25) -
Page 21: Section 4: Operations
OFF. ects. Regardless of the content in this sec- tion, Grizzly Industrial will not be held liable for accidents caused by lack of training. -19- Model G0999 (Mfd. Since 01/25) -
Page 22: Disabling & Locking Switch
On the contrary, a workpiece supported on the bowed side will rock during operation and could cause severe injury from kickback. Figure 15. Minimum lock shaft requirements. -20- Model G0999 (Mfd. Since 01/25) -
Page 23: Wood Types
Always true cupped or warped stock on a • jointer before planing. -21- Model G0999 (Mfd. Since 01/25) -
Page 24: Cutting Problems
The best way to feed rate. deal with snipe is by planing lumber longer than your intended work length and then cutting off the Solution: Reduce feed rate. excess after planing is completed. -22- Model G0999 (Mfd. Since 01/25) -
Page 25: Setting Depth Of Cut
". A series of light cuts will give better end results and put less stress on the Depth-of-Cut planer than trying to take off too much material in Gauge Indicator a single pass. Figure 19. Depth-of-cut gauge indicator. -23- Model G0999 (Mfd. Since 01/25) -
Page 26: Setting Feed Rate
Figure 21. Feed rate dial. NOTICE Only change feed rate when planer is run- ning, but DO NOT attempt to change feed rate during any cutting operations or dam- age to gearbox will result. -24- Model G0999 (Mfd. Since 01/25) -
Page 27: Feeding Workpiece
⁄ ". However, as long as you move the handwheel in the same direction during operation, backlash will not be a factor. -25- Model G0999 (Mfd. Since 01/25) -
Page 28: Section 5: Accessories
ACCESSORIES SECTION 5: ACCESSORIES T34360—Infeed/Outfeed Tables for Model G0999 Increase the bed length of your Model G0999 15" Installing unapproved accessories may 2 HP Benchtop Planer to 49" with these extension cause machine to malfunction, resulting in tables. Steel construction offers extra strength serious personal injury or machine damage. -
Page 29: Section 6: Maintenance
Protecting To reduce risk of shock or accidental startup, always disconnect machine from Cleaning the Model G0999 is relatively easy. power before adjustments, Vacuum excess wood chips and sawdust, and maintenance, or service. wipe off the remaining dust with a dry cloth. If any... - Page 30 3" Thick Scrap Stock Figure 29. Location of cutterhead cover fasteners. Figure 31. Headstock cover supported by 3" thick scrap stock. Remove (2) Phillips head screws and flat washers from rear of headstock cover (see Figure 30). -28- Model G0999 (Mfd. Since 01/25)
- Page 31 (see Figure 33). Cutterhead Cover Figure 35. Location of control box fasteners. Attach control panel to headstock cover with tap screws removed in Step 4. Headstock Cover Figure 33. Location of cutterhead cover fasteners. -29- Model G0999 (Mfd. Since 01/25)
-
Page 32: Lubrication
Apply ISO 68 oil to each leadscrew (see Figure Right Side Cover 36), taking care to keep it off poly V-belt. Figure 37. Location of handweel and right side cover fasteners. -30- Model G0999 (Mfd. Since 01/25) - Page 33 Allow mineral spirits to dry, then apply light coating of grease to chains and sprockets. Install headstock cover (see Installing Headstock Cover on Page 29). Right Side Figure 39. Feed roller drive chains exposed for lubricating. -31- Model G0999 (Mfd. Since 01/25)
-
Page 34: Cleaning Infeed & Outfeed Rollers
DO NOT operate planer if anti-kickback and headstock. fingers are not operating correctly. Failure to heed this warning could result in serious personal injury. -32- Model G0999 (Mfd. Since 01/25) -
Page 35: Section 7: Service
2. Wiring broken, disconnected, or corroded. 2. Fix broken wires or disconnected/corroded connections (Page 40). incorrect. 3. Tone ring sensor at fault. 3. Replace tone ring sensor. 4. Digital readout circuit board is at fault. 4. Replace circuit board. -33- Model G0999 (Mfd. Since 01/25) - Page 36 1. Adjust chain and sprockets; replace if necessary. rollers not disconnected, or broken. rotating. Long lines or 1. Nicked or chipped insert. 1. Rotate/replace insert (Page 35). ridges that run along length of board. -34- Model G0999 (Mfd. Since 01/25)
-
Page 37: Rotating/Replacing Cutterhead Inserts
15 x 15 x 2.5mm ........As Needed Remove any sawdust or debris from head of Soft Bristle Brush..........1 insert, Torx screw, and surrounding area. Clean Shop Rags ........As Needed Degreaser ..........As Needed Light Machine Oil.........As Needed -35- Model G0999 (Mfd. Since 01/25) -
Page 38: Replacing Poly V-Belt
Note: If too much oil is applied to the threads, excess oil will attempt to squeeze out of the threaded hole and raise insert during installa- tion, bringing it out of height alignment. When finished, install cutterhead cover. -36- Model G0999 (Mfd. Since 01/25) - Page 39 Loop new poly V-belt around cutterhead pulley (see Figure 48). Ensure belt is fully seated in pulley grooves. Poly V-Belt Figure 50. Pushing belt into position. Cutterhead Pulley Figure 48. Looping poly V-belt around cutterhead pulley. -37- Model G0999 (Mfd. Since 01/25)
-
Page 40: Tensioning Headstock Height Chain
Headstock Height Chain on Page 31), then install headstock cover. NOTICE DO NOT let chain fall off sprockets. It can be very difficult to return chain to its proper location on sprockets without changing headstock adjustments. -38- Model G0999 (Mfd. Since 01/25) -
Page 41: Calibrating Cutterhead Height Scale
Loosen jam nut, and adjust stop bolt needed calibrate scale indicator. until value on cutterhead height scale match- es value on headstock height stop dial. Tighten jam nut without turning stop bolt to secure setting. -39- Model G0999 (Mfd. Since 01/25) -
Page 42: Section 8: Wiring
Technical Support at (570) 546-9663. The photos and diagrams included in this section are best viewed in color. You can view these pages in color at www.grizzly.com. -40- Model G0999 (Mfd. Since 01/25) -
Page 43: Wiring Diagram
SHOCK HAZARD! Disconnect power before working on wiring. Control Box Circuit Board ON/OFF Switch Load Line JI-HONG J9301A 20A 125V Circuit Breaker SANG MAO A-0701 18A Control Panel READ ELECTRICAL SAFETY -41- Model G0999 (Mfd. Since 01/25) ON PAGE 40! -
Page 44: Electrical Components
Electrical Components Figure 55. Control panel wiring. Figure 56. Run capacitor and motor wiring. Figure 57. Tone ring sensor wiring. READ ELECTRICAL SAFETY -42- Model G0999 (Mfd. Since 01/25) ON PAGE 40! -
Page 45: Section 9: Parts
SECTION 9: PARTS We do our best to stock replacement parts when possible, but we cannot guarantee that all parts shown are available for purchase. Call (800) 523-4777 or visit www.grizzly.com/parts to check for availability. Dust Chute REF PART #... -
Page 46: Control Panel
PHLP HD SCR M4-.7 X 8 P0999238 FLAT WASHER 12 X 23 X .5 P0999027 DIGITAL READOUT HOUSING P0999239 HEX NUT M12-1.25 THIN P0999028 CIRCUIT BOARD -44- BUY PARTS ONLINE AT GRIZZLY.COM! Model G0999 (Mfd. Since 01/25) Scan QR code to visit our Parts Store. -
Page 47: Headstock
Headstock -45- BUY PARTS ONLINE AT GRIZZLY.COM! Model G0999 (Mfd. Since 01/25) Scan QR code to visit our Parts Store. -
Page 48: Headstock Parts List
P0999233 LOCK WASHER 5MM P0999100 BALL BEARING 6001ZZ P0999234 LOCK WASHER 5MM P0999101 INT RETAINING RING 28MM P0999236 FLAT WASHER 4MM -46- BUY PARTS ONLINE AT GRIZZLY.COM! Model G0999 (Mfd. Since 01/25) Scan QR code to visit our Parts Store. -
Page 49: Gearbox
P0999201 BUSHING 12.02 X 15.03 X 24 P0999186 BUSHING 14 X 12.01 X 7 P0999202 PHLP HD SCR M5-.8 X 10 -47- BUY PARTS ONLINE AT GRIZZLY.COM! Model G0999 (Mfd. Since 01/25) Scan QR code to visit our Parts Store. -
Page 50: Motor
P0999240 R CAPACITOR 130M 250V 2 X 3-1/2 P0999066 PHLP HD SCR M5-.8 X 10 P0999243 LOCATING PIN 4 X 12 -48- BUY PARTS ONLINE AT GRIZZLY.COM! Model G0999 (Mfd. Since 01/25) Scan QR code to visit our Parts Store. -
Page 51: Height Sensor
P0999161 PHLP HD SCR M4-.7 X 8 P0999156 PHLP HD SCR M4-.7 X 5 P0999241 PHLP HD SCR M5-.8 X 10 -49- BUY PARTS ONLINE AT GRIZZLY.COM! Model G0999 (Mfd. Since 01/25) Scan QR code to visit our Parts Store. -
Page 52: Chip Deflector
FLAT WASHER 4MM P0999053 PHLP HD SCR M5-.8 X 12 P0999244 PHLP HD SCR M5-.8 X 8 P0999054 CHAIN TENSIONER ASSEMBLY -50- BUY PARTS ONLINE AT GRIZZLY.COM! Model G0999 (Mfd. Since 01/25) Scan QR code to visit our Parts Store. -
Page 53: Base
P0999221 EXT TOOTH WASHER 8MM P0999145 SHOULDER SCREW M6-1 X 9, 8 X 7 P0999242 FLAT WASHER 8MM P0999146 DEPTH STOP -51- BUY PARTS ONLINE AT GRIZZLY.COM! Model G0999 (Mfd. Since 01/25) Scan QR code to visit our Parts Store. -
Page 54: Labels & Cosmetics
Safety labels help reduce the risk of serious injury caused by machine hazards. If any label comes off or becomes unreadable, the owner of this machine MUST replace it in the original location before resuming operations. For replacements, contact (800) 523-4777 or www.grizzly.com. -52- BUY PARTS ONLINE AT GRIZZLY.COM! -
Page 55: Warranty & Returns
WARRANTY & RETURNS Grizzly Industrial, Inc. warrants every product it sells for a period of 1 year to the original purchaser from the date of purchase. This warranty does not apply to defects due directly or indirectly to misuse, abuse, negligence, accidents, repairs or alterations or lack of maintenance. This is Grizzly’s sole written warranty...
Need help?
Do you have a question about the G0999 and is the answer not in the manual?
Questions and answers