Advertisement
WHAT'S INCLUDED

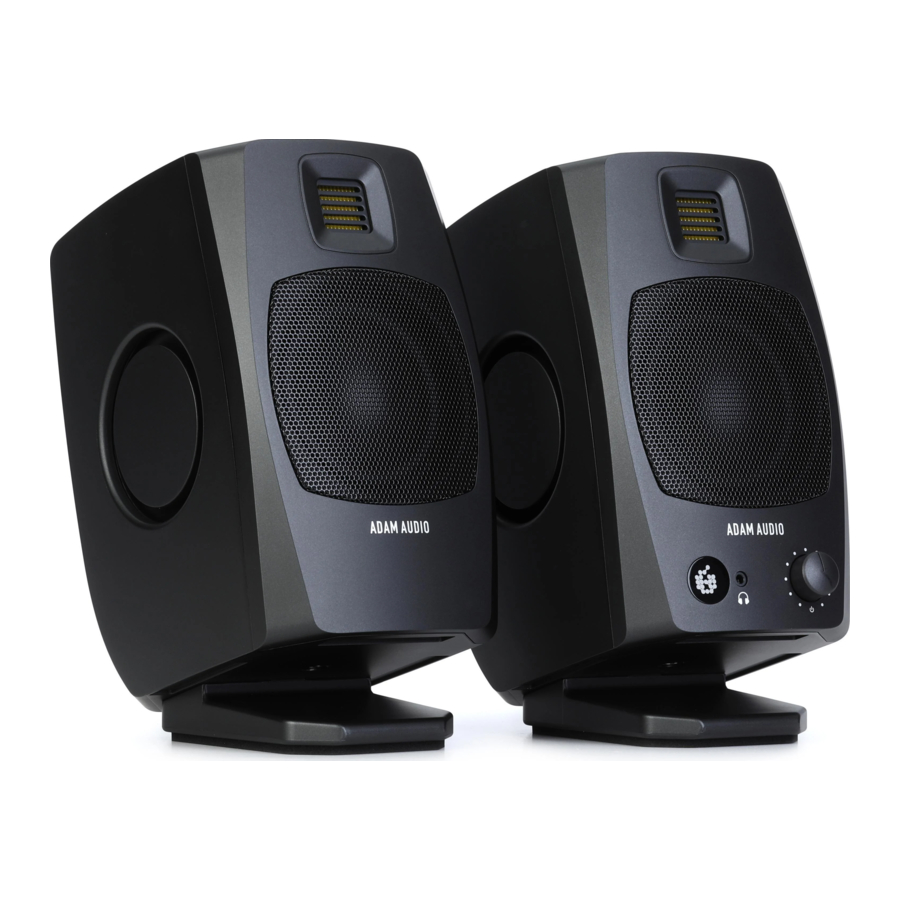
- 1x Left speaker (L)
- 1x Right speaker (R)
- 1x Link cable to connect left to right speaker
- 1x USB-C to USB-C cable
- 1x USB-C to USB-A adapter
- 1x Mains cable
- 1x Power supply block
- 2x padded monitor stands
- 6x stick-on pads
CONNECTIONS
Power connection

- Connect the left and right speakers with the four core link cable. The connectors are marked with arrows which should point upwards. When held correctly, the plugs can be inserted into the sockets easily. Do not use excessive force. This will prevent damaging the plugs and/or sockets.
- Connect the power supply block to the power input of the left speaker.
- Connect the mains cable to the power supply block.
- Make sure the delivered mains power cable matches your wall power socket before making the connection.
Balanced audio connection

- Lower both the output volume of your source and that of the D3V (by turning the front panel volume knob anticlockwise) completely before connecting or disconnecting audio cables from the D3V and/or your source equipment.
- Balanced analog audio connections are preferred when connecting the D3V to equipment with balanced analog outputs, e.g. an audio interface or a mixing console.
- Refer to the operating manuals of your source equipment to make sure the analog outputs are balanced outputs.
- Balanced audio connections have less risk of picking up unwanted noises like humming or buzzing, especially if long cable lengths are used.
- Typical balanced audio cables are "TRS-to-TRS" or "XLR-to-TRS" cables.
- Please note that all components of the connection need to be wired as balanced, otherwise the connection becomes unbalanced.
- To reproduce analog audio from a source, the analog input needs to be selected.
→ see chapter "Use of rotary front knob & LED states"
Unbalanced audio connection

- Lower both the output volume of your source and that of the D3V (by turning the front panel volume knob anticlockwise) completely before connecting or disconnecting audio cables from the D3V and/or your source equipment.
- Use short cable lengths for unbalanced audio connections to lower the risk of picking up unwanted noises like humming or buzzing.
- Typical unbalanced audio cables are "TS-to-TS" and "XLR-to-TS" cables.
- Use "RCA-to-TRS" adaptors (not included) to connect the D3Vs to a source with unbalanced RCA outputs.
- To reproduce analog audio from your source, the analog input needs to be selected
→ see chapter "Use of rotary front knob & LED states"
Digital audio connection

- Use the included USB-C-to-USB-C cable to connect the D3V "DIGITAL AUDIO INPUT" to your computer, tablet, or phone.
- If your source device doesn´t include a USB-C socket, use the included USB-C-toUSB-A adaptor instead.
- To reproduce digital audio from your source, the digital input needs to be selected
→ see chapter "Use of rotary front knob & LED states" - If your device doesn´t automatically switch its audio output to the D3V, go to the audio preferences within your device settings and manually select "ADAM Audio D3V" as the output device.
Headphone connection

- Select the analog or digital input you would like to listen to with your headphones
→ see chapter "Use of rotary front knob & LED states" - Lower the D3V output volume to minimum by turning the volume knob anticlockwise before connecting your headphones to the device using the front panel's 3.5 mm (1/8") TRS socket.
- When your headphones are connected, audio reproduction via the loudspeaker drivers is automatically muted and audio will be reproduced only via the headphone output.
- Adjust the volume of your headphones to your liking by turning the volume knob clockwise.
- To switch back audio reproduction from headphones to the D3V itself, lower the D3V output volume to minimum by turning the volume knob anticklockwise before pulling out the headphones jack.
- Raise the volume back to your liking by turning the volume knob clockwise.
INSTALLATION
Planning
 Read the safety instructions at the start of this operating manual before installing the loudspeaker.
Consider these factors when planning the installation of the loudspeakers in the room:
- With respect to the walls, the loudspeakers should be placed symmetrically in the room to ensure a good stereo image.
- The furniture and equipment in the room should be placed symmetrically (left/right) to ensure a good stereo image.
- Reflecting surfaces should be acoustically treated to reduce the effect of the reflection at the listening position.
- Avoid placing loudspeakers near room corners as there will be two reflecting surfaces near to the loudspeaker which will create comb filtering, unless well treated. Also, there may be strong coupling of the loudspeakers to the room, which can lead to audible resonances.
- The front wall should be very close to the loudspeaker (<0.3 m / <1' from the back panel) or very far away from the loudspeaker (>2 m / > 6'). Loudspeakers placed between these distances to the wall may suffer from strong cancellations, resulting in reduced bass at the listening position.
- Side walls, and the ceiling should be far from the loudspeaker (>2 m / > 6'). The rear wall should be at least 2 m / 6' from the listening position and ideally > 4 m / >12' to avoid bass cancellations at the listening position.
- In general, the further away the walls are from the loudspeakers and the listening position, the better the sound quality will be.
Unit placement advice
- Attaching the stick-on pads
- If you would like to place the D3V directly onto your desk or a shelf, attach three of the included stick-on pads to each loudspeaker's cabinet base, as shown in the picture.

- The pads decouple the loudspeakers from the surface on which they are placed, preventing any damage. They also maintain stability by reducing slippage.
- Position the loudspeakers at ear level so that the acoustic axis is aligned with your ears.

- If you would like to place the D3V directly onto your desk or a shelf, attach three of the included stick-on pads to each loudspeaker's cabinet base, as shown in the picture.
- Installing the included angling feet
- Use of the included angling feet will tilt the acoustic axis upwards by 15 degrees, which helps the alignment to your ears.
- Simply slide the tongue of the angling feet, from the back panel, into the corresponding groove of the D3V's cabinet. Repeat this procedure for the second loudspeaker and place them onto your desk or other flat surface.

- Use of the 3/8' underside mounting points
- The 3/8' underside mounting points enable the placement of the D3V onto common 3/8' threaded microphone stands. This allows you to place the loudspeakers at the perfect height, reduce typical reflections off the desktop and, as a result, improve the frequency response, linearity and therefore the overall sound quality of the D3V. Attachment to a 5/8" threaded microphone stand is also possible using an adapter (not supplied).
![]()
- For two-channel stereo audio reproduction, regardless of what type of stands you use, your head should be placed at one corner of an equilateral triangle, with the two loudspeakers at the other two corners.
![]()
- The 3/8' underside mounting points enable the placement of the D3V onto common 3/8' threaded microphone stands. This allows you to place the loudspeakers at the perfect height, reduce typical reflections off the desktop and, as a result, improve the frequency response, linearity and therefore the overall sound quality of the D3V. Attachment to a 5/8" threaded microphone stand is also possible using an adapter (not supplied).


USE OF ROTARY FRONT KNOB & LED STATES
Volume level
- The D3V's volume knob is located on the front of the left speaker and is equipped with a press-to-select feature for secondary functions.
- Turn the knob clockwise to increase the volume, turn it anticlockwise to decrease the volume.
- Depending on your preference or equipment needs, there two ways to control the volume of the D3V:
- D3V-based
- Turn down the output volume of your source device completely
- Turn up the volume of the D3V to its maximum setting (clockwise)
- Start to play a loud piece of material with plenty of low-frequency content, e.g. electronic dance music or an action movie.
- Slowly turn up the volume of your source device, while listening, until the ADAM Audio logo on the front panel starts to flash red (limiter active)
- Stop the playback immediately to prevent damage to your hearing
- You can now control the volume of your audio with the full range of the D3V's volume knob, provided you do not readjust the source volume
- Source device-based:
- Turn down the volume of the D3V to its minimum setting (anticlockwise)
- Turn up the output volume of the source device to its maximum setting
- Start to play a loud piece of material with plenty of low-frequency content
- Slowly turn up the volume of the D3V (clockwise), while listening, until the ADAM Audio logo on the front panel starts to flash red (limiter active)
- Stop the playback immediately to prevent damage to your hearing
- You can now control the volume of your audio with the full range of the source volume control, provided you do not readjust the D3V's volume level
- D3V-based
Secondary functions
- By pushing the front panel knob, various functions can be triggered:
- Press once to mute the loudspeaker - press again to unmute
- Press twice to toggle between "Analog" and "Digital" inputs
- ) Press three times to reverse* the left and the right channels, thereby swapping the reproduced audio of the loudspeakers. This function allows the placement of the D3V cabinets to be reversed, e.g. when you prefer the volume knob, and/or headphone output to be on the right, and/or the audio connections are on the right side of your desk *(To determine which L/R channel the left loudspeaker is configured to output, connect one analog input to the left input socket. Similarly, only output the left channel on the USB-C cable to check in case of digital connection)
- The backplate of the right loudspeaker has a table detailing these functions
- Standby Mode:
Press and hold the volume knob for two seconds to manually enter Standby mode. Press again to reawaken the D3V and return to normal operation.
The D3V will automatically enter standby mode after not receiving an input signal for 20 minutes. To wake, press the front panel volume knob once. Failure to enter standby mode means the unit could be receiving an inaudible low/high frequency signal. Try disconnecting the source cable.
LED states

- The ADAM Audio logo on the front of the left loudspeaker is illuminated to indicate different states of the D3V:
- Solid red: the speaker is either booting up or shutting down
- Flashing red: the limiter of one of the loudspeakers is active which means it has reached the maximum possible volume and protects itself from potential damage. Reduce the volume of the D3V, either at the source device or via the volume knob on the front panel.
- Solid green: D3V is powered on and can reproduce audio from the analog inputs via the TRS or TS cable connections
- Solid cyan: D3V is powered on and can reproduce audio from the digital input via a USB-C connection
- Pulsing orange: the speaker is muted
- Three times flashing orange: left and right channels swapping
- Pulsing purple: D3V firmware upgrade is in process (see "Firmware upgrade")
- Three times flashing green: Firmware upgrade was successful
→ (see chapter "Firmware upgrade")
ROOM COMPENSATION EQ

The acoustic experience at your listening position is predominantly driven by factors such as:
- The position of the loudspeakers in the room
- The size of your desk
- Whether the room is acoustically treated with absorbing and reflecting materials.
Located on the back panel of the left loudspeaker, the room compensation EQ controls allow you to adjust the frequency response of the DV3 according to your listening environment.
To achieve the best possible audio reproduction, move the switches to the positions which most accurately describe the location of the loudspeakers in the room and the acoustics of the room itself.
USE
Firmware update

Make sure to never cut the power or data connection to and from your D3V and computer while a firmware update is in progress!
Firmware updates can become necessary to improve and/or enhance the functionality of your D3V.
Preparing the firmware update:
- Make sure your D3V is connected to the power supply block, but do NOT connect the power supply block with the mains cable to the power outlet.
- Connect your D3V to a computer using the included USB-C to USB-C cable. Use the included USB-C to USB-A adapter, if required.
- Download the "D3V Firmware updater" which you can find here after registration of your D3V: www.adam-audio.com/my-adam/
- Close all other applications or windows which may be open
- Run the "D3V Firmware updater".
Running the firmware update:
- Press and hold the front panel knob. Keep it pressed in until instructed.
- While pressing the front panel knob, connect the mains cable of the power supply block to the power outlet.
- Keep the front panel knob pushed until the D3V is booted into firmware upgrade mode, indicated by the constant purple pulsing of the ADAM Audio logo LED. At this stage the knob can be released.
- If a firmware update is available, "D3V Firmware updater" will offer to update your loudspeaker's firmware.
- Install the update.
- Successfully updated firmware is indicated by three green flashes of the ADAM Audio logo LED, followed by an automatic reboot of the D3V.
Maintenance
- Switch off your loudspeakers and disconnect from the AC mains power before cleaning.
- Liquids should not be used to clean the loudspeaker.
- Only use a clean dry lint free cloth to clean the cabinet.
- Do not touch the drivers or passive radiators.
TROUBLESHOOTING
Should you experience problems with your monitors, for example loss of signal, unwanted interference or noise, it's worth running through the following basic checks before contacting the team here at ADAM Audio or our local representatives.
The loudspeakers are producing no signal, or only a distorted signal:
- Press the volume knob twice to select the correct input signal. Adjust the front panel volume knob and/or source equipment output level so audio can be heard.
- Consider where the problem is. If all the loudspeakers in your system are exhibiting the same lack of signal or a distorted signal, it's more likely that the problem lies with the audio source equipment. If, on the other hand, only a single loudspeaker is affected, the problem could be with that specific loudspeaker, the cable running to it or something on that specific channel in the signal chain.
- Check your signal source, connecting the loudspeakers as directly as possible to the source. Could the fault lie with another component, for example, a mixer or processor which is in the signal path before the loudspeakers?
- Check your wiring, cables, and if necessary, exchange them for others that you know are in good working order. If you only have one pair of audio cables to hand, check if the fault affects the opposite loudspeaker when you switch the L/R connections at the D3V end of the cables. If so, the problem is likely to be found in the cable or source audio. If using the digital/USB-C connection, check the correct output device has been selected in the source equipment.
The loudspeakers are producing a signal, but it is affected by occasional unwanted noise, such as buzzing, humming or crackling:
- Check your wiring, cables, and if necessary, exchange them for others that you know are in good working order. If you only have one pair of audio cables to hand, check if the fault affects the opposite loudspeaker when you switch the L/R connections at the D3V end of the cables. If so, the problem is likely to be found in the cable or source audio.
- Check that there are no sources of electromagnetic interference close to the loudspeakers that could be causing problems, such as mobile phones, wireless routers, power supplies, electrical motors, heaters, etc.
If none of the above can be identified as the source of the problem, your speakers may require service. In this case, please contact ADAM Audio or the local representative/distributor [see → www.adam-audio.com for a list].
SHIPPING
Please keep your product packaging in case your loudspeakers ever need to be transported. Without the original packing it is extremely difficult to protect your loudspeakers so that they can be shipped without damage. ADAM Audio cannot accept responsibility for transit damages caused by improper packaging.
TECHNICAL DATA
For detailed technical specifications, see the ADAM Audio D3V product pages at
→ www.adam-audio.com
IMPORTANT SAFETY INSTRUCTIONS
The intended use of this product means having read this operating manual and then following the instructions contained herein.
General
- Read the following safety instructions before setting up your system.
- Keep the instructions for further reference.
- Heed the warnings and follow the instructions.
Electrical


Risk of electric shock
To reduce the risk of fire or electric shock, do not remove back cover or any other part. No user-ser vicable parts inside. Do not expose this equipment to rain or moisture. Refer servicing to qualified personnel.
Explanation of Graphical Symbols
 The lightning flash with arrowhead symbol, within an equilateral triangle, is intended to alert the user to the presence of uninsulated "dangerous voltage" within the product's enclosure that may be of sufficient magnitude to constitute a risk of electric shock to persons.
The exclamation point within an equilateral triangle is intended to alert the user to the presence of important operating and maintenance [servicing] instructions in the literature accompanying the appliance
![]()
To reduce the risk of electric shock, do not open the loudspeaker. There are no user-serviceable parts inside. Refer servicing to qualified service personnel.- Never replace any fuse with a value or type other than those specified. Never bypass any fuse.
- Ensure that the specified voltage matches the voltage of the power supply you use. If this is not the case, do not connect the loudspeakers to the power source.
- Always switch off your entire system before connecting or disconnecting any cables, or when cleaning any components.
- To completely disconnect from AC mains, unplug the power supply from the power socket. The loudspeaker should be installed near the mains connection, and it should be easy to access the socket and disconnect the device if necessary.
- Protect the power cord from being walked on or pinched, particularly at plugs, sockets, and the point where it exits from the apparatus.
- Unplug this apparatus during lightning storms or when unused for long periods of time.
- Always keep electrical equipment out of the reach of children.
- Always use fully checked cables. Defective cables can harm your loudspeaker. They are a common source of any kind of noise, hum, crackling etc.
- Refer all servicing to qualified service personnel. Servicing is required when the apparatus has been damaged in any way, for example if the power-supply cord or plug is damaged, liquid has been spilled or objects have fallen into the device, or if the device has been exposed to rain or moisture, does not operate normally, or has been dropped.
Mounting and moving
- Some parts of the product protrude on the front and rear panels. Never position the loudspeaker face down, face up, or on either side. When moving the loudspeakers on a trolley, take care to avoid injuries by not over-balancing the trolley.
- Condensation may occur if you have moved the loudspeaker from a cold to a warm environment. Allow time for this condensation to evaporate before using the product.
- Only use this product indoors.
- Install in accordance with the manufacturer's instructions.
- The loudspeaker must be positioned on a solid surface or a stand.
- Only suitably qualified installers should mount this product.
- Only use mounts, attachments, and accessories specified by the manufacturer.
- Ensure a free airflow at both sides of the loudspeaker and allow the passive radiators to move unimpeded and radiate sound cleanly by keeping a distance of at least 10cm / 4" to nearby walls and any other objects, surfaces, or materials.
- Do not install near any heat sources such as radiators, hot air vents, stoves, or any other equipment [including amplifiers] that produces heat.
- The driver magnets emit a magnetic field. Keep magnetically sensitive items, such as hard drives and magnetic storage media, away from the loudspeaker.
Liquids, chemicals, and environment
- Do not expose this product to rain or moisture, never wet the product with any liquid and never pour or spill liquids directly onto this unit. Do not put any objects filled with liquids [e.g. vases, etc.] onto the loudspeaker.
- Never use flammable or combustible chemicals for cleaning audio components.
- Never expose this product to extremely high or low temperatures.
- Do not place product in direct sunlight.
- Never operate this product in an explosive atmosphere.
- No naked flame sources, such as lit candles, should be placed on the loudspeaker.
- Only suitable for safe use in areas less than 2000 meters above sea level.
- Only for safe use in non-tropical climate conditions.
- Only use a dry lint-free cloth for cleaning.
Health
- This loudspeaker can generate sound pressure levels in excess of 85 dB(A). High sound levels may damage your hearing! Sound exposure is a function of time and level. Longer times and lower levels can be equivalent to shorter times and higher levels. Exercise caution when using this product and do not get close to the loudspeakers when using them at high levels.
- The product generates a strong magnetic field which may affect pacemakers or implanted defibrillators.
- The tweeter has a strong magnetic grille in front of the folded diaphragm. Never place metal objects or particles near the tweeter.
- Never touch the tweeter diaphragm or allow large particles (especially metal ones) near the tweeter.
Register your D3V at: → www.adam-audio.com/my-adam/
ADAM AUDIO GMBH
BERLIN, GERMANY
T +49 30-863 00 97-0
F +49 30-863 00 97-7
INFO@ADAM-AUDIO.COM
WWW.ADAM-AUDIO.COM
All specifications are subject to change without notice.

Documents / Resources
References
![www.adam-audio.com]() ADAM Audio - MyADAM User Area Log In And Registration
ADAM Audio - MyADAM User Area Log In And Registration![www.adam-audio.com]() ADAM Audio - High Precision Studio Monitors from Berlin, Germany
ADAM Audio - High Precision Studio Monitors from Berlin, Germany
Download manual
Here you can download full pdf version of manual, it may contain additional safety instructions, warranty information, FCC rules, etc.
Advertisement


Need help?
Do you have a question about the D3V and is the answer not in the manual?
Questions and answers