Advertisement
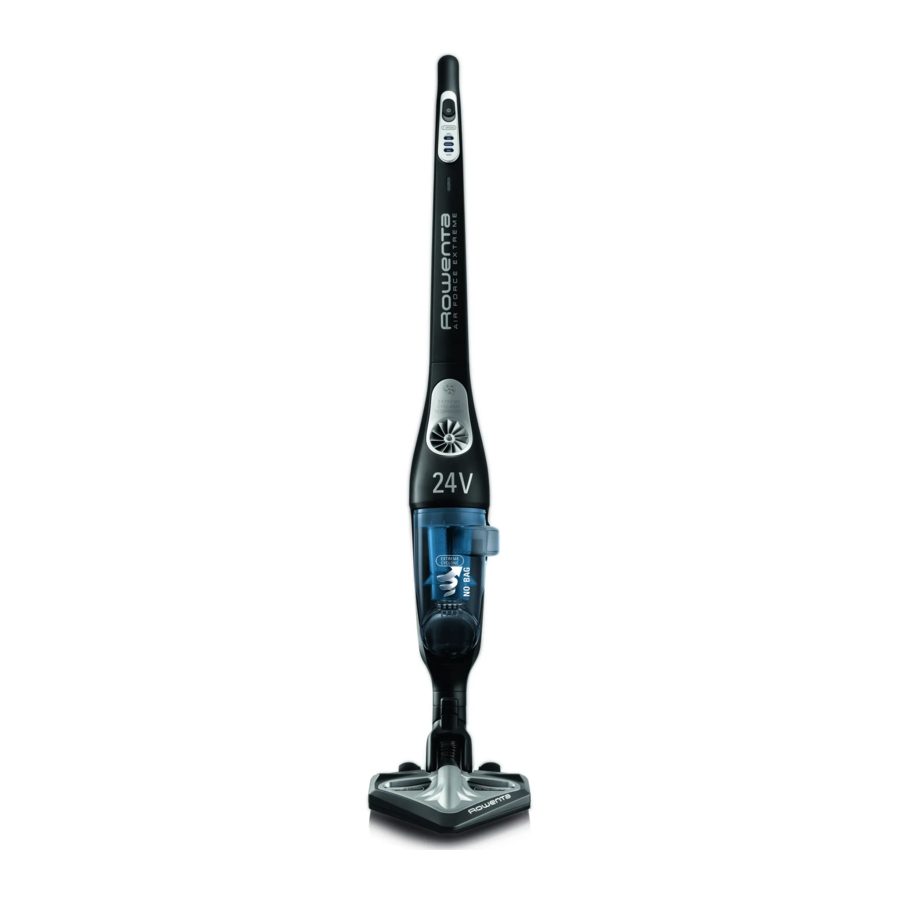
DESCRIPTION

- Ergonomic handle
- Stop/Start button
- Stop position
- Light speed signals
- «Minimum» position
- «Medium» position
- «Turbo» position
- Light charge signal
- Neck
- Main body
- Locking screw
- Air outlet grill
- Dust tray
- Dust receiver (0,5L)
- Dust separator
- Foam rubber motor protection filter
- Lid
- Connection tube
- Delta vacuum head with integrated electro-brush
- Electro-brush
- Latches
- Trap
- Wheels
- Charger
- 18V and 24V: ref. RS-RH5277*
- Batteries
- 18V: ref. RS-RH5233*
- 24V: ref. RS-RH5278*
- Tool
* May vary according to model
BEFORE FIRST USE
How to assemble the Appliance
Unpack your appliance and throw away any tags attached. Make sure to keep your guarantee and read the instructions carefully before using the appliance for the first time.
- Remove the screw from the neck and leave the nut in its place.
- Fix the neck by carefully inserting it in the upper portion of the main body.
![]()
- Insert the locking screw (7) into the neck and screw it tightly using the tool provided with the appliance.
![]()
- Fix the Delta vacuum head (11) by locking it into place in the lower portion of the main body.
![]()
- Fix the dust tray on the main body of the appliance.
![]()


Please note: In order to detach the Delta vacuum head, press the ejection button located at the back of the main body (fig.4) and pull to remove.

Charging the battery

Use only the original charger provided with the appliance. Do not charge the appliance at temperatures lower than 32ºF (0ºC) or higher than 104ºF (40°C). Using a universal charger will automatically invalidate the guarantee.
Before you use your vacuum cleaner for the first time, you must charge the battery completely (for about 10 hours).
While the battery is being charged, the Stop/Start button must be in the Stop position (2.a)
- Place the vacuum cleaner near an electric power point.
- Plug the charger in and connect it to the vacuum cleaner using the socket located at the back of the neck.
![]()
- The charge signal (4) located at the front of the main body will light in blue. Leave the vacuum cleaner to charge. Once the charge cycle is completed (after about 10 hours), the light charge signal will turn off automatically.

The vacuum cleaner can stay connected to the charger permanently, without any hazard. Keep in mind, however, that if you decide to keep the charger connected it might become slightly hot. This would be a completely normal phenomenon.
It is advisable to charge the vacuum cleaner immediately after each use in order to always have it available with a fully charged battery. Thus, you will gain the maximum benefit from its cleaning and autonomous performance functions. However, in case you plan to be absent for a long period of time (on vacation, for example), it is advisable to unplug the charger for, in this case, the autonomous performance function could be diminished due to automatic power loss.
Turning on the appliance
Unplug the charger cord from the vacuum cleaner. If the charger remains connected to both the power point and to the appliance, the latter will not function.
Hold the vacuum cleaner by the handle and slide the Stop/Start button downwards, towards one of the following three speeds:

- "Minimum": Used to vacuum clean thick or delicate rugs and carpets (3.a), as well as fragile surfaces.
Please note: always make sure that the wheels located at the back of the base are clean. - "Medium": Used for better vacuuming of all floor types, and in case of light dirt marks (3.b).
- "Turbo": Used for optimum vacuum performance on all floor types, and in case of strong dirt marks (3.c).
Vacuum cleaner running times* for each usage speed (with a fully charged battery):
| Speed 1 «Minimum» | Speed 2 «Medium» | Speed 3 «Turbo» | |
| 18 Volts | Up to 35 minutes | Up to 25 minutes | Up to 20 minutes |
| 24 Volts | Up to 45 minutes | Up to 35 minutes | Up to 25 minutes |
Functioning of the light charge signal (4)
- About one (1) minute before running time ends, the light charge signal starts to flicker in blue (4).
- When the brush becomes uncharged, it stops automatically (the light charge signal continues to flicker in blue for about ten (10) seconds). It is now time to recharge your appliance.
- Before you can use your vacuum cleaner again, you will need to recharge it for at least ten (10) minutes.
- If the appliance does not turn on after this time, and the light charge signal continues to flicker, it means that the battery is still uncharged. In this case, you will need to charge it.
USING THE ELECTRO-BRUSH
The electro-brush is a rotating, motorized brush that guarantees maximum cleaning effectiveness by allowing the appliance to suck up dirt and clean in depth. The bristles, located all along the brush, remove threads, hair and fur that might be caught on the surface of rugs and carpets.
Please note: If the vacuum head adheres too closely to the surface you are cleaning, change the speed to «Minimum».
 ATTENTION: Do not vacuum large fragments of broken objects, as they could block and damage the brush. Do not use the electro-brush on long hair carpets, on animal fur, or on fringes.
REMOVING AND CLEANING THE ELECTRO-BRUSH
ATTENTION: Always turn off the appliance and unplug it before storing or cleaning.
Using the tool provided with the appliance (15), press in the two latches located on each side of the lower side of the Delta head (fig.7). Lift the trap located on top of the electro-brush (fig.8). Remove the electro-brush and its lateral bearing in order to clean them (fig.9). Carefully remove any threads, hair, fur, etc. from the electro-brush (fig.10). Once clean, replace the electro-brush and its lateral bearing (fig.11), then replace the trap over it (fig.12). Finally, using the tool provided with the appliance, close both latches (fig.13).


FOR YOUR SAFETY
- Do not touch any rotating parts before you turn off and unplug the vacuum cleaner.
- Do not use the appliance on wet surfaces.
- Do not immerse the appliance in water.
ELECTRO-BRUSH MALFUNCTION
The electro-brush does not function properly or makes an unusual sound
- Either the rotating brush or the axis is blocked: turn off the appliance and clean them.
- The brush is worn out: visit an authorized Service Center in order to have the brush changed.
- The belt is worn out: if the belt makes noise, it means that it is slipping because it's worn out. Visit an authorized Service Center in order to have the belt changed.
The electro-brush stops while you are vacuuming
- The thermal security feature has been activated: Turn off the vacuum cleaner by moving the Stop/Start button to the Stop position (2.a) and unplug it. Check to see if any solid object is blocking the rotation of the brush. If this is the case, remove the object and clean the electro-brush (fig.10), then you may keep using the vacuum cleaner.
The electro-brush moves with difficulty
If you find that your vacuum cleaner slides with difficulty along surfaces, progressively reduce the speed until you reach the «Minimum» position (3.a). If the problem persists, take your appliance to the authorized Rowenta Service Center nearest to your home.
See the list of authorized Rowenta Service Centers or contact the Rowenta Consummer Service department.
Storage
After use, turn off your vacuum cleaner by moving the Stop/Start button to the Stop position (2a). Now you may store your appliance vertically wherever you like, thanks to the parking position.
To place the vacuum cleaner in the parking position: Place the neck vertically in order to block the appliance. To continue using the vacuum cleaner: Take it by the handle and make it swing backwards in order to unblock it and leave the parking position.
CLEANING AND MAINTENANCE
Always turn off the appliance and unplug it before storing or cleaning.
Cleaning the dust tray
- Fast emptying
Whenever the dust tray is full and reaches the "MAX" level, empty it as follows: remove the tray by sliding it downwards (fig.14), place it over a bin and press the "Push" button in order to open the trap and empty the tray's contents (fig.15). Close the trap (fig.16) and replace the dust tray on the main body of your appliance (fig.19).

![]()
- Complete cleaning procedure
It is advisable to clean the dust tray regularly.- Remove the dust tray (fig.14), then separate each of its components (9).
- Remove the foam rubber motor protection filter (9c).
- Place the dust receiver (9a), the dust filter (9b) and the lid (9d) under warm water (fig.20); then let them stand to dry or dry them with a dry cloth.
![]()
- Wash the foam rubber motor protection filter (see paragraph 2).
- Once the components of the dust tray are all dry, reassemble them; do the same with the extrafoam rubber motor protection filter (9c) provided as a supplement with your appliance.
- Close the dust tray and reposition it on the main body of your appliance (fig.19).


Cleaning the foam rubber motor protection filter
ATTENTION: Never use your vacuum cleaner without the foam rubber motor protection filter.
In order to maintain the high performance level of your appliance, do not vacuum ultra-fine substances such as plaster, cement or ashes, and clean the foam rubber motor protection filter at least once a month. If you perceive that your vacuum cleaner is performing under regular average level, we recommend that you clean the foam rubber motor protection filter more frequently.
- Remove the dust tray lid (9d) and then remove the foam rubber motor protection filter (9c).
![]()
- Clean the foam rubber motor protection filter (9c) with warm, soapy water.
Rinse and let dry for at least 12 hours before replacing the filter on the appliance.
![]()


In order to assure optimal motor protection, make sure that the foam rubber filter is completely dry before replacing it on the appliance. You will need to let it dry for at least 12 hours before reinserting it into the dust tray. An extra foam rubber motor protection filter is provided with your vacuum cleaner so that you may use the appliance while the first filter is still drying.
ATTENTION: Never place the dust tray components or the foam rubber motor protection filter in an automatic dishwasher.
Vacuum cleaner care and maintenance
Wipe the main body of the appliance with a soft, damp cloth; then dry it with a dry cloth

Do not use detergents, or aggressive or abrasive products. The transparent color of the dust tray and/or of the separator lid may change with time; however, this will not modify the performance of the appliance.
BATTERIES
Battery replacement
This appliance contains nickel-metal hydride (NiMh) accumulators which are, for safety reasons, only accessible to professional engineers. When the battery is no longer capable of retaining its charge, the NiMh block must be removed. In order to replace the accumulators, please visit the authorized Service Center nearest to your home.
REPAIRS
If you notice that your vacuum cleaner is not functioning properly, before any revision, turn it off by placing the Stop/Start button in the Stop position.
Repairs should only be carried out by specialists using original replacement parts. To attempt the repair of an electronic appliance at home may be hazardous to the user.
If your vacuum cleaner does not start
Make sure that the charger is completely unplugged from the appliance. If it is, it means that the appliance is not charged, so proceed to charge it.
If the blue light charge signal starts to flicker very rapidly when you plug the charger to the vacuum cleaner, it means that you are not using the appropriate charger or that the one you are using is faulty.
If your appliance does not vacuum
- The electro-brush is dirty: clean it.
- The separator is clogged up: remove the dust tray and clean the separator.
If your vacuum cleaner seems less efficient, makes noise or whistles
- The tube or the hose are partially clogged up: unclog them.
- The dust receiver is full: empty and clean it.
- The dust tray is not well positioned: place it correctly.
- The Delta vacuum head is dirty: demount the electro-brush and clean it.
- The foam rubber motor protection filter is saturated: clean it.
If the separator gets filled with dust
- The separator sometimes accumulates dust. Make sure that nothing is blocking the duct between the separator and the dust tray.
- The dust tray opening is blocked: Remove the dust tray, empty it and clean the opening.
The vacuum head moves with difficulty
Lower the vacuum speed by moving the appropriate switch button.
If the problem persists, take your vacuum cleaner to the authorized Rowenta Service Center nearest to your home. See the list of authorized Rowenta Service Centers or contact the Rowenta Consummer Service department.
SECURITY ADVICE
For your safety, this appliance complies with applicable rules and regulations (Low Tension Guidelines, Electromagnetic Compatibility, Environmental Regulations...).
This appliance is not designed to be used by individuals (including children) with reduced physical, sensory or mental capacities, nor by individuals lacking experience or knowledge in the use of the appliance, unless they have the benefit of being under the surveillance of a responsible person, or of having received proper instructions. It is advisable to keep an eye on children in order to make sure that they do not use the appliance as a toy.
This appliance may be used by children over eight (8) years old and by individuals with reduced physical, sensory or mental capacities, or lacking experience or knowledge, as long as they are properly supervised by a responsible person, as long as they have received instruction concerning the safe use of the appliance, and as long as all possible risks have been addressed. Children should not play with the appliance. User cleaning and care should not be carried out by children unless they are aged 8 years and over and supervised.
Keep the appliance and its lead out of reach of children under 8 years of age.
Precautions before use
Read the instructions carefully and then store them safely.
- Your vacuum cleaner is an electric appliance: it must always be used under normal conditions. Use and store the appliance away from children's reach. Never leave the appliance on and unattended. Never hold the end of the vacuum tube near your eyes or ears.
- Never vacuum wet surfaces or liquids, no matter what their nature; hot substances; ultra-fine substances such as plaster, cement or ashes; large cutting waste materials such as glass; toxic products such as solvents or paint strippers; aggressive products such as acids or strong cleaners; or gasoline or alcohol-based flammable or explosive materials.
- Never submerge the product or charge it under water or under any other liquid. Never spray water on the appliance or on the charger.
- Do not store the appliance outdoors and keep it in a cool, dry place at all times.
- Do not place the appliance near a heat source (ovens, electric heaters or hot radiators).
- Do not expose the batteries to a room temperature above 104ºF (40°C).
- Do not take the vacuum cleaner apart while it is on.
- Never use your vacuum cleaner without the dust tray and the foam rubber motor protection filter.
- Do not use the appliance:
- If it fell and shows visible signs of deterioration or functional anomalies.
- If the charger or the charger cable are damaged.
In any of these cases, do not try to take the appliance apart. Rather, take it to the authorized Rowenta Service Center nearest to your home, because special tools will be needed in order to safely carry out any repairs.
- Repairs must only be carried out by specialists using original replacement parts.
- To attempt the repair of an electronic appliance at home may be hazardous to the user.
- Only use original, guaranteed Rowenta replacement parts (filters, batteries...).
This appliance is intended for domestic use only. In case it is used inappropriately, not following the given instructions, Rowenta will not be subject to any liabilities whatsoever.
Electric power source
- Make sure that the voltage indicated on the rating plate of the charger corresponds to that of your power source.
- Never unplug the charger by pulling the electric cord.
- If the charger cord is damaged or if the charger itself does not function properly, do not use any other charger, different from the model provided by the manufacturer, and contact the Rowenta Consummer Service or go to the authorized Service Center nearest to your home.
Repairs
Repairs must only be carried out by specialists using original replacement parts. To attempt the repair of an electronic appliance at home may be hazardous to the user, and will invalidate the guarantee.
Documents / Resources
References
Download manual
Here you can download full pdf version of manual, it may contain additional safety instructions, warranty information, FCC rules, etc.
Download Rowenta AIR FORCE EXTREME, RH8779, RH8775, RH8771, RH8754, RH8753 Manual
Advertisement


Need help?
Do you have a question about the AIR FORCE EXTREME and is the answer not in the manual?
Questions and answers