Advertisement
- 1 What's in the Box?
- 2 Product View
- 3 Cleaning Formulas
- 4 Assembly
- 5 Special Features
- 6 Before You Clean
- 7 Preparing Your Machine
- 8 Cleaning Your Floors
- 9 Cleaning with Hose & Attachments
- 10 Rinsing Your Carpet (optional)
- 11 Emptying the 2-in-1 Tank
- 12 To Continue Cleaning
- 13 Storing Your Machine
- 14 Caring for Your Machine
- 15 Troubleshooting
- 16 Service
- 17 Parts & Supplies
- 18 IMPORTANT SAFETY INSTRUCTIONS
- 19 Documents / Resources
What's in the Box?

- Upper Handle
- 4 Screws Taped to Upper Handle
- Deep Cleaner Base
- Tool Caddy
- Hex Nuts
- Trial-sized BISSELL Formula
- Nozzle Clean Out Tool
- Accessory Tools (may vary by model)
 NOTE: Not all accessories come with every model. Be sure to check the carton for additional tools.
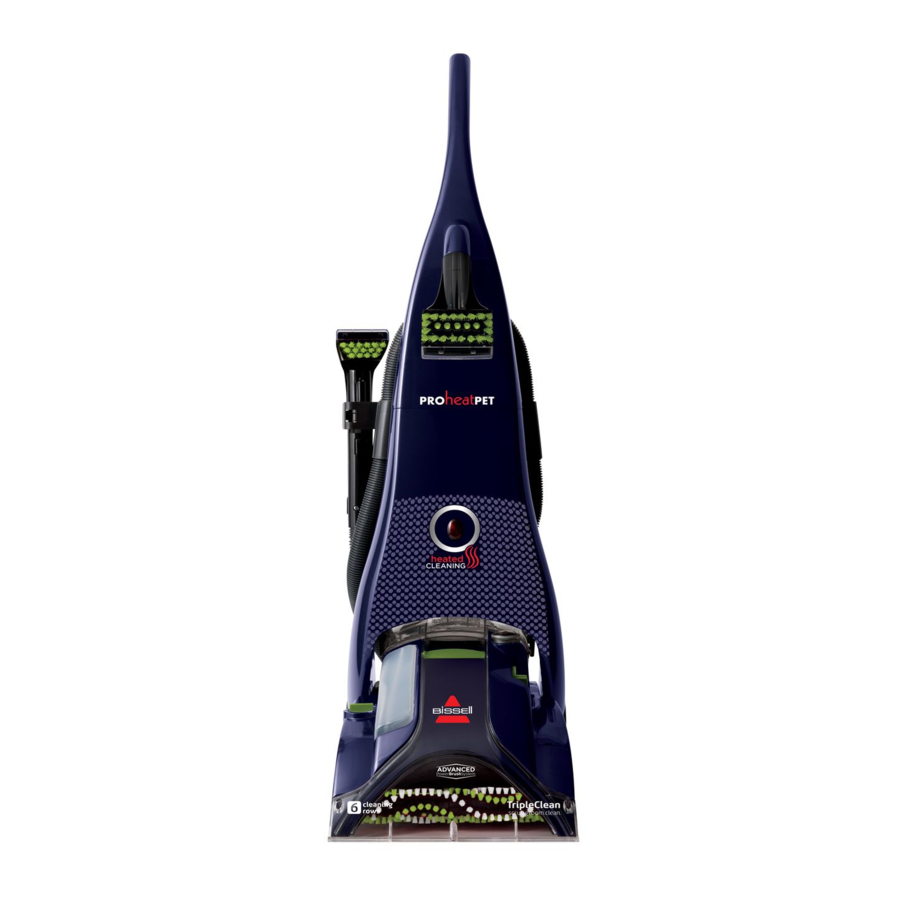
Product View

- Tough Stain Tool
- Pet Stain Tool
- Formula Tank
- SmartMix® Dial
- ReadyTools™ Dial
- Belt Access Door
- 6 Rows DirtLifter® PowerBrush
- Floor Nozzle
- Spray Trigger
- Cord Clip
- Upper Handle
- Q uick Release™ Cord Wrap
- Ready-to-Use Hose
- Power Switch
- Extra Long Power Cord
- Tool Caddy
- 2-in-1 Tank
- Recline Pedal
*Tools included may vary
Cleaning Formulas

|
Keep plenty of BISSELL cleaning formulas on hand so you can clean whenever it fits your schedule.
NOTE: Always use genuine BISSELL cleaning formulas in your machine.
 |  |  |  |
| Clean + Refresh Powerful cleaning and odor elimination with Febreze freshness | PET Stain & Odor Removes tough pet stains Includes StainProtect™ to protect against future stains | PRO MAX Clean + Protect Our most powerful formula for tough, ground-in dirt & stains Includes StainProtect to protect against future stains | PET PRO OXY Urine Eliminator Our best formula for pet urine stains & odors Includes StainProtect to protect against future stains |
Certain trademarks used under license from The Procter & Gamble Company or its affiliates.
| Pretreat Pretreat spots and stains to improve carpet cleaning performance. | Boost Add Boost carpet cleaning formula enhancers to any formula to increase its effectiveness. | ||||
 |  |  |  |  |  |
| PET Stain Pretreat Removes tough pet stains & odors with Enzyme Action | PET PRO OXY Stain Destroyer Removes tough pet stains & odors with OXY | PET Pretreat + Sanitize Penetrates to sanitize and loosen tough stains | OXY Boost Removes old, set-in stains | PRO MAX Boost Add to formula for 2X deep cleaning power | PET OXY Boost Removes pet stains and odors |
Tips Before Carpet Cleaning
- If cleaning an entire room, consider moving your furniture to another area.
- Use a dry vacuum cleaner over area before using your deep cleaner.
- Pretreat stains with BISSELL Pretreat to improve performance on coff ee stains and ground-in dirt.
Assembly
 Do not plug in your machine until you are familiar with all instructions and operating procedures. |
Your deep cleaner comes in 5 easy-to-assemble components.
- Upper Handle
- 4 Screws Taped to Handle
- Deep Cleaner Base
- Tool Caddy
- 2 Hex Nuts
The only tool you will need to assemble your deep cleaner is a Phillips-head screwdriver.

- First, slide the Upper Handle on to the base.
![]()
- 1-From the flat side of the Tool Caddy, feed the power cord through the rounded-rectangle opening.
2-Next, align the Tool Caddy with the Upper Handle holes.

- 1- Place Hex Nut into back of Tool Caddy and hold in place. Insert bolt from the front to the back, turning the bolt into the Hex Nut until snug. Do not overtighten. Repeat for the second bolt and Hex Nut.
2-Insert 2 screws into lower 2 holes located just above the Lower Hose Rack. Turn the screws until tightened.

- Attach tools to the end of the hose or front of the Upper Handle. Wrap the power cord and hose.
![]()


Special Features
SmartMix®

The SmartMix® feature automatically mixes hot tap water with the BISSELL® Advanced cleaning formula. Choose one of the 3 settings and the SmartMix will adjust the right amount of cleaning formula to mix with the hot water to fit your cleaning need.
2-in-1 Tank

Our 2-in-1 Tank system is designed with a heavy-duty bladder inside for clean water. As you clean, the clean water in the bladder will empty and mix with the cleaning formula. Dirty water will be pulled out of your carpets and collect around the outside of the bladder so that clean and dirty water are always kept separate. This allows you to maximize tank space, yet only carry one tank to and from the sink for filling and emptying.
ReadyTools™ Dial (3)

This dial switches your machine between floor cleaning and hose/tool cleaning.
Flow Indicator (4)
This is located on the machine base. It spins when the trigger is pressed to indicate that the machine is applying cleaning solution to the carpet and will stop spinning when the formula tank or bladder needs to be refilled, or when the trigger is released.
Before You Clean
Maximum Results with your ProHeat® Pet Deep Cleaner.
|
Preparing Your Machine
Fill the 2-in-1 Tank with Water
- First, press the Recline Pedal to lay down the machine handle. Lift the 2-in-1 Tank from the base of the machine using the carry handle on the tank.

- 1-Carry the tank to the sink. Set the tank on a flat surface and rotate the handle to unlatch and remove the lid. Fill up the bladder with hot tap water (140⁰F/60⁰C MAX). *Do not boil or microwave the water as it can destroy the bladder.
2-Optional: Add 2 ounces of BISSELL Boost formula to the bladder.
3-Return the tank lid by matching it to the tank edges. The tank handle must be in the forward position in order to set the lid in place. Rotate the handle to secure the latch.

![information]() Note: Remember to secure the lid before picking up the tank.
Note: Remember to secure the lid before picking up the tank.


 ATTENTION: To prevent damage to Berber carpets, avoid repeated strokes in the same area.
To reduce the risk of electric shock due to internal component damage, use only BISSELL cleaning formulas intended for use with the deep cleaner.
NOTE: Heatwave Technology® helps maintain the temperature of the water in your 2-in-1 Tank while you're cleaning.
Fill the 2-in-1 Tank with Formula
- Lift the tank up and out of the machine base.

- Fill the tank by first unscrewing the cap and insert.
![]()


- Fill with water to the 'water' line.
- Fill with formula to the 'formula' line. Turn the cap and screw on tightly to secure. Return the tank to the machine for a snug fit.
![information]() Note: Make sure the cap is properly seated to avoid leaking.
Note: Make sure the cap is properly seated to avoid leaking.
Choose the SmartMix Setting
Simply Choose one of 3 settings: Each setting is designed to adjust proper amounts of water and cleaning formula for your carpet. |
ATTENTION Do not overwet carpet. Be careful not to run over loose objects or edges of area rugs. Stalling the brush may result in premature belt failure.
Cleaning Your Floors
- Set the ReadyTools™ Dial to FLOOR CLEANING.
![]()
- Plug the power cord into a properly grounded outlet.
![]()
- Press the Power Switch to turn the machine ON.
![]()
- While pressing the trigger, make one slow pass forward and back to put water and formula down.

Release the trigger and make one slow pass forward and back over the same area to pick up the water and formula that was just put down. Repeat cleaning passes until the liquid coming up appears clean. Continue passes without pressing the trigger until you can't see any more water being pulled up.


NOTE: Both the SmartMix formula tank and the 2-in-1 bladder need to have liquid in them in order for the machine to spray. If one of the tanks are empty, the machine will not spray.

Do not overwet the carpet. Also take care not to run over loose objects, edges of area rugs, or the cord.
- Stalling the brush may result in premature belt failure.
Cleaning with Hose & Attachments
NOTE: Your deep cleaner comes with a hose and at least one tool to attach for cleaning stairs, upholstery and more.

Check upholstery tags for any special care instructions. If possible, check for colored stuffing as it is possible the color could bleed through. Check for colorfastness in a hidden area, like the back or underside of the furniture.
- Be sure to vacuum thoroughly to pick up loose debris and pet hair. The hose and tool of the vacuum can help to get into the fabric folds. Also plan activities to allow the upholstery to dry. Fill the tanks.
- Set the ReadyTools™ Dial to the TOOLS setting. This will allow the machine to divert the spray and suction to the hose.
![]()
- Set the SmartMix® Dial to the Normal setting.
![]()
- Attach the cleaning tool to the end of the hose.
![]()
- Plug in the power cord to a grounded outlet and press the Power Switch ON.
![]()


Press the trigger to spray solution on to the area you are cleaning. Slowly move the tool back and forth over the soiled surface. Release the trigger to suction up the soiled area. Work in small sections. Spray with only warm water to rinse the cleaned area (optional).
Do not overwet the upholstery.
When finished, rinse the hose and tool by suctioning warm water from a bowl. Allow the hose and tool to dry before storing the machine.
To reduce the risk of injury, be extra careful when cleaning stairs. Make sure the machine is secure and level.
Rinsing Your Carpet (optional)
Rinsing is an optional step that can be done during the cleaning process by switching to the water rinse setting, or it can be done after the carpeted area has been cleaned.
Choose the Water Rinse setting on the SmartMix® Dial, Be sure to rinse out your tank if Boost was added in with your water. Use the Water Rinse setting with water only. Follow the same path as you did for cleaning, taking care to do a forward (wet) stroke by pressing the trigger, a backward (wet) stroke, and a forward and backward (dry) stroke, releasing the trigger. Continue this until the water you see coming up the nozzle is clear.
Emptying the 2-in-1 Tank
- 1- Press the Power Switch OFF. Remove the 2-in-1 Tank from the base by lifting up on the tank's carry handle.
2- Carry the tank like a bucket to where you'll dispose of the collection water. Rotate the carry handle to unlatch the lid and empty the tank.
![]()
- After each use, remove and rinse the lint screen located on the tank lid.
![]()


NOTE: You may notice hair & debris deposits on the carpet or in the tank that were loosened by the cleaning action (especially with new carpet that may never have been deep cleaned before). This debris should be picked up and
To Continue Cleaning
- Fill the 2-in-1 Tank again.
- Make sure the tank lid is secure and return the tank to the machine. Follow cleaning instructions to continue cleaning. *Don't forget to check the formula tank and refill as needed!
![]()
- Rinse (optional) Choose the Water Rinse setting on the SmartMix Dial and follow rinse instructions at the top of this page.
![]()


Storing Your Machine
| To reduce the risk of fire, electric shock, or injury, turn power OFF and disconnect plug from electrical outlet before performing maintenance or troubleshooting. |
NOTICE To reduce the risk of a leaking condition, do not store machine where freezing may occur. Damage to internal components may result.
Once your cleaning is complete, make sure the water tank is emptied and rinsed out. Put the machine away in a closet or basement for the next use.
Caring for Your Machine
A few simple steps can assure your machine is well maintained after your cleaning is complete.
- Turn power OFF and unplug the machine. Always wrap the power cord and make sure the hose is securely wrapped.
![]()
- Make sure you rinse the 2-and-1 Tank an extra time on the last rinse. Rinse under and around the bladder as well as the lint screen.
![]()
- Clean the flow indicator filter after each use. Unscrew the cap to lift the red rotor and white filter. Rinse all parts with water and return them to the machine. Twist the cap back on, but do not overtighten.
![]()
- Nozzle and Brush Roll Cleaning Insert the Nozzle Clean Out Tool into the thin slot, on the end of the nozzle that touches the floor. Clean until free of pet hair or debris. Use the opposite side of the tool to clean the Brush Rolls by combing the bristles to help loosen hair or debris. Wipe the machine's exterior with a soft cloth. Once your carpet is dry, vacuum again to remove any excess hair or fuzz on your carpet.
![]()


Troubleshooting
To reduce the risk of electric shock, turn power OFF and disconnect plug from electrical outlet before performing maintenance or troubleshooting checks.
| Problem | Possible causes | Remedies | |
| The light is not illuminating on the front of the machine | Power Switch is OFF. | Turn Power Switch ON. | |
| Reduced spray or no spray | Bladder may be empty. | Refill bladder with hot tap water. | |
| Filter may be clogged. | Clean out the flow indicator. | ||
| Tanks may not be seated properly. | Turn power OFF (O); remove & reseat tanks. | ||
| Pump may have lost prime. | Turn power OFF (O); after 1 minute turn ON and press trigger. | ||
| Pump belt may be broken. | Turn ON the machine and check to see that the DirtLifter PowerBrush turns. | ||
| DirtLifter® PowerBrush does not turn | Brush belt or pump belt is off or broken. | Turn the machine OFF (O) and unplug from the outlet. To check if the brush belt or pump belt has broken, you will need a flathead screwdriver. Insert the blade end into the lower slot of the Belt Access Door to release the lower snap. If necessary, insert the blade end into the upper slot to release the upper snap. Examine the belt for breakage. If broken, visit BISSELL.com for replacement part information. | |
| Cleaner not picking up solution | ReadyTools™ Dial may be on the wrong setting for the cleaning job. | Set ReadyTools™ Dial to the proper setting, depending on how you are using your machine. | |
| Nozzle window may not be properly attached. | Press down firmly on the black oval gasket at the top window to make sure the two tabs on the back of the nozzle window are snapped into the mating slots in the main housing. | ||
| 2-in-1 Tank lid is not properly installed. | Reinstall lid. | ||
| 2-in-1 Tank is not properly seated. | 2-in-1 Tank must be firmly seated to function; remove and reseat tank. | ||
| Poor tool position. (Handheld attachments only.) | Adjust angle; apply more downward pressure. | ||
| 2-in-1 Tank has picked up maximum dirty water. | Empty tank following steps. | ||
Service
| Website: E-mail: Call: |
Please do not return this product to the store.
Other maintenance or service not included in the manual should be performed by an authorized service representative.
If your BISSELL® product should require service:
Contact BISSELL Consumer Care to locate a BISSELL Authorized Service Center in your area. If you need information about repairs or replacement parts, or if you have questions about your warranty, contact BISSELL Consumer Care.
Register your product today!
Registering is quick, easy and offers you benefits over the lifetime of your product.
You'll receive:
| BISSELL® Rewards Points Faster Service | Product Support Reminders and Alerts Special Promotions |
Visit BISSELL.com/registration!
Parts & Supplies
For Parts and Supplies, go to www.BISSELL.com and enter your model number in the search field.
We're Waggin' Our Tails!
BISSELL® proudly supports BISSELL Pet Foundation® and its mission to help save homeless pets. When you buy a BISSELL product, you help save pets, too. We're proud to design products that help make pet messes, odors and pet homelessness disappear.
Visit BISSELLsavespets.com to learn more.
Love your BISSELL® product?
Don't keep it a secret.
Let us, and millions of others, know what you think!
Leave your star-rating on BISSELL.com.
IMPORTANT SAFETY INSTRUCTIONS
READ ALL INSTRUCTIONS BEFORE USING YOUR DEEP CLEANER.
When using an electrical appliance, basic precautions should be observed, including the following:
| TO REDUCE THE RISK OF FIRE, ELECTRIC SHOCK OR INJURY:
|
|
SAVE THESE INSTRUCTIONS FOR FUTURE USE
This model is for household use only. Commercial use of this unit voids the manufacturer's warranty.
| Improper connection of the equipment-grounding conductor can result in a risk of electrical shock. Check with a qualified electrician or service person if you aren't sure if the outlet is properly grounded. DO NOT MODIFY THE PLUG. If it will not fit the outlet, have a proper outlet installed by a qualified electrician. This appliance is designed for use on a nominal 120-volt circuit, and has a grounding attachment plug that looks like the plug in the illustration. Make certain that the appliance is connected to an outlet having the same configuration as the plug. No plug adapter should be used with this appliance. | GROUNDING INSTRUCTIONS This appliance must be connected to a grounded wiring system. If it should malfunction or break down, grounding provides a safe path of least resistance for electrical current, reducing the risk of electrical shock. The cord for this appliance has an equipment-grounding Grounded conductor and a grounding plug. It must only be plugged into an outlet that is properly installed and grounded in accordance with all local codes and ordinances. |
- If your appliance has a motorized Brush Roll, do not leave machine running in the same spot without the handle fully upright.
Documents / Resources
References
![www.bissell.com]() Ask a Question
Ask a Question![bissell.com]() http://bissell.com/registration
http://bissell.com/registration![www.bissell.com]() http://www.bissell.com
http://www.bissell.com![bissellsavespets.com]() http://bissellsavespets.com
http://bissellsavespets.com![bissell.com]() http://bissell.com
http://bissell.com
Download manual
Here you can download full pdf version of manual, it may contain additional safety instructions, warranty information, FCC rules, etc.
Advertisement


Need help?
Do you have a question about the ProHeat Pet Advanced and is the answer not in the manual?
Questions and answers