Advertisement
Child Usage Requirements
Please refer to the chart below for proper usage to ensure the safety of your child.
There are four carry modes. Mode usage is determined by your child's weight.
Complies with
EN 13209-2:2015
ASTM F2236-16a

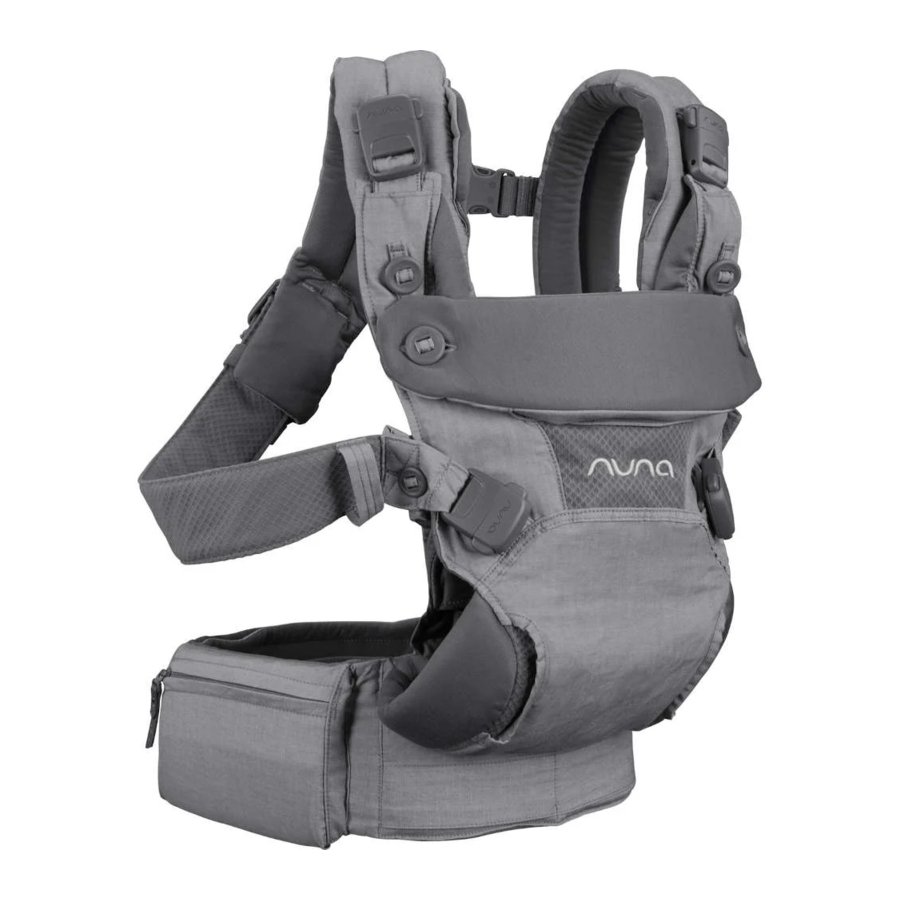
Parts List
Make sure all parts are available before assembly. If any part is missing, please contact Nuna. No tools are required for assembly.

- Shoulder Buckle
- Shoulder Buckle Strap
- Shoulder Buckle Adjustment
- Head Support Button
- Leg Hole Adjustment Button
- Side Buckle
- Waist Pocket
- Seat Width Strap
- Seat Width Button
- Shoulder Strap
- Hood Snaps
- Yoke
- Shoulder Adjustment Strap
- Waist Band
Removable Parts
- Bib (x2)
- Harness Covers
- Head Support
- Hood Pocket
- Head Support Zipper
Infant Booster
- Infant Booster
(Unzipped/Not in Use) - Infant Booster
(Zipped/In Use)
Product Set Up
Based on the chart below, position the head support according to your baby's weight.
 Your baby's head should be supported until he or she has strong head control (approximately 4 months of age).

Ergonomic Child Positioning
Hip-Healthy
CUDL is acknowledged by the International Hip Dysplasia Institute as a hip-healthy product when used as directed.
For hip-healthy babywearing, baby's thighs should be supported from the hip to the knee joint. This ergonomic "M" shape seating reduces forces on the hip joint. Never force baby's legs into a position that is not easily achieved.

Spine-Healthy
For spine-healthy babywearing, proper support is needed. The baby's spine should be allowed to naturally form a "C" shape. Never force baby into a position that is not easily achieved.

Product Use
- Open the waist band.

- Make sure both the shoulder buckles and the side buckles are connected (circled in green).

- Holding the carrier in front of you, slide your arms through the shoulder straps.
![]()
- Pull the carrier over your head.
![]()
- Make sure the yoke is connected (circled in blue). Adjust the height and width of the yoke vertically and sideways to achieve a comfortable fit. The yoke should rest between your shoulder blades.

- Secure the waist band behind your back, engaging the hook and loop to hold the band firmly in place.
To remove the carrier, reverse the steps above.
![]()
![warning]() DO NOT remove the carrier while your child is in it.
DO NOT remove the carrier while your child is in it.


Opening Baby Carrier
- Release both shoulder buckles by squeezing the sides of the buckles and pulling them away from the carrier.
![]()
- Release both side buckles.
![]()
- The carrier is open.
![]()
- If your child weighs more than 15 lb (7 kg), the leg hole adjustments are not needed. Slide the leg hole adjustment button out of the button hole on the shoulder strap near the side buckle.
![]()
![warning]() Leg hole adjustments MUST be used for children less than 15 lb (7 kg) to decrease the size of the leg hole and prevent sliding without pinching or chafing your child's leg.
Leg hole adjustments MUST be used for children less than 15 lb (7 kg) to decrease the size of the leg hole and prevent sliding without pinching or chafing your child's leg.


Magnetic Buckle Indicators
- When following the steps for securing your child, secure all four magnetic buckles by attaching them where you see the green indicators. The buckle must click into place on the raised indicator area.


Infant Booster
The infant booster MUST be used if your child weighs less than 15 lb (7 kg).
- With the shoulder and side buckles attached on one side, locate the unzipped infant booster inside the carrier.

- Zip the infant booster sides together.


When your child grows out of the infant booster:
- Unzip the infant booster.

- Fold the long side underneath itself and secure the hook and loop along the length of the fabric.

- Tuck in the corners.

- Make sure the zipper on the short side is covered by the fabric. Both parts of the zipper should now be covered.


Facing In

Securing Your Child
We recommend sitting down while securing your child in the carrier, as it provides better control.
- Begin with the carrier fully open (and the infant booster secured if your child weighs less than 15 lb [7 kg]).
![]()
- Attach one side buckle where you see the green indicator.

- Hold your child securely against your chest with one hand, and use the other to raise the front of the carrier.

- Guide your child's leg down and through the opening between the seat/ booster and the attached side buckle.

- Use one hand to hold the carrier and your child against you, and use the other to secure the other side buckle where you see the green indicator.
![]()
- Holding your child in the carrier with one hand, secure the shoulder buckles one at a time where you see the green indicators.

- Gently pull both shoulder buckle adjustments down to adjust the fit.

- Adjust the shoulder straps by gently pulling both shoulder adjustment straps evenly out in front of you.

- Make sure your child is comfortable and securely seated in the baby carrier. Adjust the straps around your child and check to make sure all buckles and snaps are secure. Allow room for your child's head movements and keep child's face free from obstructions.
![]()
![warning]() Your child should be positioned close to you, high on your body.
Your child should be positioned close to you, high on your body.
![warning]() Keep your child's face visible to you at all times.
Keep your child's face visible to you at all times.


Head Support
- For a child weighing 8–15 lb (3.5–7 kg), secure the head support so that it is up and supporting the child's head and neck area. Attach the head support to the upper head support buttons. Only fold the head support down when the child is able to hold his or her head up (approx. 4 months).
![]()
- To fold down, slide both upper head support buttons out of the button holes on the head support.

- Fold the head support down.

- Attach both bottom head support buttons into the button holes on the head support.

- Make sure your child is comfortable and securely seated in the baby carrier. Adjust the straps around your child and check to make sure all buckles and snaps are secure. Allow room for your child's head movements and keep child's face free from obstructions.
![]()
- To remove the head support, unzip it from the carrier.


Facing Out

Seat Width Strap
- Locate both the seat width strap and the seat width button inside the front fabric pocket.

- Attach the seat width button into either of the button holes on the seat width strap, depending on how much you need to narrow the seat for your child.

![warning]() The seat width is properly adjusted if your child's thighs are supported.
The seat width is properly adjusted if your child's thighs are supported. - Fold the head support down so your child's face will be above the top edge of the carrier. The carrier is now ready for you to secure your child.
Follow the same steps for securement as Facing In mode, but face your child outward.
![]()


Back Carry

Back Carry Position
We recommend practicing this method a few times without a child in the carrier before attempting it with your child.
Child should NEVER be facing out (away from you) in back carry mode.
- With your child in the baby carrier facing inward, loosen both shoulder adjustment straps (DO NOT unbuckle).

- Slide your right arm out of the right shoulder strap while cradling your child with your left arm.
![]()
- Slide your left arm under the shoulder adjustment strap on the side while cradling your child with your right arm.

- Cradling your child with your right arm, guide your child to your right hip using your left arm.

- Still supporting your child, grab the shoulder strap with your left hand and pull it down over your shoulder.

- Slightly lean forward and move your child onto your back.
![]()
- Slide your left arm up through the shoulder adjustment strap on the side while cradling your child behind your back with your right arm.

- Slide your right arm down through the shoulder strap while cradling your child with your left arm. Both shoulder straps should now be secure around your shoulders.

- Pull down on the shoulder adjustment straps to tighten. Adjust the yoke up or down vertically and side to side.

- Roll up the excess length of the shoulder adjustment straps and use the elastic loop to wrap around the rolled up strap to store it out of the way.

- Make sure your child is comfortable and securely seated in the baby carrier. Adjust the straps around your child and check to make sure all buckles and snaps are secure. Allow room for your child's head movements and keep child's face free from obstructions.
![]()


Accessories
Bib
- Make sure the head support is folded down and secured in place with the lower head support buttons.
![]()
- Store the extra length of the shoulder buckle adjustment in the pocket on the shoulder buckle strap.

- Cover the front of the head support with the front of the bib and slide both head support buttons through the button holes on the bib.

- Fold and tuck the bib over the top edge of the head support.

- Wrap both side edges of the bib around the shoulder buckle strap. The back edge of the bib is slid between the shoulder strap and shoulder buckle strap. The front edge of the bib is laid over the shoulder buckle strap.

- Attach the sides of the hook and loop. Make sure the bib is laying flat and is secure to the top edge of baby carrier.


Harness Covers
- Unbutton the head support and fold it down.

- Store the extra length of the shoulder buckle adjustment in the pocket on the shoulder buckle strap.

- Slide the harness cover between the shoulder strap and the shoulder buckle strap.

- Slide the button on the shoulder buckle strap through the button hole on the harness cover.

- Attach the hook and loop. Make sure the bottom edge of the harness cover is tucked behind the head support.

- Repeat on the other side. When both harness covers are secure, attach both bottom head support buttons into the button holes on the head support.


Hood
- Make sure the head support is up and secured in place with the upper head support buttons. Undo the snap on the pocket located on the top edge of the head support.

- Pull the hood out of the hood pocket.

- Adjust the hood to the desired position to shade your child.

- Attach three snaps on the hood strap to the three snaps on the shoulder strap. Repeat for the other side.
![]()
![warning]() Make sure the hood is not covering your child's mouth or laying too tightly over their head.
Make sure the hood is not covering your child's mouth or laying too tightly over their head.


Cleaning and Maintenance
Refer to the care label attached to the carrier fabric for washing and drying instructions. Carrier MUST be washed inside a mesh laundry bag.
It is normal for fabric to fade from sunlight and to show wear and tear after a long period of use, even when used normally.
For safety reasons, only use original Nuna parts.
Check regularly that everything functions properly. If any parts are torn, broken, or missing, stop using this product.

FALL AND SUFFOCATION HAZARD
FALL HAZARD - Infants can fall through a wide leg opening or out of carrier. Follow instructions for use.
- Adjust leg openings to fit baby's legs snugly.
- Before each use, make sure all buckles, fasteners, and adjustments are secure.
- Take special care when leaning or walking.
- Never bend at waist; bend at knees.
- Only use this carrier for children between 8 lb (3.5 kg) and 35 lb (16 kg).
SUFFOCATION HAZARD - Infants under 4 months can suffocate in this product if face is pressed tight against your body.
- Do not strap baby too tight against your body.
- Allow room for head movement.
- Keep infant's face free from obstructions at all times.
Check to assure all buckles, snaps, straps, and adjustments are secure before each use.
Check for ripped seams, torn straps or fabric and damaged fasteners before each use.
Stop using the carrier if parts are missing or damaged.
Child must face towards you until he or she can hold head upright. Ensure proper placement of child in product including leg placement.
Make sure baby's legs are straddling the seat and arms extend through arm holes.
Regularly check that your child is comfortably and securely seated in the baby carrier, especially when using as a back carrier.
To prevent hazards from falling, ensure that your child is securely positioned in the carrier.
Hold your baby closely at all times until correctly attached.
The infant booster must be used for children weighing 8–15 lb (3.5 kg–7 kg) and should ONLY be used with your child facing in.
Premature infants, infants with respiratory problems, and infants under 4 months are at greatest risk of suffocation.
For low birth weight babies and children with medical conditions, seek advice from a health professional before using the product.
When using the soft carrier, monitor your child.
Be aware of hazards in the domestic environment e.g. heat sources, spilling of hot drinks.
Take care when bending or leaning forward or sideways. Your balance may be adversely affected by your movement and that of your child.
This baby carrier is designed for use by adults while walking, standing or sitting only.
This baby carrier is not suitable for use during sporting activities.
DO NOT use this soft carrier if you use a pacemaker, as the magnetic buckles can interfere with the pacemaker.
NEVER use a soft carrier when balance or mobility is impaired because of exercise, drowsiness, or medical conditions.
NEVER use a soft carrier while engaging in activities such as cooking and cleaning which involve a heat source or exposure to chemicals.
NEVER wear a soft carrier while driving or being a passenger in a motor vehicle.
NEVER lie down or sleep with baby in the baby carrier.
Contact
For replacement parts, service, or additional warranty questions, please contact our customer service department.
infousa@nunababy.com
www.nunababy.com
1.855.NUNA.USA
For warranty information please visit
www.nunababy.com/usa/warranty
Documents / Resources
References
Download manual
Here you can download full pdf version of manual, it may contain additional safety instructions, warranty information, FCC rules, etc.
Advertisement


Need help?
Do you have a question about the CUDL and is the answer not in the manual?
Questions and answers