Bowflex SelectTech 3.1 Manual
- Assembly & owners manual (16 pages) ,
- Assembly and owner's manual (16 pages)
Advertisement
Before You Assemble
Please take the time to read all assembly instructions before attempting to assemble your Bowflex™ SelectTech™ 3.1 Bench. The best place for your Bowflex™ SelectTech™ 3.1 Bench is on a hard, level surface.
Basic Assembly Principles
Here are a few basic tips that will make your assembly of the Bowflex™ SelectTech™ 3.1 Bench quick and easy. By using these principles, you can simplify each process and save yourself extra time and effort.
- To make the assembly process go faster, gather the pieces you need for each step and thoroughly read the assembly instructions for that step prior to starting assembly for the step.
- When tightening a locknut on a bolt, use a combination wrench to grip the locknut and ensure that it is fastened securely.
- When attaching two pieces, gently lift and look through the bolt holes to help guide the bolt through the holes.
- As a general rule, and for all bolts and nuts on your Bowflex™ SelectTech™ 3.1 Bench, turn bolts or nuts toward the right (clockwise) to tighten and left (counterclockwise) to loosen.
Hardware and Tool Guide
Tools Required:
- 9/16" Socket
- 9/16" Wrench or Adjustable wrench
- 7/32" Hex Wrench (provided)
- 3/16" Hex Wrench (provided)
![]()

Hardware:
NOTE: Illustrations not to scale.

Parts

| Item # | Qty | Description |
| 1 | 1 | Rear Frame Assembly |
| 2 | 1 | Front Frame Assembly |
| 3 | 2 | Seat Connector Bracket |
| 4 | 1 | Rear Stabilizer |
| 5 | 1 | Front Stabilizer |
| 6 | 1 | Back Pad |
| 7 | 1 | Seat Bottom |
| 8 | 1 | Leg Hold Down Assembly |
| 9 | 1 | Tube, Foam Roller |
| 10 | 2 | Pad, Foam Roller |
| 11 | 10 | BHHB 5/16" x 2-1/2" |
| 12 | 6 | BHHB 3/8" x 1" |
| 13 | 2 | BHHB 3/8" x 3" |
| 14 | 4 | Nylock Nut 3/8" |
| 15 | 10 | Flat Washer 5/16" |
| 16 | 14 | Flat Washer 3/8" |
| 17 | 3 | Spring Washer 3/8" |
| 18 | 2 | BHHB 3/8" x 3 1/2" |
| 19 | 2 | End Cap 3/4" |
Assembly
- Attaching Front and Rear Frame Assemblies

Parts
Hardware Qty - 3/8" x 3 1/2" Bolts (#18)
2 - 3/8" Flat Washers (#16)
7 - 3/8" Nuts (#14)
2 - 3/8" x 1" Bolts (#12)
3 - 3/8" Spring Washers (#17)
3 Tools
- Rear Frame Assembly (#1)
- Front Frame Assembly (#2)
- Seat Connector Brackets (#3)
- 7/32" Hex Wrench
- Attach the Front Frame Assembly (2) to the Rear Frame Assembly (1) using the hardware shown.
- Attach the Seat Connector Brackets (3) to the Frame Assembly using the hardware shown.
- Tighten hardware.
- Attaching Front and Rear Stabilizers

Parts
Hardware Qty - 3/8" x 3" Bolts (#13)
2 - 3/8" x 1" Bolts (#12)
3 - 3/8" Flat Washers (#16)
7 - 3/8" Nuts (#14)
2 Tools
- Bench Frame Assembly
- Rear Stabilizer (#4)
- Front Stabilizer (#5)
- 7/32" Hex Wrench
- Attach the Front Stabilizer (5) to the Bench Frame using the hardware shown.
- Tighten hardware.
- Attach the Rear Stabilizer (4) to the Bench Frame using the hardware shown.
- Tighten hardware.
- Attaching Back Pad and Seat Bottom to Bench Frame

Parts
Hardware Qty - 5/16" x 2-1/2" Bolts (#11)
10 - 5/16" Flat Washers (#15)
10 Tools
- Bench Frame Assembly from Step 2
- Back Pad (#6)
- Seat Bottom (#7)
- 3/16" Hex Wrench
- Align the Back Pad to the Bench Frame Assembly and secure with the hardware shown.
- Tighten hardware.
- Align the Seat Bottom to the Bench Frame Assembly and secure with the hardware shown.
- Tighten hardware.
- Attaching Leg Hold Down Assembly to Bench Frame

Parts:- Bench Assembly from Step 3
- Leg Hold Down Assembly (#8)
- Roller Tube (#9)
- Roller Pad (#10)
- End Caps (#19)
Hardware:
- Pull Pin (part of Frame Assembly)


- Attach the Leg Hold Down attachment (8) to the Bench Assembly.
Begin by inserting the Roller Tube (9) through the hole in the Leg Hold Down (8), leaving room on each side for the Roller Pads (10). - Slide both Roller Pads onto the Roller Tube so that the entire assembly is centered on the Leg Hold Down Assembly.
Secure the End Caps (19) onto each end of the Roller Pads. - Attach the Leg Hold Down assembly to the Bench as shown in the figure, with the hook portion of the Leg Hold Down resting on the rubber stop of the bench and the top portion of the Leg Hold Down aligning with the pull pin hole.
Secure the Leg Hold Down by inserting the pull pin through the Leg Hold Down Assembly and the bench through the area shown.
- Final Inspection
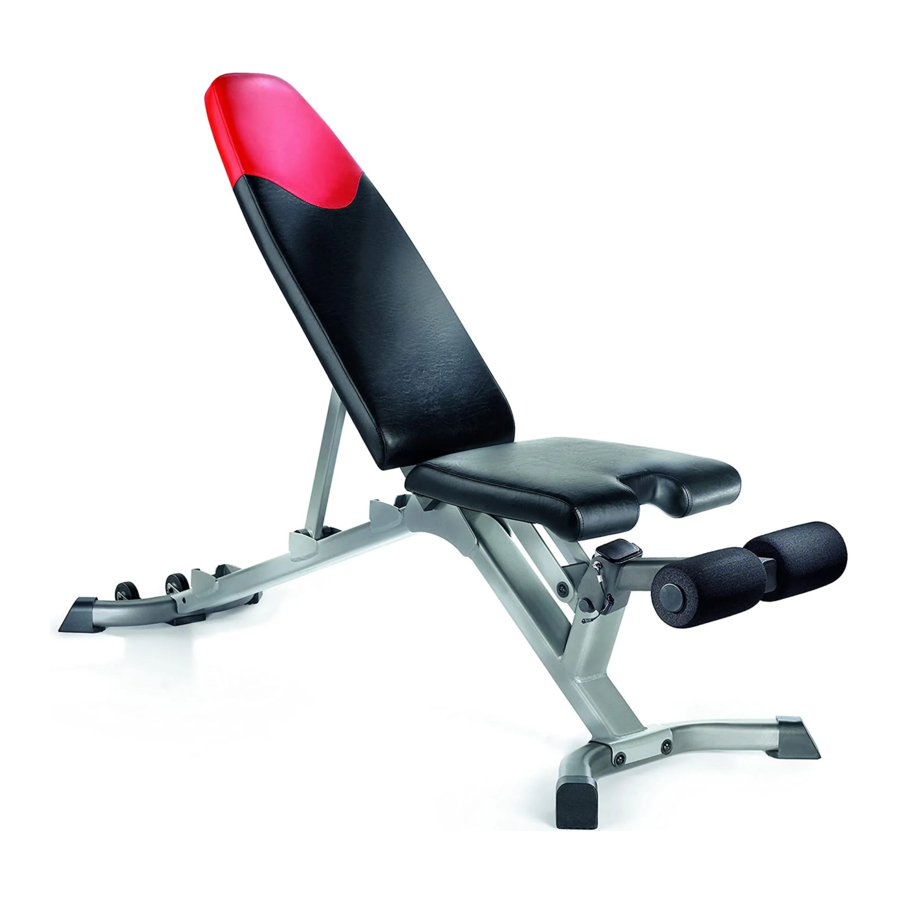
You have successfully completed assembly of your Bowflex™ SelectTech™ 3.1 Bench. Please inspect your exercise bench to ensure that all fasteners are tight and components are properly assembled. Review all warnings affixed to machine.
![]()
Failure to visually check and test assembly before use can cause damage to the Bowflex™ SelectTech™ 3.1 Bench and serious injury to users and bystanders and can also compromise the effectiveness of your exercise program.

Bench Positions

Bench Maintenance
Daily
After each use, wipe bench free of sweat with a clean, dry cloth. Upholstery can be cleaned with a mild detergent or spray cleaner.
Weekly
If used often, your bench should be thoroughly cleaned using a clean cloth and an ammonia based cleanser. Wipe bench down completely and be sure to touch up any scratches with touch up paint to prevent rusting.
Monthly
Check the frame of the bench for any sign of cracking or permanent bending. If you find this situation, do not use this bench and contact a Bowflex Representative or Nautilus, Inc. immediately.
Companion Exercise Equipment
The Bowflex™ SelectTech™ 3.1 and 5.1 benches are designed for use with Bowflex™ SelectTech™ dumbbell equipment. The SelectTech™ Dumbbell features a patented locking mechanism designed to assure proper and complete selection of the weight plates for each exercise. The SelectTech™ dumbbell line includes the following models:
- SelectTech™ 552 dumbbell – weight range 5-52 lbs. (2.7 - 23.6 kg)
- SelectTech™ 1090 dumbbell – weight range 10-90 lbs. (4.5 - 40.8 kg)
Using the bench expands the variety of exercises that you can include in your workout routine. The Owner's Manual for each dumbbell model describes the variety of exercises available to enhance your workout routine.
Dumbbell stands for the SelectTect™ dumbbells are also available separately. These stands feature an ergonomic design to enhance the functionality of the SelectTech™ Dumbbell. The dumbbell handles are positioned in a natural orientation providing a comfortable and secure lifting position. In addition, the stand's V-shape "step-in" design allows the user to maintain proper upper body position while lifting or replacing the dumbbells in the base.
- SelectTech™ Stand – for use with both the SelectTech™ 552 and the SelectTech™ 1090 dumbbell
![]()

Please contact your local distributor for information about other products.
Important Safety Instructions
 This icon means a potentially hazardous situation which, if not avoided, could result in death or serious injury.
Before using this equipment, obey the following warnings:
Read and understand all warnings on this machine.
Carefully read and understand the Assembly Manual.
- Keep bystanders and children away from the product you are assembling at all times.
- Make sure assembly is done in an appropriate work space away from foot traffic and exposure to bystanders.
- Some components of the equipment can be heavy or awkward. Use a second person when doing the assembly steps involving these parts. Do not do steps that involve heavy lifting or awkward movements on your own.
- Keep your body weight centered on the bench while exercising.
- Do not exceed the maximum user weight of 136.1 kg(300 lbs).
- Do not exceed the maximum lifting load of 81.6 kg (180 lbs).
- This equipment is for home use only.
- Set up and operate this equipment on a solid, level, horizontal surface.
- Do not assemble or operate this equipment outdoors or in a wet or moist location.
- Do all assembly steps in the sequence given. Incorrect assembly can lead to injury.
- Do not try to change the design or functionality of this equipment. This could compromise the safety of this equipment and will void the warranty.
- If replacement parts are necessary, use only genuine replacement parts and hardware supplied by Nautilus. Failure to use genuine replacement parts can cause a risk to users, keep the equipment from operating correctly and void the warranty.
- Do not use until the equipment has been fully assembled and inspected for correct performance in accordance with the Owner's Manual for your SelectTech™ dumbbells.
- Read and understand the complete Owner's Manual supplied for your SelectTech™ dumbbells before first use. Keep the Owner's and Assembly Manuals for future reference.
- Children must not be let on or near to this equipment. Moving parts and other features of the equipment can be dangerous to children.
- Not intended for use by anyone under 14 years of age.
- Consult a physician before you start an exercise program. Stop exercising if you feel pain or tightness in your chest, become short of breath, or feel faint. Contact your doctor before you use the equipment again.
- Do not wear loose clothing or jewelry. This equipment contains moving parts. Do not put fingers or other objects into moving parts of the exercise equipment.
- Always wear rubber soled athletic shoes when you use this equipment. Do not use the equipment with bare feet or only wearing socks.
- Before each use, examine this equipment for loose parts or signs of wear. Contact your local distributor for repair information.
- Correctly adjust and safely engage all Positional Adjustment Devices. Make sure that the Adjustment Devices do not hit the user.
- Keep at least 50" (1.3 m) clear on each side of the bench. This is the recommended safe distance for access and passage around the bench.
- Before exercising, make sure the back and seat supports are securely fastened and the bench is firmly in place.
- Never attempt to exercise with more resistance than you are physically able to handle.
- For safety, it is recommended that you exercise with a training partner or spotter.
- Do not use the bench if any component is found worn or damaged.
Safety Warning Labels
The following safety warnings are located on the Bowflex™ SelectTech™ 3.1 Bench. Please read all safety precautions and warning information prior to using your product. Be sure to replace any warning label if damaged, illegible, or missing. If you need replacement labels, contact your local distributor.

To register your product warranty, contact your local distributor.
For details regarding product warranty or if you have questions or problems with your product, please contact your local distributor. To find your local distributor, go to: www.nautilusinternational.com
Documents / ResourcesDownload manual
Here you can download full pdf version of manual, it may contain additional safety instructions, warranty information, FCC rules, etc.
Advertisement


Need help?
Do you have a question about the SelectTech 3.1 and is the answer not in the manual?
Questions and answers