Advertisement
- 1 OVERVIEW
- 2 HELPFUL HINTS
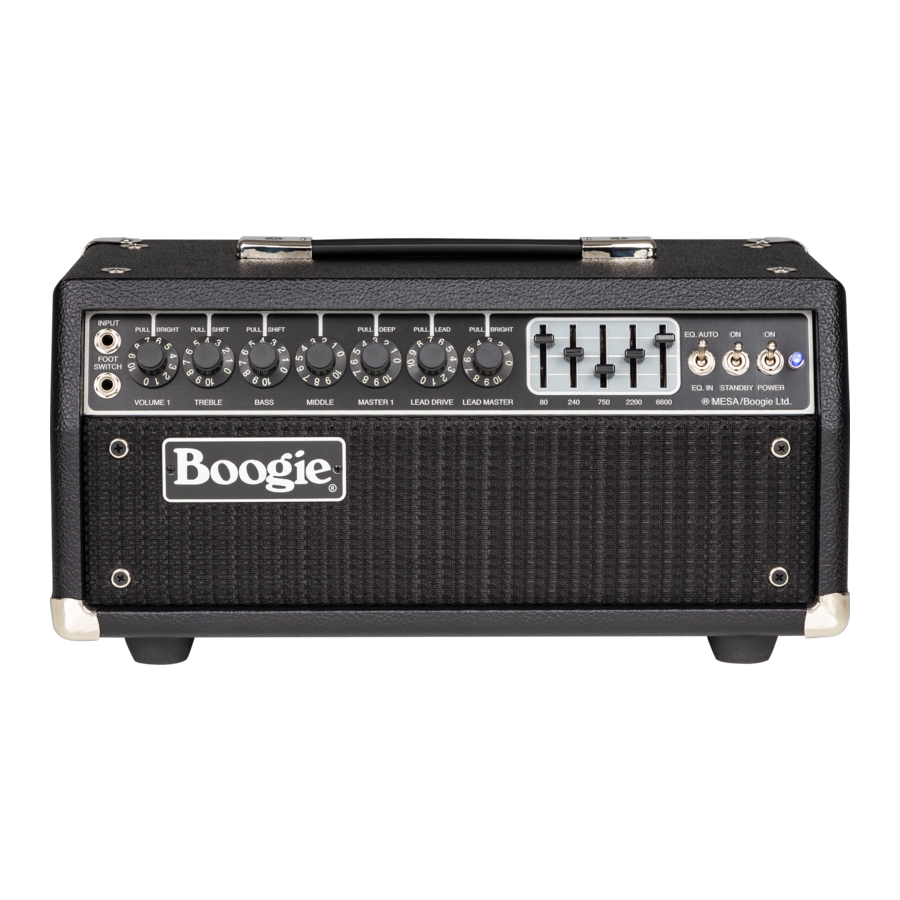
- 3 FRONT PANEL
- 4 REAR PANEL
- 5 FACTORY SAMPLE SETTINGS
- 6 USER SETTINGS
- 7 DIAGNOSING PRE-AMP TUBE PROBLEMS
- 8 SPEAKER IMPEDANCE MATCHING & HOOK-UP GUIDE
- 9 WIRING SCHEMES...Amplifier to Speaker Cabinets
- 10 MARK IIC+ TUBE REPLACEMENT DIAGRAM
- 11 SERVICE INFORMATION
- 12 IMPORTANT SAFETY INSTRUCTIONS
- 13 Documents / Resources
OVERVIEW
The amplifier you've chosen is one of our most iconic and inspirational models, steeped in both amplifier and rock music history. A Channel-switching benchmark at the time, it solidified the placement of our popular 5-Band Graphic Equalizer and Effects Loop in the signal path and improved the switching between its two performance Modes, as well as their sounds. While these improvements were great steps forward in the evolution of the Mark Series, it is really the Mark IIC+'s identifiable character and tone that has withstood the test of time and made them vintage Boogie treasures.
The sparkling Clean performance and fiery attack, mid-focused punch, and soaring, smooth overdrive in the LEAD Mode made IIC+s the voice for many of the 80s' most recorded and influential guitarists. They have since become largely unobtanium, with clean pre-owned examples bringing many times their original price in fully optioned form, and are now legendary, mystical beasts, hard to capture and impossible to tame.
This re-creation of the originals, considering today's available-parts and regulatory challenges, has been challenging and fun, along with highly educational as well. In the end, we feel we've reached a job well done and that owners of this IIC+ will be as happy, perhaps even happier, than those paying many times more for one of the less than 3,000 original Mark IIC+s built in 1984 and early '85. The fact that this rendition can be had for far less than the current price of an original C+ with their components now either 40 years old or no longer original due to potential servicing performed over the years, makes this re-creation a sound choice.
FRONT VIEW: MARK IIC+

REAR VIEW: MARK IIC+

Another attribute of this new build is that it benefits from the 40 years of discoveries made since the original IIC+s were produced. Some of our most treasured secrets unearthed through the years and now employed on every amp we build, weren't discovered until after the C+ was retired and superseded by the Mark III.
These secrets range across the entire amplifier and include both preamp and power section discoveries...Tone tricks and constructional techniques we've confirmed time and again in our R&D, including in our latest Mark VII, and they are all included in this IIC+ redux.
So, envy not those who've paid more for this inspirational model in its original form, for your amplifier IS the real deal...and then some. And though only one of many attributes, the noise floor in this IIC+ is lower, which is always appreciated in both studio and live performance environments.
Operationally, this Mark IIC+ delivers the sound and performance of its namesake, and being a Single Channel/ Dual Mode platform (not a full 2-Channel design), it has the same limitations in terms of (foot) switch-ability. Unlike the 2 and 3-Channel platforms in our product line, the IIC+ has just one set of Tone controls that are shared between its Rhythm and Lead Modes. That said, the C+ footswitches across Modes surprisingly well considering its "handicap" by today's footswitching standards. For surgical-level fine-tuning of the two sounds, however, as would be expected, there is some level of compromise or tradeoff required and that is where the classic on-board Boogie 5-Band Graphic EQ becomes invaluable. Most C+ aficionados agree that the Lead Mode is where the greatest need for additional shaping appears, likely because of the mid-focused nature of its unaltered voice. Yet that is also where a large part of its strength and character lies, as it is this midrange that makes possible the tight low end, focused attack, and voice-like quality on single notes.
Applying the EQ to scoop the midrange (for heavier sounds) or boosting the lows and highs for greater width and size is very effective, along with any shaping needed for individual guitars. So effective in fact, that we fitted an "EQ Auto" function on the original IIC+'s EQ Select switch that enables auto-engagement of the EQ when the Lead Mode is selected on the Footswitch or activated via the Front Panel LEAD DRIVE control's "PULL LEAD" switch.
Regardless of how you choose to use the Modes, Tone Controls, and Graphic EQ, the IIC+ showcases how much is possible with one set of controls. Anything from sparkling, bell-like clean sounds to the highest gain metal sounds and everything between those extremes is possible, all dynamic, touch-sensitive, and packed with expressive nuance.
HELPFUL HINTS
- Warm-Up! Always begin playing sessions with the following Cold Start Procedure at Power Up:
- With the STANDBY in the OFF position, Flip POWER to ON
- Wait at LEAST 30 Seconds.
- Flip STANDBY to ON...and Enjoy!
Following this Cold Start Procedure will help ensure reliability and prolong the toneful life of your tubes, especially the power tubes. Like an incandescent lightbulb that has a filament, much wear and stress on your tubes occurs at the instant of power up from a cold state. Much like a dimmer on a light switch being set low when you first flip it on, the STANDBY being OFF at the instant of power up – and for at least 30 seconds thereafter – allows for a warm-up period and minimizes the shock on tube filaments when they are cold. If you follow this procedure every time you power up your amplifier the likelihood of experiencing tube issues will be decreased while their longevity will be increased.
- FOOTSWITCH! To use the MESA Footswitch to access your Modes, the LEAD DRIVE's Mode Select pull switch must be pushed in/in the Rhythm position. Pulling the LEAD DRIVE control OUT defeats the Footswitch. The Red LED on the Footswitch will be dark/off when the Rhythm mode is active and come on/illuminate when the LEAD Mode is selected.
To engage the Lead Mode when the Footswitch is not connected or is unavailable, pull the LEAD DRIVE control's pull switch out. This pull switch provides easy access to the Lead Mode for recording sessions when you might have the Head in the Control Room and Cabinets in another Tracking Room, or any time you don't have the Footswitch connected or handy. - Travel Safe! Along with using the provided Slipcover and securing it in place with the Handle Flap, as well as securing the amp itself and preventing it from sliding around in your vehicle and hitting something or something doing the same to it, always remember to push all the Pull Pot switches back in before transporting your amplifier. This simple precautionary habit can save you frustration and downtime should one of the pots accidentally left in the pulled position get bumped against something in transport and sheared off. When you're done playing, try to get in the habit of using the palm and fingers flat against all pots and gently pushing them in before putting on the Slipcover.
- Respect Your Ride! Much like a race car, your new amplifier is a high-performance vehicle capable of gain and volume beyond what traditional amplifiers can deliver. The message here is that there is far more available than you will likely ever need, so applying wisdom in your application is warranted.
Just like with a race car, it is unwise to jump in and slam the accelerator down to the floor...you would likely run into trouble fast! The same concept applies to the gain (VOLUME 1 and LEAD DRIVE) and level (MASTER and LEAD MASTER) control(s) here in your amplifier.
Extremely high settings of the controls, especially in combination, make you more prone to experiencing microphonic tube annoyances such as ringing, squealing, rattling, or other forms of tube noise. This can be avoided by more sensible settings of the controls.
Thankfully, we've had decades navigating these upper realms of performance, and your new amp benefits from that experience. Still, as you will hear many times throughout this manual, you don't need to set the controls in their highest range to achieve great performance, and in fact, ignoring that practice may lead to tonal compromises or annoyances that can otherwise be easily avoided. - Power Integrity and Protection! Important! Never alter your Power Cable! Be sure to connect all three terminals of your Power Cable, including the Ground! Failure to do so, and/or modifying your Power Cable in any way – including using a 3-2 Ground Lift Adapter – may void your Warranty and increase the risk of Electric Shock. Always connect your amplifier to a 3-pin Grounded AC Wall Receptacle with the proper AC Line Voltage present (117 Volts US/Domestic).
- Protect Your Tone! It's always a good idea to use a high-quality Shielded Instrument Cable of a reasonable length – say no more than 15-18 feet – for your instrument to amplifier connection...unless you plan on using a Buffer. This will ensure the best sound and prevent loss of top end due to increased cable capacitance which can rob your instrument signal of its integrity.
- Reverb/EQ Footswitch (Included) Located underneath your amplifier on the bottom side of its Chassis near the Center you will find a stereo female ¼" jack for connecting the included Reverb/EQ Footswitch. When connected via its supplied stereo cable, this Footswitch allows remote control of the Reverb and Graphic EQ features on the fly
- Effects; Front or Rear? Depends on the Gear! Effects and processors are most often best suited for use in one of two different places in your signal chain: 1) Between your guitar and your amplifier's Input, or 2) near the end of your (preamp's) signal path in the amplifier's Effects Loop.
Here are some general guidelines/hints as to what most often goes where for the optimum performance from your pedals and effects processors, as well as your amplifier:- Front: Compressors, wah pedals, envelope followers/filters, octave pedals, boost pedals, some EQ pedals, overdrive, Distortion, and fuzz generally want to be in-line between your instrument and the amplifier's Input, i.e. "in the front."
- Rear: Time-based effects such as reverb, delay, chorus, phase, flange, most harmonizers, and most EQs usually work best in the amplifier's Effects Loop with the SEND feeding the first Effect's INPUT and the RETURN accepting the last processor's OUTPUT. In other words, "in the rear."
The above are merely suggestions and general schemes. You may find your preferences differ from these, but if they are of good quality, these categories of processors and effects should often work well in these locations in your signal chain.
![warning]() NOTE: Many reputable cable manufacturers make cable bundles that support this split wiring (Front/Rear) format and make it much easier to route your processing in this way. This method of interfacing effects is most often referred to as the "4 Cable" method. Looking into a bundle like this may save you time and help you get optimum performance from your amplifier and effects.
NOTE: Many reputable cable manufacturers make cable bundles that support this split wiring (Front/Rear) format and make it much easier to route your processing in this way. This method of interfacing effects is most often referred to as the "4 Cable" method. Looking into a bundle like this may save you time and help you get optimum performance from your amplifier and effects.
![warning]() NOTE: Ultimately, anything and everything you put into your signal path has the potential to impact your Tone. We recommend using good-quality processing, and that you try it with your amplifier if possible before committing to a purchase. Pricing can be one indicator of quality, but not always of compatibility, so the best way to assess an addition to your signal path is to try it with your amplifier and let your ears and hands be the judge.
NOTE: Ultimately, anything and everything you put into your signal path has the potential to impact your Tone. We recommend using good-quality processing, and that you try it with your amplifier if possible before committing to a purchase. Pricing can be one indicator of quality, but not always of compatibility, so the best way to assess an addition to your signal path is to try it with your amplifier and let your ears and hands be the judge.
- Straight-In is Best – Buffer the Rest! When using a Pedal setup on your front end (between the guitar and the amp's INPUT), keep in mind that EVERYTHING you put in your signal path affects the sound. You've chosen a high-end, professional instrument in your new amplifier and it stands to reason that your guitar is likely of similar quality. Try not to compromise that discernment by placing devices that are of lesser integrity in the signal path.
If you do have a string of pedals you rely on for boost, overdrive, wah, compression, and other effects on your front end, we suggest employing a buffer in your signal chain to make sure you keep levels and impedances at their optimum and avoid excess cable capacitance created in all the additional wiring. Buffers are small, affordable devices readily available through many reputable companies, including MESA/Boogie. Your Tone will be well-served if you employ one to mitigate any loss incurred by the addition of your frontend processors and subsequent cabling. - Loop Insurance! Cabling quality is also important on "the rear" of your signal chain in the Effects Loop. Here as well, use good quality shielded audio cable to prevent degradation in your Tone and noise. Even though the signal is buffered in the Effects Loop, it is still a good idea to use good-quality cabling of the shortest length possible. This patch point between the preamp and power section is a sensitive place in the amplifier's circuit and anything you introduce here has the potential to change the sound.
- Processing: Choose Wisely! Select the pedals and processors you wish to interface with the Effects Loop with the same discretion used on your front end (Input).
Since the patch point between the preamp and power amp is a sensitive place in the signal chain and the quality of what you place at this junction will ultimately affect the signal for better or worse, it's important to match your amp's level of quality with processors of similar quality. Price is somewhat an indicator of quality, but not always as indicative of compatibility.
We suggest taking whatever processors you intend to buy home to try...or taking your amplifier to the shop selling the processor and trying it in the Loop of your amplifier to determine whether it's a good match. With short to reasonable-length cables, you should hear very little difference once the Input (and possibly Output levels as well) on the processor are set to achieve unity gain (same gain level/no volume difference with cables inserted and removed from the Effects Loop's SEND and RETURN jacks).
If the level drops when you insert the cables, increase the levels on the processor. If the level goes up when the processing is introduced, reduce the levels on the processor. Ideally, there should be no difference in Tone or levels when the cables are inserted and removed – this is "unity gain" and represents little to no signal loss.
This step (trying before buying) isn't always easy or convenient, but you probably didn't choose your amplifier based solely on convenience either, likely more for its inspiring Tone and performance. Discerning choices in your outboard gear will honor that decision and keep your amplifier sounding and performing to its optimum capability. - Stay Connected! Sound waves transmit through objects and your body. This can be a good thing in the case of an electric guitar, as those sound waves affect how the instrument feels in your hands. It is preferable to have at least one speaker cabinet or the combo amplifier sitting on the floor you are standing on while playing. The transmission, and especially of the low end, will affect how the instrument feels to play. Keeping one speaker cabinet on the floor helps ensure the instrument, the amplifier, and your body are connecting and resonating in a harmonious, sympathetic feedback loop that makes playing your amp more emotionally satisfying and ultimately more expressive.
![warning]() NOTE: The exception to this advice above can be when you are playing on stages with many live microphones cranked up and/or there are large monitors and subwoofers nearby (especially if too big and too many)... or when the stage itself is extremely resonant in the lower frequencies. In any of these cases, it may be necessary to lift your cabinetry or the combo amplifier off the floor, or sometimes even off of a drum riser, to de-couple it from the floor and even your instrument to prevent feedback or "runaway resonances." This type of feedback usually occurs in the low end. In some cases, and in certain environments, alternatively, you can trim the low end in the live microphones via the mixing console and then be able to keep the amplifier coupled to (sitting on) the floor or stage. Having some coupling through the floor will likely always feel better to you and your hands.
NOTE: The exception to this advice above can be when you are playing on stages with many live microphones cranked up and/or there are large monitors and subwoofers nearby (especially if too big and too many)... or when the stage itself is extremely resonant in the lower frequencies. In any of these cases, it may be necessary to lift your cabinetry or the combo amplifier off the floor, or sometimes even off of a drum riser, to de-couple it from the floor and even your instrument to prevent feedback or "runaway resonances." This type of feedback usually occurs in the low end. In some cases, and in certain environments, alternatively, you can trim the low end in the live microphones via the mixing console and then be able to keep the amplifier coupled to (sitting on) the floor or stage. Having some coupling through the floor will likely always feel better to you and your hands. - Speak Accordingly! Cabinetry and speaker choice are hugely important to achieving the sound you want and optimizing the amplifier to styles of music you may wish to play.
Whether you have chosen a Combo with its own internal speaker, or a Head format without one, remember that speakers have a giant impact on the sound, as does the cabinetry they are loaded into.
You can add or substitute extension cabinets to tune your amplifier to the stylistic application or environment, regardless of the package you chose to house your amplifier chassis in, and tune the sound physically to best fit the music and/or venue(s) you most often play in. - Open-back cabinetry leans toward beautifully balanced, open-sounding clean sounds, adding three-dimensionality and clarity in the top end and a low-end character with more "air" in the mix.
- Closed-back cabinetry adds focus and a tighter tracking element, especially in the low end, as well as definition and punch in the rest of the spectrum. Some players use a combination of both (closed and open back) at the same time to achieve a balance of the two different characteristics. Others lean one way or another in accordance with their favored musical style, sounds, or favorite artists.
We suggest, at some point, exploring the options in each category to see if perhaps one or the other of these differing designs unlock sounds and response characteristics you've imagined, but have not yet attained. We feel all our cabinets offer exceptional performance in their category, so whatever you have now, if it's a MESA cab, you've got Tone. At some point, though, you may want to refine or radically change your sound, and perhaps require something that the "physical" impact and dimension of different cabinetry can achieve for you. - Less Can Be More! When it comes to the VOLUME 1, LEAD DRIVE, and TONE controls, restraint can be your friend and your key to great Tone.
Your amplifier was designed to deliver great performance across a wide range of settings and musical styles and much of that performance can be found in the median ranges of the controls. Unlike some amplifiers that are historically known for sounding good only at extreme settings, MESA amplifiers are designed such that the controls are active and deliver big sonic changes with subtle movements of the controls.
We suggest starting in the middle ranges or sweet spots of the controls, including the gain controls (VOLUME 1 and LEAD DRIVE), and adjusting from there to find the sounds in the Mode that suit your particular needs. This will do two things; One – it will mean you have plenty of room for adjustment in either direction, and Two – it will reduce the likelihood of excess noise being introduced and help you maintain an optimum noise floor.
Granted, there will be times when you will need to run the controls closer to their maximum (or minimum) settings, and this is fine and will not hurt your amplifier. However, if you explore the median settings on the controls first and learn their tapers, their frequencies, and their overall range, you will better know which ones can accommodate higher settings and which you may want to veer away from settings at the extreme ends...for musically relevant reasons, and also to keep the stress on tubes reasonable so they have less chance of microphonic tendencies or instability.
![warning]() NOTE: One of the most helpful of all Tone Hints for the IIC+, and one that is largely global in nature, is to remember this simple "Tone Rule:" As gain goes up, Bass should come down. The control this pertains to most on the IIC+ is the VOLUME 1 control, as it sets the overall Tone, shape, and feel of everything in BOTH Modes. So, as you increase the VOLUME 1 control (and therefore the gain) past 6.0, start reducing the BASS control relative to your increases at VOLUME 1. And if you use the VOLUME 1 control very high for heavy rock or metal sounds, don't be surprised to find the BASS set at 3.0 or well below...sometimes even off altogether, at the highest VOLUME 1 settings. This will keep the attack as focused and cohesive as possible and improve "tracking," particularly in the LEAD Mode.
NOTE: One of the most helpful of all Tone Hints for the IIC+, and one that is largely global in nature, is to remember this simple "Tone Rule:" As gain goes up, Bass should come down. The control this pertains to most on the IIC+ is the VOLUME 1 control, as it sets the overall Tone, shape, and feel of everything in BOTH Modes. So, as you increase the VOLUME 1 control (and therefore the gain) past 6.0, start reducing the BASS control relative to your increases at VOLUME 1. And if you use the VOLUME 1 control very high for heavy rock or metal sounds, don't be surprised to find the BASS set at 3.0 or well below...sometimes even off altogether, at the highest VOLUME 1 settings. This will keep the attack as focused and cohesive as possible and improve "tracking," particularly in the LEAD Mode.
Also remember that you can get additional and tighter low end with the lowest two Bands of the Graphic EQ, as they manipulate the sound downstream in the signal path and are not amplified by additional tube gain/saturation...unless you are clipping the power section, which is usually not the case when you are already applying healthy amounts of preamp gain to achieve rock or metal sounds. - EQ with IQ! The Five-Band Graphic Equalizer on your IIC+ is not only an iconic piece of rock history, it's also an extremely powerful shaping tool that – more often than not – needs to be used intelligently and with restraint if you want to achieve a balanced, cohesive sound.
The radical cut and boost capability of the EQ Slider Pots allow maximum flexibility on the one hand, but also present the possibility for blowing holes in your sound if not used with a musical sense and some restraint. This is especially true with the 750 Hz Band, where we have often seen players scooping the midrange in ever-increasing amounts until there is literally nothing left aside from "boom and sizzle."
The trap that awaits with the Graphic EQ is the fabled "EQ Hangover." This pitfall is the tendency to over EQ your sound due to the EQ'd sound of the Graphic engaged becoming your reference for "normal," instead of referencing the natural sound of the amplifier without the EQ Bands cutting and boosting specific frequencies as you sculpt and search for sounds.
You'll know you're suffering an "EQ Hangover" when the amp sounds strange, nasal, boxy...or even broken in extreme cases when you disengage the Graphic EQ. When this happens, simply let a couple/few minutes pass without playing and start over with your shaping with the EQ off or from a "Flat" Slider setting on the Bands. This will keep some sense of reality in the mix. Give your ears and brain time to adjust to the natural midrange content the amplifier has when not heavily manipulated with the Graphic EQ before passing judgment on or passing by viable less-EQ'd sounds.
This is true for all frequencies; however, the guitar is a midrange instrument, and much character and a large portion of the cut, impact, and definition needed to anchor your position in a mix is carried in the midrange frequencies. If needed, perhaps even stop playing for a few minutes and come back after a period of "recovery." Your perspective will return to a more balanced one, and you'll be in a better position to judge your sculpting with the Graphic EQ in a fair, objective, and musical way.
One tip from the world of wise studio and live front-of-house engineers applies here as well: It's a great practice to begin your shaping with the Graphic EQ by cutting what you don't want rather than boosting what you think you do want.
This approach does a few things that are beneficial: One; it keeps the noise floor (hiss and hum) lower. Two; it preserves headroom in the power section. The more radical the EQ curve, especially in the low frequencies that take more power to amplify due to their longer wavelengths, the more power it takes to amplify the sound. Three; it is easier to keep a fair perspective on what you are shaping, as boosting trains your ear to hear more is better, and this is rarely true when it comes to music.
Applying the engineer's method trains your ear toward balance and to add only what is needed for a great sound. Using care and taste in your EQ'ing will preserve tonal balance and power and ultimately give you the optimum control over your headroom (available power) and place in a mix.. - Coverage Beats Power! Adding additional cabinetry increases your (stage) volume and coverage far more than increasing wattage in an amplifier's power section. If you need to hear yourself better, try adding an extension cabinet.
![warning]() NOTE: When adding Extension Cabinet(s) make sure you keep the Impedance Load on your amplifier correct. Most MESA Cabinets are wired for an 8 Ohm Load. Mesa Cabinets built post mid-90s feature a Parallel Jack on the Cabinet's Rear Jack Plate and this is one way to connect an additional cabinet. When doing so via this method, be sure to move the cabinet connected to your amp's 8 Ohm Speaker Output over to the 4 Ohm Speaker Output (assuming the cabinet you are adding is also rated at 8 Ohms).
NOTE: When adding Extension Cabinet(s) make sure you keep the Impedance Load on your amplifier correct. Most MESA Cabinets are wired for an 8 Ohm Load. Mesa Cabinets built post mid-90s feature a Parallel Jack on the Cabinet's Rear Jack Plate and this is one way to connect an additional cabinet. When doing so via this method, be sure to move the cabinet connected to your amp's 8 Ohm Speaker Output over to the 4 Ohm Speaker Output (assuming the cabinet you are adding is also rated at 8 Ohms).
You can also connect two 8 Ohm Cabinets independently, each to one of the two 4 Ohm Speaker Outputs on your amplifier (and most MESA amps). In either case, the two 8 Ohm Cabinets together create a 4 Ohm Load, so you want to connect them to the 4 Ohm Speaker Outputs in one of the two ways listed above.
Some MESA amplifiers have only one 4 Ohm Speaker Output to accommodate the internal Silent Load feature. You can still connect two 8 Ohm Cabinets to this single 4 Ohm Speaker Output, but you will need to do so either with the Parallel jack on the rear of your MESA Cabinet or if your cabinet is an older MESA cabinet or another Brand that does not have a Parallel jack, a (non-shielded) "Y" Speaker Cable. You can use a Shielded cable in a pinch, however, shielded instrument cables usually have smaller wire, and when it comes to Speaker Cables, thicker gauge wire is preferable.
CHANNEL SELECT - PULL LEAD
There are two ways to access the Modes; The included Rhythm/Lead Footswitch and the PULL LEAD pull switch on the LEAD DRIVE control.
- To use the Footswitch: Connect the supplied unshielded Footswitch cable and Footswitch to the Front Panel FOOT SWITCH jack on the amplifier. Push in the LEAD DRIVE pull switch and select the desired Mode on the Footswitch – Red LED off = Rhythm Mode, Red LED illuminated = Lead Mode.
- To use Mode Select on the Front Panel: Pull the LEAD DRIVE pull switch to activate the Lead Mode. LEAD DRIVE Pushed in default ¬ – Red LED off = Rhythm Mode.
 NOTE: The LEAD DRIVE pull switch overrides the Footswitch when pulled out, and the Lead Mode will be selected/active.
FUSE Replacement
The Mains Fuse is there to help protect your amplifier from spikes or power surges in the AC Line, faulty or arcing power tube issues, and other forms of duress your amplifier might encounter. If the Fuse should ever blow, ALWAYS replace your Fuse with the same type and power rating Fuse. In the MARK IIC+ Simul-Class model, the Fuse is a 4 Amp SLO-BLO type Fuse.
FRONT PANEL

VOLUME 1
The VOLUME 1 control is royalty among the rotary controls and its setting determines much about the sound and feel of both the Modes. In many of our amplifiers, and those of other manufacturers as well, this spot in the circuit is called GAIN, as that is what it meters. Being a re-creation of an iconic model and wanting to stay true to Boogie history, we have used our original name for this important spot in the signal path. The VOLUME 1 control meters the gain and tube saturation in the early stages of the tube preamp and determines whether the response will be cleaner with maximum headroom or more saturated with tube overdrive.
Regardless of what style you are looking toward, the setting of VOLUME 1 determines the character and shape of the sound – clean or dirty, bright or dark, thick or trim. That's because as natural tube saturation increases, the top end recedes and is traded for girth and warmth and a slightly more compressed feel, which often leans appropriately toward the applications and playing styles where more gain is used. In other words, cleaner sounds usually benefit from the lower VOLUME 1 setting's brightness and inherently trim EQ, while higher gain sounds benefit from the receding top end and added warmth and width as more tube saturation compresses, fattens, and darkens the character at higher VOLUME 1 settings.
Not only do the opposing ends of the gain spectrum sound different, but it is also important to remember that as the signal becomes more saturated and overdrive increases, the dynamic response changes and the attack can begin to feel "slower" and less immediate. Rarely in a problematic way, because the styles played with overdrive lend themselves naturally to the sound, shape, and feel produced by the added gain, but rather just in comparison to pristine clean sounds, where the attack is more immediate and the dynamic content broader.
Some of the best sounds fall in the Tone Zone, as we call it, somewhere closer to the middle zone of VOLUME 1's range, say 4.0 to 8.0, depending on Mode and application. The lower the setting, the brighter and more stripped of low end the sound will be; the higher the setting, the warmer, thicker, and fuller the sound will become. Outside this range, the more extreme the differences will be, and at some point, there will be either weak sound when set too low, or a compromised attack and less dynamics when set too high. For clean work in the Rhythm Mode, you may want VOLUME 1 somewhere between 4.5 and 6.0 or possibly even 6.5. For higher gain overdrive work in the Lead Mode, you will likely find great sounds upwards of 7.0 but below 8.5, in order to retain the optimum attack and still have ample sustain for soloing.
You will achieve the greatest headroom, clarity, and top-end sparkle in the Rhythm Mode with the VOLUME 1 set between 4.5 and 6.0, especially with stronger output pickups. If you don't need to footswitch to a Lead sound...for example when you are doing only clean rhythm parts in a session, you have the freedom to optimize the Clean Mode's character and sound in this way, using VOLUME 1 to find the perfect amount of headroom, clarity, and brightness, all of which ultimately equate to dynamic accuracy. Above 5.5 on VOLUME 1, you will begin to feel the tube saturation making the sound warmer, fuller, and darker and feel slower.
When you DO need to footswitch between a Clean and Lead Mode sound, you will need to experiment with your guitar settings and pickup selections as well as your touch (for dynamic content) to determine the compromise "sweet spot" on VOLUME 1.
This will be the spot where the Clean Mode is clean enough and has enough headroom and sparkle, yet the Lead Mode sounds round and full and still has a tight, definitive attack characteristic. It can take some patience to find a setting on VOLUME 1 that is perfectly balanced for both the Rhythm and Lead Modes. You may have to lean a bit toward perfection in one or the other of the two sounds, but it should – with the right pickups and selections on your guitar – be possible to get good performance from both Modes despite the fact you don't have separate VOLUME 1 (gain) controls for each Mode.
This "sweet spot" usually lies somewhere between 6.75 and 7.75 or even 8.0 if your instrument has more "normal"/medium output pickups. Many players select different pickups – or combinations of pickups – for each to maximize the accuracy and performance of each sound. For example, a Neck pickup or Neck and Middle combination for the Clean Mode work – perhaps with the guitar's Volume control even rolled back a touch – and then a Bridge Humbucker for the Lead Mode overdrive sounds. Adopting something like this can help minimize VOLUME 1 compromises and maximize finding a sweet spot setting that works well for both Modes and sound styles.
Outside this "sweet spot" range on VOLUME 1, there are some good usable sounds, but with a good quality instrument and capable pickups, you will likely only occasionally find the need to venture there unless heavy rock and metal sounds are your calling. If that is the case, you may find VOLUME 1 set much higher, or even all the way up, for the extremes in gain and then rolling your Instrument Volume control farther back to compensate for the added gain present when going back to the Clean Mode.
If this very high range (8.0 and above) is your go-to range on VOLUME 1, also remember what we covered in the Helpful Hints Section: when VOLUME 1 is set in its highest range, the tubes are more prone to any microphonic issues, such as squealing and "runaway" harmonic peaks and even Reverb howling or other gain related issues, including excess noise in the form of hiss and/or hum.
Also recall that as VOLUME 1 goes much above 6.0, the BASS control should come down (below 4.5 or lower) for the most articulate attack and focused low end in the Lead Mode.
VOLUME 1 / PULL BRIGHT
The PULL BRIGHT feature on VOLUME 1, as described in its name, adds additional brightness in the highest frequencies. The region it enhances is well above that of both the TREBLE and the PRESENCE controls and is most effective for adding shimmer and sparkle to clean sounds for added dimension, spatial quality, and a feeling of "air" in the mix. This brightness not only affects the top end where its energy is focused, but it also adds dimension to the low end as well, adding the impression of air and breath.
This feature is active in both RHYTHM and LEAD Modes, though you will likely notice its most profound effects in the RHYTHM Mode at lower to middle settings of the VOLUME 1 control. It is very active below 5.0 on VOLUME 1, so if you are looking for pristine, squeaky clean Rhythm sounds, feel free to use VOLUME 1 a bit below halfway/5.0 and engage the PULL BRIGHT. Just keep in mind you may need to fill the sound in with the BASS and perhaps even MIDDLE controls to compensate for the reduction of gain at these lower VOLUME 1 settings.
As the VOLUME 1 control is increased past halfway/5.0 the PULL BRIGHT is less and less effective, until at Max/10.0, its effect is nullified and the BRIGHT feature is rendered inactive.
In the LEAD Mode, the VOLUME 1 PULL BRIGHT is a little less powerful, since most often you will likely be using the VOLUME 1 set above 6.0, usually 7.0 or a little higher, for the best LEAD Mode performance. In this case, you will be getting mostly the highest region of harmonics layered into the sound via the PULL BRIGHT on VOLUME 1. This works out well, as it allows for beautiful shimmering clean sounds in the RHYTHM Mode and at the same time and setting, a nice halo of harmonic content in the LEAD Mode that adds dimension and a soaring quality to produce supremely musical overdrive.
Regardless of how you choose to apply the PULL BRIGHT, you will find it offers dimension and a wonderful musical complexity to the sound across the wide range of input gain settings available on the VOLUME 1 control. We suggest spending some time experimenting with the PULL BRIGHT here on VOLUME 1, the TREBLE and PRESENCE, along with the two highest Bands in the Graphic EQ (2200 and 6600), to better understand where these different regions of top end exist in the spectrum and how they interact to shape top end, so you can quickly achieve the sounds you hear in your mind.
TREBLE
Next to VOLUME 1, TREBLE is the most critical control in the amplifier, or at least certainly among the preamp's Tone Controls. It feeds the Tone control string, and therefore its setting can determine how powerfully the MID and BASS work. Like VOLUME 1, there are three zones in its range: low, middle, and high. These are as simple to understand as warm, cut, and bright, with the bright (highest) zone having a pseudonym/nickname, which is "dangerous," at least when it comes to musically balanced sounds.
The lowest part of the range is where the round, warm sounds will be found. The most usable part of this range is between 2.5 and 4.5 with the portion below 2.5 having few uses apart from dark jazz sounds, and even there 3.5 – 4.5 being the most useful for that musical genre.
The middle range is where most of the best sounds and performance are found for a wide range of instruments and styles, 4.0 – 5.75 being by far the most frequented for most players. In this range, the balance between all the Tone controls is at its best, and plenty of brightness, cut, and openness are available for almost any style and instrument.
From 5.75 through 7.5 on the TREBLE will, for most, be used in a very specific application that calls for maximum attack and cut with an instrument that is shy on top end or for a gained-up chording sound in a crowded mix. When using settings in this zone, you may also need to increase the BASS and MID to fill in the gaps, as the TREBLE set up there overpowers the other two Tone controls.
The high zone of the TREBLE can be used for the high gain LEAD Mode as well as to add attack and cut, but keep in mind that, like having the PRESENCE set high, it can also lend an unwanted buzzy or fizzle-y quality to the sound, especially on single notes if not balanced well with the other Tone controls.
Lastly, avoiding very high TREBLE settings can help reduce hiss and excess noise in your amplifier, especially in the Lead Mode. Avoiding that region can also reduce the likelihood of tubes with microphonic tendencies to begin squealing or whistling, especially at high gain VOLUME 1 settings combined with high TREBLE settings. We pay special attention to this in the final play-testing as your amplifier was built, but no one can predict what a tube will do over time with continual use, temperature fluctuations, and the bumps, jiggles, and bounces incurred in traveling.
TREBLE / PULL SHIFT
The TREBLE's Pull-Switch revoices the treble frequencies lower and boosts them (when Pulled Out), adding focus, girth, and punch for thickening chords and robust, commanding single-note soloing. The TREBLE SHIFT affects ONLY the Lead Mode. The frequencies boosted tend not to be as pleasing or useful for clean sounds.
A lot of character and energy is carried in this fairly wide-Q boost, and it can be very effective in stepping up the authority in your lead playing and the aggressiveness of your rhythm work. It can also be handy in "beefing up" guitars that have a meeker voice or weaker pickups when that is the call for some musical genres.
The trade-off or flip side of this fattening and boosting is that these lower frequencies (of the treble range) can overshadow or cover up your guitar's natural character in the top end quite a bit. When going for lower gain, more traditional sounds where you want your guitar's true character to shine through intact, the SHIFT may be too forward in the wrong places and not open enough higher up where you need the sparkle and "air" to provide the highest level of nuance and detail. For traditional sounds or any time where the guitar's natural character is important, we suggest using the non-SHIFT (pushed-in) TREBLE mode to allow the natural (higher) harmonics to come through unaltered.
BASS
The BASS is one of the easiest controls to understand and operate here in the IIC+, as it is largely independent and obvious in terms of controlling a frequency range within the preamp. Being a low-frequency control and knowing low frequencies come across as not just lower, but also "slower," it doesn't have the potential for unpleasantness at higher settings that the TREBLE control does. There IS interaction to be aware of, and we will get to that, but it can be used at your discretion to fill in and round out your sound, especially in the Rhythm Mode with cleaner sounds.
In terms of interaction, first we have the PULL DEEP on the MASTER control that affects similar frequencies, but it is in a different location and is manipulating low frequencies farther downstream in the signal path closer to the power section. This means the low end added with the MASTER's PULL DEEP will not be amplified additionally in the preamp, so it can be used more freely for high gain/overdrive (Lead Mode) applications with less risk of the sound becoming indistinct or bloated in the low end.
Next, another interaction, and possibly the most important one to be aware of, we already mentioned earlier in the Helpful Hints Section, but to simplify and underscore the point, we'll go with this: As gain (VOLUME 1) goes up, BASS should come down. This notion applies to both Rhythm and Lead Modes and any time the VOLUME 1 control is set much beyond 6.0.
This means that if you want to push the Rhythm Mode hard for traditional amp break-up and use the VOLUME 1 maxed or anywhere near, you will want to run the BASS low, for example, 3.0 and below. You can incrementally roll the BASS up as you start reducing VOLUME 1, but it doesn't take much this early in the signal path to compromise the attack.
For clean work with VOLUME 1 at the compromise "sweet spot" (6.75 – 7.75) where you can have a nice clean sound and also a saturated, warm Lead sound to switch between, the BASS will likely be pretty low...say 3.5 – 4.0, and likely with the BASS SHIFT in the off (pushed-in) mode to achieve the best results. When VOLUME 1 is below 5.5, you can be far more liberal with the BASS setting and even employ the BASS SHIFT when you want the sound to be really full and big.
For high gain applications that see the VOLUME 1 higher, say 7.5 on up to 8.5, you will likely need to run the BASS control low, for example, 2.0, or even off altogether nearer to the maximum VOLUME 1 settings. This will help ensure a definitive attack and a balanced dynamic response.
If you need a lot of low-end combined with high gain for hard rock, metal, or heavy prog sounds, we suggest looking toward the Graphic EQ's two lowest Bands (80 Hz and 240 Hz) for the best performance.
NOTE: The Five Band Graphic EQ comes at the very end of the preamp's signal path and right before the power section, so the low end dialed up there is not further amplified in the preamp. In contrast, the BASS control is located upstream early in the preamp's signal path, and low frequencies added there are subject to more amplification and can quickly become overbearing and swamp the attack, especially on high gain sounds, sounding imbalanced and tubby.
Just keep in mind that the two lowest Bands of the Graphic EQ, when coupled with high BASS settings and especially high GAIN settings, can also overwhelm the attack and swamp the sound. Again, use common sense and taste to achieve the best blend of low-end and attack clarity.
High settings of either, and especially both combined, also have the potential to create unwanted vibrational noises in a Combo and, at extreme volumes, can even cause possible speaker damage. Use common sense and taste to ensure uninterrupted performance.
BASS / PULL SHIFT
As described in the BASS control, this PULL switch engages a boost in sub-low-end frequencies. The BASS SHIFT affects both Rhythm and Lead Modes. Its main application is to add breathy low end (sub-low air) to lower gain clean sounds in the Rhythm Mode. It's most effective when the VOLUME 1 control is set below 5.5 or 6.0, and even then, you will need to keep an ear out for attack clarity and speed/dynamics.
Adding (pulling) the BASS SHIFT to sounds in the Lead Mode rarely produces good results, as the sub-low "air" it adds tends to cloud up and slow the attack in a sound that is already a bit slowed and compressed by natural tube saturation. You can try it for Lead Mode sounds where VOLUME 1 is set low purposefully for more of a "smear," as opposed to saturation, for low to medium gain sounds, and occasionally, it adds something desirable. For the most part, though, when it comes to overdrive sounds in the Lead Mode, better results are found in the PULL DEEP on the MASTER control and in the onboard 5-Band Graphic EQ, as again, both affect low end farther downstream in the circuit.
MIDDLE
The MIDDLE control adjusts the blend of a wide band of midrange frequencies in the mix, adding or taking away punch and authority. At the lower end of its range, it scoops mids and creates a resilient, easy-to-play feel that is forgiving and broad sounding, allowing the top end and low end to be the dominant parts of the EQ curve. The middle and upper ranges of the MIDDLE control bring in the punch, attack, and forwardness that mid-dominant sounds are known for. Depending on the instrument, musical style, and/or technique level, some may find this degree of punch and forwardness stiff feeling and unforgiving to play, so this is something you will need to determine for yourself through experimentation.
Clean sounds usually sound and feel better with lower settings of the MIDDLE, say 2.0 – 4.5 depending on the instrument. This range allows more low-end breathiness and air to support the sound and more top-end shimmer to come through and open it up, the overall result being a more three-dimensional character.
Gain sounds – depending on the style of music and application (Rhythm or Lead) – can call for either a lower setting with scooped mids or a little more midrange dialed in to make the sound more authoritative or aggressive and to focus the attack.
With clipped/overdriven sounds in the Rhythm Mode, the MIDDLE can color the sound and change the feel substantially. The lower range lets the gain smear the notes seemingly more evenly and cohesively, while a higher setting adds gain but also changes the texture and attack, causing some elements to stand out more than others.
Remember that you can use the MIDDLE control and the 750 Hz Band of the Graphic EQ in combination with each other to further define the character of your sounds. The two respond very differently, being in different parts of the signal path, and each has a different part of the midrange under its control in terms of center point and width. Though both are fairly broad Q, using the two types of controls together can help you shape the mids with more options than using either one alone. Keep this in mind as you sculpt for specific mid-frequencies when searching for your own signature sounds.
You will notice the MIDDLE is the only control not fitted with a Pull SHIFT feature. This is because the MIDDLE control handles such a broad spectrum of midrange that we feel deviation in either direction presents frequencies that don't sound as musically pleasing, are not as easy to dial, or that blend as well. Likely a result of their placement in the circuit, the sound quickly becomes harsh when raised in the higher direction and boxy and clunky when dropped in the lower direction. This prompted us to leave well enough alone and stick with what works.
MASTER
Though it is most often associated with the Clean Mode, the MASTER control really functions as an overall output level control for the entire amp. Once you have your optimum Clean Mode volume level set, then use the LEAD MASTER control to set the level of the Lead Mode. Turning the MASTER control up or down will raise or lower the overall volume level of both Modes. Another way to think of it is that the LEAD MASTER controls only the Volume of the Lead Mode relative to the Clean Mode's MASTER setting, which is your basis for overall volume.
You will find the MASTER control rarely needs settings above 3.0 for levels loud enough to play with an ensemble. That said, the amplifier starts to really "come to life" above say, 2.0 in terms of hearing the power section open up and be dynamic. So, between 2.0 and 3.5 you will likely find your adequate and/or appropriate volume levels for ensemble playing live and for at least Soloing levels in recording sessions. These higher volumes will more readily showcase the dynamic and ever-changing harmonic content of your tube amplifier.
MASTER / PULL DEEP
This pull switch activates a low-end boost farther downstream in the signal path than that found on the BASS control's PULL SHIFT. The PULL DEEP affects both Rhythm and Lead Modes.
DEEP rounds out the bottom end and adds fullness that sounds more "fundamental" and less "airy" than that of the BASS' PULL SHIFT. Because it is farther downstream in the signal path, it works well in both Rhythm and Lead Modes and is not as likely to cause unfocused or "tubby" low end as the gain is increased.
Many players leave the PULL DEEP engaged all the time, citing the amp sounds too "small" or "empty" without its enhancement. In a straight A/B outside a musical context, we can understand this perspective. However, within a musical context, there are times when the added low end slows the attack or "clouds up" the sound and pulls down (in the time domain) the feel. Tight clean rhythm comping might be one example of this, along with single note lines in either the Rhythm or Lead Modes that you want tucked up in a mix and not sounding too wide. For such applications, the PULL DEEP can make the attack cumbersome and make you feel as if you are "dragging around extra weight" with the pick, as well as sounding too thick or heavy for certain parts in a mix.
If you like the PULL DEEP engaged or rely on it for feel, one remedy to the above challenge may be found by adding some measure of top end in the stylistically appropriate places; TREBLE for cut, the PRESENCE control for overall brilliance, or the highest two Bands of the Graphic EQ for specific and more personal shaping. Sometimes even all three. Most times this "counter-weighting" on the top end can bring things back into balance, albeit creating an even wider sound.
If the biggest, widest sound is your goal, the PULL DEEP's enhancement can be a good starting point, adding width and girth in the lower half of the spectrum. From there, try balancing the low end with the appropriate top end from one of the three places it resides (TRBLE, PRESENCE or the top/highest two Bands of the Graphic EQ).
LEAD DRIVE / PULL LEAD
NOTE: Before we get to the LEAD DRIVE control's function and operation, we'll need to access it. If the Footswitch is connected, you likely have already. If not, here's how; unlike the other pull switches on the IIC+ that activate voicing changes, the pull switch on the LEAD DRIVE simply provides a way to access the Lead Mode when the Footswitch is not connected or unavailable. Pulling the control out engages the Lead Mode.
The LEAD DRIVE control is a separate and dedicated gain control for the Lead Mode's overdrive. It meters gain farther down the signal chain in the two triodes that create the additional cascading tube saturation necessary to create the thick, smoldering overdrive and sustain the Lead Mode is famous for. This characteristic, or rather one similar in the Mark I model – along with separating overdrive from playing loudness as facilitated by the LEAD MASTER control – is what put Randall Smith and MESA Engineering on the map in the early 1970s.
Before this groundbreaking advancement in amplification exemplified in the original Mark 1 Boogie, to approach this level of overdrive and sustain, one needed to turn an amplifier all the way up, saturating the power tubes at blistering volume levels and all but losing the (preamp's) shaping power over the sound...not to mention punishing audiences no end in the search for sustain.
Here in the IIC+, you can achieve even more gain and sustain, still retain all the shaping power in the preamp (by not overshadowing it with a power section that's running wide open and imparting its own often overpowering character), and choose the playing volume/loudness that best suits your music and environment.
The Lead Drive, though a separate downstream control for the Lead Mode, is dependent on the setting of the initial Input stage gain derived from the setting of the VOLUME 1 control. It is a combination of the settings on these two controls that determines the amount and the character of the overdrive in the Lead Mode.
Set low, between 2.5 and 4.5, the sound will be brighter, less saturated, and therefore most dynamic, and not yet into the "rich, full, saturated" region. This region can be advantageous for blues and classic rock sounds as the saturation is not so intense that it masks the instrument's character that much yet.
Since the TREBLE SHIFT enhances the high midrange and boosts that region in the Lead Mode, the sound is quite different when it is engaged. For this lower region of gain, and when looking for classic rock or blues sounds, you may want to leave the TREBLE control pushed in (SHIFT not engaged). The guitar's personality will come through more this way with the standard treble circuit, and you'll find the character and harmonic spectrum and its balance and dynamic properties more in keeping with traditional sounds.
The LEAD DRIVE's middle range, from 4.5 to 6.5, is where you will likely find yourself for most rock styles exemplified in the 80s and 90s. Here the sound begins to be more saturated and "creamy" with increased sustain and a little less dynamic content or sensitivity.
Pulling the TREBLE SHIFT amplifies these traits and fills in the upper mids/low treble to produce a snarling attack and soaring quality to single notes. From 5.5 to 6.5 (with the VOLUME 1 control optimized at roughly 7.0 to 7.75 depending on pickups and your attack) and with the TREBLE SHIFT and MASTER's DEEP engaged, is where the iconic IIC+ modern rock (up to metal) CRUNCH rhythm, and Lead sounds live. The heavier Crunch Rhythm sounds are dramatically enhanced by the Graphic EQ's classic "V" setting and this combination of control settings and Graphic EQ shape/curve is critical to achieving the best when it comes to IIC+ CRUNCH sounds.
Single note Lead sounds can be enhanced by the Graphic EQ in whatever ways you'd like, but it is less essential as the unaltered midrange lends itself to this application, keeping the notes in all registers balanced, focused, and punching through a mix well. The exception here is if you are relying heavily on the Graphic EQ for your Rhythm sound, at which point you may need it for your Lead sounds as well so that they won't sound nasal or boxy by comparison.
The highest region of the LEAD DRIVE, 6.5 to 10, is for maximum overdrive and sustain. While there may be times you need this much gain, as you move higher and higher, the tradeoffs begin in terms of dynamic content, tracking, low-end tightness and accuracy, tube stability (preamp), and feedback potential (from your instrument and speakers). The closer to max (10) you get, the more compromised things will be in these areas. Likely the most used region is between 7.0 and 8.0 for heavy rock and metal sounds, again with an optimized VOLUME 1 setting between the same range. Here, you should have thick saturation and plenty of sustain, yet still enough tracking and dynamic content to do grinding walls of Crunch Rhythm and searing, soaring single note Lead work.
NOTE: A helpful tip for achieving the best sound and character balance of gain and Tone is this simple idea: Use as much gain on both the VOLUME 1 and LEAD DRIVE controls as it takes to get the job done...and not much more!
Contrary to popular belief in some circles, more gain is not always better. A balance of gain and Tone is always most musical and best preserves the ingredients for excitement and "fire" in your playing. The more dynamic content available, and the more nuance that can come through the gain in your sound, the more you have to work with in terms of expression and conveying emotion. The most powerful music is always emotion-filled. Plus, if you can get by with more reasonable settings, you'll get the benefit of not dealing with as many of the side effects of excessive gain, such as an excessive noise floor, tube rattles, microphonic tube issues, feedback, and the potential for the aforementioned other character tradeoffs.
And lastly, by using only the necessary amount of gain, you open the door for the amplifier to become more a part of and more symbiotic with your instrument as the nuances emerge, and it will actually inspire you to "dig deeper" emotionally. As you learn to utilize its characteristics and strengths it will invite a call-and-response relationship and catapult your playing to the emotional places singers do with their unique voices and traits... instead of simply covering them up with gain and leveling out all the emotional peaks and valleys, much like too much compression can do to a singer in a studio environment.
Only a tube amp can offer this incredibly wide range of attack, sustain, and dynamic content along with its friendly and organically "right" and musical EQ-ing. We urge you to explore and learn the traits, places, and characteristics in this instrument that can reward your playing and use them to showcase the best version of your voice as a guitarist.
LEAD MASTER
The LEAD MASTER control is the separate Master Volume level control for the Lead Mode. It helps you adjust and optimize the volume levels between the two Modes for your stage and studio applications. As mentioned earlier, the MASTER control feeds the signal to the LEAD MASTER and determines how much signal strength there is to work with in a particular volume range.
At medium volume levels the number setting of the two controls, MASTER and LEAD MASTER, should dial up fairly close in number for relatively equal volume levels of the two Modes. At very low or very high volume levels, the two controls could potentially dial up with greater number setting differences to equal the same or similar volume levels. This is due to dynamic differences between clean and saturated (and naturally compressed) characters as well as the signal fed from the MASTER to the LEAD MASTER.
If you have your MASTER control set for a particular clean rhythm level and you need the Lead Mode considerably louder than the Rhythm Mode, which is a common and likely scenario in performance situations, you may need to increase the MASTER to feed a little more signal down the line for the LEAD MASTER to operate on for a wider range of level differences between the two Modes.
This will also increase your Rhythm Mode level, so you may need to either back down your instrument's volume control a bit at times, or perhaps in more extreme cases or venues, even introduce a Volume Pedal into the Effects Loop to be able to adjust the Rhythm Mode's level on the fly to keep a certain Rhythm Mode volume in place or have more flexibility between the Modes' levels.
You could also handle discrepancies in the opposite manner and insert a (Clean) Boost into the signal chain, either in the Front of the amp before the INPUT or in the Effects Loop, and trigger it for the Lead Mode to obtain a significant difference in level between the Modes. And, lastly, there is always the possibility of using the Graphic EQ in a way that compensates for differences between the two Modes, either dipping certain or all frequencies below the Center Line for reduced levels of either Mode or boosting them above it for volume increases for either of them.
The EQ AUTO feature in the EQ switch accommodates this approach to tailoring the Lead Mode level, as it will turn on the Graphic EQ automatically every time the Lead Mode is selected. In some cases, this may be the easiest solution to obtain the desired levels between the Modes, albeit considering your dependency on the Graphic EQ for its more specific shaping applications for certain sounds.
When playing at really low levels, such as in your home or apartment late at night, so as not to disturb others, you may need to reduce the Rhythm Mode's MASTER setting to the low volume level necessary to fit the environment. You will then likely need to set the LEAD MASTER substantially higher than the number on the MASTER control to reach a similar or appropriate Lead level matching that of the Rhythm Mode. This is because at very low settings of the MASTER there will be a very small signal sent on to the LEAD MASTER.
There is usually a way to make things work between the MASTER and LEAD MASTER regardless of your application; it just may take a couple of moments of creative thinking to consider and isolate any challenges and come up with a solution that best fits your individual needs.
LEAD MASTER / PULL BRIGHT
Much like the PULL BRIGHT on VOLUME 1, this pull switch fitted to the LEAD MASTER control engages a Bright circuit that accentuates the upper harmonic region in the Lead Mode. Similar to VOLUME 1's BRIGHT, this Bright circuit is more active (apparent) in the lower range of the LEAD MASTER's sweep and less effective as the LEAD MASTER is increased toward its upper range.
The LEAD BRIGHT adds urgency and openness to the sound as well as dimensionality. We suggest at least trying it engaged much of the time and using the TREBLE, PRESENCE, or highest two Bands of the Graphic EQ to roll out any excess top end, as this will lend a three-dimensional character and a dynamic feeling to the sound.
For warmer, rounder sounds, feel free to try pushing the LEAD DRIVE control in, thus defeating the LEAD BRIGHT. This may be the way to go for certain solo passages or overdrive sounds that require a heavier, more dense character and richness, especially with longer scale and/or maple neck instruments, and even more so, single coil pickups. Sometimes these guitars are plenty open sounding and bright enough in themselves that the LEAD BRIGHT circuit is not necessary or possibly even detrimental to your goals. We suggest experimenting with the TREBLE, PRESENCE, and LEAD BRIGHT in different combinations to see where the elements of top end reside and using the combination that best suits your goal and vision for perfect Tone.
NOTE: The LEAD BRIGHT adds substantial top end to the circuit, and therefore it has the potential, with high LEAD DRIVE (gain) settings, to introduce more noise in the form of background hiss. It can also accentuate or entice any borderline microphonic preamp tubes used in the Lead circuit to become more susceptible to microphonic ringing/squealing at high gain settings. Of course, we screen for this when tubing up your amplifier at build. However, tubes can change with time and use. The best solution is to try and find a balance between all these gain and voicing options such that this does not occur, or at least reduces the likelihood of experiencing microphonic issues due to excessive brightness and top end. Between the Tone Controls and available Pull Shift voicing functions, PRESENCE, and the Graphic EQ, you should have many ways to add brightness in a way and in a place (in the circuit) that should provide for what you need yet also not introduce extreme conditions for the tubes.
5-BAND GRAPHIC EQUALIZER
A Boogie hallmark since the early 1970s when it first appeared on Mark Is, the Five-Band Graphic EQ is famous for its guitar-centric shaping power and the versatility upgrade it brings to Boogie amplifiers, old and new, big and small. It allows near surgical-level control of the frequency spectrum, at least in terms of guitar sounds, and yet, at the same time, is broad and sweeping enough to be fast and easy to dial up.
Another attribute is that its placement at the end of the preamp's signal path is perfect for enhancing high-gain sounds. This late placement in the circuit allows far more low end to be added than would otherwise be possible farther upstream in the preamp, where it would be further amplified through the signal path and subsequent tube stages, resulting in tubbiness and a compromised attack envelope.
The five frequency bands are "broad Q" and range in center frequency point from 80 Hz. on the low end to 6600 kHz on the top end, with 750 Hz commanding the all-important midrange in the center. Each band provides approximately 12 db of cut and boost from the center line's "Flat" detent point and that provides ample room to radically shape the sound or just subtly enhance it.
The most classic application for the Graphic EQ in Mark amplifiers is the time-honored and widely used dipping or "scooping" of the 750Hz Mid Band in conjunction with the boosting of all the other Bands in a "V" pattern. This creates a wide, 3-D spread and delivers huge Crunch Rhythm performance from the Lead Mode. The Mark IIC+ is where this "V" setting planted its stake in heavy rock sounds first, with the biggest acts in 80s rock using it to reinvent "Crunch" Rhythm and take it to a new level of ferocity and width.
The "V Curve" also works for enhancing clean sounds, but it is usually preferred with a less exaggerated form of the "V" pattern for sounds with less tube saturation. This would be especially true for the two lowest bands in combination with the Clean sounds in Rhythm Mode.
For Crunch Rhythm sounds in the Lead Mode, the added wideness and low-end "chug," top-end "grind," and high harmonics spread in the classic "V Curve" allows for 4x12-like performance out of cabinets much smaller and with fewer speakers. It can even help open-back combos sound giant and menacing! The "V Curve" applied to our cascading gain is a signature sound etched in rock for so many recording artists from the 70s when we first introduced it, through the 80s and 90s when high gain ruled the airwaves, and on through today – as one of the biggest, widest guitar sounds ever captured.
NOTE: EQ Hangover! Going abruptly back to a sound that is "flatter" and devoid of the mid dip/scoop, added low end and boosted upper harmonics this classic "V" setting creates, will sound flat, lifeless, nasal, and even "broken" until your ears readjust to the "normal" midrange content the amplifier has when not scooped out with the Graphic EQ.
This is an EQ Hangover and something we deal with all the time in R&D. It is no cause for alarm, but it can be unnerving the first couple of times you experience it.
When this happens, and it will if you explore the Graphic EQ like we hope you will, simply give your ears some time, perhaps even stop playing for a few minutes or longer and come back after a period of "recovery" time, and your perspective will return to a more balanced one.
Engaging the 5-BAND EQ
Controlling the EQ is done in the following ways:
With the Front Panel EQ Toggle (Left of the 3 Toggles), which provides these 3 choices:
- EQ OUT = Center position – bypassed.
- EQ IN = Lower position – EQ engaged all the time.
- EQ AUTO = Upper position – engages the EQ for Lead Mode ONLY every time the Lead Mode is selected.
With the EQ button on the EQ/REVERB Footswitch. This (included) separate footswitch plugs into the ¼" Stereo jack on the underneath/bottom of the chassis in the middle behind the power tubes.
Should you ever need more finite control over the sound, you can always insert an external EQ into the EFFECTS LOOP – a Graphic style with more and narrower gaps between Bands, or a Parametric–style with overlapping sweepable bands and adjustable Q (bandwidth) for even more surgical control over the frequencies. We highly doubt you will ever need to, though, as thousands of players worldwide over the last 50 years have turned to our Five Band EQ for its flexibility, guitar-centric accuracy, musicality, and ease of operation.
The FREQUENCY BANDS (Slider Pots)
80 Hz focuses on the sub-low end and can provide sub-air and richness for clean sounds and low-end "chug" for high gain chording or bass lines. It works well with open-back cabinets to add some of the character and low end that closed-back cabinets bring to the mix, obviously not physically, but rather electronically. This low end comes late in the signal path, so often it is the place to look for extra low end that will stay tight and focused, especially for the IIC+ high gain sounds in the Lead Mode. Remember that the 80 Hz slider carries a lot of power and has the potential to damage speakers if they are not rated for the power the IIC+ has on tap.
240 Hz handles the region from the higher low end through the low midrange, bringing in and out fullness and richness for clean sounds and chesty thump for gain sounds. This band often plays a supportive role rather than a dominant one and fills in the gaps, nooks and crannies. By itself, 240 Hz is not the most instantly gratifying frequency range, but its role is important nonetheless in arriving at a balanced sound. Remember there is also ample power in the 240 Hz slider's higher low end to do some damage to speakers not rated to handle the 75watt power section. While not as potentially damaging perhaps as the 80 Hz slider, it DOES carry low-end and midrange frequencies that can be tough on drivers not designed to handle them at higher power/volume levels.
750 Hz is probably the most sonically powerful band of the Graphic EQ's five bands. Not so much in its potential to cut toward the imbalanced or boost toward the unpleasant like the top of the 2200's range, but rather more in a musically active sense. Its ability to scoop or boost radically the all-important midrange where the guitar lives in the frequency spectrum makes it the go-to for your most effective shaping for stylistic accuracy quickly. This is especially true for jumping between old-school blues and R&B sounds that are filled in with ample midrange, over to modern metal and heavy styles where literally dropping the 750 can get you in the territory with just this one band's setting. This is a bit of an overstatement, but it hints at the stylistically important power of the 750 Hz band.
Because of this shaping power and the importance of the midrange in the guitar's makeup, as well as its place in an ensemble landscape, this is a good time to recall the previously mentioned EQ Hangover we discussed earlier. If there is any band among the five in the Graphic EQ that warps one's tonal perspective the fastest, it is 750 Hz. Pulling out or boosting the midrange quickly and effectively and then going back to a sound that replaces it with more balance quickly, as can be the case when switching from one Mode that has it engaged to one where it is not engaged, can at times sound very strange – even broken – while your ears adjust to the difference.
On that note, when stylistically possible, try to avoid going down the rabbit hole in terms of the 750 Hz slider. The more you cut or boost the midrange, especially while also boosting the lows and highs alongside it with adjacent bands, the more difficult it will be to return to a balanced sound where the EQ is not engaged. Over EQ-ing is rarely a good thing for Tone, so approach the Graphic EQ as a tool for subtle enhancement, when possible, instead of a "crutch" the entire amp leans on.
2200 kHz handles the next higher region from the upper midrange through the middle top end. This is an important frequency range as, similar to 750 Hz, it handles part of the spectrum that defines how a given sound will cut through a mix. The 2200's top end sits above the midrange, adding definition to the pick attack and, in a way, "placing things" in the time domain.
While cutting and boosting the 2200 kHz slider doesn't change anything physically, it can seem as if it does, as this lower top-end "cut" factor weighs heavily on how our ears perceive things in terms of a sound being fast or slow feeling. Not just in the frequency range that the 2200 band controls, but also in the low-end and lower midrange.
When dipping the 750 Hz slider in search of width and dimension, you can boost the 2200 band and dial in attack for the low end to give the impression of tightening it up. This can be especially effective for heavier, higher gain sounds in the Lead Mode.
From that perspective, it is the 750 Hz and 2200 kHz bands that are the most powerful and the most critical of the five sliders to become familiar with and set appropriately for the sounds you want. Almost more than any other, they determine how sounds feel to play and how authoritative or textural they will come across in a mix.
The 2200 band is also an important bridge to the harmonic region found in the 6600 band. Balancing these two top-end sliders is very important, as the 2200 provides the glue that holds a harmonically enhanced sound together, at least in terms of rhythmic accuracy and overall definition. The more harmonics that are showcased with the boosting – and sometimes even cutting – of the 6600 band, the more critical the setting of the 2200 band becomes in terms of filling in gaps and creating a sound that is cohesive, musical, and rhythmically accurate. For example, when searching for huge-sounding yet tight-tracking heavy sounds in the Lead Mode, try working with and swapping the 2200 and 6600 bands to find the best blend of harmonic enhancement and definitive pick attack. You may find the 2200 band set a little higher than its higher 6600 kHz counterpart to add the "cut" that keeps the low strings tracking their tightest and most accurately.
6600 kHz stands watch over the uppermost harmonic region and though perhaps not as critical to the attack frequencies, it is no less important to a balanced sound. Cutting or boosting the 6600 kHz band to extremes can result in either too dark or too bright a sound, from muffled and choked to sizzling and thin, so you want to apply it with taste and musical sensibility.
The most common application where the 6600 kHz slider is boosted is seen in heavy rock and metal sounds for the fabled "V" setting. Here, the 750 Hz slider is dipped below the center line for a midrange scoop, the 2200 kHz band is boosted to near or above the upper line above Center for the attack that heavy crunch sounds need, and then boosting the 6600 kHz band somewhere around the line above Center adds the harmonic edge and haze. The two lowest sliders are most often boosted to near the line above Center for these sounds as well, to add the "chug" on the low end. In total this "V-Curve" all adds up to a huge sound that has been a staple on classic and modern rock and metal albums since the late 70s when the Boogie 5-Band Graphic EQ adorned our MARK I Boogies.
Dipping or cutting the 6600 kHz slider is most often associated with searching for warm, round single-note solo sounds, be they clean for jazz-style sounds or higher gain for rock and fusion music. Dropping the 6600 slider below the center line begins to remove the harmonic content from the sound and this happens rather quickly.
Some players dip both the 6600 and the 2200 bands for ultimate warmth; others boost the 2200 a bit as the 6600 is being reduced to swap in its frequency to add clarity to the attack as the sound gets darker up higher. Either way you go, the 6600 kHz slider comes in handy when you want to customize your sounds – especially those infused with gain – and for a bright guitar with weaker, vintage-style pickups you love for clean work, but perhaps struggle with trying to get a warm overdriven solo sound from.
Now that you have an overview of the Graphic EQ and a better understanding of the frequency points and how they might be used to enhance or attain the sounds you want, we suggest spending some time exploring. Getting to know how the 5 bands interact with not only the other adjacent bands but also with the rotary Tone controls and what is most effective where, will help you navigate the sounds available in the two Modes more quickly and accurately. Regardless of how you choose to apply it, the Boogie 5-Band Graphic EQ helps set Mark Series amplifiers – older or newer – further apart from others in creating an ultimate palette for your expression.
STANDBY
The STANDBY provides a warm-up/idle state for the tubes in your amplifier. It should ALWAYS be used at power up, even if the amp's chassis is warm to the touch from recent use. This is because tubes cool far more quickly than other components like the chassis, and even when they are warm, it is far easier on their filaments to have 30 seconds of warm-up/prep time before being hit with the high voltage.
The STANDBY also doubles as a mute feature for set-up before and breaks during performance. Use the STANDBY any time you are pausing from playing and want to keep your amplifier in a warm and ready state. If you're going to take a break for a couple of hours, it's probably best to power down to save electricity, just be sure to use the Cold Start Procedure (under the POWER instructions below) when you return and want to power back up and use the amplifier again.
NOTE: A little preemptive troubleshooting instruction here that you may never need, but is good to know anyway as a tube amp owner/user:
Should you ever flip the STANDBY to ON and hear a loud hum or loud static, or should you smell something hot/burning, quickly flip the STANDBY to OFF. What you could potentially be hearing (or smelling) may be a power tube arcing or shorting. While this is rare, it can happen if a power tube were to become faulty. In the event it ever does occur, flipping the amplifier to STANDBY stops the incident right away. On occasion, it will correct the problem, but often it can reoccur. You can troubleshoot the problem using the method below:
While looking at the Rear of the amplifier and watching the power tubes (you may need to move the Tube Cage by unhooking the nylon clips and moving it out of the way or removing it altogether), flip the STANDBY to ON.
If a power tube(s) is arcing or shorting, you will likely see it flashing brightly rather quickly or perhaps glowing red in the tube's center metal parts more than the rest of the set. Sometimes an arcing or shorting tube can pull its paired counterpart out of bias and cause it to "run away" as well. Regardless, flip the STANDBY to OFF.
Get an "OV-Glove" or similar method of hand protection (leather gloves, a rag, etc.) to grab the hot tube with! Do NOT use your bare skin as the tubes will be very HOT!
Push up the spring steel Tube Clamp(s) and gently rock the faulty tube back and forth slightly while pulling it down and out of its socket. Notice the orientation of the tube guide (raised bump) on the plastic piece in the center of the tube's base.
Gently and slowly and making sure the Tube Guide is aligned with the slot in the socket, install a new tube of the same type and color rating (preferably matched MESA Tubes) as the one(s) removed if possible. Again, make sure to line up the plastic guide bump with the slot in the tube socket's center hole. Make sure the tube is seated completely in the tube socket and that the tube filaments light up. If they are not lit up and glowing orange, check the tube's orientation and that it is seated firmly and completely into the socket.
Flip the POWER switch to ON and wait at least 30 seconds.
While watching the rear of the amplifier – and specifically the power tubes again – flip the STANDBY switch to ON.
If you do not see any unusual flashes or brightly glowing (red hot) metal in the center of any of the tubes, you have remedied the issues and are ready to enjoy your amplifier again.
If you see a flash or the center of the tube glowing bright red in the center of the metal inside the glass, repeat the steps in this troubleshooting section again using another/different (hopefully known good) power tube(s) of hopefully the same color rating.
POWER
This is the AC Mains Power Switch. The ON position supplies the AC voltage present at the wall socket – the domestic rating = 117 Volts (120 V). Make sure the amplifier's power cable (supplied) is firmly seated in its IEC socket on the amplifier's Rear Panel and that it is connected to a grounded power source that accepts the standard 3-prong plug.
NOTE: Never alter or modify your power cable! Do not use Ground Lift Adapters (3 to 2 adapters)! Doing so will void your warranty and put you at risk of electric shock.
Always begin playing sessions with the following Cold Start Procedure at Power Up:
- With the STANDBY in the OFF position, Flip POWER to ON
- Wait at LEAST 30 Seconds
- Flip STANDBY to ON...and Enjoy!
Following this Cold Start Procedure will help ensure reliability and prolong the toneful life of your tubes, especially the power tubes. Like an incandescent lightbulb that has a filament, much wear and stress on your tubes occurs at the instant of power up from a cold state. Much like a dimmer on a light switch being set low when you first flip it on, the STANDBY being OFF at the instant of power up – and for at least 30 seconds afterward – allows the tubes to warm up and minimizes the shock on tube filaments when they are cold.
That's about it for the Front Panel Modes, controls, and features. Hopefully, this information will prove valuable as you explore to find your dream Tones. Now that you better understand your amplifier and what you can do to shape the sounds you hear and need, let's turn it around and go over the Rear Panel and its controls and features.
REAR PANEL

(MAINS) FUSE
This is the Mains Fuse, and it is there to help protect your amplifier from spikes or power surges in the AC Line, faulty or arcing power tube issues, and other forms of duress your amplifier might encounter within or from the outside world. If the Fuse should blow, ALWAYS replace your Fuse with the same type and power rating Fuse. In the Mark IIC+ Simul-Class model, the Fuse is a 4 Amp SLO-BLO type Fuse. If your amplifier should ever fail to power up, after checking the AC Cable to be sure it is firmly and completely seated in the IEC Socket on the underside of the chassis, and the power source to make sure it is live and supplying AC power to the power strip or wall your amp is connected to, you can inspect the Fuse. To do so, push in and turn the Fuse Cap counterclockwise to release the guide from the slot and remove the Fuse. If the tiny wire inside the fuse is broken or there is a burnt discoloration in the glass, your Fuse is blown and will need replacing. Be sure to use a SLO-BLO type fuse of the same Rating noted above.
NOTE: Important! NEVER put anything but a proper fuse in the Fuse Holder! Do Not use a Fuse with a higher Rating! Do NOT put tin foil or any other conductive material in the Fuse Holder in an attempt to bypass the Fuse!!! These things can put you at risk for an electric shock and can also cause damage to your amplifier that will not be covered under the Warranty.
SLAVE OUT / SLAVE LEVEL
This 1/4" output and its associated Level control provide a signal comprised of the entire amplifier, both preamp and power section, derived from the Speaker Output. The Level control provides a "pad" and a way to optimize the signal level for feeding things like an input to an effects processing rig, an IR reader, or an additional power amp and cabinets to further amplify the IIC+ for use in bigger venues.
Once a signal (derived from the Speaker outputs) is taken from the SLAVE output, it cannot be fed back into your (the same) amplifier, as much like a microphone held up to a Monitor in the same sound system, feedback will occur. The signal must be sent on to another destination, like an IR reader, external amplifier, or effects setup sent on to another destination, like a satellite amplifier providing the other half of a stereo setup.
The level available at the SLAVE output ranges from near Instrument level up to Line Level and beyond at the highest range of the SLAVE LEVEL control. ALWAYS start any session/application with the SLAVE LEVEL zeroed out and increase it SLOWLY to the appropriate level for your destination.
In the IIC+'s first run in the mid-80s, this output was used by many to feed a Stereo Effects Rack and then feed the outputs of each side (channel) of the last processor into a stereo power amp (often our MESA power amps, either two mono M-180/M-190 or later, a Stereo Strategy 400 or Simul-Class 295 Stereo) and two additional cabinets to create the fabled Dry/Wet/Wet rigs of the 80s legendary studio and touring racks. The thinking there being the main "Tone Generator" amp was not altered by anything in the Loop and the Effects Processing, much like in a studio environment, was fed to the parallel "channels" (amps) to be "mixed in" alongside the dry signal from the "Tone Generator" amp Head to a desired wet mix level.
The great thing about this setup, aside from sounding gigantic and being assured that any processing being used won't compromise your "pure Tone" coming from the "Dry" Head (or Combo), is that you can fine-tune the volume ratio (percentage) of mix level of the processed signal for each venue or application with one MASTER/ volume control on each of the stereo "Slave amps," along with any EQ and or PRESENCE settings you prefer... assuming identically featured MESA or other equivalent guitar Heads or guitar-centric power amps were being used for the "wet channels."
NOTE: The SLAVE Output provides a signal that is a combination of sound from both the preamp and power amp; however it does NOT contain the shaping (sharp roll-off of top end and complex EQ-ing) the speaker imparts on the sound. The speaker in any guitar amp is a huge part of the sound, usually at least 50% of it, and that is NOT contained in the SLAVE's signal.
Don't be surprised when you hear a harsh, dry, unrefined, or even "ratty" sound, this is normal. The SLAVE is NOT a speaker-compensated "DIRECT" output for feeding a mixing console or digital interface for your recording setup, such as those contained in some of our other amplifiers. Those outputs are labeled "Direct Output" or "D.I. OUT" and have circuitry that mimics the shaping a speaker imparts on the signal. You CAN feed an external IR Reader or compensated Load Box/DI with the SLAVE's signal, and this will provide a sound more like what you are accustomed to when using your amplifier and speaker cabinet. You may find some of these devices work better with a speaker output feeding them, as the Inputs of these devices are often optimized for the overall higher signal levels present at amplifiers' Speaker Outputs.
EFFECTS LOOP
These two 1⁄4" jacks provide the interfacing patch points for your "rear end" processing needs. The Effects Loop is a signal loop from the end of the preamp to just before the (MASTER, EQ) and Driver stage. The SEND jack takes a portion of the signal at the preamp's end with suitable levels to feed processors, and the RETURN jack interrupts the signal and feeds whatever you have plugged in there back into the power section just before the MASTER, EQ, and the Driver tube.
Wired in this way, the SEND can provide a "Preamp Out" signal if ever needed and the RETURN can serve as a "Power Amp In" that will allow using the amplifier as a Power Amp that has an EQ and a MASTER level control.
The RETURN might be used should you ever want to use it as a Stereo Satellite, say if you had another IIC+ or other amplifier, and wanted a Stereo Rig but only wanted to deal with one preamp and set of controls for your sounds. The SEND could provide an output signal, much like the SLAVE, except sending only the preamp's sound and at a lower, or at least "fixed," level.
Using this patch point for your (most especially time-based) processing usually ensures the best sonic performance and signal-to-noise ratio with your outboard processors. That said, it is important to point out that this is a critical junction in the IIC+'s circuit path, and whatever is inserted here can affect the overall performance of the amplifier.
Unlike "Front End" processing, where things like wah, boost, overdrive, fuzz, octave pedals, compression and such typically work better, the Effects Loop location farther downstream in the signal path is great for time-based effects like chorus, delay, doubling, phase shifters, flange, harmonizers, and (outboard) EQs. These effects tend to work better without the additional gain and EQ-ing of the preamp, and because they are not being additionally amplified by the preamp, the signal-to-noise ratios are usually better running such things in the Loop.
The Effects Loop is a Series Loop, meaning that the entire signal goes through it, unlike a Parallel Loop, where a large percentage of the signal is taken around the Loop and mixed back into the signal path alongside the portion that has been redirected for processing. Therefore, the quality of the devices used in the Loop and their performance is critical to achieving the best sound and performance from your amplifier. We recommend auditioning any processor with your amplifier BEFORE buying it to ensure it delivers a good match in performance.
One clue is price. As with most segments of the marketplace, you get what you pay for most times and there can be a range of quality in regard to both build/component and sonic performance. While technology has raced ahead and features are at an all-time pinnacle, it is the sound and feel for which you've likely chosen your analog all-tube amplifier. Therefore, we recommend a similar degree of discretion when it comes to choosing your processing devices. Ultimately, what you insert in the middle of your amplifier's signal path will have a lot to do with how it performs.
To connect your Processors via the Effects Loop:
- Connect the SEND to your processor's INPUT.
- Connect the RETURN to your processor's OUTPUT.
NOTE: If your processor has Stereo OUTPUTS – or is Stereo IN and OUT ¬ – connect the Mono Inputs of the processor to the IIC+'s Loop's SEND and RETURN. Most Stereo processors provide a Mono option on the Inputs and Outputs and most times, though not always, the Mono signal is processed in the LEFT Channel. In some cases, you may be able to connect the additional (output) channel of a stereo processor to another amplifier to achieve a stereo effect.
NOTE: Keep in mind that connecting two amplifiers in the above manner (Stereo via the Effects Loop) can result in ground loops and unwanted noise from the amplifiers having differing Ground references. This is sometimes remedied by lifting one of the amplifier's circuit to chassis Ground, and depending on the amplifiers, this might be a switchable feature. DO keep the Mark IIC+ Grounded in this scenario (don't disconnect the Ground prong on the Power Cable) as it needs to remain grounded to help prevent the risk of shock. Alternatively, there are buffers and isolating devices on the market, including some made by us here at MESA, that can help with these types of grounding issues. Call your local music retailer to investigate your options should you experience these unwanted noises when connecting two amplifiers in this manner.
Cabling: It is always best to use the shortest cable lengths possible when patching in your processors. If you intend to run very long cable lengths, use a buffer. Even though the amplifier's Effects Loop IS buffered, there can be some minimal sonic penalty the longer the cable length becomes. Always use shielded, high-quality cables to connect your processors to the Effects Loop.
Levels and Compatibility: One way to check the quality of your processors and also match the levels, is to do this simple test: Set up a sound without processors in the Loop. Listen to the sound and observe the feel. Insert your processing into the Loop and do the same.
Next, remove the SEND and RETURN cables from the IIC+'s Loop, and if the sound gets better, or the level jumps up, you will know that either your processor's levels are set too low and need adjustment, or perhaps the processor's output section is in question or just not a good match.
If unplugging the cables from your Effects Loop reduces the signal level, simply lower the Input and/or Output Levels on the processors. Repeat the test until there is no – or very little – difference in levels when the Effects Loop patch cables (processors) are inserted and removed from the Effects Loop.
PRESENCE
The PRESENCE is a Tone control of sorts located in the later part of the signal chain in the power section. It adjusts the mix of a predetermined (high) frequency relating to the negative feedback circuit in the power section. It is a very powerful control, and its setting can give the impression of opening the sound up and adding brightness and attack, or clamping it down, compressing and darkening it. These characteristics, in turn, affect how you perceive dynamic content, as brighter sounds appear as faster while warmer sounds feel slower and more relaxed.
This addition ¬ – or removal – of top end with the PRESENCE control can seem to move the sound forward and back (near or far) in the musical landscape (mix). It also has an impact on our perception in the time domain and helps define whether the sound feels either "tight-tracking" and "fast" or "slow" and "behind the beat."
Clean sounds handle higher PRESENCE settings well to a point, then things can become too forward in the top end. Overdrive sounds usually call for lower to medium PRESENCE settings. Overly high settings of the PRESENCE there can quickly lead to unfocused, and at real extremes, even buzzy top-end characteristics, especially with single note lead playing, which is rarely good. Some Crunch Rhythm and Heavy chording sounds can tolerate added cut and sizzle from the medium to higher range of the PRESENCE, but how much usually depends on the track or ensemble mix it is sitting in as well as your guitar and the pickups therein.
As mentioned before, along with the PRESENCE, the top end can be swapped around by utilizing the differing frequencies found in the TREBLE and even upper range of the MID control that carries a fair amount of high mid/low treble region cut. Between these three regions and flavors of high frequencies, you will be able to sculpt just the right type and amount of top end you need. And if you are still in need of more, or just different, there's plenty left in the upper two Sliders of the 5-Band Graphic EQ!
REVERB
The IIC+ features an analog all-tube spring reverb circuit that produces a lush ambient reverb effect. From subtle background reverb to a drenched wash, the reverb enhances the sounds you dial up, adding dimension and a more spatial landscape.
The Reverb is activated via turning up the mix level control labeled REVERB on the Rear Panel.
MESA REV/EQ FOOTSWITCH! Once the mix level of the Reverb has been set with the REVERB control, you can control the Reverb (on/off) via the included Stereo Footswitch, where there is a footswitch button provided for this function. The separate REV/EQ Footswitch is connected via the supplied Stereo Cable and a ¼" Stereo jack located on the underside of the Chassis, behind the power tubes, near its center. Once connected here, the REV/EQ Footswitch will give you on/off control over the Reverb and the Graphic EQ.
The preamp Modes here in the IIC+ range from the more traditional gain circuit in Rhythm to the high gain signature of the fabled IIC+ Lead Mode. With both the gain and dynamic content differences being this variable and wide-ranging, it is not always possible to achieve uniform input-send and return-mix levels in the reverb circuitry.
Fortunately, this difference in mix/level due to gain characteristics also tracks the musical styles that tend to be played in the Modes. In Rhythm, where clean sounds are favored, be they rhythmic chording or single note soloing, you will find plenty of Reverb depth to play virtually any style from R&B to jazz, country to surf music. In the Lead Mode, where gain rules supreme and Crunch Rhythm and burning soloing can be the main applications, high Reverb mix settings are usually not called for or appropriate. That said, you will likely find ample reverb depth available for most of your needs. Again, these mix level differences are a result of widely ranging gain signatures and the challenges they can present to the Reverb circuit.
Regardless of how you choose to apply the lush, tube Reverb throughout your music and Mode choices, the Mark IIC+'s Reverb will likely prove to be a valued part of many sounds, be they more traditional and "clean based" or high gain and saturated in nature.
SPEAKERS (OUTPUTS)
These jacks deliver your amplifier's power to your speakers. One 8 OHM and two 4 OHM OUTPUTS are provided to accommodate a wide range of cabinetry options.
When using a single 8 Ohm MESA cabinet, such as in the Combo, you will most often want to use the 8 Ohm Output. This provides a proper impedance match, and in the Simul-Class Power Mode, this impedance match setup will deliver the maximum power and headroom.
NOTE: For a bolder, punchier and slightly brighter response in the CLASS A power mode, try moving the speaker cabinet from the 8 OHM SPEAKER Output over to the 4 OHM SPEAKER Output. The impedance will be a more correct match due to the fact you are using a different tap on the transformer and two less power tubes. This is not essential, but rather offers a different color and response.
When using two MESA 8 OHM cabinets – such as two 1x12 Extension cabinets or two (MESA) 4x12 cabinets – the two 4 OHM SPEAKER Outputs should be used, one cabinet to each SPEAKER Output jack. Though each cabinet will present a mismatch individually, when connected to the two 4 Ohm jacks, they will be connected together in parallel, and together "wired in series" (internally), the total impedance load will be 8 Ohms. This also will be a proper impedance match and allow the maximum power and headroom.
One 4 Ohm cabinet (such as a 2x12 using 8 Ohm speakers wired in parallel) should be connected to one of the two 4 OHM SPEAKER Outputs.
A 2x12 with 8 Ohm speakers wired in series – presenting a 16 Ohm Load – should be connected to the 8 OHM SPEAKER Output. The maximum power will not be possible in this scenario, but it will be a mismatch in the safe direction.
We use predominantly 16 Ohm speakers wired in series for our 2x12 cabinet production so that players can combine two 8 Ohm 2x12 cabinets – one in each of the 4 OHM SPEAKER Outputs – as a way of getting 4x12 performance and coverage in an easier-to-carry weight (and bulk) range and still get the same full-rated power from the amplifier.
Some prefer the sound and feel of the 8 Ohm speakers themselves, citing more bold punch in the midrange and top end that remains more attached and cohesive. In a 2x12 scenario (two 8 Ohm Speakers wired in parallel at 4 Ohms total Load), and with a single such cabinet, use the 4 OHM SPEAKER Output even though the full rated power will not be available. Most players find it is more than enough headroom and power and accept the trade-off in power for the difference in voicing compared with its 16 Ohm-loaded 8 Ohm 2x12 counterpart. They are both great-sounding cabinets, it's just what you need and want in regard to overall voicing and power. The standard 16 Ohm-loaded/8 Ohm version will be more scooped in the midrange and harmonic laden, excelling at rock and metal sounds, while the Custom Order 4 Ohm version will be more filled-in regarding midrange, sound rich and balanced, and excel in most other musical genres with a bit more punch and cohesive, attached top end.
NOTE: If you decide to order a 2x12 with 8 Ohm speakers wired in parallel – for a 4 Ohm total impedance – remember that you will not be able to combine that with another cabinet as the amplifier is not designed to accommodate impedance loads below 4 Ohms.
MESA 4x12 cabinets can be treated just like the 1x12 Extension Cabinets, as they also present a total impedance load of 8 Ohms (each pair wired in series then the pairs combined in parallel to achieve 8 Ohms total). Remember, it is not the number of speakers, but rather the total impedance that is important for your amplifier's output transformer.
For more information and a recap of speaker impedance, wiring styles, and total loads, see the Speaker Wiring section in the rear of this manual.
SIMUL-CLASS/CLASS A (OUTPUT POWER)
This switch determines the output power and its wiring style created in the power amp section of your amplifier. Selecting SIMUL-CLASS (upper position) brings on-line all four of the output tubes and the full 75 watts of power.
SIMUL-CLASS utilizes two of the four octal tube sockets wired in Class AB to produce optimum power and headroom with the most punch and authority possible, while the other two octal sockets are wired Class A, producing a lower threshold where clip begins, a smoother transition into clip and a warmer, less forward character. Combining these two types of wiring and operating classes creates a superbly musical and harmonically rich character that filters out the harsher artifacts associated with Class AB, while the more pleasing elements are accentuated and showcased from the Class A-wired tubes.
The SIMUL-CLASS mode will provide the greatest headroom for clean work, the tightest tracking low end and articulation for heavy gain work, and overall, a round, robust, and rich, three-dimensional sound. We consider this the "normal" operating mode, as it delivers the best tonal attributes and musical balance from this innovative way of wiring a 4-tube "100-watt" output section. The SIMUL-CLASS setting will round out, optimize, and propel your preamp sounds in the most accurate and authoritative way possible, and the result is a huge, wide, harmonically complex, and captivating sound.
The CLASS A power selection harnesses two of the four output tubes (outer pair/far left and far right) and they are wired in Class A Triode. This produces less power, approximately 25 watts, versus the "standard" more efficient AB-style operating mode, which might produce roughly 50 watts. However, Class A operation lends a warmer, smoother transition into clip. In Class A designs, the tubes produce more heat as they are dissipating the same amount of current, whether there is signal running through them or they are just idling without amplifying signal. You can think of it like they are always (at least partially) on. This is why the transition to clip is sooner, smoother, and sweeter... they are warmed up and ready to sing!
There is also a nice upper harmonic component to the Class A story as well, and this can benefit both low and higher-gain sounds, depending on your styles and needs. The upper harmonic region is more easily coaxed out of the Lead Mode, and frankly, for much of the medium volume work, studio or live, you may not miss the added low end the Class A sockets remove in trade for what they give in return in terms of harmonic lushness.
This lower-power Class A setting is great for sounds where you either want earlier clipping of the power section or a less forward, punchy and focused character. The Class A mode also reduces the low end accentuation a bit, so it can be handy if you don't want or need really tight tracking of the low end for a specific style or application.
Applications for these character traits might be cranked "bluesy/rootsy" soloing in the Clean Mode where you aren't using the preamp's Lead Mode for overdrive, but rather prefer a "traditional gain amp" driving the power section toward clip and some power tube overdrive. Another application might be clean sounds where you want a little looser low end and less hard-hitting punch in the midrange resulting from the lower power...more like a traditional/vintage amp's character.
Either way you choose to amplify the preamp sounds you craft, the Simul-Class output power here in the IIC+ is one of, if not the most, versatile, toneful, and alluring sounding power amplifiers out there. We are confident you are going to appreciate its dimensionality and nuanced character as much as the countless players who embraced it 40 years ago upon its release, on up through today's vintage Mark IIC+ and later Mark Series devotees.
That wraps up the Controls and Features on the Rear Panel, and you are now ready to enjoy your amplifier's sound while also understanding its signal path and the operation of its powerful controls. We sincerely hope the Mark IIC+ brings you all the joy and musical fulfillment the originals have been bringing its fans over the last 40 years. It is a dynamic and powerfully emotive amplifier that truly is a musical instrument and a perfect platform for your expression...one we hope will propel you and your playing to new heights and keep inviting you to explore new musical frontiers.
From all of us at MESA/Boogie, Congratulations, Cheers, and Welcome to the Family!
FACTORY SAMPLE SETTINGS
OPTIMIZED FOR: CLEAN
ORANGE = KNOB PULLED

OPTIMIZED FOR: LEAD
ORANGE = KNOB PULLED

OPTIMIZED FOR: FOOTSWITCHING
ORANGE = KNOB PULLED

BLUES
ORANGE = KNOB PULLED

WARM LIQUID GAIN
ORANGE = KNOB PULLED

WALL OF GAIN
ORANGE = KNOB PULLED

USER SETTINGS

DIAGNOSING PRE-AMP TUBE PROBLEMS
Because your amplifier is an all tube design, it is quite possible that you will at some point experience minor pre-amp tube noise. Rest assured - this is no cause for alarm and you can take care of the problem yourself in a matter of minutes by simply swapping tubes.
Let us begin by saying; It is a "very good" idea to keep at least a couple of spare pre-amp tubes on hand at all times to insure uninterrupted performance. These minor pre-amp tube problems can take many forms but can generally be described in two categories: Noise and Microphonics. Noise can be in the form of crackling, sputtering, white noise/hiss and/or hum. Microphonic problems usually appear in the form of a ringing or high pitched squealing that gets worse as the gain or volume is increased thus are more noticeable in the higher gain "HI" modes. Microphonic problems are easily identified because the problem is still present even with the instruments' volume off or unplugged altogether - unlike pick-up feedback which ceases as the instrument is turned down. Microphonic noise is caused by mechanical vibration and shock: think of banging a microphone around and you'll understand where the word came from.
The best way to approach a pre-amp tube problem is to see if it occurs only in one specific mode or channel. This should lead you to the tube needing replacement. Then all that remains is to swap the suspect tube for a known good performer. If you cannot narrow down the trouble to a specific mode or channel, the problem may be the small tube that drives the power tubes which is operational in all modes and channels. Though rare, a problem with the driver tube would show up in all aspects of performance - so if you can't narrow the problem down to being mode or channel specific, you may want to try replacing the driver tube. driver problems generally show themselves in the form of crackling or hum in all modes of performance and/or weak overall output from the amplifier. Occasionally an anemic driver tube will cause the amplifier to sound flat and lifeless, but this is somewhat uncommon, as worn power tubes are a more likely suspect for this type of problem.
Sometimes making the diagnosis is more trouble than it's worth and it's faster and easier to merely replace the small pre-amp tubes ONE AT A TIME with a replacement known to be good. But MAKE SURE you keep returning the tubes to their original socket until you hit the one that cures the problem. You'll notice that tubes located nearer to the INPUT jack always sound noisier...but this is because they are at the start of the chain and their noise gets amplified over and over by the tubes that follow. The tube that goes into this "input socket" (usually labeled V1) needs to be the least noisy of the bunch. The tube that goes at the end of the preamp chain - just ahead of the power tubes - can be quite noisy without causing any problem at all. The tubes in your amp have already been located in the most appropriate sockets and this is why you should NEVER pull them all out at once and ALWAYS swap them one at a time. ALWAYS return a perfectly good tube to its original socket. Also it's a good idea to put the amp on STANDBY when swapping tubes to reduce the heat build up in the tubes themselves and to prevent explosive noises (which can still occur even if you are pulling the tubes away from their sockets gently) from coming through the speaker.
Remember, take your time, be patient and chances are real good that you can fix your amp yourself by finding and replacing the bad tube. It kills us to see someone who has shipped their amp back to us...and all it needed was a simple tube replacement! If you must send back your amp, remove the chassis from the cabinet by unscrewing the four mounting bolts on the bottom top. The chassis then slides back like a drawer and comes out from the back. Remove the big power tubes and mark them according to their location from left to right 1, 2 etc. They need to be wrapped separately with plenty of wadded up newspaper around them and put in a smaller box within the larger carton. Remove the Rectifier tubes and wrap them also. You can leave the preamp tubes in or remove them and wrap them separately being sure to label their location. (See tube Task Chart.)
To wrap the chassis, use plenty of tightly wadded up newspaper so there is at least six inches of "crush space" between the chassis and the cardboard box. Bubble wrap also works well, but please DON'T use styrene peanuts - they will shift during transit and get lodged inside your electronics as well as allowing your amp to end up at the bottom of the box unprotected and possibly damaged.
Pre-amp tubes don't normally wear out as a rule. Therefore, it is not a good idea to change them just for the sake of changing them. If there isn't a problem - don't fix it. If there is no result from your substitutions, it may be possible that you have more than one problematic tube. Though rare, this does happen and though it makes the troubleshooting process a little more intimidating, it is still possible to cure the problem yourself.
NOTE: It is normal to hear a slight metallic ringing sound when tapping on the preamp tubes. As long as the tube does not break into oscillation or start crackling or any other form of bizarre noise, it is considered normal and functional.
TUBE NOISE & MICROPHONICS
You may occasionally experience some form of tube noise or microphonics. Certainly no cause for alarm, this quirky behavior comes with the territory and the tone. Much like changing a light bulb, you don't need a technician to cure these types of minor user serviceable annoyances and in fact, you'll be amazed at how easy it is to cure tube problems...by simply swapping out a pre-amp or power tube!
First may we suggest that you set the amplifier up on something so that you can get to the tubes comfortably without having to bend down. It also helps to have adequate lighting as you will need to see the tube sockets clearly to swap tubes. Use caution and common sense when touching the tubes after the amplifier has been on as they may be extremely hot! If they are hot and you don't want to wait for them to cool off, try grasping them with a rag and also note that the glass down around the bulbous silvery tip is considerably less hot which makes it easier to handle. Gently rock the tube back and forth as you pull it away from its socket.
DIAGNOSING POWER TUBE FAILURE
There are two main types of tube faults: shorts and noise. Both large and small tubes may fall prey to either of these problems but diagnosis and remedy is usually simple.
If a fuse blows, the problem is most likely a shorted power tube and shorts can either be mild or severe. In a mildly shorted tube the electron flow has overcome the control grid and excess current flows to the plate. You will usually hear the amp become distorted and begin to hum slightly. If this occurs, quickly look at the power tubes as you switch the amp to STANDBY and try to identify one as glowing red hot. It is likely that two of a pair will be glowing since the "shorted" tube will pull down the bias for its adjacent mates, but one tube may be glowing hotter — and that one is the culprit. The other two are often fine — unless they've been glowing bright red for several minutes.
Because there is no physical short inside the tube (just electrons rioting out of control) merely switching to STANDBY for a few moments then back to ON will usually cure the problem...at least temporarily. Watch the tubes carefully now. Should the problem recur, the intermittent tube will visibly start to over heat before the others and thus it can be identified. It should be replaced with one from the same color batch, shown on its label. Call us and we will send one out to you.
The severe short is not nearly so benign. In the worst cases, a major arcing short occurs between the plate and the cathode with visible lightning inside the glass and a major noise through the speaker. If this is seen to happen, IMMEDIATELY turn the amp to STANDBY. By this time the fuse probably will have blown. Such a short is usually caused by a physical breakdown inside the tube including contaminate coming loose or physical contact (or near contact) between the elements. Replace it and the fuse with the proper slo-blo type and power up the amp using the power up procedure as we described earlier in this manual.
TUBE NOISE
Often caused by contamination within in a tube, the culprit can usually be identified, and by lightly tapping on the glass, you will probably hear the noise change. Hearing some noise through the speakers while tapping on the 12AX7's is normal however. And the one nearer the INPUT will always sound louder because its output is being further amplified by the second 12AX7.
The power tubes should be all but quiet when they are tapped. If crackling or hissing changes with the tapping, you have probably found the problem. To confirm a noisy power tube, merely put the amplifier on Standby, remove it from its socket and turn it back on. It will cause no damage to run the amplifier briefly with one power tube missing. You may notice a slight background hum, however, as the push-pull becomes unbalanced. Whenever you are trying to diagnose a suspect tube, keep your other hand on the POWER and STANDBY switches ready to shut them off instantly in the unlikely case you provoke a major short.
If you think you've located a problem tube but aren't sure, we recommend substituting the suspect with a new one just to be sure of your diagnoses. You will be doing yourself and us a big favor by just following the simple guidelines previously mentioned regarding tube replacement. You'll probably be successful with much less effort than is required to disconnect everything and haul the unit to a technician who will basically perform the same simple tests. If the tubes are still within their six-month warranty period, we will happily send you a replacement. Just note the color designation on the tube label so that we can send you the appropriate match.
SPEAKER IMPEDANCE MATCHING & HOOK-UP GUIDE
IMPEDANCE
Wiring up speakers to provide the most effective load and making sure that all of them are in phase will help in creating the best sound possible. This is not too difficult, as long as you understand a few things about loading and how to connect your speakers to provide an optimal resistive load.
MESA/Boogie amplifiers can handle 4 and 8 ohms effectively. Never run below 4 ohms in a tube amplifier unless you are absolutely certain that the system can handle it properly; this can cause damage to the output transformer. A few amplifiers can handle 2 ohms effectively without damaging them ( for example the MESA'S bass 400+ ). You can always have a higher resistance ( 16 ohms, for example ) without damaging results, but too low of a resistance will likely cause problems.
MIS-MATCHING
When running a higher resistance ( for example: 8 ohm output into 16 ohm cabinet ), a slightly different feel and response will be eminent. A slight mismatch can provide a darker smoother tone with a little less output and attack. This response is a result of the amplifier running a bit cooler. Sometimes when using more than one cabinet a mismatch will be the only option.
WHAT IS MY CABINETS IMPEDANCE?
If you have only a single speaker, you just match that single speakers impedance to the amplifier, and you are done. In many cases, you will have a number of speakers, and then you must calculate the "load" that the amplifier will need to support. There are generally three ways to wire multiple speakers together. They are as follows:
SERIES
When you wire ( hook-up ) speakers in series, the speakers resistance ( as measured in ohms ) is additive - i.e. putting two 8 ohm speakers in series results in a 16 ohm load.

PARALLEL
When wiring in parallel, the resistance of the speakers decreases. Two 8 ohm speakers wired in ( hooked-up ) Parallel results in a 4 ohm load. It's easy to calculate the effect of a resistive load when all the speakers are all the same resistance. It is really not suggested to wire different resistive load values in Parallel ( 8 and 4, 16 and 8 etc. ) The formula for figuring the total impedance in Parallel is the multiplication of the two loads divided by the sum of the two loads - i.e. putting two 8 ohm speakers in Parallel results in a 4 ohm load. Connect the Positive side of Speaker A to the Positive side of Speaker B - Connect the Negative side of Speaker A to the Negative side of Speaker B.

COMBINATION OF SERIES & PARALLEL
This is really just two sets of series wired speakers connected in Parallel. This is how you maintain a consistent load with multiple speakers. The importance of this is more evident when you have more than one cabinet to connect to your amplifier. This is when you need to figure out the loads and how to wire them up without applying too low of a resistance on the amplifier.
Simply connect the Positive side of Speaker A to the Positive side of Speaker C.
Connect the Negative side of Speaker A to the Positive side of Speaker B. Next, connect the Negative side of Speaker C to the Positive side of Speaker D.
And lastly, connect the Negative side of Speaker B to the Negative side of Speaker D.
4 Eight ( 8 ) Ohm speakers wired in series Parallel = a Total Load of 8 Ohms.

WIRING SCHEMES...Amplifier to Speaker Cabinets


MARK IIC+ TUBE REPLACEMENT DIAGRAM
BEFORE CHANGING TUBES FLIP POWER & STANDBY SWITCH TO OFF

TO MAINTAIN WARRANTY, USE MESA/BOOGIE® TUBES WHEN REPLACEMENT IS NECESSARY FOR CUSTOMER SUPPORT, PLEASE CALL 707-778-6565 MONDAY-THURSDAY 9-5 PST, OR VISIT WWW.MESABOOGIE.COM
FRONT PANEL: MARK IIC+

REAR PANEL: MARK IIC+

SERVICE INFORMATION
- USA /CANADA Customer Support:
For technical support, troubleshooting, tone questions, settings help and more...
Call us at 707-778-6565, Monday-Thursday, 9AM-5PM Pacific time, or email us at service@mesaboogie.com.
![warning]() NOTE: If a Product Specialist is not available when you call (helping other customers), PLEASE leave a voice message with a phone number and a good time to call and WE'LL CALL YOU BACK!
NOTE: If a Product Specialist is not available when you call (helping other customers), PLEASE leave a voice message with a phone number and a good time to call and WE'LL CALL YOU BACK! - INTERNATIONAL Customer Support:
For warranty and technical support, please contact your LOCAL MESA DISTRIBUTOR.
You may use this link to search the web for your local distributor's contact information:
![]()
www.mesaboogie.com/support/

IMPORTANT SAFETY INSTRUCTIONS
- Before attempting to use this apparatus, read and follow these instructions for proper use.
- Keep these instructions.
- Heed all warnings.
- Do not use this apparatus near water.
- Clean only with a dry cloth, do not use any solvent such as benzene, naphtha or paint thinner on apparatus.
- Do not block any ventilation openings. Install in accordance with manufacturer's instructions.
- Do not install near any heat sources such as radiators, heat registers, stoves or other apparatus (including other amplifiers) that produce heat. Avoid placing the apparatus in direct sunlight.
- Do not defeat the safety purpose of the polarized or grounding type plug. A polarized plug has two blades with one wider than the other. A grounding type plug has two blades and a third grounding prong (protective earth connection). The wide blade or third prong is provided for your safety. If the provided does not fit your outlet, consult an electrician for replacement of obsolete outlets.
- Be sure that the amplifier's rated power supply voltage and frequency matches the voltage and frequency of your power source BEFORE connecting amplifier to the power source. The amplifier's rated power supply voltage and frequency are clearly indicated on the back panel near the power inlet, and the power cord's plug should match the power source in your region.
- Protect the power cord from being walked on, pinched, or from excessive stress, particularly at the plug and attachment point of the apparatus.
- Only use attachments and/or accessories specified by the manufacturer.
- Refer all servicing to qualified service personnel. Servicing is required when the apparatus has been damaged in any way, such as the power plug or cord is damaged, liquid has been spilled or objects have fallen into the apparatus, the apparatus has been exposed to rain or moisture, does not operate normally or has been dropped.
- To ensure proper ventilation, ensure that there is a minimum of 4" (10cm) of space at the rear of the apparatus. The ventilation should not be impeded by covering the ventilation openings with items such as newspapers, cloth, tapestries, curtains, etc. Do not impede ventilation by placing objects on top of the apparatus which extend past the rear edge of the cabinet.
- No naked flame sources, such as lighted candles or oil lamps, shall be placed on the apparatus.
- The apparatus shall not be exposed to dripping or splashing, and insure that no objects filled with liquids, such as vases or beverages, are placed on the apparatus.
- The AC plug is the mains disconnect, the plug shall remain accessible after installation.
![]()
To reduce the risk of fire or electric shock, do not expose this apparatus to rain or moisture.![]()
Do not defeat the safety grounding pin on the power cable, it is there for your safety.![]()
Do not open or perform any internal modifications on this apparatus.![]()
Do not attempt to repair the apparatus, or replace parts within it (except where this manual provides specific instructions directing you to do so). Refer all servicing to your retailer, the nearest authorized Mesa Boogie Service Center, or authorized Mesa Boogie distributor in your region.![]()
Always disconnect the apparatus from the power source before changing fuses, tubes or removing the chassis for service. Use only the same type and rating as specified on the back of the apparatus when replacing a fuse.![]()
Disconnect apparatus from the power source during a lightning storm or when unused for long periods of time.![]()
This apparatus is heavy. Insure that the apparatus remains stable after installation.![]()
In areas where children may be present, use additional precautions as needed to protect the children from the hazards presented by the unit. This includes risk of electric shock, burns and toppling over.![]()
This apparatus contains hot components and surfaces. Avoid direct contact with heated tubes and other components. Insure that any factory installed guards remain installed.![]()
void contact with moving fan blades that may be present within the apparatus or cabinet.![]()
tube envelopes are glass and can present a hazard if broken. Always turn apparatus off, disconnect from the power source, and allow to cool before changing tubes.![]()
To avoid damaging your speakers and other equipment, turn off the power of this and all connected equipment before making or changing connections. power apparatus up with the volume levels set to minimum, and slowly increase to desired level.![]()
Always insure that the proper speaker load is connected to the apparatus before operating the apparatus. Failure to do so may cause damage to the apparatus.![]()
Do not use excessive force when handling cords, jacks, buttons, switches and controls. Never unplug the apparatus from the power source by pulling on the wire, use the plug body.![]()
This apparatus, in combination with speakers and/or headphones, may be capable of producing sound levels that could cause permanent hearing loss. Do not operate for a long period of time at high levels, or at a level that is uncomfortable, without hearing protection. If you experience any hearing loss or ringing in the ears, you should immediately stop using the apparatus and consult an audiologist.


Documents / Resources
References
Download manual
Here you can download full pdf version of manual, it may contain additional safety instructions, warranty information, FCC rules, etc.
Advertisement


Need help?
Do you have a question about the MARK IIC+ and is the answer not in the manual?
Questions and answers