Mesa/Boogie MARK 5 THIRTY-FIVE Owner's Manual
Hide thumbs
Also See for MARK 5 THIRTY-FIVE:
- Owner's manual (52 pages) ,
- Operating instructions manual (24 pages) ,
- Owner operating instructions (11 pages)
Table of Contents
Advertisement
Advertisement
Table of Contents

Subscribe to Our Youtube Channel
Related Manuals for Mesa/Boogie MARK 5 THIRTY-FIVE


Summary of Contents for Mesa/Boogie MARK 5 THIRTY-FIVE
- Page 1 THIRTY-FIVE ™ Owner’s Manual...
- Page 2 There are far too many circuits and sounds to think of it as merely an amp... it’s a living history of MESA/Boogie! From the groundbreaking MARK I that introduced the world to high-gain with it’s cascading preamp, to the Mark II, the world’s first high gain Dual Mode Channel Switching amplifier (and it’s later siblings that introduced Simul-Class™...
-
Page 3: Table Of Contents
THIRTY-FIVE ™ Table of Contents PRECAUTIONS OVERVIEW ____________________________________________________________________________________ 1-7 GETTING STARTED _____________________________________________________________________________ 7-8 HELPFUL HINTS _______________________________________________________________________________ 8-9 FRONT PANEL THE CHANNELS: MODE BY MODE ______________________________________________________________ 10-11 THE MODES IN DEPTH: CHANNEL 1 _____________________________________________________________ 12-13 THE MODES IN DEPTH: CHANNEL 2 _____________________________________________________________ 14-17 THE CONTROLS INPUT, CH SELECT, GAIN ______________________________________________________________________ 18-19 TREBLE ______________________________________________________________________________________ 19... -
Page 4: Important Safety Instructions
Make certain grounding conforms with local standards. YOUR AMPLIFIER IS LOUD! EXPOSURE TO HIGH SOUND VOLUMES MAY CAUSE PERMANENT HEARING DAMAGE! Your Mesa/Boogie Amplifier is a professional instrument. Please treat it with respect and operate it properly. READ AND FOLLOW INSTRUCTIONS OF PROPER USAGE. -
Page 5: Overview
THIRTY-FIVE ™ Operating Instructions Overview: NOTE: This section appears on our website. Feel free to skip this section and go straight to “GETTING STARTED” if you have read it there or don’t need a global overview of the amplifier. Following a 35 year tradition of 4xEL84 based power with successful models such as the Caliber™, Maverick™, Nomad™ and Lone Star™, we’re proud to add the legendary and first-ever MARK preamp to the 9-Pin power lineup and include the MARK FIVE™: 35. - Page 6 a looser feel and enhanced power clip expression. To further bolster its stage-ready resume, we’ve added a Channel Independent SOLO™ Feature, a long-spring tank for the all-tube Reverb, the complete set of Voicing Choices from our CabClone™ with the addition of the VINTAGE voicing mode to its on-board DI Output and an upgraded Footswitch for access to the new footswitchable choices.
- Page 7 What was a switchable On/Off Gain Boost feature on the original MARK I appears here (and on the Carlos Tribute KING SNAKE) as an adjustable MID/BOOST found on the MID Control. From 0 to 5.0 on the MID/BOOST you will find the normal range of a standard MID control in a condensed form.
- Page 8 harmonics and even more urgent attack than its cousin upstairs, the IIC+ Mode. This hyper reactive voice jumps at the first hint of pick attack and roars with aggression. It’s further antagonized by the similar response of the EL84 power tubes here in the FIVE: 35 with their fast attack, higher mid frequency and relative lack of sub-low bottom end.
- Page 9 used in our Mini Rectifier Twenty-Five and has the ability to enhance many styles. It’s the perfect fit for the 6 versatile preamp Modes in this MARK rendering as well. The 10 Watt setting is great for lower volume practicing, rehearsing and recording and allows more use of the power section as a gain source, enabling you to reduce the preamp’s GAIN Control settings and explore the old school approach to achieving tube overdrive...
- Page 10 Overview: Rear Panel The first feature of note starting at the far left is the Series, Fully Buffered, FX LOOP. This is the interface point for outboard processing and it provides a junction between the preamp and power section. The LOOP performs well with both Rack and Pedal type outboard gear with the obvious exceptions being those effects that work better on the INPUT of an amplifier (Wah, Compression, Gain and Overdrive Pedals, Envelope Filters, etc.).
-
Page 11: Getting Started
NOTE: When using the SPKR ON position, make SURE you have a working speaker connected to one of the SPEAKER OUTPUTS. Failure to do so may result in damage to your amplifier that is not covered under Warranty. Using the amplifier in the SPKR ON position without a speaker or external load (resistor, soak, etc) will likely cause damage to your output transformer and render your amplifier inoperative. -
Page 12: Helpful Hints
SAMPLE SETTINGS Below are a couple of different ways to set up the two Channels for Channel Switching sound (Mode) choices. Remember, there are countless ways to set up the Channels and after reading the rest of this Operating Guide, you will be well equipped to dedicate the Channels to your footswitchable needs quickly and effortlessly. - Page 13 • The Front Panel CHANNEL SELECT mini toggle (located between the two Mode switches at the left of the Front Panel) must be set to the CENTER FS position for the Footswitch to select the Channels. • The GAIN and TREBLE Controls are the most powerful tone shaping controls in each Channel and should be used with taste. They determine much about the attack characteristic and the overall personality of the sound in all the Modes.
-
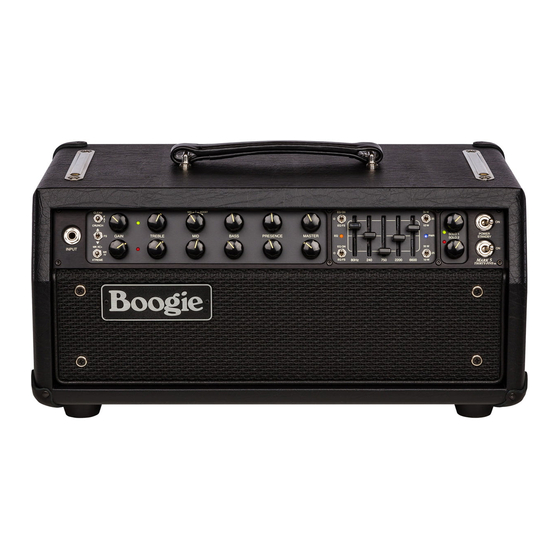
Page 14: Front Panel
FRONT PANEL BOOST EQ ON 35 W CLEAN CRUNCH EQ FS 10 W SOLO 1 POWER GAIN TREBLE BASS PRESENCE MASTER SOLO 2 STANDBY MK IIC+ EQ ON 35 W INPUT XTREME EQ FS 80Hz 2200 6600 10 W THIRTY-FIVE ™... - Page 15 CHANNEL 2 This Channel is the higher gain channel of the MARK FIVE: 35 and is dedicated to creating the best saturated gain sounds from our fabled MARK II-C+ and our MARK IV. Though the entire channel is aimed at high gain sounds, many expressive and dynamic medium to low-gain sounds can also be found here with the GAIN control set lower (below 11:00).
-
Page 16: The Modes In Depth: Channel 1
THE MODES IN DEPTH: CHANNEL 1 CLEAN As discussed in the previous section, this is the lowest gain of the three Channels in the MARK FIVE: 35 and will cover all your “more-stripped”, brighter needs for clean rhythm and solo styles as well as slightly driven chording sounds. As with the Modes in each of these two MARK Channels, we start with the slimmer, tighter voice of CLEAN, move up the girth scale to FAT, and finally to the higher gain, mid-saturated architecture of CRUNCH... - Page 17 FAT works great for chording and rhythmic work, but in contrast to the CLEAN Mode, FAT sings with a huge, lush voice that fills-in a mix and casts a halo of harmonic richness around the entire instrument. The sonic footprint is much wider than CLEAN and can carry a part such that it becomes the backbone of a song without any processing.
-
Page 18: The Modes In Depth: Channel 2
The MODES IN DEPTH: CHANNEL 2 Channel 2 in the MARK FIVE: 35, taken directly from the MARK FIVE’s Channel 3, is a tribute to the entire line of MARK series Channel Switching amplifiers and contains three circuits from the pinnacle of that architecture. The two most sought after of these, the MARK II-C+ and the MARK IV, provided both the starting points and ultimate reference for this collection of Modes. - Page 19 Hints For The Best Results With The MK IIC+ Mode • Use the Graphic EQ if you need extreme low end with high GAIN settings - this comes later in the circuit and will have less tendency to get loose and tubby than that of the rotary BASS control. •...
- Page 20 path at a point earlier in the preamp to get the job done correctly. This “early bass” gets amplified over and over until it turns to flub, where as the Graphic EQ comes at the end of the signal chain and adds low end to the “finished preamp sound”. IMPORTANT! A Few Words On Pickups Pickups are a huge factor and ingredient in the overall character of your Tone.
- Page 21 XTREME The last Mode in Channel 2 is named appropriately and is all about more! More gain, more attack, more punishing mids, more tight, huge lows and as you have probably discovered by now, more output volume. Though it’s one letter short of its forbearers’ name, it performs here in the MARK FIVE: 35 with equal fury and is by far the most radical of this amp’s Modes.
-
Page 22: The Controls
THE CONTROLS INPUT This ¼ inch jack is the INPUT to the preamp. Connect your Instrument here using a good quality, shielded cable (grounded) of preferably no more than 12–15 feet in length. Longer cables may compromise the sound and roll off top end due to increased capacitance. -
Page 23: Treble
The Channel 2 Modes offer up their most iconic, focused and detailed sounds in this middle zone. As these sounds are all higher gain than their Channel 1 counterparts, the best dynamic response and attack characteristics are at the lower end of this range. As you approach 2:00 there will be plenty of saturation to keep chords grinding and single notes hanging and you will start noticing increas- ing compression of the sound. -
Page 24: Mid/Boost: Channel 1
Back then everyone was so mesmerized by the newfound gain available, this trade-off seemed a small price to pay for SUSTAIN! But Here at MESA/Boogie, Tone never sleeps, so we’ve endowed this MARK model with an adjustable BOOST found here on the upper half of the MID control! It doesn’t completely solve these issues, but it does provide a middle region previously unavailable that allows incrementally added gain WITH incrementally decreasing Tone-shaping power in the Tone control string. -
Page 25: Bass
The middle region (11:00–1:00) is where the punch and attack begin to come on with more urgency and this is where mahogany guitars really like to see the MID set for adding the cut and definition. Here the high mid and lower top end begins to creep into the mix of the MID controls’... -
Page 26: Master
You can think of the PRESENCE as a control that allows you to either clamp the power amp down, compressing it and darkening things, or open it up and let the full spectrum of upper harmonics come blazing through. It also has a great deal to do with how dynamic the signal is and how a sound will cut through the mix in an ensemble environment. -
Page 27: 5-Band Graphic
The MASTER here in the FIVE: 35 is really nothing more than a variable resistor that offers an infinite range of settings possibilities and makes the amplifier many times more versatile with no sonic penalty. If you prescribe to this old school approach, then by all means, use the MASTER that way…... -
Page 28: Multi-Watt™ Power
Each Channel is fitted with a mini-toggle just to the left of the SLIDERS to select the operational status of the 5-Band Graphic EQ and the FIVE: 35 gives you two ways to utilize its shaping power. In each Channel you can decide which of three ways you want to apply the EQ: EQ ON 35 W EQ ON (toggle up) - EQ ACTIVE all the time in that Channel... -
Page 29: Power
where the 35 WATT setting would still be clean and have ample headroom. 25 WATTS offers that perfect window… easy to push into clip and loud, but not too loud… powerful enough to play with a drummer, but not so powerful that you’re melting eardrums in the front row. -
Page 30: Rear Panel
BOOST EQ ON 35 W CLEAN CRUNCH EQ FS 10 W SOLO 1 POWER GAIN TREBLE BASS PRESENCE MASTER SOLO 2 STANDBY REAR PANEL MK IIC+ EQ ON 35 W INPUT XTREME EQ FS 80Hz 2200 6600 10 W THIRTY-FIVE ™... -
Page 31: Headphone
To connect your outboard processor(s) to the FX Loop: 1. Connect the SEND jack on the MARK FIVE: 35 Rear Panel to your processor’s INPUT using a high quality shielded cable of the shortest possible length. 2. Connect the RETURN jack of the MARK FIVE: 35 to your (last) processor’s OUTPUT also using a high quality shielded cable of the shortest possible length. -
Page 32: Reverb
Two 4 Ohm and one 8 Ohm SPEAKER Outputs are provided for interfacing the MARK FIVE: 35 to your cabinet of EQ ON 35 W choice. Most MESA/Boogie cabinets are built wired Standard to 8 Ohms unless Custom Ordered (or modified by an outside party, EQ FS 80Hz... -
Page 33: Cabclone™ D.i
later in this manual regarding speaker impedance and speaker hook-up schemes. No matter how unusual your speaker setup, it is usually possible to get optimum, safe performance through various speaker wiring techniques. NOTE: We prefer an 8 Ohm Cabinet (Impedance) Load whenever possible and feel it provides the optimum impedance matching and delivers the best performance. - Page 34 ing SPKR ON defeats the internal Load and connects the signal to the SPEAKER Outputs. DO NOT USE THE AMPLIFIER IN THE SPKR ON SWITCH POSITION WITHOUT A CABINET (LOAD) CONNECTED! Damage to the amplifier will likely occur and is not covered under the Warranty! NOTE: REMINDER! If you have everything ON...
- Page 35 TONE and enable you to roam wherever you feel inclined stylistically with confidence. From all of us here at MESA/Boogie, welcome to the Family and we wish you many years of inspiration and enjoyment from your...
- Page 36 NOTES PAGE 32...
-
Page 37: Factory Sample Settings
FACTORY SAMPLE SETTINGS FAT CLEAN / II-C+ LEAD BOOST EQ ON 35 W CLEAN CRUNCH EQ FS 10 W EQ OPTIONAL GAIN TREBLE BASS PRESENCE MASTER MK IIC+ EQ ON 35 W INPUT 80Hz 2200 6600 XTREME EQ FS 10 W TIGHT CLIPPED / II-C+ BLUES LEAD BOOST EQ ON... - Page 38 FACTORY SAMPLE SETTINGS II-C+ CLEAN / II-C+ SOARING LEAD BOOST EQ ON 35 W CLEAN CRUNCH EQ FS 10 W EQ OPTIONAL GAIN TREBLE BASS PRESENCE MASTER MK IIC+ EQ ON 35 W INPUT 80Hz 2200 6600 XTREME EQ FS 10 W CRUNCH SOLO / MARK IV TIGHT RHYTHM BOOST...
- Page 39 FACTORY SAMPLE SETTINGS CRUNCH MODE BLUES / II-C+ LOW SOLO BOOST CLEAN EQ ON 35 W CRUNCH EQ FS 10 W EQ OPTIONAL GAIN TREBLE BASS PRESENCE MASTER 35 W MK IIC+ EQ ON INPUT XTREME EQ FS 80Hz 2200 6600 10 W LITTLE AMP...
-
Page 40: User Settings
USER SETTINGS BOOST EQ ON 35 W CLEAN CRUNCH EQ FS 10 W SOLO 1 GAIN TREBLE BASS PRESENCE MASTER SOLO 2 35 W MK IIC+ EQ ON XTREME EQ FS 80Hz 2200 6600 10 W BOOST EQ ON 35 W CLEAN CRUNCH EQ FS... - Page 41 USER SETTINGS BOOST EQ ON 35 W CLEAN CRUNCH EQ FS 10 W SOLO 1 GAIN TREBLE BASS PRESENCE MASTER SOLO 2 35 W MK IIC+ EQ ON XTREME EQ FS 80Hz 2200 6600 10 W CLEAN BOOST EQ ON 35 W CRUNCH EQ FS...
-
Page 42: Tube Trouble Shooting Guide
TUBE NOISE & MICROPHONICS: You may occasionally experience some form of tube noise or microphonics. Certainly no cause for alarm, this quirky behavior comes with the territory and the Tone. Much like changing a light bulb, you don’t need a technician to cure these types of minor user serviceable annoyances and in fact, you’ll be amazed at how easy it is to cure tube problems...by simply swapping out a pre-amp or power tube! First may we suggest that you set the amplifier up on something so that you can get to the tubes comfortably without having to bend... -
Page 43: Speaker Hookup Guide
DIAGNOSING PRE-AMP TUBE PROBLEMS: Because your amplifier is an all tube design, it is quite possible that you will at some point experience minor pre-amp tube noise. Rest assured - this is no cause for alarm and you can take care of the problem yourself in a matter of minutes by simply swapping tubes. - Page 44 MESA/Boogie amplifiers can handle 4 and 8 ohms effectively. Never run below 4 ohms in a tube amplifier unless you are absolutely certain that the system can handle it properly; this can cause damage to the Output transformer. A few amplifiers can handle 2 ohms effectively without damaging them ( for example the MESA’S Bass 400+ ).
- Page 45 SPEAKER IMPEDANCE MATCHING & HOOK-UP GUIDE: (Continued) PARALLEL: When wiring in parallel, the resistance of the speakers decreases. Two 8 ohm speakers wired in ( hooked-up ) Parallel results in a 4 ohm load. It’s easy to calculate the effect of a resistive load when all the speakers are all the same resistance. It is really not suggested to wire different resistive load values in Parallel ( 8 and 4, 16 and 8 etc.
- Page 46 WIRING SCHEMES...Amplifier to Speaker Cabinets Partial back view of amplifier Partial back view of amplifier 8 OHM 4 OHM 4 OHM 8 OHM 4 OHM 4 OHM 8 Ohm Cabinet Partial back view of some Mesa amp 8 OHM 4 OHM 4 OHM 4 Ohm Cabinet 8 Ohm Cabinet...
- Page 47 WIRING SCHEMES...Amplifier to Speaker Cabinets Partial back view of amplifier Partial back view of amplifier 4 OHM 4 OHM 8 OHM 8 OHM 4 OHM 4 OHM 8 Ohm Cabinet 8 Ohm Cabinet 16 Ohm Cabinet 8 Ohm Cabinet SAFE MISMATCH CORRECT MATCH Partial back view of amplifier Partial back view of amplifier...
- Page 48 WIRING SCHEMES...Amplifier to Speaker Cabinets Partial back view of amplifier 16 Ohm 4 OHM 4 OHM 8 OHM SERIES BOX 8 Ohm 8 Ohm 8 Ohm Cabinet 8 Ohm Cabinet 8 Ohm Cabinet SAFE MISMATCH Partial back view of amp Partial back view of amplifier CORRECT MATCH 8 OHM...
- Page 49 WIRING SCHEMES...Amplifier to Speaker Cabinets Partial back view of amplifier 16 Ohm 4 OHM 4 OHM 8 OHM SERIES BOX 8 Ohm 8 Ohm 8 Ohm Cabinet 8 Ohm Cabinet 16 Ohm Cabinet SAFE MISMATCH Partial back view of amplifier 8 OHM 4 OHM 4 OHM...
-
Page 50: Tube Task Chart
PAGE 46... -
Page 51: Parts List
PAGE 47... - Page 54 15/11/04...
Need help?
Do you have a question about the MARK 5 THIRTY-FIVE and is the answer not in the manual?
Questions and answers