Table of Contents
Advertisement
Quick Links
Advertisement
Table of Contents

Related Manuals for Mesa/Boogie MARK IIC+


Summary of Contents for Mesa/Boogie MARK IIC+
- Page 1 MARK IIC + Owner’s Manual...
- Page 2 Hello from the Home of Tone! Congratulations on your choice of the MARK IIC+, and welcome to the MESA/Boogie® Family! The instrument you’ve selected has a deep heritage that combines the best attributes of vintage tube amplification with pioneering innovation. The bloodline of this iconic circuit traces back to our MARK I™...
-
Page 3: Table Of Contents
MARK IIC + Table of Contents CONTENTS IMPORTANT SAFETY INSTRUCTIONS ��������������������������������������������� 1 PRODUCT COMPLIANCE INFORMATION ������������������������������������������� 2 Overview �������������������������������������������������������������������� 3 Helpful Hints ����������������������������������������������������������������� 4 FRONT PANEL ��������������������������������������������������������������� 10 VOLUME 1 ���������������������������������������������������������������� 10 VOLUME 1 / PULL BRIGHT ����������������������������������������������������� 11 TREBLE ������������������������������������������������������������������ 12 TREBLE / PULL SHIFT ... -
Page 4: Important Safety Instructions
IMPORTANT SAFETY INSTRUCTIONS Before attempting to use this apparatus, read and follow these instructions for proper use. Keep these instructions. Heed all warnings. Do not use this apparatus near water. Clean only with a dry cloth, do not use any solvent such as benzene, naphtha or paint thinner on apparatus. Do not block any ventilation openings. -
Page 5: Product Compliance Information
PRODUCT COMPLIANCE INFORMATION Suppliers Declaration of Conformity for MARK IIC+ Responsible Party Gibson 209 10th Ave S Ste 205, Nashville, TN 37203 United States Telephone: + 1 615 933 6000 PAGE 2... -
Page 6: Overview
IIC+ will be as happy, perhaps even happier, than those paying many times more for one of the less than 3,000 original Mark IIC+s built in 1984 and early ’85. The fact that this rendition can be had for far less than the current price of an original C+ with their components now either 40 years old or no longer original due to potential servicing performed over the years, makes this re-creation a sound choice. -
Page 7: Helpful Hints
Another attribute of this new build is that it benefits from the 40 years of discoveries made since the original IIC+s were produced. Some of our most treasured secrets unearthed through the years and now employed on every amp we build, weren’t discovered until after the C+ was retired and superseded by the Mark III. These secrets range across the entire amplifier and include both preamp and power section discoveries...Tone tricks and constructional techniques we’ve confirmed time and again in our R&D, including in our latest Mark VII, and they are all included in this IIC+ redux. - Page 8 • FOOTSWITCH! To use the MESA Footswitch to access your Modes, the LEAD DRIVE’s Mode Select pull switch must be pushed in/in the Rhythm position. Pulling the LEAD DRIVE control OUT defeats the Footswitch. The Red LED on the Footswitch will be dark/off when the Rhythm mode is active and come on/illuminate when the LEAD Mode is selected.
- Page 9 Buffers are small, affordable devices readily available through many reputable companies, including MESA/Boogie. Your Tone will be well-served if you employ one to mitigate any loss incurred by the addition of your front- end processors and subsequent cabling.
- Page 10 selling the processor and trying it in the Loop of your amplifier to determine whether it’s a good match. With short to reasonable-length cables, you should hear very little difference once the Input (and possibly Output levels as well) on the processor are set to achieve unity gain (same gain level/no volume difference with cables inserted and removed from the Effects Loop’s SEND and RETURN jacks).
- Page 11 your sound, and perhaps require something that the “physical” impact and dimension of different cabinetry can achieve for you. • Less Can Be More! When it comes to the VOLUME 1, LEAD DRIVE, and TONE controls, restraint can be your friend and your key to great Tone. Your amplifier was designed to deliver great performance across a wide range of settings and musical styles and much of that performance can be found in the median ranges of the controls.
- Page 12 Bands. This will keep some sense of reality in the mix. Give your ears and brain time to adjust to the natural midrange content the amplifier has when not heavily manipulated with the Graphic EQ before passing judgment on or passing by viable less-EQ’d sounds. This is true for all frequencies;...
-
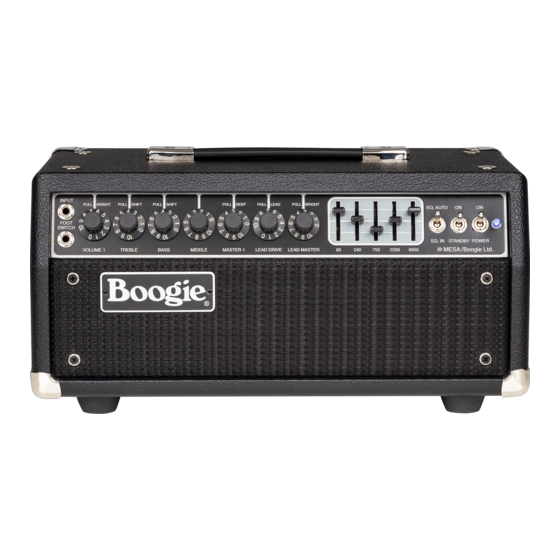
Page 13: Front Panel
NOTE: The LEAD DRIVE pull switch overrides the Footswitch when pulled out, and the Lead Mode will be selected/active. FUSE Replacement The Mains Fuse is there to help protect your amplifier from spikes or power surges in the AC Line, faulty or arcing power tube issues, and other forms of duress your amplifier might encounter. -
Page 14: Volume 1 / Pull Bright
the Clean Mode’s character and sound in this way, using VOLUME 1 to find the perfect amount of headroom, clarity, and brightness, all of which ultimately equate to dynamic accuracy. Above 5.5 on VOLUME 1, you will begin to feel the tube saturation making the sound warmer, fuller, and darker and feel slower. When you DO need to footswitch between a Clean and Lead Mode sound, you will need to experiment with your guitar settings and pickup selections as well as your touch (for dynamic content) to determine the compromise “sweet spot”... -
Page 15: Treble
case, you will be getting mostly the highest region of harmonics layered into the sound via the PULL BRIGHT on VOLUME 1. This works out well, as it allows for beautiful shimmering clean sounds in the RHYTHM Mode and at the same time and setting, a nice halo of harmonic content in the LEAD Mode that adds dimension and a soaring quality to produce supremely musical overdrive. -
Page 16: Bass
more traditional sounds where you want your guitar’s true character to shine through intact, the SHIFT may be too forward in the wrong places and not open enough higher up where you need the sparkle and “air” to provide the highest level of nuance and detail. For traditional sounds or any time where the guitar’s natural character is important, we suggest using the non-SHIFT (pushed-in) TREBLE mode to allow the natural (higher) harmonics to come through unaltered. -
Page 17: Bass / Pull Shift
and taste to ensure uninterrupted performance. BASS / PULL SHIFT As described in the BASS control, this PULL switch engages a boost in sub-low-end frequencies. The BASS SHIFT affects both Rhythm and Lead Modes. Its main application is to add breathy low end (sub-low air) to lower gain clean sounds in the Rhythm Mode. -
Page 18: Master / Pull Deep
the LEAD MASTER control to set the level of the Lead Mode. Turning the MASTER control up or down will raise or lower the overall volume level of both Modes. Another way to think of it is that the LEAD MASTER controls only the Volume of the Lead Mode relative to the Clean Mode’s MASTER setting, which is your basis for overall volume. - Page 19 not overshadowing it with a power section that’s running wide open and imparting its own often overpowering character), and choose the playing volume/loudness that best suits your music and environment. The Lead Drive, though a separate downstream control for the Lead Mode, is dependent on the setting of the initial Input stage gain derived from the setting of the VOLUME 1 control.
-
Page 20: Lead Master
part of and more symbiotic with your instrument as the nuances emerge, and it will actually inspire you to “dig deeper” emotionally. As you learn to utilize its characteristics and strengths it will invite a call-and-response relationship and catapult your playing to the emotional places singers do with their unique voices and traits... instead of simply covering them up with gain and leveling out all the emotional peaks and valleys, much like too much compression can do to a singer in a studio environment. -
Page 21: Lead Master / Pull Bright
LEAD MASTER / PULL BRIGHT Much like the PULL BRIGHT on VOLUME 1, this pull switch fitted to the LEAD MASTER control engages a Bright circuit that accentuates the upper harmonic region in the Lead Mode. Similar to VOLUME 1’s BRIGHT, this Bright circuit is more active (apparent) in the lower range of the LEAD MASTER’s sweep and less effective as the LEAD MASTER is increased toward its upper range. -
Page 22: Engaging The 5-Band Eq
For Crunch Rhythm sounds in the Lead Mode, the added wideness and low-end “chug,” top-end “grind,” and high harmonics spread in the classic “V Curve” allows for 4x12-like performance out of cabinets much smaller and with fewer speakers. It can even help open-back combos sound giant and menacing! The “V Curve” applied to our cascading gain is a signature sound etched in rock for so many recording artists from the 70s when we first introduced it, through the 80s and 90s when high gain ruled the airwaves, and on through today –... - Page 23 750 Hz is probably the most sonically powerful band of the Graphic EQ’s five bands. Not so much in its potential to cut toward the imbalanced or boost toward the unpleasant like the top of the 2200’s range, but rather more in a musically active sense.
- Page 24 can result in either too dark or too bright a sound, from muffled and choked to sizzling and thin, so you want to apply it with taste and musical sensibility. The most common application where the 6600 kHz slider is boosted is seen in heavy rock and metal sounds for the fabled “V”...
-
Page 25: Power
pull its paired counterpart out of bias and cause it to “run away” as well. Regardless, flip the STANDBY to OFF. Get an “OV-Glove” or similar method of hand protection (leather gloves, a rag, etc.) to grab the hot tube with! Do NOT use your bare skin as the tubes will be very HOT! Push up the spring steel Tube Clamp(s) and gently rock the faulty tube back and forth slightly while pulling it down and out of its socket. -
Page 26: Rear Panel
REAR PANEL WARNING: Unplug power before replacing SIMUL- fuse or removing bolts mounting chassis. CLASS VOLTAGE POWER FUSE MARK IIC + 120 V~ 4A SLO 100V~ 60Hz BLOW 120V~ EFFECTS 8 OHM 4 OHM 4 OHM SLAVE 220V~ POWER FUSE HAND-WIRED IN 100 V~ T4AL/... -
Page 27: Effects Loop
used for the “wet channels.” NOTE: The SLAVE Output provides a signal that is a combination of sound from both the preamp and power amp; however it does NOT contain the shaping (sharp roll-off of top end and complex EQ-ing) the speaker imparts on the sound. -
Page 28: Presence
To connect your Processors via the Effects Loop: 1. Connect the SEND to your processor’s INPUT. 2. Connect the RETURN to your processor’s OUTPUT. NOTE: If your processor has Stereo OUTPUTS – or is Stereo IN and OUT ¬– connect the Mono Inputs of the processor to the IIC+’s Loop’s SEND and RETURN. -
Page 29: Reverb
the track or ensemble mix it is sitting in as well as your guitar and the pickups therein. As mentioned before, along with the PRESENCE, the top end can be swapped around by utilizing the differing frequencies found in the TREBLE and even upper range of the MID control that carries a fair amount of high mid/low treble region cut. -
Page 30: Simul-Class/Class A (Output Power)
also will be a proper impedance match and allow the maximum power and headroom. One 4 Ohm cabinet (such as a 2x12 using 8 Ohm speakers wired in parallel) should be connected to one of the two 4 OHM SPEAKER Outputs. A 2x12 with 8 Ohm speakers wired in series –... - Page 31 40 years. It is a dynamic and powerfully emotive amplifier that truly is a musical instrument and a perfect platform for your expression...one we hope will propel you and your playing to new heights and keep inviting you to explore new musical frontiers. From all of us at MESA/Boogie, Congratulations, Cheers, and Welcome to the Family! PAGE 28...
-
Page 32: Factory Sample Settings
FACTORY SAMPLE SETTINGS OPTIMIZED FOR: CLEAN ORANGE = KNOB PULLED INPUT PULL BRIGHT PULL SHIFT PULL SHIFT PULL DEEP PULL LEAD PULL BRIGHT EQ. AUTO FOOT SWITCH EQ. IN STANDBY POWER ® MESA / Boogie Ltd. VOLUME 1 TREBLE BASS MIDDLE MASTER 1 LEAD DRIVE... - Page 33 FACTORY SAMPLE SETTINGS BLUES ORANGE = KNOB PULLED INPUT PULL BRIGHT PULL SHIFT PULL SHIFT PULL DEEP PULL LEAD PULL BRIGHT EQ. AUTO FOOT SWITCH EQ. IN STANDBY POWER ® MESA / Boogie Ltd. VOLUME 1 TREBLE BASS MIDDLE MASTER 1 LEAD DRIVE LEAD MASTER 2200...
-
Page 34: User Settings
USER SETTINGS INPUT PULL BRIGHT PULL SHIFT PULL SHIFT PULL DEEP PULL LEAD PULL BRIGHT EQ. AUTO FOOT SWITCH EQ. IN STANDBY POWER ® MESA / Boogie Ltd. VOLUME 1 TREBLE BASS MIDDLE MASTER 1 LEAD DRIVE LEAD MASTER 2200 6600 WARNING: Unplug power before replacing SIMUL-... -
Page 35: Diagnosing Pre-Amp Tube Problems
DIAGNOSING PRE-AMP TUBE PROBLEMS Because your amplifier is an all tube design, it is quite possible that you will at some point experience minor pre-amp tube noise. Rest assured - this is no cause for alarm and you can take care of the problem yourself in a matter of minutes by simply swapping tubes. - Page 36 Pre-amp tubes don’t normally wear out as a rule. Therefore, it is not a good idea to change them just for the sake of changing them. If there isn’t a problem - don’t fix it. If there is no result from your substitutions, it may be possible that you have more than one problematic tube.
-
Page 37: Speaker Impedance Matching & Hook-Up Guide
MESA/Boogie amplifiers can handle 4 and 8 ohms effectively. Never run below 4 ohms in a tube amplifier unless you are absolutely certain that the system can handle it properly; this can cause damage to the output transformer. - Page 38 SERIES When you wire ( hook-up ) speakers in series, the speakers resistance ( as measured in ohms ) is additive - i.e. putting two 8 ohm speakers in series results in a 16 ohm load. NEGATIVE = POSITIVE = Speaker A = 8 Ohms Speaker B = 8 Ohms SERIES:...
- Page 39 COMBINATION OF SERIES & PARALLEL This is really just two sets of series wired speakers connected in Parallel. This is how you maintain a consistent load with multiple speakers. The importance of this is more evident when you have more than one cabinet to connect to your amplifier.
- Page 40 WIRING SCHEMES...Amplifier to Speaker Cabinets SPEAKERS SPEAKERS 8 OHM 4 OHM 4 OHM 8 OHM 4 OHM 4 OHM 8 Ohm Cabinet 4 Ohm Cabinet SPEAKERS SPEAKERS 8 OHM 4 OHM 4 OHM 8 OHM 4 OHM 4 OHM 8 Ohm Cabinet 16 Ohm Cabinet SAFE MISMATCH SAFE MISMATCH...
- Page 41 WIRING SCHEMES...Amplifier to Speaker Cabinets SPEAKERS 8 OHM 4 OHM 4 OHM 8 Ohm Cabinet 8 Ohm Cabinet PAGE 38...
-
Page 42: Tube Guide
PAGE 39... -
Page 43: Parts List
PAGE 40... -
Page 44: Service Information
MARK IIC + SERVICE INFORMATION USA /CANADA Customer Support: • For technical support, troubleshooting, tone questions, settings help and more... Call us at 707-778-6565, Monday-Thursday, 9AM-5PM Pacific time, or email us at service@mesaboogie.com. NOTE: If a Product Specialist is not available when you call (helping other customers), PLEASE leave a voice message with a phone number and a good time to call and WE’LL CALL YOU BACK! INTERNATIONAL Customer Support: •... - Page 45 Thank you for trusting MESA/Boogie® to be your amplifier company and we wish you many years of toneful enjoyment from this handcrafted instrument.
- Page 46 Scan to download Mesa/Boogie product manuals in additional languages. Or, visit www.mesaboogie.com/manuals 1317 Ross Street, Petaluma, CA 94954 USA • (707) 778-6565 • www.mesaboogie.com 24/11/27...
Need help?
Do you have a question about the MARK IIC+ and is the answer not in the manual?
Questions and answers