Pari BOY Classic, LC SPRINT, 130, 023, 041 Manual
- Instructions for use manual (312 pages) ,
- User manual (2 pages) ,
- Instructions for use manual (44 pages)
Advertisement
IMPORTANT INFORMATION
Intended purpose
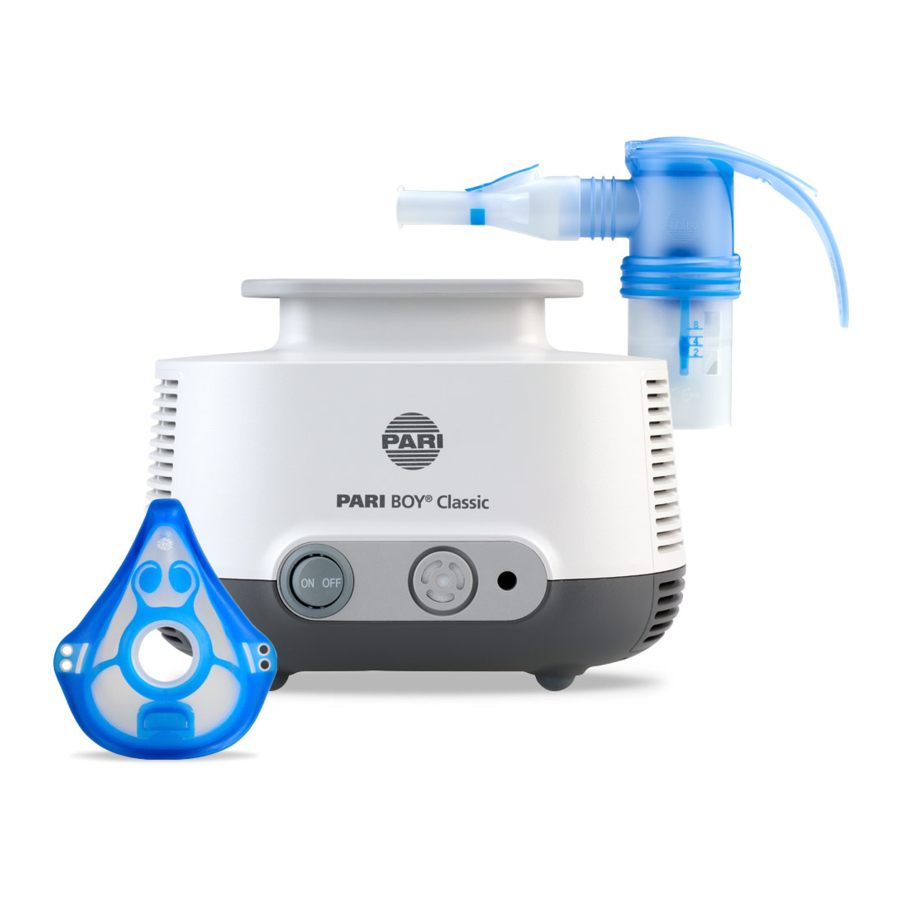
The PARI inhalation system consists of a PARI compressor, a PARI nebuliser and PARI accessories. The system is used to treat the lower airways.
This product can be used in a home environment, as well as in professional health institutions. Aside from the compressor, if used in a home environment, the product components may only be used by a single patient (no patient change). In a professional environment, the device can be used with different patients as long as the corresponding hygiene reprocessing measures are complied with.
This product must be used only by individuals who understand the contents of the instructions for use and are able to use the product safely.
Individuals in the following groups must be supervised by a person who is responsible for their safety:
- Babies, infants, and children
- Individuals with limited capabilities (e.g. physical, mental, sensory)
If the patient is not able to use this product safely on their own, then the treatment must be carried out by the responsible person.
This PARI product is suitable only for patients who are able to breathe by themselves and are conscious.
The frequency and duration of use is determined by professional medical staff [1]according to the individual needs of the patient.
Compressor
The purpose of the PARI compressor is to generate compressed air for operating a PARI nebuliser.
The PARI compressor must be used only for PARI nebulisers. It can be operated by the patient themselves and must only be used indoors.
Nebuliser
The PARI LC SPRINT nebuliser generates an aerosol[2] for inhalation for the therapy of the lower airways.
Together with a PARI compressor or the PARI CENTRAL and with PARI accessories, the nebuliser forms an inhalation system.
The nebuliser is suitable for use in treating patients in all age groups.
Only solutions and suspensions that are approved for use in nebuliser treatment may be used.
The nebuliser must only be connected with a PARI compressor or with a central gas supply system. The PARI CENTRAL is intended for the connection with the central gas supply system.
An application takes approximately 5 to 10 minutes (depending on the quantity of fluid), but in any case no more than 20 minutes.
[1] ) Professional medical staff: Doctors, pharmacists, and physiotherapists.
[2] ) Aerosol: Small particles of solid, liquid or mixed composition (fine "mist") suspended in gases or air.
Mask
The PARI mask soft is an accessory for inhalation treatment. That enables inhalation of aerosol2 through the mouth and nose.
The different mask sizes are suitable for treating patients in the following age groups:
- PARI adult mask soft: Adults
The specified ages are approximate. The actual size of the mask depends on the size and shape of the person's face.
The mask must be used only with PARI nebulisers.
Indication
For treatment of diseases of the lower airways.
Masks
For patients who cannot inhale using a mouthpiece, or if inhalation via mask is preferred. The mask forms a system with a nebuliser. The indication for this system is the same as the indication for the nebuliser used.
Contraindication
Compressor, nebuliser and mask
There are no contraindications known to PARI GmbH.
Labelling
The following symbols can be found on the product and/or the packaging:
 | Medical device |
 | Unique Device Identifier (UDI) |
 | Legal manufacturer |
 | Date of manufacture |
 | Serial number |
 | Item no. |
 | Production batch number, lot number |
 | This product conforms to the EU Medical Device Regulation 2017/745. |
 | Consult instructions for use |
 | The device is drip-proof (degree of protection as per IEC 60529/EN 60529). |
 | Humidity limit |
 | Atmospheric pressure limit |
 | Degree of protection of the application component: Type BF |
 | Protection class II appliance |
 | Temperature limit |
 | Alternating current |
 | The medical device was distributed commercially after 13 August 2005. The product must not be disposed of with normal domestic waste. The symbol of the refuse bin with a cross through it indicates that it must be disposed of separately. |
 | On/Off |
 | PARI BOY compressor |
 | Air filter for compressor type 130 |
 | Tubing adapter |
 | PARI adult mask soft |
 | Elastic band |
 | Mask stabiliser |
 | PARI LC SPRINT nebuliser with nozzle attachment |
 | Connection tubing |
 | Mouthpiece with exhalation valve |
Safety and warning instructions
The present instructions for use contain important information, safety instructions and precautionary measures. The user must follow these in order to guarantee safe operation of this PARI product.
This PARI product must be used only as described in these instructions for use. The instructions for use of the inhalation solution used must also be followed.
Labelling and classification of warning instructions
In these instructions for use, safety-critical warnings are categorised according to the following hazard levels:

DANGER indicates a hazardous situation which will lead to very severe injuries or death if it is not avoided.

WARNING indicates a hazardous situation which can lead to very severe injuries or death if it is not avoided.

CAUTION indicates a hazardous situation which can lead to mild or moderate injuries if it is not avoided.
 NOTE
NOTE
NOTE indicates a hazardous situation which can lead to material damage if it is not avoided.
General
If non-approved solutions or suspensions are used for nebulisation, then nebuliser aerosol characteristics may differ from the information provided by the manufacturer.
This product is not suitable for use in an anaesthetic breathing system or a ventilator breathing system.
Tracheotomised patients cannot inhale using a mouthpiece. To perform inhalation therapy, they require specific equipment. In this case, please contact your doctor for further information.
Skin care products containing oils or fats can damage the soft plastic components. The patient should refrain from using skin care products of this kind while using the device.
If your health condition does not improve or it even worsens as a result of the treatment, seek professional medical advice.[3]
[3] ) Professional medical staff: Doctors, pharmacists, and physiotherapists.
Life-threatening situation from electrocution
 |
| Life-threatening situation from electrocution The compressor is an electrical device powered by mains voltage. It has been designed so that no live parts are accessible. However, in unfavourable ambient conditions, or if the compressor or power cord is damaged, this protection may no longer be provided. There may then be a risk of contact with live parts. This in turn may lead to an electric shock.
|
- Every time before use, make sure that the compressor housing, the power cord and the power plug are undamaged. The compressor must not be operated
- if the housing, the power cord or the power plug is damaged,
- if a fault is suspected following a fall or similar.
- Never leave the compressor unattended while it is in use.
- Plug the compressor into an easily accessible socket. It should be possible to quickly unplug the power plug at all times.
- Switch the compressor off and disconnect the power plug from the mains socket immediately:
- if it is suspected that the compressor or the power cord might have been damaged (e.g. after the compressor has fallen, or if there is a smell of burning plastic)
- if a malfunction occurs during operation
- before cleaning and maintaining the device
- immediately after use
- Keep the power cord away from domestic animals (e.g. rodents). They may damage the insulation on the power cord.
Danger of a device defect
To avoid a device defect, comply with the following instructions:
- Make sure that the local supply voltage matches the voltage data marked on the compressor identification label.
- To avoid overheating of the compressor,
- Never operate the compressor while it is in a bag,
- Never cover the compressor while it is operating,
- Make sure that the ventilation slits on the compressor are unobstructed at all times while it is operating.
- To disconnect the compressor from the socket, always pull the power cord out by the power plug, not the cable.
- Make sure that the power cord is never kinked, pinched or jammed. Do not pull the power cord over sharp edges.
- Keep the compressor and the power cord away from hot surfaces (e.g. stove top, electric fire, open fire). Direct heat may damage the compressor housing or the insulation on the power cord.
Treatment of babies, infants, and anyone who requires assistance
| |
| Life-threatening situation from strangulation For individuals who are not able to perform the therapy session without assistance or cannot appreciate the hazards, the risk of injury is greater e.g., strangulation with the power cord or the connection tubing. Such individuals include, for example, babies, children, and people with limited capabilities.
|
Hazard due to small parts which can be swallowed
The product contains small parts. Small parts can block the airways and lead to a choking hazard. Keep all components of the product out of the reach of babies and infants at all times.
Impairment of treatment due to electromagnetic interference
Use only original spare parts and original accessories from PARI. The use of third-party products can result in increased emissions of electromagnetic interference or reduced interference resistance of the PARI compressor.
Impairment of the therapy by disregarding the reprocessing instructions
Impairment of the therapy
Exceeding the reprocessing instructions can result in damage to the product. This can impair the therapy.
Falling short of the instructions can result in insufficient reprocessing. This can increase the risk of infection.
- Comply with the instructions about the reprocessing limits, temperature, holding time, and concentration of the chemical used.
Reporting serious incidents
Report serious adverse incidents to the manufacturer and to the competent authority.
PRODUCT DESCRIPTION
Components
Please refer to the package for information on the supplied components.
Overview and designations

| 1 | Compressor | |
| 2 | Nebuliser | |
| 2a | Nebuliser upper part | |
| 2b | Nozzle attachment | |
| 2c | Nebuliser lower part | |
| 2d | Mouthpiece (with exhalation valve) | |
| 2e | Tubing adapter | |
| 2f | Connection tubing | |
| 3 | Mask | |
| 3a | Elastic band | |
Working parts
The compressor includes the following working parts:

| 1 | Carrying handle | |
| 2 | Power cord[4] (connected inseparably to the compressor) | |
| 2a | Cable holder | |
| 3 | Ventilation slits | |
| 4 | Holder for nebuliser | |
| 5 | Identification label (bottom of device) | |
| 6 | Compressed air connection | |
| 7 | Air filter | |
| 8 | On/off switch | |
[4] ) The power plug type is country-specific. The figure shows the europlug (type "C").
Description of function
Inhalation therapy (compressor with nebuliser and mouthpiece or mask)

The compressor supplies the nebuliser with compressed air. When compressed air is supplied, the nebuliser generates an aerosol from the liquid, for example the medication with which it is filled. This aerosol is breathed into the lungs through the mouthpiece or optionally a mask.

In combination with a mouthpiece or a suitable mask, the PARI LC SPRINT nebuliser (Type 023) is a suitable therapy for patients in all age groups. The nozzle attachments described below are particularly suitable for the specified age groups.
The size of the aerosol droplets is determined by the nozzle inserts. The smaller the droplets are, the farther they can penetrate into the deeper and smaller regions of the lung:
- The blue nozzle insert produces droplets for the central lung region in adults and children aged 4 and older.
Mask
The mask is an accessory for PARI inhalation systems.
The mask makes it possible to inhale aerosol through the mouth and the nose.
The patient can breathe out through the aperture or the exhalation valve at the bottom end of the mask without having to take the mask off.
The PARI child and adult mask soft can be fixed to the face using the elastic band. The elastic band is attached to the loops on the side of the mask.
Only in professional healthcare institutions is the mask stabiliser inserted into the mask during the sterilisation process, to maintain the shape of the mask.
Material information
The individual product components are made from the following materials:
Nebuliser
| Product component | Material |
| Nebuliser upper part | Polypropylene, thermoplastic elastomer |
| Nozzle attachment | Polypropylene |
| Nebuliser lower part | Polypropylene, thermoplastic elastomer |
| Mouthpiece (with exhalation valve) | Polypropylene, thermoplastic elastomer |
| Polyvinyl chloride (PVC) connection tubing | Polyvinyl chloride |
| Tubing adapter | Polyamide |
| Tubing connector | Thermoplastic elastomer |
Mask
| Product component | Material |
| PARI mask soft | Polypropylene, thermoplastic elastomer |
| Elastic band | Synthetic rubber |
Maintenance
The compressor is maintenance free.
Service life
The individual product components have the following expected lifetimes:
| Product component | Service life |
| Compressor | Approximately 1,000 operating hours (this corresponds to max. 5 years) If the compressor is still in use after this time, have it tested. To do this, contact the manufacturer or distributor. |
| Nebuliser, PARI mask soft, tubing adapter, connection tubing und accessory | Home environment [see: Limits of reprocessing in a home environment,] |
| Nebuliser, PARI mask soft, tubing adapter, connection tubing und accessory | Professional environment [see: Limits of reprocessing in a professional healthcare institution] |
When the expected operating life has been reached, replace the affected component. Replacement sets or PARI Year Packs (a nebuliser with connection tubing and an air filter for a compressor) are available.
USE
All the steps described below must be carried out properly.
If the nebuliser is to be connected to a central medical gas supply system via a PARI CENTRAL, the instructions for use of the PARI CENTRAL must be followed.
Do not use product components unless they have been thoroughly cleaned and dried. Wash your hands thoroughly before every use. You must perform cleaning and disinfection before using the device for the first time
Danger of acute respiratory distress when the nebuliser is operated using oxygen When the nebuliser is used with the PARI CENTRAL O2, acute respiratory distress can arise through an increased level of carbon dioxide in the blood.
COPD patients with exacerbation may develop acute respiratory distress as a result of treatment which uses oxygen.
- The PARI CENTRAL O2 is no longer sold.
- If you use a PARI CENTRAL O2 which is still on the market, perform the treatment using oxygen only after consultation with, and under the supervision of, a professional.
Setting up the compressor
The space in which the compressor is operated must satisfy certain conditions [see: During operation]. Also note the following warnings before setting the compressor up:

Risk of fire due to a short circuit
A short circuit in the compressor can cause a fire. In order to reduce the risk of fire in such an event, follow the instructions below:
- Do not operate the compressor close to easily flammable objects such as curtains, tablecloths, or paper.
- Do not operate the compressor in areas where there is a risk of explosion or in the presence of gases promoting combustion (e.g. oxygen, nitrous oxide, flammable anaesthetics).
Impairment to quality of treatment caused by electromagnetic interference Electrical devices can cause electromagnetic interference. Interference can impair the function of the devices and thus also the effectiveness of the treatment.
- Do not place the device immediately beside or on top of other devices.
- Keep it at a minimum distance of 30 cm from portable wireless communication devices (including their accessories, such as antenna cables or external antennas).
- If the device must be operated immediately beside or on top of other devices, then all devices must be monitored to ensure that they are working properly.
Danger of injury from falling compressor
A compressor placed in a poor position poses a risk of injury.
- Do not place the compressor above head height.
- Make sure that it cannot be pulled down by the power cord or the connection tube.
- Do not place the compressor on a soft surface such as a sofa, a bed or a tablecloth.
NOTE
Danger of device fault caused by dust
If the compressor is operated in a very dusty atmosphere, dust may collect inside the housing. This may cause a fault in the device.
- Do not operate the compressor on the floor, under the bed or in workshops.
- Operate the compressor only in a low-dust environment.
Set the compressor up as follows:
- Place the compressor on a firm, flat, dust-free, dry surface.
![]()
Route the power cord in so that it is not a tripping hazard and so that no one can become entangled in it. Poorly routed cable connections pose a risk of injury.
Plug the power plug into a suitable socket.
Preparing for treatment
Assembling the nebuliser
Risk of impaired treatment
Damaged components and/or an incorrectly assembled nebuliser may impair functioning of the nebuliser and thus treatment as well.
- Check all nebuliser components and the accessories before each use.
- Replace any broken, deformed or seriously discoloured parts.
- Follow the assembly instructions in these instructions for use.
- Press the nozzle insert lightly onto the nozzle in the nebuliser lower part. The arrow on the nozzle insert must point upwards.

- Place the nebuliser upper part on the nebuliser lower part and turn it clockwise to lock the two parts together.
- Attach the connection tubing to the nebuliser.


Preparing the inhalation therapy
USING THE MOUTHPIECE
- Fit the mouthpiece onto the nebuliser.


USING THE MASK
- If necessary, attach the elastic band to the mask.

- Attach the mask to the nebuliser.


Filling the nebuliser
NOTE
Nebuliser lid might break off
If the cap is twisted in the wrong direction, it may break off. The nebuliser will then be unusable and irreparable.
- Never move the lid except in the direction allowed by the hinge.
- Insert the nebuliser in the holder on the compressor intended for this purpose.
- Open the nebuliser lid by pressing your thumb against the underside of the lid.
- Pour the required quantity of inhalation solution into the top of the nebuliser. Be sure to follow the instructions regarding the minimum and maximum fill volumes [see: General nebuliser data]. If the nebuliser contains too little or too much liquid, the nebulisation and consequently the therapy will be less effective.

- Close the nebuliser lid. Make sure that the lid snaps into place.

If several inhalation solutions are to be used one after the other:
- Rinse the nebuliser out with drinking water between the individual applications.
- Shake excess water out of the nebuliser.
- Fill the nebuliser with the next inhalation solution as described.
Performing treatment
All the safety instructions and warnings in these instructions for use must have been read and understood before any treatment is carried out.
![]() Always hold the nebuliser upright during treatment.
Always hold the nebuliser upright during treatment.
- If necessary, use the tubing adapter to connect the connection tubing and the compressor.

![]()
Life-threatening situation if tubes are mixed up! If tubing systems for other devices are present close by (e.g., for infusions), check carefully to ensure that the other end of the connection tubing connected to the compressor is connected to the nebuliser. Otherwise, there is a danger that different connection options may be confused with each other. Push the connection tubing of the nebuliser with a slight twist into the compressor's air connection.

- Take the nebuliser out of its holder on the compressor and hold it upright.
- Verify that all parts are firmly connected to each other.

![]()
Life-threatening situation from electrocution if there is a device fault! Switch the compressor off immediately, and disconnect the power plug from the mains socket if a fault is suspected (e.g., if the device is dropped, or there is a smell of burning plastic). If there is a device fault, there may be a risk of contact with live parts. This in turn may lead to an electric shock. Switch the compressor on by shifting the on/off switch to "ON".

- Check that an aerosol is being generated (a fine mist is escaping from the nebuliser) before you begin the treatment.


Information about the PIF-Control System:

The PARI PIF-Control System in the nebuliser upper section is designed to help the patient learn a slow, controlled inhalation technique. This improves uptake of the active agent in the lower airways.
If the patient breathes in too quickly, the inflow of air is reduced, and this increases the resistance when inhaling.
If you feel increased resistance when inhaling during the treatment, proceed as follows:
- Breathe out.
- Breathe in again slowly. Try to breathe in slowly enough that you no longer feel increased resistance.
Inhalation therapy
INHALING WITH THE MOUTHPIECE
- Sit in an upright position and relax.
- Hold the mouthpiece between your teeth and enclose it with your lips.
- Breathe in as slowly and deeply as possible through the mouthpiece, and out again calmly.
- Carry out the inhalation treatment until the noise in the nebuliser changes.
![]() Some residual fluid will remain in the nebuliser after the end of the treatment.
Some residual fluid will remain in the nebuliser after the end of the treatment.
INHALING WITH A MASK
Impaired treatment due to escaping aerosol
If the mask does not form a seal on the face, aerosol may escape. This may result in medication underdosage.
- Make sure that the mask completely covers both corners of the mouth and the nose.
- Take note of possible side effects caused by escaping aerosol. These are described in the information for use of the respective medication.
With PARI child or adult mask soft
- Check whether the exhalation valve is pressed outwards, to ensure that the user can breathe out freely during the inhalation session.

- Sit in an upright position and relax.
- Use gentle pressure to place the mask tightly over mouth and nose. Ensure that the nebuliser is positioned vertically.
- If necessary, use the elastic band to hold the mask firmly in place against the face. The elastic band runs along the back of the head.

- Breathe in as slowly and deeply as possible through the mask, and out again calmly.
- Carry out the inhalation treatment until no more aerosol is generated.


![]() Some residual fluid will remain in the nebuliser after the end of the treatment.
Some residual fluid will remain in the nebuliser after the end of the treatment.
Ending the treatment
- Switch the compressor off by shifting the on/off switch to "OFF".
- Place the nebuliser back in the holder on the compressor.
- Disconnect the power plug from the mains socket.
![]() Complete disconnection from the mains is only certain when the power plug has been unplugged from the socket.
Complete disconnection from the mains is only certain when the power plug has been unplugged from the socket.
Storage
After ending the treatment, store the compressor as described below:
![]() When putting the compressor away, unplug the power plug from the socket. Electrical devices that remain plugged into the power supply present a potential hazard source.
When putting the compressor away, unplug the power plug from the socket. Electrical devices that remain plugged into the power supply present a potential hazard source.

![information]() NOTE! Do not wind the power cord around the compressor. If the power cord is wound or bent very tightly, the wires inside the cord may break. The power cord will then be unusable. Wind the power cord up loosely.
NOTE! Do not wind the power cord around the compressor. If the power cord is wound or bent very tightly, the wires inside the cord may break. The power cord will then be unusable. Wind the power cord up loosely.- Secure the cable end in the cable holder.
REPROCESSING
Risk of infection due to cross-contamination in the case of a change in patients
If a product is used for more than one patient, there is a risk that germs may be transmitted from one patient to the next.
- Clean, disinfect and sterilise all separated parts before every patient change.
- Replace the connection tubing or carry out mechanical cleaning and disinfection of the connection tubing [see: Reprocessing the connection tubing].
Risk of infection due to growth of bacteria
Inadequate disinfection encourages the growth of bacteria and thus increases the risk of infection.
- During disinfection, comply with the specified holding time and the concentration of the chemical used.
- When using a disinfector, ensure that the device is clean and operating properly. Allow the disinfection to continue until the disinfector switches off automatically or the minimum disinfection time stated in the instructions for use of the disinfector has elapsed. Do not switch the device off prematurely.
Risk of infection by residual germs
If there is dirt on the parts, germs capable of reproduction may remain despite the sterilisation process. As a result, there is a danger of infection.
- Clean, disinfect, and dry all parts thoroughly before sterilising.
- Use only validated procedures for cleaning and disinfection.
Risk of infection due to moisture
Moisture encourages the growth of bacteria.
- Ensure that the components are allowed to dry sufficiently after each processing step.
NOTE
Risk of damage to plastic parts!
Plastic melts if it comes into contact with hot surfaces.
- During thermal disinfection, you must ensure that the water level in the container is sufficient, in order that the individual parts do not come into contact with hot surfaces.
![]() Always use drinking water for reprocessing in a home environment.
Always use drinking water for reprocessing in a home environment.
In professional health care institutions, drinking water is sufficient for precleaning. For all other reprocessing steps and processes, use deionised water with a low microbiological load (at least drinking water quality).
Please observe the instructions for use for the chemicals used. Wash your hands thoroughly before every reprocessing.
Reprocessing cycles
Perform the reprocessing steps as per the specified reprocessing cycles.
Reprocessing cycles in a home environment
| Nebuliser components |
|
| Mask components |
|
| Elastic band | Cleaning visible dirt |
| Compressor housing |
|
| Air filter | Replace after 200 operating hours (approx. 1 year)[6] |
Reprocessing cycles in professional healthcare institution
SINGLE PATIENT USE
| Nebuliser components |
|
| Mask components |
|
| Elastic band | Cleaning visible dirt |
| Compressor housing | Cleaning visible dirt |
| Air filter | Replace after 200 operating hours (approx. 1 year)6 |
BEFORE A CHANGE OF PATIENTS
| Nebuliser components |
|
| Mask components |
|
| Connection tubing | Mechanical cleaning with disinfection |
| Elastic band | Replacing the elastic band |
| Compressor housing |
|
| Air filter | Replace after 200 operating hours (approx. 1 year)6 |
[5] ) For the therapy of patients at risk, disinfect the individual parts once per day. Take note of the additional information for patients at risk [see: Reprocessing for patients at risk].
[6] ) Air filters are included in every PARI Year Pack.
Reprocessing for patients at risk
Danger of infection for patients at risk
For patients at risk, airway infections represent an increased risk of deterioration of general health, because these patients are particularly vulnerable to residual germs. Patients at risk include cystic fibrosis patients, patients with immunosuppression or immunodeficiency, and vulnerable patient groups.
- If you are a patient at risk, disinfect the individual parts once per day during the therapy.
- If you are unsure whether you are a patient at risk, consult with specialist medical personnel before use.
Limits of reprocessing
Limits of reprocessing in a home environment
| Nebuliser and accessories, disinfection | 300 processing cycles, max. 1 year |
| Mask, disinfection | 300 processing cycles, max. 1 year |
Limits of reprocessing in a professional healthcare institution
| Nebuliser and accessories, disinfection | 300 reprocessing cycles, max. 1 year |
| Nebuliser and accessories, sterilisation | 100 processing cycles, max. 1 year |
| Connection tubing | 50 reprocessing cycles, max. 1 year |
| Mask, disinfection | 300 processing cycles, max. 1 year |
| Mask, sterilisation | 100 processing cycles, max. 1 year |
Preparation for reprocessing
| Procedure | ||
| Compressor |
| |
| Nebuliser |
| |
| • Carefully pull the blue exhalation valve out of the slot in the mouthpiece. The exhalation valve must still be attached to the mouthpiece. |  | |
| Mask |
| |
Reprocessing of nebuliser and mask
The following products can be cleaned, disinfected and sterilised according to the procedure described below:
- PARI nebuliser and PARI accessories
- PARI mask soft
The connection tubing and elastic band of the mask must be treated separately.
| Procedure | |||
| Step 1: Precleaning | All individual parts must be precleaned immediately after use. EQUIPMENT:
PROCEDURE:
| ||
| Home environment | Step 2: Cleaning | EQUIPMENT:
| |
PROCEDURE:
|  | ||
RINSING:
Cleaning the elastic band
| |||
 The elastic band cannot be disinfected or sterilised.
| Procedure | ||
| Home environment | Step 3: Desinfection |
EQUIPMENT:
PROCEDURE:
|
EQUIPMENT:
PROCEDURE: | ||
| In professional health care institutions | Step 2: Cleaning and disinfection | EQUIPMENT:
PROCEDURE:
|
| Procedure | |||
| In professional health care institutions | Step 3:Sterilisation | For sterilisation, use a process compliant with the ISO 17665 series of standards. PROCEDURE:
| |
| Information on sterilising a PARI mask soft: Always use the corresponding mask stabiliser when sterilising this mask type, because otherwise the mask may lose its shape under the effects of high temperatures. |  | ||
| |||
| Drying | Ensure that there is no residual moisture remaining in the components. If necessary:
| ||
| Visual Inspection | Inspect all product components after each cleaning, disinfection or, where applicable, sterilisation. Replace defective, deformed or seriously discoloured parts. | ||
| Storage | Store this product as described below:
| ||
Reprocessing the compressor
| |
| Life-threatening situation from electrocution Liquids can conduct electricity, thereby posing a risk of electric shock.
|
NOTE
Danger of device fault due to liquid penetration
If liquids get into the interior of the compressor, this may cause a fault in the device.
- Never immerse the compressor in water.
- Never clean the compressor in running water.
- Never spray any liquids onto the compressor or the power cord.
- If liquid gets into the compressor, it must not be used under any circumstances. Before starting the compressor again, contact the manufacturer or distributor.
| Procedure | ||
| Step 1: Cleaning | Wipe the outer surface of the housing with a clean, damp cloth. |  |
| Step 2: Desinfection | For disinfection, use a standard, alcohol-based disinfectant (e.g. isopropanol). When applying and dosing the disinfectant, it is essential to follow the instructions for use for the product.
The procedure was validated in Europe using a disinfectant suitable for use on plastics as per the DGHM and/or the VAH list: Propanol/Isopropanol | |
| Visual Inspection |
The air filter must be checked at regular intervals (after every 10th use). If it is discoloured brown or grey, or if it is damp or clogged, it must be replaced. The air filter cannot be cleaned and then reused! | |
Removing the air filter
|  | |
Replacing the air filter
| ||
| Storage |
|  |
| ||
Reprocessing the connection tubing
Dry the connection tubing after each use.
The maximum operating life of the connection tubing is 1 year.
| Procedure | ||
| In professional health care institutions (when changing between patioents) | Mechanical cleaning and desinfection | EQUIPMENT:
PROCEDURE:
|
| Drying |
| |
| Visual Inspection |
| |
| Storage |
| |
Further information about reprocessing
Further validated processes for reprocessing
The instructions provided were validated by PARI and were found to be suitable for preparing your medical device for its reuse.
Further validated processes for reprocessing:

https://www.pari.com/fileadmin/041D0624_Professional_healthcare_institution_Validated_Reprocessing_Methods.pdf
Ensure that the reprocessing actually performed by your personnel on your equipment with the chemicals used achieves the desired results. For this, validation and routine monitoring of the process are usually required. In particular, if you have to deviate from our validated process, ensure that the reprocessing method selected by you is appropriately effective, and that potential adverse effects are assessed.
TROUBLESHOOTING
The compressor must be repaired only by PARI GmbH Technical Service or a service location expressly authorised to do so by PARI GmbH. If the compressor is opened or manipulated by anyone else, all claims under the warranty shall be void. In these cases, PARI GmbH will accept no liability.
Contact the manufacturer or distributor:
- in the event of faults that are not listed in this chapter.
- if the suggested procedure does not correct the fault.
| Fault | Possible cause | Remedy |
The compressor does not start up | The power plug is not plugged into the mains socket correctly. | Check whether the power plug is plugged into the socket correctly. |
| The supply voltage is not suitable for running the compressor. | Check whether the local supply voltage matches the voltage data marked on the compressor identification label. | |
No aerosol is coming out of the nebuliser | The nebuliser nozzle is blocked. | Clean the nebuliser. |
| The connection tubing is not connected properly. | Check that the tubing connectors are connected firmly to the compressor and the nebuliser. | |
| The connection tubing is leaking. | Replace the connection tubing. |
TECHNICAL DATA
Compressor
General compressor data
| Supply voltage | 220 – 240 V |
| Mains frequency | 50 Hz |
| Power consumption | 0.95 A |
| Housing dimensions (W × H × D) | 18.5 cm × 13.0 cm × 15.0 cm |
| Weight | 1.7 kg |
| Pressure[7] | 1.6 bar |
| Compressor flow7 | 5.0 l/min. |
| Sound pressure level | 54 dB(A) |
Classification as per IEC 60601-1/EN 60601-1
| Type of electric shock protection | Protection class II |
| Degree of protection from electric shock from the application component (nebuliser) | Type BF |
| Degree of protection against penetration by water and solid materials, as per IEC 60529/N 60529 | IP 21 |
| Degree of protection when used in the presence of flammable mixtures of anaesthetics with air, with oxygen, or with nitrous oxide | No protection |
| Operating mode | Continuous operation |
Electromagnetic compatibility
Electrical medical equipment is subject to special precautionary measures with regard to electromagnetic compatibility (EMC). Such equipment must be installed and operated only in accordance with the electromagnetic compatibility instructions.
Portable and mobile high-frequency communication devices can disrupt electrical medical equipment. Using accessories, converters and power cords other than those specified (with the exception of converters and power cords that the manufacturer of the medical electrical device sells as spare parts for internal components) can result in higher emission levels or reduce the device's resistance to interference.
The device must not be operated directly beside or on top of other devices. If the medical electrical device must be operated beside or on top of other devices, then it must be monitored to ensure that it is operating properly in the arrangement used.
On request, technical data on electromagnetic compatibility (EMC information) is available in table format from the manufacturer or distributor, or on the website [see: Links]
Ambient conditions
DURING OPERATION
| Ambient temperature | +10°C to +40°C |
| Relative humidity | 30% to 75% (non-condensing) |
| Atmospheric pressure | 700 hPa to 1,060 hPa |
The compressor is intended for operation in all healthcare situations. It is not permitted to operate it in trains, motor vehicles or aeroplanes.
Use of the compressor in professional healthcare facilities is limited to the inpatient wards and the intensive care unit. Use of the compressor in areas with elevated magnetic or electrical radiation (e.g. close to an MRI scanner) is not permitted.
TRANSPORT AND STORAGE BETWEEN USES
| Minimum ambient temperature (without monitoring of relative humidity) | -25°C |
| Maximum ambient temperature (with relative humidity of up to 93%, non-condensing) | +70°C |
| Humidity | max. 93% |
| Atmospheric pressure | 500 hPA to 1,060 hPA |
Nebuliser
General nebuliser data
| Size[8] | 10 cm × 10 cm × 4 cm |
| Weight8 | 31 g to 33 g |
| Operating gases | Air, oxygen |
| Minimum compressor flow | 3.0 l/min. |
| Minimum operating pressure | 0.5 bar / 50 kPa |
| Maximum compressor flow | 6.0 l/min. |
| Maximum operating pressure | 2.0 bar / 200 kPa |
| Minimum fill volume | 2 ml |
| Maximum fill volume | 8 ml |
Aerosol data according to ISO 27427
The aerosol characteristics presented in these instructions for use were determined in accordance with ISO 27427 using 2 ml Salbutamol fill volume. If other solutions or suspensions are used for nebulisation, the aerosol characteristics may differ from the values shown (particularly if they have greater viscosity).
The following data is based on tests according to a standard which takes adult breathing patterns as a basis. Therefore, these figures will probably differ from corresponding figures that were calculated for populations of children and infants.
| Nozzle insert (blue) | Minimum compressor flow (3 l/min – 0.6 bar) | Nominal compressor flow (5 l/min – 1.6 bar)[9] | Maximum compressor flow (6 l/min – 1.9 bar) |
| MMAD [µm][10] | 4.7 | 3.8 | 3.3 |
| GSD[11] | 2.19 | 2.24 | 2.70 |
| Respirable fraction [% < 5 µm] | 52.3 | 61.9 | 60.5 |
| Aerosol fraction [% < 2 µm] | 13.3 | 22.1 | 29.4 |
| Aerosol fraction [% > 2 µm < 5 µm] | 39.0 | 39.8 | 31.2 |
| Aerosol fraction [% > 5 µm] | 47.7 | 38.1 | 39.5 |
| Aerosol output [ml] | 0.35 | 0.41 | 0.38 |
| Aerosol output rate [ml/ min] | 0.07 | 0.16 | 0.18 |
| Residual volume [ml] (gravimetric) | 1.16 | 1.16 | 1.10 |
| Percentage of fill volume emitted per minute [%/min] | 3.3 | 8.0 | 9.2 |
[7] ) Towards nebuliser nozzle (Ø 0.48 mm).
[8] ) Without mouthpiece and mask; unfilled.
[9] ) Operation with PARI BOY compressor (Type 130).
[10] ) MMAD = Mass Median Aerodynamic Diameter
[11] ) GSD = Geometric Standard Deviation
FURTHER INFORMATION
Disposal
Compressor
This product falls within the scope of the European Council Directive on Waste Electrical and Electronic Equipment (WEEE)[12]. Accordingly, this product must not be disposed of with domestic waste. The disposal regulations applying in the respective countries must be complied with (e.g. disposal by local authorities or distributors). Materials recycling helps to reduce the consumption of raw materials and to protect the environment.
Nebuliser and mask
All product components may be disposed of with normal domestic waste. The country-specific disposal regulations must be observed.
[12] ) Directive 2012/19/EU of the EUROPEAN PARLIAMENT AND THE EUROPEAN COUNCIL of July 4, 2012 on waste electrical and electronic equipment.
Links
Terms and conditions of warranty: https://www.pari.com/int/warranty-conditions

Technical data regarding electromagnetic compatibility:

https://www.pari.com/fileadmin/041D0623-Electromagnetic-compatibility-EMV.pdf
PARI inhalation systems in aircraft:

https://www.pari.com/fileadmin/041D0625_Airplane_Certificate_Jet_nebuliser.pdf
Contact
Email: info@pari.de
Tel.: +49 (0)8151-279 220 (international)
+49 (0)8151-279 279 (German)
Disclaimer
These instructions for use describe the components of PARI products and optional accessories. For this reason, these instructions for use also describe and illustrate features not present in your PARI product because they are, for instance, country-specific and/or optional. When using the systems, products and functions, the applicable country-specific regulations must be observed.
Warranty
The PARI compressor comes with a 4-year warranty. The warranty period commences on the date of purchase.
PARI GmbH
Spezialisten für effektive Inhalation
Moosstraße 3
82319 Starnberg • GERMANY
info@pari.de
Documents / Resources
References
![www.pari.com]() Home - PARI
Home - PARI![www.pari.com]() https://www.pari.com/fileadmin/041D0624_Professional_healthcare_institution_Validated_Reprocessing_Methods.pdf
https://www.pari.com/fileadmin/041D0624_Professional_healthcare_institution_Validated_Reprocessing_Methods.pdf![www.pari.com]() warranty-conditions - PARI
warranty-conditions - PARI![www.pari.com]() https://www.pari.com/fileadmin/041D0623-Electromagnetic-compatibility-EMV.pdf
https://www.pari.com/fileadmin/041D0623-Electromagnetic-compatibility-EMV.pdf![www.pari.com]() https://www.pari.com/fileadmin/041D0625_Airplane_Certificate_Jet_nebuliser.pdf
https://www.pari.com/fileadmin/041D0625_Airplane_Certificate_Jet_nebuliser.pdf
Download manual
Here you can download full pdf version of manual, it may contain additional safety instructions, warranty information, FCC rules, etc.
Advertisement


Need help?
Do you have a question about the BOY Classic and is the answer not in the manual?
Questions and answers