Advertisement
Quick Links
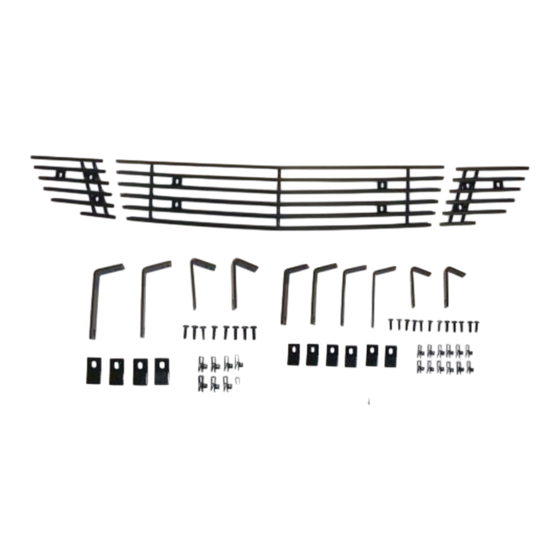
ROUSH Billet Lower Grille Kit
Kit Part Number 1310R8200B
Application: 2010 ROUSH Mustang
w/ROUSH Front Fascia
Installation Instructions
Before installing your ROUSH Performance Product(s), read through the entire
installation procedure and check to make sure all items are present. Contact ROUSH
Customer Service at 1-800-59-ROUSH, 9:00 AM to 5:00 PM EST, weekdays, for any
questions regarding fit, missing parts or instructions that are unclear to you.
1310R8200BIM
Page 1 of 10
1-800-59-ROUSH
Advertisement

Related Manuals for ROUSH 1310R8200B


Summary of Contents for ROUSH 1310R8200B
- Page 1 Installation Instructions Before installing your ROUSH Performance Product(s), read through the entire installation procedure and check to make sure all items are present. Contact ROUSH Customer Service at 1-800-59-ROUSH, 9:00 AM to 5:00 PM EST, weekdays, for any questions regarding fit, missing parts or instructions that are unclear to you.
- Page 2 Packaging List for ROUSH Billet Lower Grille Kit Part Description ROUSH Part Number ROUSH Billet Lower Grille Kit 1310R8200B Lower Billet Grille - Center 4448 Lower Billet Grille - LH 4448WL Lower Billet Grille - RH 4448WR Installation Instructions 1310R8200BIM...
- Page 3 The information contained in this publication was accurate and in effect at the time the publication was approved for printing and is subject to change without notice or liability. ROUSH Performance Products (RPP) reserves the right to revise the information presented herein or to discontinue the production of parts described at any time.
- Page 4 5. Install two (2) Long L Brackets to the lower mounting holes of the LH and RH Grilles as shown in Figure 3. Do not tighten the screws at this time. (Left side shown, right side similar) Figure 3 1310R8200BIM Page 4 of 10 1-800-59-ROUSH...
- Page 5 (1) at each wheel well splash shield, four (4) at the front fascia and three (3) at the rear edge of the close-out panel. If the vehicle has a ROUSH Front Splitter installed, remove two (2) head screws. Refer to Figure phillips 5.
- Page 6 10. Using a 1/4” drive ratchet with an 8 mm socket, remove two (2) screws that attach the top of the fascia to the headlight assemblies. Refer to Figure 8. (Left side shown, right side similar.) Figure 8 1310R8200BIM Page 6 of 10 1-800-59-ROUSH...
- Page 7 13. With an assistant, lift the two (2) upper fascia mounts from the pins on the headlamp assemblies and remove the front fascia. 14. Place the fascia assembly onto a cloth covered table to avoid scratching the fascia. 1310R8200BIM Page 7 of 10 1-800-59-ROUSH...
- Page 8 Refer to Step 11, Figure 9. Hook the upper fascia mounts onto the pins of the head light brackets. Reinstall the two (2) bolts, removed in Step 10, to the head light brackets. Refer back to Figure 8. Torque the bolts to 8 Nm (71 lb-in). 1310R8200BIM Page 8 of 10 1-800-59-ROUSH...
- Page 9 Figure 4. Insert the push pin body into the hole and then the push pin button. 24. Close the hood. Congratulations!!! You have completed the installation of the ROUSH Performance Products, Billet Lower Grille Kit. It is recommended that you save all parts removed from your vehicle during the installation of this kit.
- Page 10 (e.g.: oil, anti-freeze, battery acid, brake fluid, etc.); (vii) acts of God, natural disasters and other similar causes beyond the reasonable control of ROUSH; or (viii) application of chemicals that affect the parts. This Limited Warranty does not cover surface deterioration of paint, trim, and...
Need help?
Do you have a question about the 1310R8200B and is the answer not in the manual?
Questions and answers