Table of Contents
Advertisement
Quick Links
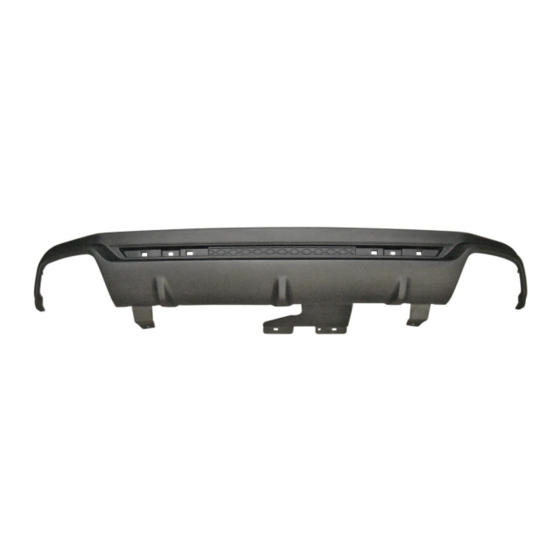
2013 Mustang Rear Valance Kit
P/N: 421406 (R1313-17F957)
Application: 2013 Ford Mustang
Note: Roush rear valance kit will only work with the Roush off road exhaust system
1313-5231.
P/N:
Installation Instructions
Before installing your ROUSH Performance Product(s), read through the entire installation
procedure and check to make sure all items are present. Contact ROUSH Customer Service at
1-800-59-ROUSH, weekdays from 9:00 AM to 5:00 PM EST, with any questions regarding fit,
missing parts or instructions that are unclear to you.
1313-17F957IM-AA 20120803RA
1-800-59-ROUSH
Page 1 of 25
Advertisement
Table of Contents

Related Manuals for ROUSH 421406


Summary of Contents for ROUSH 421406
- Page 1 2013 Mustang Rear Valance Kit P/N: 421406 (R1313-17F957) Application: 2013 Ford Mustang Note: Roush rear valance kit will only work with the Roush off road exhaust system 1313-5231. P/N: Installation Instructions Before installing your ROUSH Performance Product(s), read through the entire installation procedure and check to make sure all items are present.
- Page 2 Die Grinder ● Air Saw Drill 1/8” Drill Bit ● Center Punch 1/4” Drill Bit 3/8” Drill Bit ● 9/16” Drill Bit ● 10 mm Wrench ● Torque Wrench Commercially Available Clear Coat 1313-17F957IM-AA 20120803RA 1-800-59-ROUSH Page 2 of 25...
-
Page 3: Limit Of Liability Statement
The information contained in this publication was accurate and in effect at the time the publication was approved for printing and is subject to change without notice or liability. ROUSH Performance Products (RPP) reserves the right to revise the information presented herein or to discontinue the production of parts described at any time... -
Page 4: Work Safely
Allow the engine, cooling system, brakes and exhaust to cool before working on a vehicle. WORK SAFELY! Perform this installation on a good clean level surface for maximum safety and with the engine turned off. 1313-17F957IM-AA 20120803RA 1-800-59-ROUSH Page 4 of 25... -
Page 5: Section A - Removal
The following section will guide you through the removal of the factory bumper cover. 1. Open the trunk and remove the two (2) plastic nuts, two (2) pin-type retainers, release the trunk trim panel, disconnect the trunk light electrical connector and remove the trunk trim panel. 1313-17F957IM-AA 20120803RA 1-800-59-ROUSH Page 5 of 25... - Page 6 2. Release the side marker harness retainer. 3. Disconnect the LH and RH tail lamp electrical connectors. 1313-17F957IM-AA 20120803RA 1-800-59-ROUSH Page 6 of 25...
- Page 7 4. Remove the six (6) 11 mm nuts, push the harness grommets through the body and remove the LH and RH tail lamps. 5. Remove the six (6) screws and depress the two (2) center clips on the LH and RH side splash shields to release. 1313-17F957IM-AA 20120803RA 1-800-59-ROUSH Page 7 of 25...
- Page 8 6. On the underside of the vehicle, remove and discard the two (2) clips. 7. Remove the four (4) pin-type retainers. 1313-17F957IM-AA 20120803RA 1-800-59-ROUSH Page 8 of 25...
- Page 9 CAUTION: To protect the bottom of the bumper cover from damage, place on a protective surface once removed. 9. Pull outward on the LH and RH side to release the bumper cover, holding the center remove the bumper cover. 1313-17F957IM-AA 20120803RA 1-800-59-ROUSH Page 9 of 25...
- Page 10 (14) center trim tabs. 11. Cut out the exhaust area templates provided in the kit (P/N: 1313-17F958TMPL), tape the template to the bumper cover and mark the area as shown. 1313-17F957IM-AA 20120803RA 1-800-59-ROUSH Page 10 of 25...
- Page 11 12. Using a center punch, mark the center of the holes on the template. 13. Remove the template, use a 1/8” drill bit to drill the pilot holes and finish with a 1/4” drill bit. 1313-17F957IM-AA 20120803RA 1-800-59-ROUSH Page 11 of 25...
- Page 12 14. Mark the lines to be slotted on the bumper cover. 15. Using a 1/4” de-burring tool, open the slots marked on the bumper. 1313-17F957IM-AA 20120803RA 1-800-59-ROUSH Page 12 of 25...
- Page 13 Using a center punch, mark the the center of the holes on the template. Cut the 9/16” and the 3/8” holes out of the template and trace the holes to cut on the bumper cover. Repeat above steps for the opposite side. 1313-17F957IM-AA 20120803RA 1-800-59-ROUSH Page 13 of 25...
- Page 14 19. Cut out the center template provided for the valance panel and tape into position with the arrow pointing upward. Using a center punch, mark the the center of the holes on the template. 1313-17F957IM-AA 20120803RA 1-800-59-ROUSH Page 14 of 25...
- Page 15 20. Using a 1/8” drill bit, drill the pilot holes and finish with a 1/4” drill bit. 21. Mark the lines to be slotted on the bumper cover. Using a 1/4” de-burring tool, open the slots marked on the bumper. 1313-17F957IM-AA 20120803RA 1-800-59-ROUSH Page 15 of 25...
- Page 16 23. Cut out the template for lower LH and RH bumper cover mounts. Using a center punch, mark the center of the holes on the templates for the LH and RH bumper cover mounts. 1313-17F957IM-AA 20120803RA 1-800-59-ROUSH Page 16 of 25...
- Page 17 LH and RH bumper cover mounts. 25. Using alcohol, clean the rear valance and bumper cover mating surfaces. Apply ® 3M Ad-Pro (P/N: 021200-27571) to the rear valance where tape will be applied. 1313-17F957IM-AA 20120803RA 1-800-59-ROUSH Page 17 of 25...
- Page 18 26. Install the 2-sided tape (P/N: 1313-17F957TAPE) on the back side of the rear valance as shown. 27. Peel the backing off the 2-sided tape. 1313-17F957IM-AA 20120803RA 1-800-59-ROUSH Page 18 of 25...
- Page 19 29. Install the twelve (12) U-nuts (P/N: 19339B), two (2) W-clips (P/N: W9X14) and two (2) 8 mm bolts (P/N: R18020057-00) on the back of the valance. 30. Reinstall the two (2) reflector markers. 1313-17F957IM-AA 20120803RA 1-800-59-ROUSH Page 19 of 25...
- Page 20 31. Remove sections of the foam bumper cover insert shown for proper fit. 1313-17F957IM-AA 20120803RA 1-800-59-ROUSH Page 20 of 25...
-
Page 21: Section B - Installation
3. With the bumper cover installed, mark the center of the two (2) holes for the center bumper cover mount. NOTE: After drilling the holes, apply commercially available clear coat such as ® Motorcraft PM-19500-600) to the bare metal surfaces. P/N: 1313-17F957IM-AA 20120803RA 1-800-59-ROUSH Page 21 of 25... - Page 22 4. Drill two (2) 1/8” pilot holes. Open with a 1/4” drill bit on the center bumper cover bracket. 5. Install the two (2) J-clips (P/N: N623332-S439). 1313-17F957IM-AA 20120803RA 1-800-59-ROUSH Page 22 of 25...
- Page 23 Tighten to 6 Nm (53 lb-in). 7. Install the two (2) push-pins, two (2) 8 mm bolts and two (2) nuts (P/N: W704521- S437) through lower LH and RH bumper cover mount. Tighten to 6 Nm (53 lb-in). 1313-17F957IM-AA 20120803RA 1-800-59-ROUSH Page 23 of 25...
- Page 24 Congratulations!!! You have completed the installation of your new ROUSH Performance Products 2013 Mustang rear valance kit. 1313-17F957IM-AA 20120803RA 1-800-59-ROUSH Page 24 of 25...
-
Page 25: Warranty
(e.g.: oil, anti-freeze, battery acid, brake fluid, etc.); (vii) acts of God, natural disasters and other similar causes beyond the reasonable control of ROUSH; or (viii) application of chemicals that affect the parts. This Limited Warranty does not cover surface deterioration of paint, trim and...
Need help?
Do you have a question about the 421406 and is the answer not in the manual?
Questions and answers