Advertisement
Quick Links
Advertisement

Related Manuals for ROUSH 422231


Summary of Contents for ROUSH 422231
- Page 1 2019+ Ford Ranger FENDER FLARE KIT Installation Instructions P/N: 422231 (R1419-FLARE) 800.59.ROUSH...
- Page 2 Before installing your ROUSH Performance Product(s), read through the entire installation procedure and check to make sure all items are present. Contact ROUSH Customer Service at 1-800-59-ROUSH, weekdays from 9:00 AM to 5:00 PM EST, with any questions regarding fit, missing parts or instructions that are unclear to you.
- Page 3 PACKING LIST FOR 422231 (R1419-FLARE) ROUSH WHEEL FLARE KIT DESCRIPTION PART NUMBER FLARE KIT - AS MOLDED IN COLOR 1419-16000J7 FENDER FLARE HARDWARE KIT 1419-FFHWK RED - ACCENT LIGHT 47972-BA WIRE HARNESS - REAR LIGHTS 1419-15N515 ZIP TIES (7") CTUV740 GROMMET (7/16")
-
Page 4: Limit Of Liability Statement
The information contained in this publication was accurate and in effect at the time the publication was approved for printing and is subject to change without notice or liability. ROUSH Performance Products (RPP) reserves the right to revise the information presented herein or to discontinue the production of parts described at any time. - Page 5 The following manual will guide you through the installation of the 2019-2020 ROUSH Ranger Fender Flares (P/N: 422231) Ranger Disassembly 1. Locate your vehicle in a safe area and block the wheels. 2. Begin by removing the three (3) push pins from the original front fender flare.
- Page 6 7. With the tailgate down, remove the two (2) bolts retaining the LH side taillight using an 8 mm socket and remove the taillight from the vehicle. Store screws and taillight in a safe location for re-use. 1419-16000IM-AA082720 Page 5 of 16 1-800-59-ROUSH...
- Page 7 8. Disconnect the electrical connector and cut the zip tie retaining the harness. 9. Strip the wire casing back off the wire about 12 inches. 1419-16000IM-AA082720 Page 6 of 16 1-800-59-ROUSH...
- Page 8 10. Cut the two wires connected to pin #3 (power) and to pin #10 (ground) about 5 inches from the rear face of the connector. 1419-16000IM-AA082720 Page 7 of 16 1-800-59-ROUSH...
- Page 9 10 (four places). 12. Install the newly connected pins from each half of the harness into the two (2) supplied electrical connector shells taped to the wire harness. 1419-16000IM-AA082720 Page 8 of 16 1-800-59-ROUSH...
- Page 10 14. Zip tie and tape the harness together. Re-attach the electrical connector to the taillight and re-install the taillight using the two (2) screws previously removed. Torque to 5 Nm. 1419-16000IM-AA082720 Page 9 of 16 1-800-59-ROUSH...
- Page 11 Retain the harness with the provided zip ties. 16. Remove the three (3) push pins from the rear factory flares and discard. 1419-16000IM-AA082720 Page 10 of 16 1-800-59-ROUSH...
- Page 12 T30 torx bit. Store for reuse. ROUSH Ranger Fender Flare Installation 1. Remove the new ROUSH flares from the box and inspect them for proper edge seal fitment over the lip of the flare. Make adjustments as need to re-seat the edge seal as it may have been moved during shipping &...
- Page 13 (mylar tape, 3x push pins, 1x short screw, 1x spring clip) and the previously removed front flare bolt. 3. Place the new ROUSH front flare in the wheel well and mark the forward most fender flare hole location (towards the front of the flare/vehicle) using a marker.
- Page 14 4. Take off the flare and install the mylar tape at the marked location. 5. Install the spring clip over the tape as shown. 1419-16000IM-AA082720 Page 13 of 16 1-800-59-ROUSH...
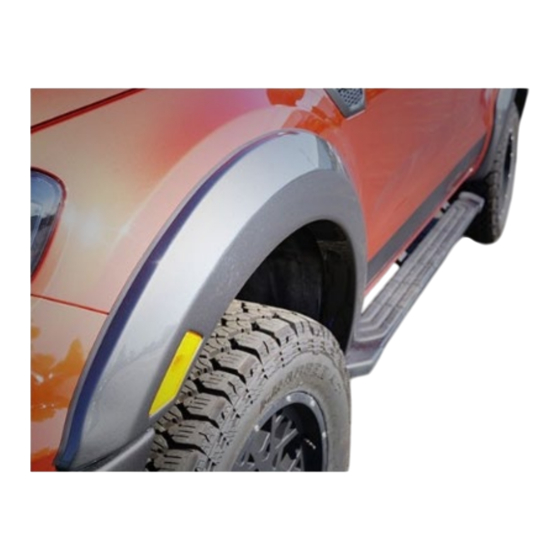
- Page 15 (onto the spring clip). Connect the front factory light to the harness and install the light into the pocket of the fender flare. 7. Picture after front fender installation complete. Repeat on other side of vehicle. 1419-16000IM-AA082720 Page 14 of 16 1-800-59-ROUSH...
- Page 16 (red wire to yellow and white wire to white) of the Roush flare. 10. Position the flare in location on the bedside and install the three (3) push pins provided in the kit.
- Page 17 11. Use the small white edge tool provided to adjust the edge seal around the fender flare to body to make sure any gaps and curled areas are seated firmly. 12. Congratulaions the ROUSH fender flare installation is complete. 1419-16000IM-AA082720...
Need help?
Do you have a question about the 422231 and is the answer not in the manual?
Questions and answers