Advertisement
- 1 Product Overview
- 2 Installation
- 3 Dash Cam Recording Operation
- 4 Playback and Manage Videos
- 5 Review and Control on Smartphone
- 6 Install Accessories
- 7 Dashcam Settings
- 8 Firmware Upgrade
- 9 Customer Service
- 10 Documents / Resources
Product Overview
Standard Items

 Note: The Type-C Data Cable is only used to connect the camera or SSD to external devices such as computers and smartphones for data transfer. It can not be used to charge the camera.
Optional Accessories


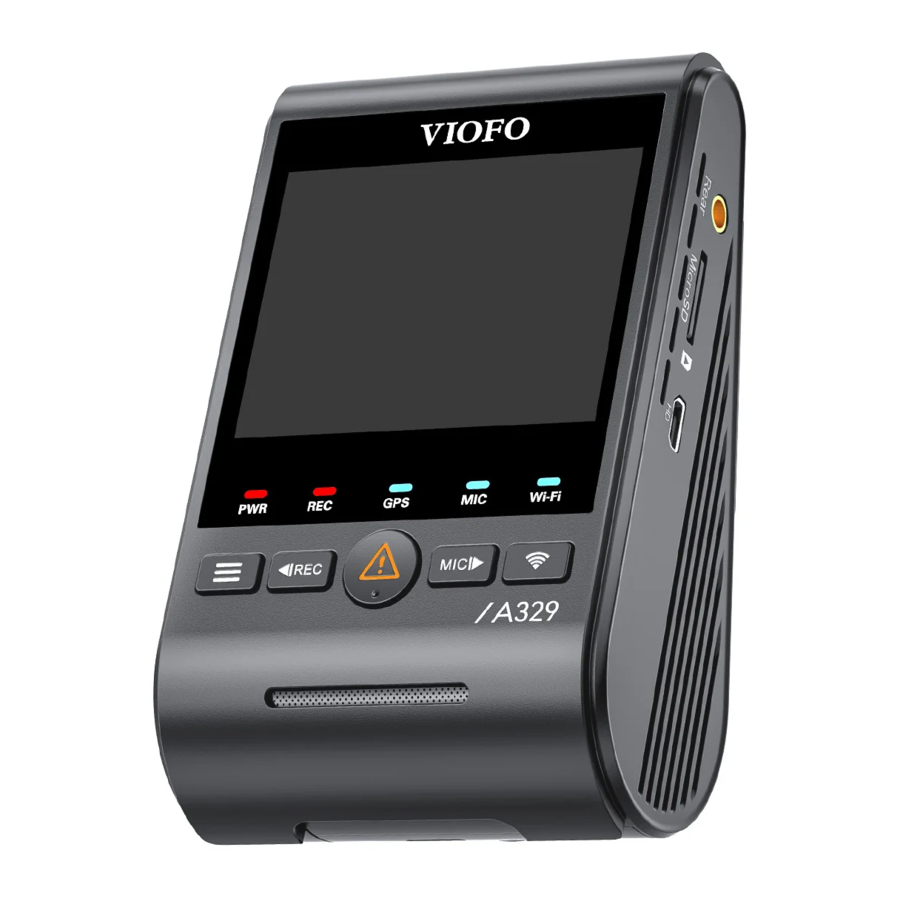
Product Diagram
Front Camera (Main Unit)

- Menu / Power On|Off
- Menu Up / Recording Start | Stop
- Menu Confirm / Video Protect / Playback
- Menu Down / Microphone On | Off
- Wi-Fi On | Off
- Rear Camera Port
- Memory Card Slot
- Micro HDMI Port

- Power In (not support parking mode via a hardwire kit) / Data Cable Port / SSD Connection Port
- Reset Button
- Power Status Indicator
- Recording Status Indicator
- GPS Status Indicator
- Microphone Status Indicator
- Wi-Fi Status Indicator

- USB Power Port
- Mount (GPS Module)
- Lens
Rear Camera (Optional)

- Bracket
- Power In
- Lens
- LED Indicator
LED Indicators
| LED | Led Status | Behavior |
| PWR | Flashing Red | Updating Firmware |
| Solid Red | Power On | |
| Off | Power Off | |
| REC | Solid Red | Recording |
| Flashing Red | Not Recording | |
| GPS | Flashing Blue | GPS Signal Receiving |
| Solid Blue | GPS Signal Received | |
| Off | GPS Disabled | |
| MIC | Solid Blue | Audio Recording On |
| Off | Audio Recording Off | |
| Wi-Fi | Flashing Blue | Wi-Fi On and Waiting Connecting |
| Solid Blue | Wi-Fi Connected | |
| Off | Wi-Fi Disabled |
Buttons and Icons
![]()
![]()
Display Overview

Installation
Insert / Remove the Memory Card
Insert the memory card
Ensure the camera is turned off. Hold the memory card in the orientation shown, slide it into the card slot until you hear a click.

Remove the memory card
Ensure that the camera is turned off, and then push the edge of the memory card with your fingernail. The card will spring out far enough to be removed.
Note:
- The microSD card is sold separately. The microSD card must have a high endurance or UHS-I rating and the capacity is up to 512GB.
- We recommend that you buy VIOFO industrial grade microSD card for extended endurance, excellent performance and reliability.
- Memory card must be formatted before first use. Please format the card on a computer or in the camera to the exFAT or FAT32 file system.
- Please turn off the A329 before inserting or removing the microSD card.
- Inserting or removing the microSD card while recording may destroy the files.
Format the memory card
Memory card must be formatted before first use.
Format the memory card in the camera
To format the card in the camera, either use the VIOFO App and the format option in the Settings, or alternatively long press the [  ] button.
Format the memory card using a computer
To format the memory card on your computer, follow your computer's user manual. For deep formatting of the memory card, you can also download the GUI Format tool from our official website: https://viofo.com/download/guiformat.exe
Note: We suggest formatting the card periodically to ensure the best performance of the camera. Formatting the card will erase all data permanently, please back up important data beforehand.
Install the SSD (Optional)
Install the SSD
- Connect the SSD to the dashcam using the VIOFO Type-C SSD cable.


Note: We recommend using a PSSD (portable SSD). SSD must be formatted before first use. Please format it on a computer or in the camera to the exFAT file system.
- Secure the SSD at a suitable location inside the car, making sure it doesn't obstruct the driver's view. We recommend installing the SSD in the glove box on the passenger side.


- When the SSD is inserted, the dashcam will prompt with "Save the videos to the external SSD?" You can choose to save the recorded videos to the SSD immediately, or set the file storage location later in the dashcam settings.
![]()

Remove the SSD
Unplug the SSD cable from the dashcam. If the dashcam already has a memory card inserted, the recorded files will be automatically saved to the memory card.

If there is no memory card inserted, it will prompt you to insert a memory card.

Install the Front Camera
- Select a location on the windshield behind the rear-view mirror where the camera will not obstruct the driver's view while driving.


- Wipe clean the installation surface of the windscreen with a dry cloth, it must be grease free for the sticky pad to stick firmly.
- Mount the dashcam directly to the windshield with the sticky pad, or attach the static sticker to the selected location before installation.
- Peel the protection film off the sticky pad and camera lens.
![]()

- Fix the camera on the selected location.
- Adjust the Lens Angle
- Look at the live view on the LCD.
- Adjust the angle of the lens up / down if necessary.
![]()
- Connecting to Power

Insert the car charger USB cable's male port into the camera mount's Type-C port. Plug the car charger adapter into your vehicle's 12V / 24V female power socket.


Install the Static Sticker (Optional)
- Wipe clean the surface of the windscreen before installation.
- Peel the red sign protective film off the static sticker, then attach the sticker to the windscreen. Press it for a few seconds, making sure no bubbles are left.

- Peel the green sign protective film off the static sticker.

- Peel the protection film off the sticky pad on the mount, and attach it to the sticker. Press the camera hard for a few seconds, making sure it is attached firmly.
![]()


Install the Rear Camera (Optional)
- Select an installation location on the windscreen, without defrost grid wires, and where the camera can record the entire rear view.
- Wipe clean the installation surface of the windscreen with a dry cloth.
- Peel the protection film off the sticky pad and camera lens.
![]()
- Fix the rear camera on the selected location.
- Connecting with Rear Camera Power off the product and connect the rear camera cable to the front camera (main unit). Cable routing should be as shown in the following two diagrams.


 Tips:
Tips:
- Do not install / mount the camera in a location that interferes with the driver's visibility and safety.
- Install / mount the camera close to the rear view mirror so that both sides of the scene being recorded are equally covered by the camera's FOV (field of view).
- To ensure a clear view on rainy days, the lens should be positioned within the windshield wiper's sweeping range.
- Do not install / mount the camera on or near airbag panels.
- Installation / mounting location should not be affected by sun control film (window tint). There should not be any other electronic equipment close to the camera for optimal performance.
Note: Do not install / mount the camera or cables near an airbag panel or within the airbag's working range. The manufacturer is not liable for any injury or death caused by deployment of the airbag.
Remove Cameras
To remove the front camera from its bracket, slide the camera to the right and pull the front camera out of the mounting bracket.

Note: When you want to plug and unplug the rear camera, please turn off the camera first.
Dash Cam Recording Operation
Initial Setup
Upon the first activation of the dashcam, please perform the initial setup by setting the language, time zone and speed unit.
- Language Setting
When prompted with the initial setup dialog to set a language, press the menu up [![]() ] and menu down [
] and menu down [ ![]() ] buttons to select the language, and press the OK [
] buttons to select the language, and press the OK [![]() ] button to confirm.
] button to confirm.
![]()
- Time Zone Setting
Press the menu up [![]() ] and menu down [
] and menu down [ ![]() ] buttons to select the time zone, and press the OK [
] buttons to select the time zone, and press the OK [![]() ] button to confirm. You can also press the [
] button to confirm. You can also press the [ ![]() ] button to return to the previous level to modify settings.
] button to return to the previous level to modify settings.
![]()
- Confirm Auto Time and Date Setup Press the OK [
![]() ] button to confirm.
] button to confirm.
![]()
- Speed Unit Setting
Press the menu up [![]() ] and menu down [
] and menu down [ ![]() ] buttons to select the speed unit, and press the OK [
] buttons to select the speed unit, and press the OK [![]() ] button to confirm.
] button to confirm.
![]()
- Format microSD Card
Memory card must be formatted before first use. Select the [![]() ] and press the OK [
] and press the OK [ ![]() ] button to confirm formatting the memory card. After successful formatting, the camera will automatically restart and power on.
] button to confirm formatting the memory card. After successful formatting, the camera will automatically restart and power on.
![]()
![warning]() Note:
Note: - The above settings can be modified anytime from the settings menu.
- After restoring device to factory settings, the initial setup interface will also be triggered upon startup.
- Format External SSD
If your dashcam has an external SSD connected, you can choose whether to format the SSD and whether to save videos to the SSD. We recommend formatting the SSD before first use.
![]()


 ] button to return to the previous level to modify settings.


Power On / Off
- When you start the engine, the camera will turn on and begin recording automatically.
- When you turn off the engine or unplug the charging cable from the power adapter, the camera will stop recording and turn off.
- Short press [
![]() ] button to power on the camera. Long press [
] button to power on the camera. Long press [ ![]() ] button to power off the camera.
] button to power off the camera.
 ] button to power on the camera. Long press [
 Loop Recording
- Insert a microSD card into the camera's card slot and automatic loop recording will begin once the camera detects power.
- Time frame for each video file is 1 / 2 / 3 / 5 / 10 minutes.
- When there is insufficient space on the microSD car, loop recording will automatically overwrite the oldest files (one by one).
- Loop recording files are saved to microSD card: \DCIM\Movie.
Emergency Recording
- Automatic emergency recording When the G-sensor is activated by a collision, the current footage will be locked automatically to avoid being overwritten by loop recording.
- Manual emergency recording Pressing the [
![]() ] button during a recording will lock the current file being recorded. Once locked, the file will not be overwritten by the loop recording feature.
] button during a recording will lock the current file being recorded. Once locked, the file will not be overwritten by the loop recording feature.
Note: Collision detection sensitivity can be adjusted in settings under the "G-sensor" option. Locked files are saved to microSD card: DCIM \ Movie \ RO
Disable / Enable Audio Recording
Pressing the [ ] button once to turn off / on audio recording, [
  ] LED light will be off / solid Blue.
Parking Mode
There are three options for parking mode.
- Auto Event Detection
The camera will automatically record a video sequence while a moving object is being detected during parking mode. It will stop recording when no new movement is detected. - Time Lapse Recording
Time lapse records a video at low frames at 1 / 2 / 3 / 5 / 10 fps, it keeps recording continuously without audio recorded.
![warning]() Note: Timelapse 1 fps mode supports Super Night Vision option, which can provide brighter and clearer night vision in extreme low light conditions, with lower power consumption.
Note: Timelapse 1 fps mode supports Super Night Vision option, which can provide brighter and clearer night vision in extreme low light conditions, with lower power consumption. - Low Bitrate Recording
This mode uses low bitrate to record video and audio, and uses small file sizes for continuous recording.
Note: Parking mode provides surveillance of your parked vehicle only when the engine is off and the USB Type-C Hardwire Kit is used to provide continuous power. The Hardwire Kit also protects your car battery from being drained. We recommend buying the VIOFO HK4 ACC hardwire kit cable for parking mode recording.
View on a TV
The camera has a HDMI out port for connecting an external display such as a monitor or TV. You can use a Micro HDMI to HDMI cable to connect the dashcam to a monitor, allowing it to display the dashcam's real-time video.
Note: The Micro HDMI port supports connecting to an external monitor, with a minimum display resolution of 1920x1080P and a maximum resolution of 4K.
Playback and Manage Videos
Playback Video on Dashcam
- Under standby mode (not recording), long press [
![]() ] button to enter the playlist.
] button to enter the playlist. - Use the arrow buttons [
![]() ] to select the desired video and press the button [
] to select the desired video and press the button [ ![]() ] to play.
] to play. - Press the [
![]() ] button to exit.
] button to exit.
 ] to select the desired video and press the button [
  ] button to exit.
Playback Video on VIOFO APP
Long press the Wi-Fi button to enable Wi-Fi. Connect Wi-Fi on your phone first. Open VIOFO app and choose "Connect your camera" to use your phone to control the dashcam. You can play and manage files through the APP. You can check the app introduction refer to [ Review and Control on Smartphone ].
Playback Video on PC
Via Memory Card
- Remove memory card from dashcam. Before removing the memory card, make sure you have switched off the Dashcam.
- Insert the memory card into a microSD card adapter or card reader connected to your PC.
- Open the DCIM folder, using VLC or another video player to playback the video.
Note: For your PC with a microSD slot, you can directly insert the memory card into it.
Via External SSD
- Remove the external SSD from dashcam.
- Connect the SSD to your PC using the Type-C Data Cable.
- Open the DCIM folder, using VLC or another video player to playback the video.
Video File Storage Location
| Recording Mode | Behavior |
| Loop Recording ( Including Motion Detection ) | DCIM \ Movie |
| Emergency Recording ( Locked Video ) | DCIM \ Movie\ RO |
| Parking Recording ( Auto Event Detection / Time-lapse Recording / Low Bitrate Recording ) | DCIM \ Movie \ Parking |
| Snapshot | DCIM \ Photo |
File Format Definition Files recorded by front camera and rear camera are saved separately.

Review and Control on Smartphone
Connect to Smartphone
The VIOFO app allows you to control your camera remotely by using a smartphone. Features include full camera control, live preview, playback and video recording.
Android Device
Android users can download the app from Google Play,

or download the APK directly from our official website:

https://viofo.com/en/content/13-app/
IOS Device
IOS users can download the app from the App store.


Connect VIOFO APP
Turn on the Wi-Fi in the menu or long press the [ ] button. When the Wi-Fi is on, Wi-Fi name (SSID) and the password appear on the camera LCD screen.

- Step 1: Use the phone to connect A329 Wi-Fi. When the phone is connected with the dashcam, the LED light on the camera shows solid blue.
- Step 2: Open VIOFO app and choose "Connect your camera" to use your phone to control the dashcam.
- Step 3: Now you can see the live view of both cameras. You can change the settings and check the files on the app.
APP Layout Overview
Choosing "Connect your camera" to use your phone to control the dashcam.

- Menu
- Home Page
- Downloaded Video
- VIOFO Official Facebook Page
- Official Support
- Firmware Update

- Rear Camera Live Video
- Front Camera Live Video
- Audio Recording Status
- Switch Camera Video Source
- Take a Video Snapshot
- Go to Video File Lists
- Start / Stop Recording
- Go to Dashcam Settings
- Select All / Deselect All
- Download Video Files
- Delete Video Files
Install Accessories
Install CPL on Front Camera
The CPL (Circular Polarizing Lens) can be used to reduce reflections and glare from the window glass and road surfaces that can otherwise damage image quality, this works in the same way as polarized sunglasses, getting more saturated and beautiful video.

When installing the CPL, you need to align the white mark on the CPL with the corresponding mark on the camera.
Install CPL on Rear Camera (Optional)

Install Bluetooth Remote Control (Optional)
The Bluetooth Remote Control (optional), featuring three buttons and conveniently mounting on your dashboard, allows you to safely lock important videos, turn on/off Wi-Fi, enable/disable HDR, and perform additional functions, all without diverting your attention from the road.
Pairing with dash camera
- Power on the camera.
- Press and hold the video lock button on remote control for 3 seconds to pair with camera.
- If get paired successfully, the LED indicator of the remote turns blue.


Dashcam Settings
You can set the dashcam settings according to your needs and preferences using the camera or the VIOFO App. To enter the settings menu, please stop recording first.
Video Settings
- Resolution:
- Front Camera:
4K 60fps
4K 21:9 60fps
4K 30fps
4K 21:9 30fps
2K 60fps
2K 30fps - Front Camera + Rear Camera:
4K P60 + 2K P30
4KP60 21:9 + 2K 21:9
4K P30 + 2K P30
4KP30 21:9 + 2K 21:9
2K P60 + 2K P30
2K P30 + 2K P30
- Front Camera:
Note: The 4K resolution refers to 3840x2160P, and the 2K resolution refers to 2560x1440P. The 4K 21:9 refers to 3840x1600P, and the 2K 21:9 refers to 2560x1080P.
- Video Bitrate:
Low / Normal / High / Maximum. You can set the bitrate for video. High bitrate may improve the quality and smoothness of the video, especially when recording fast motion or high contrast scenes. Using high bitrate mode may decrease the amount of recording time available on your memory card. Using low bitrate will save space and record for longer time.
- Loop Recording:
1 / 2 / 3 / 5 / 10 Minutes. Recording will begin automatically after powering on with a microSD card in the device. Each recorded file is one minute long as a default and the old footage will be replaced when microSD card storage is full. - Record Audio:
Turn on and off the microphone. This can also be changed during recording by pressing the microphone button [![]() ].
]. - Exposure Value (Front / Rear):
Adjusting the value of the EV (Exposure Value) properly can create better footage under different light sources. It ranges from -2.0 to +2.0. You can adjust the EV for the front and rear cameras separately. The default is set at 0.0. - HDR (Front / Rear):
Off / On / Auto HDR Timer. You can set HDR for the front and rear cameras separately. The default setting is Off. The multi-exposure HDR technique helps automatically balance the lighting in over bright and over dark areas to avoid over exposure issues.
![warning]() Note: When the front camera HDR is set to 'Auto', the rear camera HDR will then display 'Auto' option. The HDR Timer follows the front camera's and cannot be adjusted individually.
Note: When the front camera HDR is set to 'Auto', the rear camera HDR will then display 'Auto' option. The HDR Timer follows the front camera's and cannot be adjusted individually. - G-Sensor:
The G-sensor measures shock forces and locks the video recorded at the time. The settings from "low to high" determine the amount of force needed to lock the file from being overwritten. We recommend that you set it at low.
- Stamp: Choose to imprint the information on the recorded video. Date Stamp / GPS Speed Stamp / GPS Coordinates Stamp / Custom Stamp / License Plate Stamp / Logo Stamp / Brand Model Stamp / Resolution Stamp / Stamp Text Color.
![warning]() Note: You can change the stamp text color in the video file to white/yellow/cyan/golden.
Note: You can change the stamp text color in the video file to white/yellow/cyan/golden. - Time-lapse Recording: Off / 1 / 2 / 3 / 5 / 10 fps.
Record video from frames captured at specific time intervals to conserve memory and reduce the time it takes to review video. The default is off. - Parking Recording
Parking Mode: There are 3 options under parking mode:- Auto Event Detection The camera will automatically record a video sequence while a moving object is detected during parking. It will stop recording without new movements.
- Time Lapse Recording Time lapse records a video at low frames at 1 / 2 / 3 / 5 / 10 fps, it keeps recording continuously without audio recorded. Timelapse 1 fps mode supports SNV (Super Night Vision) option, which can provide brighter and clearer night vision in extreme low light conditions, with lower power consumption.
- Low Bitrate Recording This mode uses low bitrate to record video and audio, and uses small file sizes for continuous recording.
Note:
- We recommend that you buy VIOFO HK4 ACC hardwire kit cable for parking mode recording.
- In case you park the car outside in hot summer, we highly recommend time lapse recording mode. If the temperature inside the car goes above 60°C, we advise turning off the dashcam to avoid recording errors or even irreversible damages.
Parking Recording Timer:
"Off" means the camera will keep recording until the hardwire kits cut the power supply. "1 Hour" means the camera will shut down after it gets into parking mode for 1 hour.
Enter Parking Mode Timer:
Set the timer for entering parking mode. (Only for hardwire cable, if you use external battery, this function will not work.)
"Off" means the camera will enter parking mode right away when the engine is off.
"90 Seconds" means the camera will enter parking mode 90 seconds after the engine is off.
Parking G-sensor:
The G-sensor detects significant or sudden movement (such as an impact or collision), it will trigger an event recording. We suggest setting it to High Sensitivity in parking mode recording.
Parking Motion Detection:
Adjusts the sensitivity of the motion detection so minor motion caused by wind or rain doesn't trigger a recording.
Parking GPS:
Turn on / off GPS logger in parking mode.
Parking HDR:
Turn on / off HDR in parking mode.
- Image Rotate & Mirror:
Turn on / off the Rear camera image rotate and mirror. - Custom Text Stamp:
Imprint the customize text on the recorded video. - License Plate Number:
Imprint the car number on the recorded video. - Live Video Source:
Front Camera / Rear Camera / Rear Overlaid / Front Overlaid. - Privacy Mode:
Turn on / off privacy mode. When the privacy mode is on, the dashcam only saves the latest 2 (for single-channel camera) or 4 (for dual-channel camera) normally recorded video files.
System Settings
- Wi-Fi:
Off / 2.4GHz / 5GHz.
Set it On / Off. Press the [![]() ] button for 3 or 5 seconds to enable Wi-Fi quickly. We recommend choosing 5GHz Wi-Fi mode.
] button for 3 or 5 seconds to enable Wi-Fi quickly. We recommend choosing 5GHz Wi-Fi mode. - Bluetooth Button Function:
Set the customized button functions for Bluetooth remote control. The Mic Button and Action Button can be set to control certain functions of the dashcam, including:
Turn On / Off Microphone
Take a Photo
Turn On / Off WiFi
Power Off
Switch to Timelapse Recording
Turn On / Off HDR - Time Zone:
Set the current time zone for GPS time and date calibration.
![warning]() Note: The time zone must be manually adjusted for daylight savings, except for the United States regions.
Note: The time zone must be manually adjusted for daylight savings, except for the United States regions.
 ] button for 3 or 5 seconds to enable Wi-Fi quickly. We recommend choosing 5GHz Wi-Fi mode.
- Time Format:
24H / 12H. Set system time format. - Daylight Saving:
Off / United States. Set US daylight saving on or off. - Date/Time:
Set system date / time. - Boot Delay:
The camera will boot seconds delay when powered on. The settings are Off / 5 Seconds / 10 Seconds. - LED: All Off / All On / Power LED Only. You can enable / disable the LED lights.
- Parking Mode LED:
All Off / All On / Power LED Only. You can enable / disable the LED lights under Parking Mode. - Manage SSD Storage:
You can choose to backup MicroSD card files (Last 24 hours/7 days/All) into SSD, or delete external SSD files. - Video Storage:
MicroSD Card / External SSD. You can choose to store videos and photos on these two different storage devices.
- Beep Sound:
Off / Only Keytone / Only Boot Sound / All. You can enable/disable the button and startup sounds. - Voice Notification:
Turn on / off the voice notification. - Voice Notification Volume:
Low / Medium / High Adjust the volume of the voice notification. - Voice Control:
Turn off / on the voice control. When Voice Control is turned on, you can control the camera with spoken commands, using your voice to take photos, turn on/off Wi-Fi, start recording, and more.
![warning]() Note: Voice command language should be consistent with dashcam system language in following four options: English, Chinese, Russian, and Japanese. For all other dashcam language systems, English is the only language to trigger voice control function.
Note: Voice command language should be consistent with dashcam system language in following four options: English, Chinese, Russian, and Japanese. For all other dashcam language systems, English is the only language to trigger voice control function. - Voice Command:
Voice recognition commands. You can issue different voice commands to remote control the camera, like:- Take Photo
- Turn On Audio
- Turn On Screen
- Turn On Wi-Fi
- Show Front Camera
- Show Both Cameras
- Video Start
- Turn Off Audio
- Turn Off Screen
- Turn Off Wi-Fi
- Show Rear Camera
- Lock The Video
- GPS:
Turn on / off GPS logger. A GPS module is used to include the location data in the recorded videos. If disabled, your camera will no longer measure your speed and position; nor synchronize the time / date. (Only available when connecting with GPS signal) Please use "Dashcam Viewer" to playback videos and to visualize your position and speed on your computer. - Speed Units:
Kilometer per hour (KMH) and miles per hour (MPH) are available for speed units. - Screen Saver: The screen goes black by default after 1minute while recording. You can set it by adjusting different time intervals on menu.
- Video Out OSD:
Off / On. When connecting the camera to an external display via the Micro HDMI port, the display can shows dashcam's live recording in real time. You can turn off/on the on-screen display of icon information. - Frequency: Set it to minimize flickering and banding in the recorded video.
- Language: Display language setting. (English, Traditional Chinese, French, etc.)
- Format: MicroSD Card / External SSD. You can choose to delete all data on the microSD card or external SSD.
![warning]() Note: Once you format the card or SSD, all information will be deleted and unrecoverable. Make sure to back up all files that you needed before formatting.
Note: Once you format the card or SSD, all information will be deleted and unrecoverable. Make sure to back up all files that you needed before formatting.
- Format Reminder:
Off / 15 / 30 / 60 Days. Set regular reminders for formatting the memory card. - Default Setting:
Restore device to factory settings. - Version:
Check the current firmware version of the camera.
File Lists
- Video: Video File Lists.
- Photo: Photo File Lists.
Firmware Upgrade
Follow the instructions at viofo.com to upgrade the firmware.
Note:
- Before using a microSD card to upgrade the firmware, formatting the card in the camera is necessary to ensure stable read and write operation.
- Do not unplug or power off the camera during a firmware upgrade, it may cause the camera to subsequently fail to boot.
- Not support firmware upgrade via external SSD.
Customer Service
From the date of purchase on, all products are warranted for 12 months and all accessories are warranted for 3 months. VIOFO offers lifetime technical support for all our users.
Product Registration Program
VIOFO also have Product Registration Program to help customers extend warranty by 6 months. Visit www.viofo.com and register your new product to extend the warranty from 12 months to 18 months.

Scan the QR code to activate 6-month extended warranty now
Video Sharing
Share videos caught on VIOFO camera with us. Let's enjoy your new findings together! Gain a chance to get a mysterious gift at share@viofo.com.
How to Contact Us?
- Submit a ticket at support.viofo.com
- Live chat box at www.viofo.com
- support@viofo.com
- www.facebook.com/viofo
- +86 755 8526 8909 (CN)
- Mon-Fri 9am-6pm

Scan the QR code to submit a ticket

Scan to Access User Guide Videos
Documents / Resources
References
![viofo.com]() https://viofo.com/download/guiformat.exe
https://viofo.com/download/guiformat.exe![play.google.com]() Google Play
Google Play![viofo.com]() viofo app
viofo app![apps.apple.com]() VIOFO on the App Store
VIOFO on the App Store![viofo.com]() VIOFO Official Site | Best Sell Dash Cam | 4K Dash cam front and rear
VIOFO Official Site | Best Sell Dash Cam | 4K Dash cam front and rear![www.viofo.com]() VIOFO Official Site | Best Sell Dash Cam | 4K Dash cam front and rear
VIOFO Official Site | Best Sell Dash Cam | 4K Dash cam front and rear![support.viofo.com]() Support : VIOFO Support Center
Support : VIOFO Support Center
Download manual
Here you can download full pdf version of manual, it may contain additional safety instructions, warranty information, FCC rules, etc.
Advertisement


Need help?
Do you have a question about the A329 and is the answer not in the manual?
Questions and answers