
Related Manuals for Viofo T130


Summary of Contents for Viofo T130
- Page 1 USER MANUAL The user manual is available on https://support.viofo.com Copyright (c) 2021,VIOFO Ltd, all rights reserved V21.12.22...
-
Page 2: Table Of Contents
Table of Contents Product Overview 1. Product Overview Standard Items 7. Systems Setting Standard Items Video Setting Optional Accessories System Setting Product Diagram Other 8. Firmware Upgrade Car Charger 2. Installation Main Unit Adapter 9. Notice Inserting / Remove the Memory Card Install Front Camera 10. -
Page 3: Optional Accessories
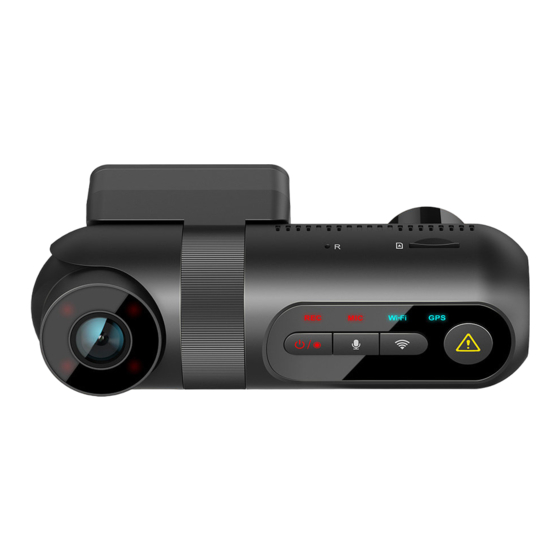
Optional Accessories 13 14 15 Rear Camera Rear Camera USB Cable (6M) Circular Polarizing Bluetooth Remote Lens Filter Hardwire Kit Product Diagram 9. Video Protect 1. GPS Module Front Camera (Main Unit) 10. Rear Camera Port 2. Reset Hole 11. Power In / microSD Card Reader 3. -
Page 4: Installation
Flashing Blue GPS Signal Receiving memory card are facing away from Solid Blue Wi-Fi Connected the VIOFO logo side of the main unit. Ensure the camera is turned off and Flashing Blue Wi-Fi on and Waiting Connecting Wi-Fi push the memory card into the card... -
Page 5: Install Front Camera
• Make sure the metal contacts on the memory card are facing away from the VIOFO logo side of the main unit. Ensure the camera is turned off and push the memory card into the card slot until you hear a click. - Page 6 2. Select a location on the windshield behind the rear-view mirror where the 7. Connecting to Power. camera will not obstruct the driver’s view while driving. Plug the USB power adapter into your vehicle’s 12V / 24V female 3. Wipe clean the installation surface of the windscreen with a dry power socket.
-
Page 7: Install Rear Camera
3. Install Rear Camera (Optional) Front Camera 1. Select an installation location. 2. Wipe clean the installation surface of the windscreen with a dry cloth. Rear Camera Select a location on the windscreen, without defrost grid wires, and where the camera can record the entire rear view. 3. -
Page 8: Dash Cam Recording Operation
The collision sensing feature can be adjusted in settings under the “G-sensor” Power On/Off option via VIOFO App. Locked files are saved to SD card: DCIM \ Movie \ RO 1. When you start the engine, the camera will turn on and begin recording automatically. -
Page 9: Play And Manage Videos
Hardwire Kit also protects your car battery from being drained. We DCIM \ RO ( Locked Video ) recommend buying the VIOFO HK4 ACC hardwire kit cable for parking mode recording. Parking recording ( Auto Event Detection / Time-lapse Recording /... -
Page 10: Review And Control On Smartphone
Wi-Fi Status LED will be flashing blue. 1 - Menu 4 - Official Support • Step 1: Use the phone to connect T130 Wi-Fi. When the phone is connected 2 - Downloaded Video 5 - Firmware Update with the dashcam, the LED lights on the camera shows solid blue. -
Page 11: Install Optional Accessories
Install Optional Accessories Install CPL The CPL (Circular Polarizing Lens) can be used to reduce reflections and glare from the window glass and road surfaces that can otherwise damage image quality, this works in the same way as polarized sunglasses, getting more saturated and beautiful video. -
Page 12: 7. Systems Setting
• WDR (Wide Dynamic Range): On / Off. The dynamic range is the ratio of the brightest portion of the Camera setup is available in the VIOFO App. Connect the image to the darkest portion of the image. WDR enables the camera to App as above, stop recording, then enter the settings menu. - Page 13 • Notification Sounds: Note: We recommend to buy VIOFO HK4 ACC hardwire kit cable for Off / Button beep only / Startup sound only / All on. parking mode recording. The parking recording files name of front You can enable/disable the button and startup sounds.
-
Page 14: Other
• Voice Notification: • Reset Camera Settings: Reset all settings to default values. turn on / off the voice notification. You can change the language setting • Wi-Fi Name (SSID): Change Wi-Fi name. through the voice notification language option. • Wi-Fi Password: Change Wi-Fi Password. Wi-Fi default password is 12345678. •... -
Page 15: Firmware Upgrade
(2) This device must accept any interference received, including interference that may cause undesired operation. Notice Shenzhen VIOFO Technology Co., Ltd, declares that this Radio Frequency peripheral is in compliance with the essential requirements and other relevant provisions of Directive 1999/5/EC. -
Page 16: Customer Service
From the date of purchase on, all products are warranted for 12 months and all accessories are warranted for 3 Share videos caught on VIOFO camera with us. Let’s enjoy months. VIOFO offers lifetime technical support for all our your new found together! Gain a chance to get a mysterious users.
Need help?
Do you have a question about the T130 and is the answer not in the manual?
Questions and answers