cecotec CONGA 3000 CARPETCLEAN (05082) Manual
- Instruction manual (46 pages) ,
- Instruction manual (120 pages)
Advertisement
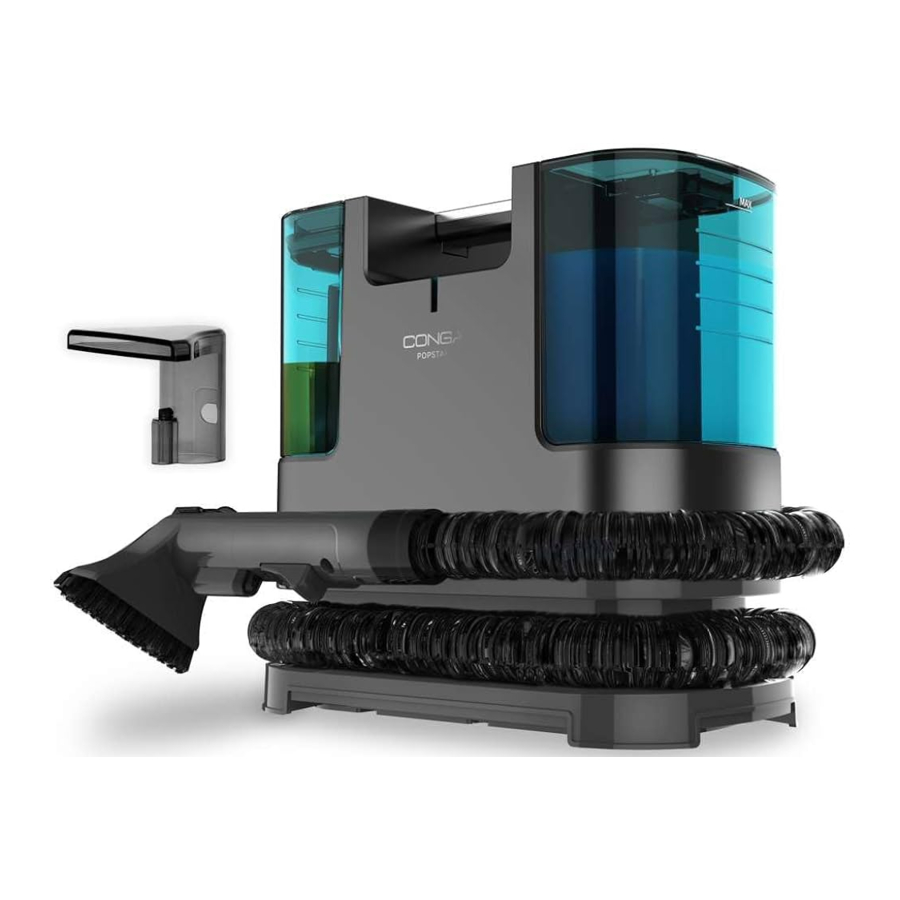
PARTS AND COMPONENTS
Fig. 1

- Power button
- Clean-water tank release tab
- Clean-water tank
- Main body
- Hose
- Hose hook
- Water release button
- Hose bracket
- Plug
- Waste-water tank
- Waste-water tank release tab
- Handle
- Power cord holder
To transport the device, you can wind the hose around the machine and tie and hang the power cord in its hook, as shown in Figure 1.
Attachments
Fig. 2

- Water suction nozzle with brush, to be used on carpets, etc.
- Suction inlet
- Brush
- Water outlet
- Right-angle suction nozzle, for narrow slots and seat backrests
- Suction inlet
- Water outlet
BEFORE USE
- This product includes a safety package to protect it during transport. Unpack the device and keep the original packaging and materials in a safe place. It will help prevent any damage if the product needs to be transported in the future. In case the original packaging is disposed of, make sure all packaging materials are recycled accordingly.
- Make sure all parts and components are included and in good conditions. If any sign of visible damage is observed, immediately contact Cecotec's official Technical Support Service.
Box contents:
- Upholstery cleaner
- Right-angle suction nozzle
- Water suction nozzle with brush
- Clean-water tank
- Waste-water tank
- Hose hook
- Water tank cap
- Instruction manual
ASSEMBLY
- Insert the hose hook (6) in the device (4).
Fig. 3

- Remove the clean-water tank (3) from the main body of the device (4). To do so, slide the clean-water tank release tab (2) and remove the tank (3) in the direction of the arrow shown in figure 4.
![]()
- Turn the clean-water tank (3), loosen the cap, and fill the tank with clean water. The maximum water capacity is 1.2 litres approximately and it is marked in the tank with 'MAX'.
Fig. 5
![]()
- Install the clean-water tank (3) again in the main body of the device (4).
Fig. 6
![]()
- Insert the hose bracket (8) in the suction nozzle (A/B). The holes on both pieces must match during assembly.
Fig. 7
![]()


- After filling the tank with water (3), you must tighten the cap correctly to avoid leakage.
- You can add low-foam detergent to the clean-water tank (3), combined with water in a 5:10 proportion.
- After using your device, you must empty the remaining water in the clean-water tank (3) to avoid leakage and mould formation.
- Do not shake the clean-water tank (3) during installation, as it could cause water leakage.
OPERATION
- Plug the device into a power supply.
Fig. 8
![]()
- Press the power button (1) to turn the device on.
Fig. 9
![]()
- Hold down the water release button (7) to spray clean water (Fig. 10). Spray clean water over the dirt to bring it to the surface.

- Press the vacuuming inlet (18) on the dirt to bring water and dirt to the surface and vacuum them.
Fig. 11

- Stop spraying clean water and vacuum the waste water (Fig. 12). After using the device, dry the surface with a dryer or let it air dry.

- Switch off the device by pressing the power button.
Fig. 13
![]()
- Disconnect the device from the power supply.
- Empty the clean and waste water from the tanks and clean the waste-water tank.


- Do not spray water continuously over the same spot.
- Take special care when using the device to clean stairs.
- After using the device, hang and wind the power cord in the power cord holder.
Cleaning embedded dirt
- You can add low-foam detergent in the clean-water tank or apply it directly on the stain.
- Make sure the detergent will not damage the soiled surface before using it.
- Do not use thinners, aniline, chloroform or flammable detergents.
Recommended liquids
- Alkaline ionised water.
- Low-foam detergent to the clean water tank combined with water in a 5:10 proportion.
- Citric acid
- Water with hydrochloric acid.
Non-recommended liquids
- Neutral kitchen detergent.
- Alkaline detergent.
- Acid detergent.
- Apply detergent over the soiled surface, spray clean water and scrub the dirt with a brush (19) to bring it to the surface.
- Vacuum the dirt and do not let any detergent remain.
Fig. 14
![]()

- To know the detergent quantity and use, carefully read the manufacturer instructions.
- Stop using the device when the water or foam in the waste-water tank (12) reaches the maximum water level and clean the waste-water tank (12); otherwise, water may enter the machine.
Using the right-angle suction nozzle
Press the suction nozzle against the soiled surface and move it from top to bottom.
Fig. 15

CLEANING AND MAINTENANCE
- Stop the device and unplug it from the mains before cleaning it.
- Do not wet the device to avoid the risk of electric shock.
- Do not use detergents, thinners, benzene or other chemical agents to clean the device.
- After every use, you must remove and clean the waste-water tank (12), the clean-water tank (3) and the suction nozzle (A/B) to prevent humidity and dirt remains from emitting bad odours.
Fig. 16
![]()

Cleaning the main body
- The most common dirt can be cleaned with a slightly damp cloth.
- The most stubborn dirt can be cleaned with a cloth slightly soaked in detergent and then a cloth slightly soaked in water.
Cleaning the waste-water tank
- When the waste water reaches the maximum level (11), stop using the device and unplug it from the mains.
- Remove the waste-water tank (12). To do so, slide the waste-water tank release tab (13) and remove the waste-water tank (12) in the direction of the arrow shown in Figure 17.
![]()
- Remove the upper cover of the waste-water tank and empty the waste water.
Fig. 18
![]()
- Clean the tank, the upper cover and the sealing strip.
Fig. 19
![]()
- Install the sealing ring in the cover and secure it to the tank, making sure the holes (29) match the tabs (28).
Fig. 20
![]()
- Place the waste-water tank (12) in the main body of the device (4).
Fig. 21


Figure 20:
- Tabs
- Holes
- Do not lean or shake the waste-water tank when transporting or assembling it; otherwise, waste water will easily leak.
- We recommend you empty the waste water before it exceeds the maximum level on the tank (11); if you continue using the tank after the waste water has exceeded the maximum water level (11), the float valve (31) will automatically stop the machine vacuuming water (30).
Fig. 23
![]()

Figure 22:

- Automatic vacuuming stop device
- Float valve
Cleaning the clean-water tank
- Remove the clean-water tank (3) in the arrow direction, as shown in the assembly section. Fig. 4
- Loosen the cap and empty the remaining water. Fig. 23
- Tighten the cap of the clean water tank again (3) and install the empty tank.
- Press the power button (1) to turn on the device.
Fig. 24
![]()
- Press the water release button (7) to empty the remaining water in the device.
Fig. 25
![]()
- When it stops releasing water, turn off the device and unplug it from the mains.
- Tilt the machine and empty the remaining water at the bottom of the device.
Fig. 26


Cleaning the suction nozzle
- Press the suction nozzle release button (32) and separate it from the hose bracket (8).
Fig. 27
![]()
- Remove the front cover (33) by lifting it with your finger.
Fig. 28

- Rinse the suction nozzle.
- Install the suction nozzle cover again. Make sure the pins are correctly placed in the holes and press these parts until they click.
Fig. 29-30
![]()


Figure 28-29:
- Suction nozzle release button
- Suction nozzle front cover
- Holes
- Pins
- When cleaning the suction nozzle, empty the water outlet (20) if clogged.
Fig. 31
![]()
- Check the hose (5) is not damaged and has no leaks.
Fig. 32


Cleaning the air inlet sponge and the filter sponge
Rinse the air inlet sponge (36) and the filter sponge (37) after every use and replace them if worn.
Figure 33

- Air inlet sponge (located on the bottom of the waste-water tank)
- Filter sponge (located on the bottom of the clean-water tank)
- We recommend removing them with tweezers.
- Let them air dry after cleaning.
- Install the parts again in the machine after cleaning.
- After cleaning it, store the machine in a dry place at room temperature and avoid direct sunlight.
TROUBLESHOOTING
If you observe any problem, carefully read this manual and try any possible solutions before contacting Cecotec's Technical Support Service.
| Problem | Possible causes | Possible solutions |
| The appliance does not work, and the switch is on. | The plug is not correctly connected and loose, so it does not make contact. | Turn off the device and connect it again to the mains. |
| The internal line or power cord are broken. | Contact the Technical Support Service of Cecotec. | |
| The device overheats up and it activates the protective device. | Read the instructions on the protective device. | |
| When pressing the water release button, there is no water or little water released. | The nozzle is clogged. | Remove the suction nozzle and clean it with clean water. |
| The bracket or pump are damaged. | Contact the Technical Support Service of Cecotec. | |
It does not vacuum, or it is too weak | The power button is in the Off position. | Turn on the power button. |
| The waste-water tank is full, which activates the float valve. | Empty the waste-water tank and use it again. | |
| The hose does not work properly. | Check the hose is not cracked, broken or clogged. | |
| The waste-water tank is not correctly installed. | Install the waste-water tank correctly. | |
| The air inlet sponge is blocked. | Clean or replace the sponge. |
If after these tasks the problem still occurs, contact the provider or Cecotec's Technical Support Service.
Do not try to disassemble, repair or modify the device by yourself.
TECHNICAL SPECIFICATIONS
Product: Conga 3000 CarpetClean upholstery cleaner
Reference: 05082
Voltage: 220-240 V, 50/60Hz
Power: 400 W
IPX4
Actual waste-water tank capacity: around 0.5 litres
Actual clean-water tank capacity: around 1.2 litres.
Hose length: φ30 mm x 1.2 m
Dimensions: 290 mm x 180 mm x 270 mm
Technical specifications may change without prior notification to improve product quality.
Documents / ResourcesDownload manual
Here you can download full pdf version of manual, it may contain additional safety instructions, warranty information, FCC rules, etc.
Advertisement


Need help?
Do you have a question about the CONGA 3000 CARPETCLEAN and is the answer not in the manual?
Questions and answers