
Subscribe to Our Youtube Channel
Related Manuals for SRAM Avid BB5


Summary of Contents for SRAM Avid BB5
- Page 1 Ball Bearing Disc Brake Installation and Setup Guide Caliper Caliper PLEASE READ THE SAFETY AND WARRANTY INFORMATION INSIDE 955-310589-000 Rev. B © SRAM Corporation, 2005...
- Page 2 955-310589-000 Rev. B...
- Page 3 BB7 and BB5 Installation & Set-Up Guide English CONGRATULATIONS! You have selected the best mechanical disc brakes your money can buy! This manual contains important information for installing, setting up and adjusting your new brakes. To ensure that your Avid brakes perform properly, we recommend that you have them installed by a qualified bicycle mechanic.
- Page 4 English BB7 and BB5 Installation & Set-Up Guide SAFETY INFORMATION Brakes are a safety-critical item on a bicycle. Improper setup or ALWAYS RIDE UNDER CONTROL use of brakes can result in loss of control or an accident, which Remember, it takes longer to stop in wet conditions. To reduce could lead to a severe injury.
- Page 5 BB7 and BB5 Installation & Set-Up Guide English INSTALL ROTOR Mount the rotor to the hub using the supplied T-25 TORX bolts and tighten to the specified ® torque. Avid logo MUST face out. Install the wheel into the fork or frame. TORQUE TO: 6.2 Nm (55 in-lb) WARNING:...
- Page 6 English BB7 and BB5 Installation & Set-Up Guide Loosen before mounting MOUNT REAR CALIPER Loosen the CPS bolts, then mount the rear caliper to the I.S. tabs on the rear of the bike. Tighten the mounting bolts to the specified torque. Check that the caliper moves freely on the CPS hardware.
- Page 7 BB7 and BB5 Installation & Set-Up Guide English ALIGN THE CALIPER (BB7 ONLY) Turn the inboard (closest to the wheel) knob clockwise until it pushes the rotor into the position shown. Note that the rotor should not be centered between the walls of the caliper body. Rotor should be offset to the outboard side of the rotor slot.
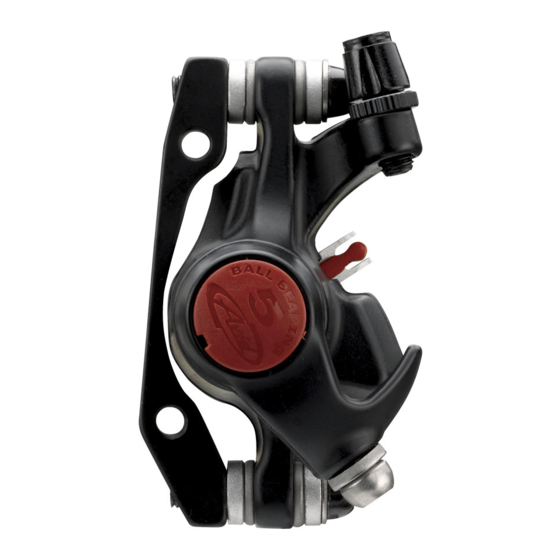
- Page 8 English BB7 and BB5 Installation & Set-Up Guide ALIGN THE CALIPER (BB5 ONLY) Use your fingers or a Torx® wrench to turn the inboard pad adjustment knob clockwise until the rotor is centered in the caliper. This positions the pads for the next step in the installation. Even Spacing ®...
- Page 9 BB7 and BB5 Installation & Set-Up Guide English ADJUST THE PADS (BB7 ONLY) ADJUST THE PADS (BB5 ONLY) Turn both pad adjustment knobs counterclockwise until Back the adjustment knob off (counterclockwise) until the desired pad/rotor clearance is achieved (approx. 2 or 3 rotor spins freely.
- Page 10 English BB7 and BB5 Installation & Set-Up Guide Fine Tuning BEFORE EACH RIDE PAD BREAK-IN • Check cables for signs of wear or fraying. It may take anywhere from 20 to 40 complete stops to break in Avid pads. You may begin to notice an increase in braking •...
- Page 11 BB7 and BB5 Installation & Set-Up Guide English PAD WEAR ADJUSTMENT PAD WEAR ADJUSTMENT (BB7 ONLY) (BB5 ONLY) Over time, you will need to compensate for brake pad wear. Over time, you will need to compensate for brake pad wear. You can do so with two very simple adjustments: You can do so with two very simple adjustments: 1.
- Page 12 English BB7 and BB5 Installation & Set-Up Guide PAD REPLACEMENT (BB7 ONLY) A pad should be replaced when its total thickness (backing plate and friction material) is less than 3mm. 1. REMOVE THE OLD PADS Back both adjuster knobs all the way out (counterclockwise,) then squeeze the pad tabs together and pull both pads straight out of the caliper.
- Page 13 BB7 and BB5 Installation & Set-Up Guide English PAD REPLACEMENT (BB5 ONLY) A pad should be replaced when its total thickness (backing plate and friction material) is less than 3mm. 1. REMOVE THE OLD PADS Back the inner adjustment knob all the way out (counterclockwise). Pull the pad spreader clip from between the pads, then pull the pads out of the caliper one at a time.
- Page 14 English BB7 and BB5 Installation & Set-Up Guide SRAM CORPORATION WARRANTY EXTENT OF LIMITED WARRANTY WEAR AND TEAR PARTS ARE IDENTIFIED AS: SRAM warrants its products to be free from defects in materials or - Dust seals workmanship for a period of two years after original purchase. This - Bushings warranty only applies to the original owner and is not transferable.
Need help?
Do you have a question about the Avid BB5 and is the answer not in the manual?
Questions and answers