Advertisement
Quick Links
Advertisement

Related Manuals for ADE EWD100 Series


Summary of Contents for ADE EWD100 Series
- Page 1 Labelling scale SERIES EWD100 6 kg/15 kg User manual ade-germany.de...
- Page 2 Table of contents Package contents ......................3 General information ....................4 Reading and storing the user manual ................4 Proper use ........................4 Explanation of symbols ....................4 Safety ......................... 6 Explanation of notes ...................... 6 General safety instructions .................... 6 Description of the device ..................
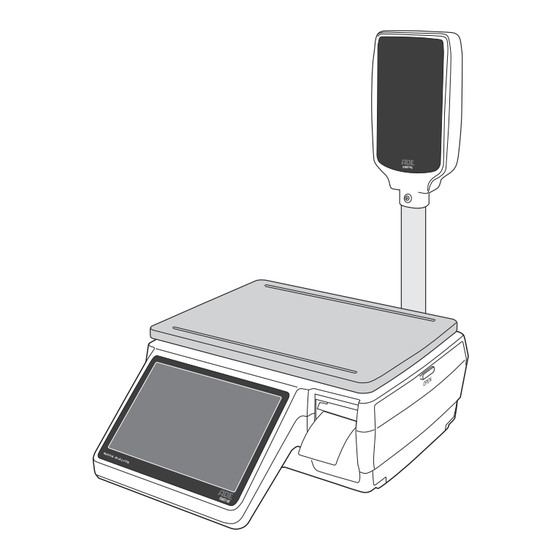
- Page 3 Package contents Package contents Scale (with detachable weighing Mains cord platform) Declaration of Conformity and User Tripod display Manual (without illustration) Required tools (not included in the package contents) Slotted screwdriver Dok./Rev.-Nr. EWD100-230925-Rev002-UM-en...
- Page 4 General information General information Reading and storing the user manual This user manual is part of this labelling scale (hereinafter referred to only as ‘scale’). It contains important information on start-up and handling. Read the user manual carefully, especially the safety instructions, before you begin using the scale.
- Page 5 General information 0122 Official number of the “Notified Body” of the initial calibration Accuracy class of the scale (commercial scale) Calibration value (scale interval) Direct current Alternating current Digit increment The scale has the degree of protection “IP20”. It is protected against IP20 solid foreign objects with a diameter of ≥...
- Page 6 Safety Safety Explanation of notes The following symbols and signal words can be found in this user manual, on the appli- ance or on the packaging. This signal symbol/word designates a hazard with a WARNING! moderate degree of risk which may lead to death or severe injury if not avoided.
- Page 7 Safety – Do not open the housing; instead, have a qualified professional carry out repairs. Contact a qualified workshop for this. – Only parts that comply with the original device specifications may be used for repairs. This scale contains electrical and me- chanical parts that are essential for protection against hazards.
- Page 8 Safety WARNING! Danger for children and persons with impaired physical, sensory or mental capacities (e.g. partially disabled persons, older persons with reduced physical and mental capacities) or lack of experience and knowledge (e.g. older children). – The scale can be used by children 8 years of age and above and by persons with reduced physical, sensory or mental capabilities or lack of experience and knowledge if they have been given supervision or instruction concerning the use of the scale in a...
- Page 9 Safety CAUTION! Health hazard! Poor hygiene when handling the scale can seriously affect health. – Clean the scale thoroughly of production residues before you begin using it. – Do not place food without a tray or food that leaves residues (e.g.
- Page 10 Safety – Never place the scale near hot surfaces. – Use the scale at constant ambient temperatures and avoid using it in draughty areas as this may yield incorrect measurement results. – Ensure that the power cord does not come into contact with hot parts.
- Page 11 Description of the device Description of the device This platform scale is designed exclusively for weighing items. The item to be weighed can be placed directly on the weighing platform or weighed in a container, for example. The scale prints labels for the identification of weighed items. The scale can be connected to a computer.
- Page 12 Description of the device Sealing Mains cord connection Support foot, 4× On/Off button USB port, 2× Serial connection (RS232), 2× LAN port Additional serial connection (RJ11) SD card slot Dok./Rev.-Nr. EWD100-230925-Rev002-UM-en...
- Page 13 2. Check to make sure that all parts have been included in the delivery (see Page 3). 3. Check whether the scale or the individual parts exhibit signs of damage. If this is the case, do not use the scale. Contact ADE Sales (see back page) or the dealer from whom the scale was purchased.
- Page 14 First use Mounting the tripod display 1. Connect the plug connections of the cables with each other. Pay attention to the colour polarity. 2. Place the cables in the stand of the tripod display 3. Place the tripod display in the holder and fix it with the screws using a slotted screwdriver Aligning the scale...
- Page 15 First use 4. Pull off the roll holder 5. Insert a new roll by threading it into the tensioning device 6. If you want to change the roll, remove the empty roll by pulling it off the tensioning device. 7. Replace the roll holder. 8.
- Page 16 First use Switching off 1. To switch off the scale, press and hold the On/Off button for a few seconds. A message ‘Switch off appliance?’ appears in the display. 2. Press ‘Switch off’. The scale is now switched off. Stand-by mode 1.
- Page 17 First use 5. Press the ‘Launcher’ button. 6. Press the button with the setting symbol. 7. Press the ‘Network’ button. Dok./Rev.-Nr. EWD100-230925-Rev002-UM-en...
- Page 18 First use 8. Press the button with the radio symbol. 9. Select your Wi-Fi network from the list and enter the password if necessary. 10. Press ‘Disconnected’ to confirm the entry. 11. Press the ‘Back’ button. 12. Press the button with the scale symbol. 13.
- Page 19 First use 14. Press the ‘Close Application’ button and then the ‘Open Application’ button. The set-up is complete, and you can log in again. Connecting via LAN cable 1. Log in as an Admin in the same way. 2. Press the ‘Launcher’ button. 3.
- Page 20 First use 4. Press the ‘Network’ button. 5. Press the button with the LAN cable symbol. 6. Press ‘Disconnected’ to confirm the entry. 7. Press ‘Back’. Dok./Rev.-Nr. EWD100-230925-Rev002-UM-en...
- Page 21 Wi-Fi connection that has been set up. 2. Download the operating software from the homepage using the following link or QR code: ade-germany.de/downloads/software/EWD100PC 3. Unpack the software into a folder. 4. Run the ‘T-Touch Central’ exe file. You are now in the login area.
- Page 22 First use Carrying out the basic configuration using PC software 1. Log in as Administrator by entering ‘Admin’ as the username and ‘1234’ as the password. 2. Press the ‘Device information’ button. Dok./Rev.-Nr. EWD100-230925-Rev002-UM-en...
- Page 23 First use 3. Press the ‘Add’ button. 4. Type the IP address in the field with the red star. The IP address of the scale is shown in the top red line of the display 5. Press the ‘Save’ button. Dok./Rev.-Nr.
- Page 24 First use If you are unable to connect your PC to the device, check that the IP ad- dress displayed on the device matches the IP address in the PC software and change it if necessary. 6. Press the button ‘Configuration of basic parameters’. Dok./Rev.-Nr.
- Page 25 First use 7. Make entries in the mandatory fields: Company name, address and phone. 8. Press the ‘Save’ button. 9. Close the programme by pressing the ‘Exit’ tab in the menu bar. Creating categories and products Logging in – Log in as user by entering ‘User’ as the username and ‘1234’ as the password. Creating categories 1.
- Page 26 First use 3. Enter a number (e.g. 1) in the ‘Number’ field. Numbers from 1–15 are shown on the first page and numbers from 16–32 are shown on the second page of the scale display. 4. Enter the category name (e.g. bread or chocolates) in the ‘Category’ field. 5.
- Page 27 First use 9. Select the scale to which you want to export the data. 10. Press the ‘Start’ button. The products have now been exported to the scale. Creating products 1. Press the ‘Product information’ button. You will see a list of sample products that have already been created. 2.
- Page 28 First use Basic Information 1. Enter the PLU (product number), product name and price. 2. Select the price unit. 3. Enter the tax. 4. If necessary, enter a pre-tare (e.g. packaging weight). 5. Select the category to which the product is to be assigned. Dok./Rev.-Nr.
- Page 29 First use Further information 1. Select a ‘label format’. 2. If necessary, select an additional label via ‘Label Format2’. An overview of the label formats can be found on Page 39. 3. Select ‘Print Date (+/-)’ in the ‘Use By date’ line and enter the number of days, indi- cating the minimum shelf life of the goods from label printing.
- Page 30 First use Text boxes 1. Enter the ingredients in the ‘Ingredient’ field. 2. Format allergens in bold by highlighting the ingredient with the mouse and pressing the ‘B’ next to the text box. The allergenic ingredients, which must be labelled in accordance with the Food Information Regulation (EU) No.
- Page 31 First use Notes 1. Enter a text in the ‘Note1’ field. This text is only displayed on the label in one line with max. 40 characters. 2. If you have selected the additional label ‘Z58-4’, enter a text in the field ‘Note2’. This text is displayed on the label in up to 18 lines with a maximum of 800 characters.
- Page 32 First use Nutritional values According to the Food Information Regulation (EU) No. 1169/2011, the following nutritional information (based on 100 grams or 100 millilitres) must be provided: • Energy content (in kcal or kJ) • Fat • Sat. fat • Salt •...
- Page 33 First use Exporting data to the scale You can export categories and products to the scale. 1. Select ‘Information settings’ in the menu bar. 2. Select ‘Product information’ or ‘Category information’. Alternatively, you can also call up the products directly using the ‘ products’ button. 3.
- Page 34 First use 5. Select the scale to which you want to export the data. 6. Press the ‘Start’ button. The ‘Import’ or ‘Scale to PC’ button can be used to import categories and products stored on the scale to the computer. This option can be useful if you are using a new computer and want to transfer the values from the scale to it.
- Page 35 First use 2. Change the price of the desired product by pressing directly on the value in the ‘Price’ column and entering a new value there. 3. Press the ‘Save’ button. 4. Press the ‘Select All’ button. 5. Press the ‘Export’ button. 6.
- Page 36 Operation Operation Login 1. Log in as ‘User’. 2. Press ‘Sale’. Dok./Rev.-Nr. EWD100-230925-Rev002-UM-en...
- Page 37 Operation Weighing items 1. Select a product category. 2. Select a product. 3. Press ‘Label’. The label is printed. Setting Auto label You can set automatic printing via the ‘Auto label On/Off’ button. The label is then print- ed as soon as you place an item on the weighing platform and the weight stabilises. Dok./Rev.-Nr.
- Page 38 Operation Using the tare function The tare function is designed to determine the difference between the gross or total weight and the net weight of an item. If you did not define a pre-tare on the computer when you created the product, you can use this function to define a tare value for the packaging.
- Page 39 Label formats Label formats Standard labels 58×60 mm – Main labels Etikettenwaage EWD100 Standardetiketten 58 x 60 mm Hauptetiketten H58-1 H58-2 H58-3 - Company, address, telephone, - Company, address, telephone, email - Company, address, telephone, email email - Product name, 2 rows, ca. 40 characters - Product name, 2 rows, ca.
- Page 40 Label formats Standard labels 58×60 mm – Additional labels Etikettenwaage EWD100 Standardetiketten 58 x 60 mm Zusatzetiketten Z58-1 Z58-2 Z58-3 - Product name, 1 row, ca. 40 characters - Product name, 1 row, ca. 40 characters - Product name, 1 row, ca. 40 characters - Ingredients, 18 rows, ca.
- Page 41 Label formats Standard labels 58×76 mm – Main labels Etikettenwaage EWD100 Standardetiketten 58 x 76 mm Hauptetiketten H76-1 H76-2 H76-3 - Company, address, telephone, email - Company, address, telephone, email - Company, address, telephone, email - Product name, 2 rows, ca. 40 characters - Product name, 2 rows, ca.
- Page 42 Label formats Etikettenwaage EWD100 Standardetiketten 58 x 76 mm Standard labels 58×76 mm – Additional label Zusatzetiketten Z76-1 - Company, address, telephone, email - Product name, 1 row, ca. 40 characters - Nutritional table - Note 2, 11 rows, ca. 440 characters Dok./Rev.-Nr.
- Page 43 Troubleshooting Troubleshooting Problem Possible causes Solution Scale is beeping. A label is still stuck in the Take out the label. label output. The scale does not work. The AC adapter is not con- Plug the AC adapter into a nected. power outlet.
- Page 44 Cleaning and maintenance Problem Possible causes Solution The error message “--UL- The zero setting range or the Make sure that the load -” is displayed. maximum weighing capacity plate is correctly posi- has been exceeded. tioned. Then switch the scale off and on again if necessary.
- Page 45 Transport – Do not put the scale in a dishwasher. It would be destroyed as a result. 1. To disconnect the scale from the mains, pull the mains plug out of the socket. 2. Carefully remove the weighing platform. 3. Use a slightly damp cloth or commercially available mild disinfectant to clean all surfaces. 4.
- Page 46 Supply voltage: 100−240 V ; 50/60 Hz Dimensions: 400 × 520 × 600 mm Weighing platform: 380 × 272 mm (stainless steel) Weight: 8.7 kg Operating temperature range: -10 °C to +40 °C Disposal Disposing of the packaging Dispose of the packaging separated into single type materials. Dispose of paperboard and cardboard with waste paper and plastics with recyclable waste.
- Page 47 Warranty Warranty ADE Germany GmbH will repair or replace this product provided proof is furnished that damage caused by defects in materials and workmanship occurred within one year from the date of purchase. Proof of purchase is required. The warranty does not apply to all moving parts, such as rechargeable batteries or cables.
- Page 48 +49 40 432776-0 At the regular land line rate of your phone company info@ade-germany.de ade-germany.de © Copyright Reprint or reproduction (including extracts) only with the approval of: ADE Germany GmbH Neuer Höltigbaum 15 22143 Hamburg Germany 2023 Distributed by: ADE Germany GmbH Neuer Höltigbaum 15...
Need help?
Do you have a question about the EWD100 Series and is the answer not in the manual?
Questions and answers