
Related Manuals for SACAGAWEA DESIGNS VK-1227


Summary of Contents for SACAGAWEA DESIGNS VK-1227
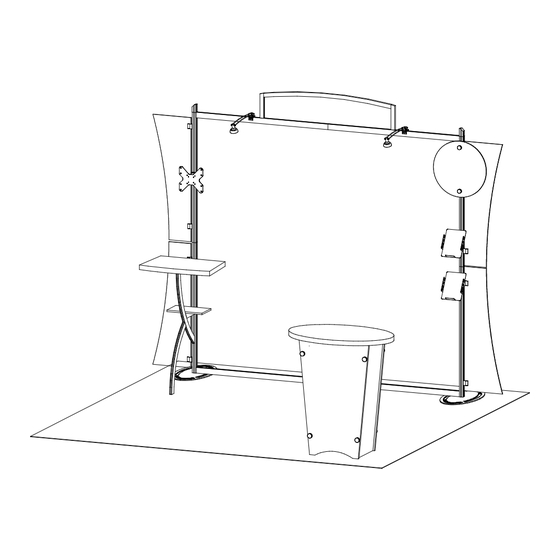
- Page 1 © 2024 Order #XXXXX VK-1227 - 10’ x 10’ Display 10’ 10’ Plan View SETUP INSTRUCTIONS If you would like to tell us about your experience with your setup instructions please email us at info@classicexhibits.com...
- Page 2 © 2024 Order #XXXXX Plan View = 1 sq foot...
- Page 3 © 2024 Order #XXXXX General Information General Setup Instructions - Read entire setup instruction manual prior to WARNING unpacking parts and pieces. - The setup instructions are created specifically for this configuration. - Setup instructions are laid out sequentially in steps, including exploded views with detailed explanation for assembly.
- Page 4 © 2024 Order #XXXXX Counter Assembly Completed Assembly Bottom view of counter Counter Bolt Bolt Mounting Plate Mounting w/ Wing Nuts Plate 2) Mounting plate bolt in, 3) Place mounting plate onto 1) Mounting plate & wing nuts, packed position. [10] then tighten bolt, part in packed position.
- Page 5 © 2024 Order #XXXXX Case Packing Top View of Each Level Literature Trays Wing Panels Assembled Header Lights Base Plates Round Sign Graphics Counter Setup Hardware Monitor Mount Shelf Level 1 (Bottom Level) Level 2 Level 3 Case 1 of 2...
- Page 6 © 2024 Order #XXXXX Case Packing Top View of Each Level Counter Top (2) Side Panels Front Panel Back Panel w/ Door Shelf Floor Shelf Supports Level 1 (Bottom Level) Level 2 Level 3 Level 4 Level 5 Case 2 of 2...
- Page 7 © 2024 Order #XXXXX Backwall Assembly Item Qty. Description Steps: Base Plate 1) Attach base plates [1] lower verticals [2A] and [3A], using bolts. 42” S40 Vertical Extrusion w/ A10 Clamps 2A,2B 2) Connect verticals [2A to 2B] and [3A to 3B], using connection bars [B]. 3A,3B 42”...
- Page 8 © 2024 Order #XXXXX Backwall Attachments Item Qty. Description Steps: 7/8/9 1/1/1 Header Frame 1) Connect lights to top horizontal extrusions [5A/5B]. See Light Connection detail. 30.2” Curved Extrusion 2) Attach assembled Header Frame and affix graphic using Velcro. Light Connection Support Leg 3) Attach extrusions [10/11] and shelf to vertical [2A].
- Page 9 © 2024 Order #XXXXX LTK-1001 Counter Assembly Setup Instructions: 1) Attach pins at bottom interior of side panels. Note: Pins are designed to be slightly angled. 2) Use screw caps to secure the side panels to front panel and back panels, making sure Velcro is facing inward. 3) Slide floor into the bottom of assembled pedestal base.
Need help?
Do you have a question about the VK-1227 and is the answer not in the manual?
Questions and answers