Advertisement
Quick Links
Advertisement

Related Manuals for Shengmilo S600


Summary of Contents for Shengmilo S600
- Page 1 S600 Eigentümerhandbuch www.shengmilo-bikes.com...
- Page 2 This manual contains details of the product, information on its operation and maintenance, and other helpful tips for owners. Read it carefully and familiarize yourself with the Shengmilo S600 before using it to ensure safe use, reduce the risk of damage and premature wear and prevent incidents.
- Page 3 Besuchen Sie www.shengmilo-bikes.com, um die neueste Version herunterzuladen. Assembly and first adjustment of your Shengmilo S600 required special tools and skills, and it is recommended that this is performed by a trained bicycle mechanic if possible.
- Page 4 ................................13 Adjust the Seat Height ......................................16 Pedals Installation ....................................... 17 Safety Checklist ........................................18 Shengmilo E-Bike Gebrauch und Pflege ................................19 Grundlegende Anzeigeeinstellungen ................................... 19 Battery Charging ........................................27 Reitbeschränkungen ......................................34 Instandhaltung ........................................35 Limited Warranty .........................................39 WARRANTY WILL COVER .....................................39 Teile &...
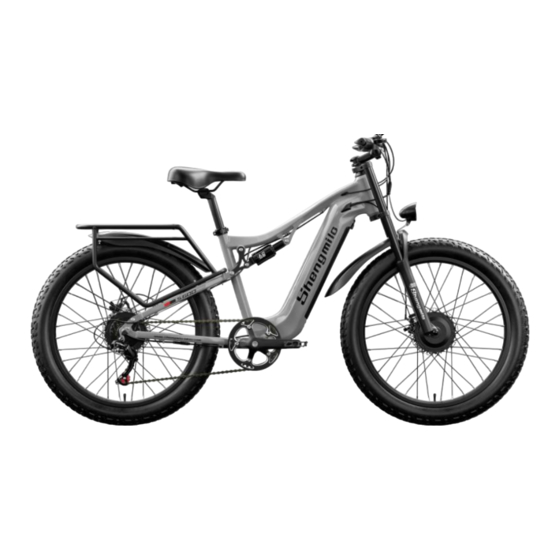
- Page 5 Shimano Shift Lever LCD-Display Fahrradspezifikation Throttle Meter B Button Horn Power Switch Saddle Kopfrohr Batter y LED-Kopflicht Rear Motor Front Suspension Fork/ Frontschock Rear Brake Frontmotor Frontbrake Rear Derailleur Controller...
- Page 6 A-Gesamtlänge B-Handlebar Höhe C-Wheelbase D-Min Seat Height E-Max Seat Height F-Chain Stay Length G-Standover Height 27.5 H-Wheel Diameter I-Head Tube Length J-Handlebar Länge...
- Page 7 48V 17,5Ah SAMSUNG Zellen EU plus 2.0 A smart charger Batterie Charger PAS-Modus: 80 –90KM; Trottle Sine wave brushless motor c controller Range Controller Modus: 40 ~ 50 KM 2 × 1000W (Front- und Rückenrad) Yolin Farbdisplay Motor Display Gesamtzahlung 400 lbs (180kg) Weight 70,5 lb (32KG)
- Page 8 Fahrradmontageanleitung ◆ V o r b e r e i t u n g s - C h e c k l i s t 15mm French und 18mm French Motor label Charger H eadlight Fahrradreparatu Pedals Screws Keys (2x, identisch) rwerkzeug Extra tools needed: 1 pair of scissors NOTICE: Bevor Sie Ihr Fahrrad zusammenbauen, wird es empfohlen, die Batterie für die Gründe zu entfernen:...
- Page 9 Empfohlene Torque Values Empfohlene Torque (NM) Hardware Location Handlebar 12-18 Stem 12-18 Saddle 12-18 Front Wheel (Für Fahrräder mit Rollen auf Front Wheel) 15-22 Rear wheel 30-38 Bottom Bracket Teile 30-50 Pedals 28-33 Kategorie: Disk Mounting Bolts Kategorie: Disk Caliper Mount Crank Bolts 32-36 Rear Derailleur Cable Pinch...
- Page 10 Assembly Instructions H a n d l e b a r I n s t a l l a t i o n ( 4 m m H e x W r e n c h ) Schritt 1: Loosen the bolts on your bike stem. Schritt 2: Zentren Sie Ihre Handlebars und rotaten Sie sie auf die Ausrichtung auf den Markierungspunkt auf das ältere Bild.
- Page 11 ◆ F r o n t W h e e l I n s t a l l a t i o n Schritt 1: Beobachten und erinnern Sie die Reihenfolge der Bildschirme und Wascher auf der linken und rechten Seite des Vorderrades.
- Page 12 (1) Front fork alignment bearing (2) Tighten the front fork (3) Tighten the screws with tools Schritt 4: Wenn Sie den vorderen Radmotorkabelplug verbinden, zahlen Sie die Aufmerksamkeit auf die Ausrichtung der Arrows. Schritt 5: After connecting the front wheel motor cable, use a cable tie to secure the cable to the front fork, and use scissors to shorten the cable tie (Schritt 5: After connecting the front wheel...
- Page 13 (1) Secure the wire to the fork with zip ties.(2) Use scissors to shorten the tie (1) Sichern Sie den Draht zu dem Falk mit Zip ties.(2) Verwenden Sie die Scissors. Schritt 6: Rotate the front wheel. Make sure the quick release skewer lever on the front wheel is fully closed and check the wheel balance in Pedal-Only Mode.
- Page 14 HINWEIS: Die Boltextraktoren können im Shengmilo folding hexkey set gefunden werden. 1. Loosen die Kugeln auf den Kopflichten mit einem PH1 wrench 2. Align the headlight bolt holes with the holes on the fork bracket 3. Set the nut to tighten the bolt...
- Page 15 Schritt 2: Loosen the bolts on the front fender holder. Align the front fender bolt holes with the holes in the holder, then re-faden the bolts through all the holes and tighten the bolts with 6mm rench retaining nuts. Loosen die Bolzen auf dem vorderen Fenderhalter mit einem 6mm Hex-Wrench. 2. Tighten the bolts with 6mm rench retaining nuts.
- Page 16 Adjust the Seat Height: Open the seatpost quick release lever. Adjust the seatpost height by sliding the seatpost up or down to a height genehmigt for your leggy length and preferred reiting position. Verlängern Sie den Sitzbeitrag nicht über die minimale Einfügungsmarkierung hinaus, die auf den Sitzbeitrag eingesetzt wird.
- Page 17 P e d a l s I n s t a l l a t i o n ( 1 5 m m w r e n c h ) Seien Sie sicher, dass Ihre Pedals auf der richtigen Seite installiert sind, wie sie auf der falschen Seite installiert werden, und werden die Fäden beschädigen. Indicators for the right pedal(R) and the left pedal(L) can be found in two places: the stickers on the plastic cover, and the bottom of the pedal threads (die Stickers on the plastic cover, and the bottom of the pedal threads): Die Stickers on the plastic cover (die Stickers on the...
- Page 18 Safety Checklist Sicherheitskontrolle Grundlegende Schritte oTest front and rear brakes for proper function (Test Front and Rear Brakes for Proper Function) (Test Front and Rear Brakes for Proper Function). Br akes OEnsure Brake Pads sind nicht überschwemmt und korrekt in Beziehung zu Rims positioniert. oMake sure brake control cables are lubricated, correctly adjusted and display no obvious wear.
- Page 19 oIn Flate tires innerhalb der empfohlenen Grenzwerte, die auf den Seitenwänden angezeigt werden. oCheck for bulges or signs of excessive wear. OClean tires to ensure that tread is exposed. Räder und Tires oEnsure rims run true and have no obvious wobbles or kinks. OÜberprüfen Sie, dass alle Radsprachen hart sind und nicht kaputt sind.
- Page 20 Shengmilo E-Fahrrad Gebrauch und Pflege Die Folgetabelle der Inhalte bietet allgemeine Richtlinien zu Shengmilo E-Bike variable power assist settings und ihre Auswirkungen auf beide Bereiche und Leistung. Dieser Inhalt wird auf die meisten Fahrer angewendet werden, aber mehrere Faktoren werden individuelle Ergebnisse beeinflussen, einschließlich Fitness und Gewicht des Fahrers, terrain, Eigenschaftspflege usw.
- Page 21 Kopflicht B Button ◆ L C D - M e t e r F u n c t i o n a l A r e a D i s t r i b u t i o n Power D Kopflichtindikatoren Display Boost/Cruise Indication...
- Page 22 ◆ L C D M e t e r K e y G u i d e Key operations include short press, long press, and long press key combinations. Details are as follow: 1. Long press thekey to power on/off the E-bike (*If the electric bike is not used for more than 10 minutes, the LCD-Meter will automatically shutdown) 2.
- Page 23 Elektrofahrräder werden mit einer durchschnittlichen Geschwindigkeit von 6 Kilometern pro Stunde reisen. Zur gleichen Zeit zeigt der Bildschirm. Press and hold the key again or press the break to cancel this mode. (*Die Schiebefunktion wird empfohlen, wenn das Fahrrad aufgedrückt wird. Do not use this function while reiting.) (Die Schiebefunktion wird empfohlen, verwendet zu werden, wenn das Fahrrad aufgedrückt wird.) Kreuzfahrtmodus: When you use pure electric power, reach the speed you are satisfied with, long press the button to enter the battery life modus (Kreuzfahrtmodus): Wenn Sie reine elektrische Leistung erreichen, die Geschwindigkeit erreichen, Sie sind mit langem Drücken des...
- Page 24 Wenn da ein Fehlercode auf der Anzeigeseite ist, kontaktieren Sie bitte den Händler rechtzeitig, um Ihnen zu helfen, das Elektrofahrrad kann nicht normalerweise laufen, wenn da ein Fehler ist. ◆ P a r a m e t e r S e t t i n g 1.
- Page 25 Press and hold the key to save the parameter-settings and exit the personalized parameter-setting-option-interface (Schlüssel zum Speichern und Halten der Schlüssel zum Speichern der Parameter-Einstellungen und zum Verlassen der personalisierten Parameter-Einstellungs-Option -Schnittstelle). 2. Parameter settings: 02P sets options for metric and imperial units, 00 for metric and 01 for imperial. Short press thekey to enter the state of changing parameters, short press the or key to select parameters, short press the key, save the parameter setting, and return to the personalized parameter setting item selection interface;...
- Page 26 06P ist die Wheel Diameter Setting Option, der Meter kann die Wheel Diameter Range angehängt werden: 1-50 Zoll. 08P ist die Geschwindigkeitseinstellungsoption, und der anpassbare Bereich der Instrumentengeschwindigkeitsgrenze ist 1~100 km/h. short press the key to enter the state of changing parameters, short press the or key to select parameters, short press the key, save the parameter setting, and return to the personalized parameter setting list selection interface;...
- Page 27 (09P ist auf dem Bild gezeigt) (10P ist auf dem Bild gezeigt) Startup-Mode- Assist mode setting interface Einstellschnittstelle 3. Parameter Setting (Shortcut Operation): Fabrikreset-Betrieb DEF ist die Option to restore the factory default parameters, dEF-Y means that the default parameters need to be restored, and dEF-N means that there is no need to restore the default parameters.
- Page 28 (DEF ist auf dem Bild gezeigt) Restore default settings interface Dual Drive Quick Switching Operation Press and hold the button for 3 seconds to switch the motor drive mode to achieve different drive mode experiences. P1 → Single Front-Wheel-Antriebsmodus P2 → Single Rear-Wheel-Antriebsmodus P3 → Doppel-Antriebsmodus Battery Charging C h a r g i n g P r o c e d u r e...
- Page 30 Schritt 3: Safest way to charge your battery Start by Plugging the Charger in the Battery Charging Port. Mit der Batterie innerhalb des Fahrrads, Platz des Laders auf einer Wohnung, sicheren Platz und Verbindung des DC-Ausgabeplugs des Laders (barrel connector (2)) zum Ladehafen (1) auf der Seite der Batterie.
- Page 31 (Strange smoke, smoke, or liquid emanating) • Overheating battery and/or charger (Überhitzung der Batterie und/oder Ladung) Bitte stoppen Sie das Laden und kontaktieren Sie www.shengmilo-bikes.com unmittelbar.. ◆ L a d e t i p p s Die Batterie kann auf oder aus dem Fahrrad aufgeladen werden.
- Page 32 ( - 1 0 ° C e l s i u s ) u n d ü b e r 1 0 4 ° F a h r e n h e i t ( 4 0 ° C e l s i u s ) b e l a s t e t w i r d . • Do not cover the charger when charging. • Halte die Batterie von den Kindern weg, während sie aufgeladen wird. • Stellen Sie sicher, dass Sie nur einen genehmigten Shengmilo-Fahrradcharger kaufen direkt von www.shengmilo-bikes.com für Ihre spezifische Fahrradseriennummer.
- Page 33 Das Shengmilo-Fahrrad kann sicher im Licht regnen. Wie auch immer, Fahren durch sehr schwere Downpours oder durch überflutete Straßen ist nicht empfohlen, als der Krank und/oder der Motor kann wet bekommen, was Schaden verursachen kann.
- Page 34 Charger Care I Information Überprüfen Sie die Ladung, die Ladekabeln und die Batterie für Damage, bevor Sie jede Ladung beginnen. 2. Always charge in a safe area that is cool, dry, indoors, away from direct sunlight, dirt, or debris, in a clear area away from potential to trip on the charging (in a safe area that is cool, dry, indoors, away from direct sunlight, dirt, or debris), in a clear area away from potential to trip on the charging (in a clear area that is cool, dry, indoors, away from direct sunlight, dirt, or debris) cords, oder für Damage to Occur to the bike, battery, oder charging equipment while parked und/or charging.
- Page 35 Einstellungen sind perfekt für Menschen, die frisch und zeitgemäß bei der Arbeit ankommen wollen, ohne dass sie süß und exhaustiert sind. • Lower pedal settings (L1/2) are popular for Shengmilo riders to use after work, or when leisurely exercise is preferred. Das ist das Beste, um zu Hause von der Arbeit zu nutzen, um sich selbst zu erfrischen und zu glauben, dass Stress durch den angenehmen Arbeitstag akkumulated ist.
- Page 36 ◆ Pedal-only In diesem Modus wird der Shengmilo wie ein normales Fahrrad leisten, wie du ohne jegliche Hilfe vom Motor fahren wirst. Dieser Modus ist besonders nützlich, wenn Sie aus der Batterie laufen oder nach intensiverem Widerstandstraining suchen. Wir schlagen vor, dass Sie ein niedrigeres Assistenzniveau ausgewählt haben, wenn Sie Ihren Shengmilo S600 am ersten fahren. After being...
- Page 37 3. Shengmilo S600 kann sicher in Lichtregen geräuscht werden. Wie auch immer, Fahren durch sehr schwere Downpours oder durch überflutete Straßen ist nicht empfohlen, als der Krank und/oder der Motor kann wet werden, was Probleme verursachen kann.
- Page 38 ◆ Kettenwartung 1. Wir empfehlen, die Kette nach jeder Fahrt zu reinigen, besonders in regnerischen und menschlichen Umgebungen. Verwenden Sie eine trockene Kleidung, um die Kette und seine Zubehör sauber zu ziehen. Verwenden Sie einen Brush, um Sand und Schmutz in der Kette zu entfernen, während Sie warmes Soawasser verwenden, wenn es benötigt wird.
- Page 39 Warranty Info • All Shengmilo e-bikes are covered under our manufacturers 1 year, 6 months, and three months warranty for the original owner against all manufacturing defects (All free Accessories are not covered by warranty service).
- Page 40 • This warranty includes a replacement frame only. Labor charges to changeover parts to replacement frames are not included. • Shengmilo behält sich das Recht vor, Scratch and Dent Stock zu verwenden, wenn es einen Rahmen unter dieser Warnung ersetzt. Frame styles and/or colors not in stock may be replaced with a compatible style and/or color at the discretion of Shengmilo.
- Page 41 Shengmilo will not be liable and/or responsible for any damage, failure, or loss caused by any unauthorized service or use of unauthorized...
- Page 42 Verknüpfung zu Assembly Video and Online Resources Assembly Video Bitte verweisen Sie auf das „COMMUNITY Video“ auf der Shengmilo Website www.shengmilo-bikes.com/pages/videosto Sehen Sie sich das offizielle Shengmilo S600 Assembly Video an. Online-Ressourcen Für weitere Informationen zu den besten Praktiken, besuchen Sie bitte die Shengmilofficial Website www.shengmilo-bikes.com...
- Page 43 Wir sind hier, um zu helfen! If you have questions, please: Zugriff auf die offizielle Website von Shengmilowww.shengmilo-bikes.com. Kontaktieren Sie direkt per E-Mail atinfo@shengmilo-bikes.com.
Need help?
Do you have a question about the S600 and is the answer not in the manual?
Questions and answers