Table of Contents
Advertisement
Advertisement
Table of Contents

Related Manuals for Shengmilo S600


Summary of Contents for Shengmilo S600
- Page 1 S600 Owner's Manual www.shengmilo-bikes.com...
-
Page 2: About Manual
This manual contains details of the product, information on its operation and maintenance, and other helpful tips for owners. Read it carefully and familiarize yourself with the Shengmilo S600 before using it to ensure safe use, reduce the risk of damage and premature wear, and prevent accidents. - Page 3 Visit www.shengmilo-bikes.com to download the latest version. Assembly and first adjustment of your Shengmilo S600 require special tools and skills, and it is recommended that this be performed by a trained bicycle mechanic if possible.
-
Page 4: Table Of Contents
Adjust the Seat Height ......................................16 Pedals Installation ........................................ 17 Safety Checklist ........................................18 Shengmilo E-Bike Use and Care ..................................19 Basic Display Settings ......................................19 Battery Charging ........................................27 Riding Limitations ....................................... 34 Maintenance .........................................35 Limited Warranty .........................................37 WARRANTY WILL COVER .....................................37 Parts &... -
Page 5: Bike Specication
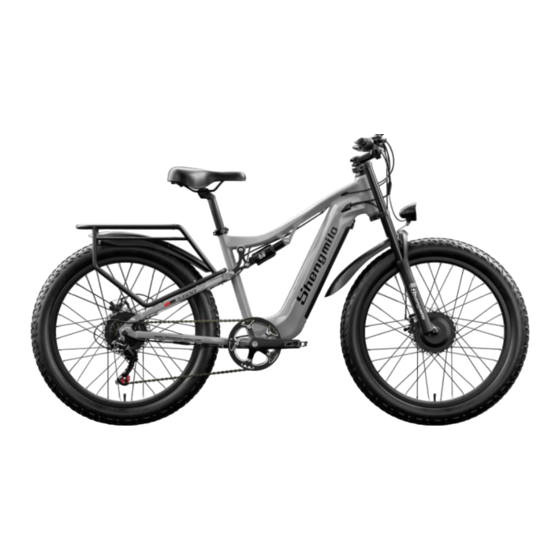
Shimano Shift Lever LCD Display Bike Specication Throttle Meter Button Horn Power Switch Saddle Head Tube Battery LED Headlight Rear Motor Front Suspension Fork / Front Shock Rear Brake Front Motor Front Brake Rear Derailleur Controller... - Page 6 A - Total Length B - Handlebar Height C - Wheelbase D - Min Seat Height E - Max Seat Height F - Chain Stay Length G - Standover Height 27.5 H - Wheel Diameter I - Head Tube Length J - Handlebar Length...
- Page 7 48V 17.5Ah SAMSUNG Cells EU plus 2.0 A smart charger Battery Charger PAS mode: 80 –90KM; Trottle mode : Sine wave brushless motor controller Range Controller 40~50 KM 2×1000W (Front and rear wheel) Yolin color display Motor Display Total Payload 400 lbs (180kg) Weight 70.5 lb (32KG)
-
Page 8: Bike Assembly Guide
2 . Reduce the weight of the e-bike to make it easier to maneuver the bike while assembling. 3 . Avoid battery damage during the assembly process. Go to page to learn about removing and charging the battery. * Please go to our YouTube channel “ Shengmilo official store” to watch our assembly. tutorial videos! -
Page 9: Recommended Torque Values
Recommended Torque Values Recommended Torque( NM) Hardware Location Handlebar 12-18 Stem 12-18 Saddle 12-18 Front Wheel(For bikes with bolts on front wheel) 15-22 Rear wheel 30-38 Bottom Bracket Parts 30-50 Pedals 28-33 Disk Mounting Bolts Disk Caliper Mount Crank Bolts 32-36 Rear Derailleur Cable Pinch Front Derailleur Clamp... -
Page 10: Assembly Instructions
Assembly Instructions ◆ Handlebar Installation ( 4mm Hex Wrench ) Step 1: Loosen the bolts on your bike stem. Step 2 : Center your handlebars and rotate them to align to the marking pointed to in the below image. Step 3:: Tighten bolts to handlebar stem, but don’t tighten completely as you may want to further adjust the angle later to align more precisely. -
Page 11: Front Wheel Installation
◆ Front Wheel Installation Step 1: Observe and remember the sequence of screws and washers on the left and right sides of the front wheel. Schematic diagram of Schematic diagram of the arrangement of the arrangement of the nuts on the the nuts on the side of the front side of the front... - Page 12 Step 3 : Before installing the front fork, please refer to Step 1. First insert 2 washers and 1 buckle on the left side of the front wheel bearing (the top of the buckle needs to face outward); insert 1 washer and 1 buckle on the right side of the front wheel bearing (the top of the buckle needs to face outward).
-
Page 13: Headlight & Front Fender Installation
Step 5 : After connecting the front wheel motor cable, use a cable tie to secure the cable to the front fork, and use scissors to shorten the cable tie.. (1)Secure the wire to the fork with zip ties. (2)Use scissors to shorten the tie. Step 6 : Rotate the front wheel. - Page 14 NOTICE: The bolt extractors can be found in the Shengmilo folding hex key set. 1. Loosen the bolts on the headlights with a PH1 wrench 2. Align the headlight bolt holes with the holes on the fork bracket 3. Set the nut to tighten the bolt...
- Page 15 Step 2 : Loosen the bolts on the front fender holder. Align the front fender bolt holes with the holes in the holder, then re-thread the bolts through all holes and tighten the bolts with 6mm wrench retaining nuts. 2. Tighten the bolts with 6mm wrench retaining nuts. Loosen the bolts on the front fender holder with a 6mm hex wrench.
-
Page 16: Adjust The Seat Height
Adjust the Seat Height: Open the seatpost quick release lever. Adjust the seatpost height by sliding the seatpost up or down to a height appropriate for your leg length and preferred riding position. Do not extend the seatpost beyond the minimum insertion marking etched onto the seatpost. NOTICE: The seat angle has been preadjusted to factory safety standards. -
Page 17: Pedals Installation
◆ Pedals Installation (15mm wrench) Make sure your pedals are installed on the correct side, as installing on the wrong side will damage the threads. Indicators for the right pedal (R) and the left pedal (L) can be found in two places: the stickers on the plastic cover, and the bottom of the pedal threads. Before you install the pedals, apply a small amount of waterproof grease onto the spindle. -
Page 18: Safety Checklist
Safety Checklist Safety Check Basic Steps o Test front and rear brakes for proper function. o Ensure brake pads are not overworn and are correctly positioned in relation to rims. Brakes o Make sure brake control cables are lubricated, correctly adjusted and display no obvious wear. o Check that brake control levers are lubricated and tightly secured to handlebars. -
Page 19: Shengmilo E-Bike Use And Care
Shengmilo E- Bike Use and Care The following table of contents provides general guidance on Shengmilo e-bike variable power assist settings and their effects on both range and perfor- mance. This content will apply broadly to most riders, but multiple factors will affect individual results including rider fitness and weight, terrain, proper maintenance, etc. - Page 20 LCD Meter Functional Area Distribution ◆ Power Display Headlight Indication Boost/Cruise Indication Speed Display Fault Diagnosis Kilometer(KM/H) When there is a failure there will be a code. Miles (MPH) E-Bike Mode Display Interface Pure Electric Mode (PAS 1-5) Total Mileage(DOD) Power-assist mode (PAS 1-5) Single Mileage(TRIP) Riding mode(PAS 0)
- Page 21 LCD Meter Key Guide ◆ Key operations include short press, long press, and long press key combinations. Details are as follows: 1. Long press the key to power on/off the E-bike (*If the electric bike is not used for more than 10 minutes, the LCD meter will automatically shutdown) 2.
- Page 22 (*The push function is recommended to be used when pushing the bike uphill. Do not use this function while riding.) 6. Cruise mode: When using pure electric power, reach the speed you are satisfied with, long press the button to enter the battery life mode.
- Page 23 ◆ Parameter Setting 1. Personalized Parameter Setting Steps: Note: In the power-on state, the operation is performed when the display speed of the instrument is 0. Press and hold the button for more than 2 seconds at the same time to enter the personalized parameter setting item selection interface;...
- Page 24 (02P is shown in the picture) Metric and Imperial unit setting interface 05P is the power assist gear range setting option. The power assist gears available for the instrument are: 0~5. 06P is the wheel diameter setting option, the meter can adjust the wheel diameter range:1-50 inch. 08P is the speed limit setting option, and the adjustable range of the instrument speed limit is 1~100 km/h.
- Page 25 (08P is shown in the picture) (05P is shown in the picture) (06P is shown in the picture) Assist gear range setting interface Speed limit setting interface Wheel diameter setting interface 09P is set start options for start up method, 00→zero start, 01→non-zero start. 10P is set options for drive mode.
- Page 26 3. Parameter Setting(Shortcut Operation): Factory reset operation DEF is the option to restore the factory default parameters, dEF-Y means that the default parameters need to be restored, and dEF-N means that there is no need to restore the default parameters. When the main interface speed is 0, press and hold the keys simultaneously for more than 2 seconds to enter the factory default parameter restoration interface.
-
Page 27: Battery Charging
Battery Charging ◆ Charging Procedure for Off-bike Charging Step 1 : Find the keys located on the handlebar and remove them. If you cut them from the handlebars, be careful not to damage any of the wires. NOTICE: Please keep your key and its spare in a safe place. Once lost, they are difficult to copy. Step 2 : Use the key to unlock the battery. - Page 28 Step 3 : Safest way to charge your battery Start by plugging the charger into the battery charging port. With the battery inside the bike, place the charger on a flat, safe place and connect the charger's DC output plug (barrel connector )to the charging port on the side of the battery.
- Page 29 • Longer-than-expected charge time • Strange smell, smoke, or liquid emanating from battery and/or charger • Overheating battery and/or charger Please stop charging and contact www.shengmilo-bikes.com immediately.. ◆ Charging Tips • The battery can be recharged on or off the bike.
- Page 30 14° Fahrenheit (-10° Celsius) and over 104° Fahrenheit (40° Celsius). • Do not cover the charger when charging. • Keep the battery away from children while charging. • Make sure to only use an approved Shengmilo bike charger purchased directly from www.shengmilo-bikes.com for your specific bike...
- Page 31 • The Shengmilo bike can be safely ridden in light rain. However, riding through very heavy downpours or through flooded streets is not recommended, as the crank and/or motor can get wet, which may cause damage.
- Page 32 ◆ Charger Care Information Check the charger, charger cables, and battery for damage before beginning each charge. 2. Always charge in a safe area that is cool, dry, indoors, away from direct sunlight, dirt, or debris, in a clear area away from potential to trip on the charging cords, or for damage to occur to the bike, battery, or charging equipment while parked and/or charging.
- Page 33 Shengmilo S600 can reach speeds of up to 25 miles per hour with throttle mode, which not only allows you to travel faster but also reassures riders with extra power whenever needed, depending on traffic conditions and rider energy levels. If you are an adventurer who chases after...
-
Page 34: Riding Limitations
◆ Pedal-only In this mode, the Shengmilo will perform like a normal bike, as you’ll be riding without any assistance from the motor. This mode is especially useful if you run out of battery, or are looking for more intensive resistance training. -
Page 35: Maintenance
3. Shengmilo S600 can be safely ridden in light rain. However, riding through very heavy downpours or through flooded streets is not recommended, as the crank and/or motor can get wet, which may cause problems. - Page 36 ◆ Chain Maintenance 1. We recommend cleaning the chain after each ride, especially in rainy and humid environments. Use a dry cloth to wipe the chain and its accessories clean. Use a brush to remove sand and dirt stuck in the chain, along with use warm soapy water if needed. Do not use strong acidic or alkaline cleaning agents (such as rust remover), because these chemicals can damage the chain.
-
Page 37: Limited Warranty
Warranty Info •All Shengmilo e-bikes are covered under our manufacturer's 1 year, 6 months, and three months warranty for the original owner against all manufacturing defects (All free Accessories are not covered by warranty service). -
Page 38: Parts & Components
• This warranty includes a replacement frame only. Labor charges to changeover parts to replacement frames are not included. • Shengmilo reserves the right to use scratch and dent stock when replacing a frame under this warranty. Frame styles and/or colors not in stock may be replaced with a compatible style and/or color at the discretion of Shengmilo. - Page 39 • For the avoidance of doubt, Shengmilo will not be liable and/or responsible for any damage, failure, or loss caused by any unauthorized service or use of unauthorized parts.
-
Page 40: Contact Us
We are here to help! If you have questions, please: Access Shengmilo’s official website www.shengmilo-bikes.com. Contact us directly by email at info@shengmilo-bikes.com.
Need help?
Do you have a question about the S600 and is the answer not in the manual?
Questions and answers
Hi, is it possible to set the default all-wheel drive or rear-wheel drive? If yes, how)
Yes, the Shengmilo S600 can switch between all-wheel drive and rear-wheel drive. To do this, press and hold the button for 3 seconds to switch between drive modes: P1 for front-wheel drive, P2 for rear-wheel drive. However, setting a permanent default mode is not mentioned.
This answer is automatically generated