Table of Contents
Advertisement
Quick Links
Model No.: C30EL / C30ELBK / C36EL / C39EL / C48EL / C60EL
C30ELGLASS / C36ELGLASS / C39ELGLASS
C39ELGLASSBK / C48ELGLASS / C60ELGLASS
CK36EL / CK36ELGLASS / CK54SINKL / CK542SINKR
CK55ADASINKL/ CK55ADASINKR
CK722ADASNKR / ALK36COIL / ALK36GLASS
ALK54RSINK / ALK543LSINK / ALK72ADADLL
ADA723ADARR / C30IND / C36IND / C39IND / C48IND
C60IND / CK54IND / CK72IND / CK48NCSINKL
CK48NCSINKR
BEFORE USE, PLEASE READ AND FOLLOW ALL SAFETY RULES AND OPERATING INSTRUCTIONS.
Write Model & Serial Nos. (on back of unit) here:
Model: _____________________________
Serial #: ____________________________
ALL-IN-ONE KITCHEN
OWNER'S MANUAL
CK72ADASNKL
/
Felix Storch, Inc.
An ISO 9001:2015 registered company
770 Garrison Avenue
Bronx, New York 10474
www.summitappliance.com
Advertisement
Table of Contents

Related Manuals for Summit CK55ADASINKL


Summary of Contents for Summit CK55ADASINKL
- Page 1 Model No.: C30EL / C30ELBK / C36EL / C39EL / C48EL / C60EL C30ELGLASS / C36ELGLASS / C39ELGLASS C39ELGLASSBK / C48ELGLASS / C60ELGLASS CK36EL / CK36ELGLASS / CK54SINKL / CK542SINKR CK55ADASINKL/ CK55ADASINKR CK72ADASNKL CK722ADASNKR / ALK36COIL / ALK36GLASS ALK54RSINK / ALK543LSINK / ALK72ADADLL...
-
Page 2: Table Of Contents
TABLE OF CONTENTS Appliance Safety Important Safeguards Location of Parts Installation Instructions 7-11 Before Using Your Appliance Installation of Your Appliance Electrical Connection Backsplash Installation Water Faucet Installation and Water Line Connection Sink Strainer Installation and Water Drain Overflow Drain Line Installation Installation of Your Refrigerator Operating Your Appliance 11-12... -
Page 3: Appliance Safety
APPLIANCE SAFETY Your safety and the safety of others are very important. We have provided many important safety messages in this manual and on your appliance. Always read and obey all safety messages. This is the Safety Alert Symbol. The symbol alerts you to potential hazards that can kill or injure you and others. - Page 4 in electrical shock or death. • User Servicing - Do not attempt to repair or replace any part of your appliance unless it is specifically recommended in this manual. All other servicing should be referred to a qualified technician. FOLLOW WARNING CALLOUTS BELOW ONLY WHEN APPLICABLE TO YOUR MODEL Use two or more people to move and install appliances.
- Page 5 Caution - Do not store items of interest to children in cabinets above a range or on the back guard of a • range - children climbing on the range to reach items could be seriously injured. Do Not Touch Heating Elements or Areas Near Heating Elements - Heating elements may be hot even •...
-
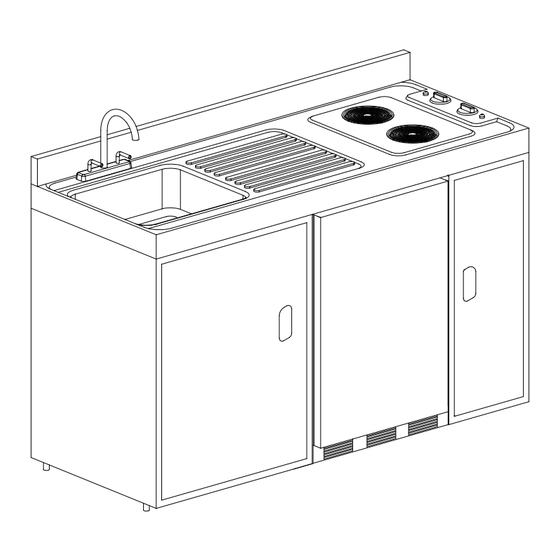
Page 6: Location Of Parts
LOCATION OF PARTS WATER FAUCET REFRIGERATOR STORAGE COMPARTMENTS ADJUSTABLE LEG HOT WATER COLD WATER DRAINING GROOVES HEAT ELEMENT (500W) INDICATOR LIGHT THERMOSTAT KNOBS INDICATOR LIGHT DRAIN SINK STAINLESS STEEL TOP HEAT ELEMENT (900W) RESIDUAL HEAT INDICATOR HOT WATER COLD WATER DRAINING GROOVES BURNER(900W/7") BURNER(600W/5 ) -
Page 7: Installation Instructions
INSTALLATION INSTRUCTIONS BEFORE USING YOUR APPLIANCE • Remove the exterior and interior packing. • Before connecting the refrigerator of your All-in-One Kitchen to the power source, let it stand upright for approximately 2 hours. This will reduce the possibility of a malfunction in the cooling system from handling during transportation. -
Page 8: Electrical Connection
as in illustration above. To level your Refrigerator, adjust the leveling legs at the bottom of the refrigerator. WARNING: Do not store or install the appliance outdoors. • For satisfactory water drainage of the sink, and proper cabinet door function, it is important to level •... -
Page 9: Backsplash Installation
BACKSPLASH INSTALLATION Install the backsplash to the kitchen cabinet as shown below: BACK SPLASH BACK OF UNIT WATER FAUCET INSTALLATION AND WATER LINE CONNECTION Connection to the water supply must be performed by a professional licensed plumber and comply with all Local Codes and Ordinances. -
Page 10: Sink Strainer Installation And Water Drain
SINK STRAINER INSTALLATION AND WATER DRAIN Connection to the water sink must be performed by a professional licensed plumber and comply with all Local Codes and Ordinances. The sink strainer is already preassembled in the factory. • • Secure the water drain system to the sink strainer as below shown. STRAINER (DRENAJE) NOT INCLUDED... -
Page 11: Installation Of Your Refrigerator
INSTALLATION OF YOUR REFRIGERATOR NOTE: The refrigerator is supplied with a separate instruction manual. Please review prior to the final installation of your Compact Kitchen. • Disconnect the power supply. Failure to disconnect the appliance could result in electrical shock or personal injury. -
Page 12: Operating Your Cooktop For Models With Induction Cooktop
Operating Indicators • When a burner is turned on, the corresponding operating indicator will light up regardless of the setting. Residual Heat Indicator • The residual heat indicator will light up when some part of the glass ceramic cooktop is too hot to touch or place articles upon. -
Page 13: Care And Maintenance
CARE AND MAINTENANCE CLEANING YOUR APPLIANCE • Turn off the power, unplug the cooktop and refrigerator, make sure all surface units are off and cool before removing anything, then remove all items including shelves and rack. Wash the inside surfaces with a solution of warm water and baking soda. The solution should consist •... -
Page 14: Vacations
VACATIONS • Short vacations: Leave the Refrigerator of your Compact Kitchen operating during vacations of less than three weeks. Long vacations: If the appliance will not be used for several months, remove all items, and turn off the • power supply. Clean and dry the interior thoroughly. To prevent odor and mold growth, leave the door open slightly, blocking it open if necessary. -
Page 15: Troubleshooting
TROUBLESHOOTING You can solve many common problems easily, saving you the cost of a possible service call. Try the suggestions below to see if you can solve the problem before calling a service technician. Troubleshooting Guide PROBLEM POSSIBLE CAUSE Compact Kitchen does not operate. Not connected to power supply. -
Page 16: Limited Warranty
LIMITED WARRANTY ONE YEAR LIMITED WARRANTY Within the 48 contiguous United States, for one year from the date of purchase, when this appliance is operated and maintained according to instructions attached to or furnished with the product, warrantor will pay for factory - specified parts and repair labor to correct defects in materials or workmanship. Service must be provided by a designated service company.
Need help?
Do you have a question about the CK55ADASINKL and is the answer not in the manual?
Questions and answers