Advertisement
Quick Links
User Manual
Introduction
Congratulations on your purchase of the Extech MO280 Moisture Meter. This
device non-invasively measures and displays relative moisture content in wood,
building products, and other materials. The MO280 can also detect moisture
behind ceramic tiles or behind and under various floor or wall coverings, on
fabric/cloth and on paper products. This professional meter, with proper care,
will provide years of safe reliable service.
Theory of Operation
The square sensor on the rear of the instrument sends and receives a low power
electromagnetic signal through the material under test. The LCD shows the
average relative moisture content (in %) of the material under test to a max.
depth of 20mm. Moisture that is closer to the surface of the material under test
has a greater effect on the average than moisture deeper in the material. The
MO280 is an auto-calibration device; no user calibration is needed.
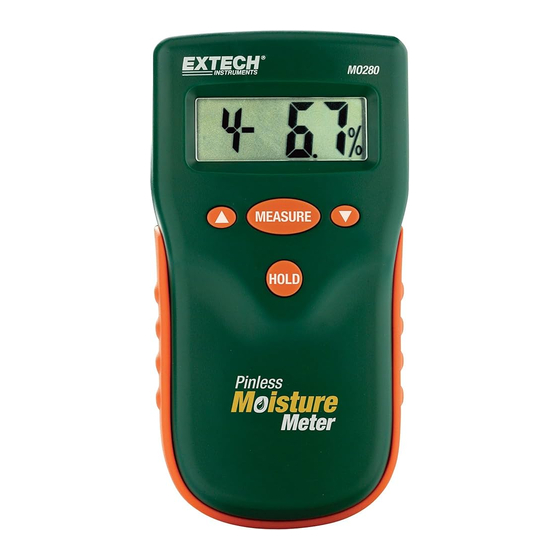
Description
1. Moisture reading
2. Low battery icon
3. Material group number 0-9
4. Data Hold icon
5. Keypad
Note: Sensor, battery compartment, and ON/OFF switch
on reverse side of meter
Measurement Considerations
The thickness of the sample under test must be at least 3/4" (20mm). If the
sample is thinner, use a stack of samples to measure. Also, the measurement
area of the sample should be larger than the MO280 sensor area which is 1.6 x
1.6" (40 x 40mm).
General Specifications
Max. Measurement depth:
0.75" (20mm)
Sensor area
1.6" x 1.6" (40 x 40mm)
Battery type:
9V (rear compartment)
Display:
LCD with sleep mode
º
Operating conditions:
32
F to 122
0 to 60%RH (non-condensing)
Meter Dimensions:
2.75x 5.25x 1.0" (70 x 133 x 25.4mm)
Weight:
5.6oz (160g) with battery
Pin Free Moisture Meter Model MO280
Operation
1.
Slide the rear power switch to the ON position
2.
IMPORTANT: Hold the meter up so that the rear sensor is not covered by your
hand or any surface or object. If the meter emits chirping tones, the sensor is
entirely or partially covered
3.
Momentarily press the MEASURE button to activate the sensor (the LCD
display will switch on)
4.
Press and hold the UP or DOWN button to select a material group 0 to 9 (see
table below). When the desired group is displayed, release the button. The
meter will briefly chirp
5.
Firmly press the meter to a smooth flat surface with the sensor side of the
meter (back) touching the material under test and wait for the display to
stabilize; Note the value on the LCD.
6.
The meter's audible tones will sound as the reading changes. A blinking
reading with an urgent chirping sound indicates that the measurement is out
of the range of the instrument's capability. Try another range by selecting
another material group (see material group & range tables below)
7.
Press the HOLD button to freeze a displayed reading. To unfreeze, press the
HOLD button again.
8.
If the meter goes into sleep mode, press the MEASURE button to wake it up. If
the meter does not wake or if the low battery icon appears on the LCD,
replace the 9V battery located in the rear battery compartment
9.
Turn the rear power switch to OFF when meter is not in use. This will optimize
the battery life
Cautions
• This device is not a toy and must not reach children's hands. It contains
hazardous objects as well as small parts that the children could swallow. In case
a child swallows any of them, please contact a physician immediately
• Do not leave the battery and packing material lying around unattended; they
can be dangerous for children if they use them as toys
• In case the device is going to be unused for an extended period of time, remove
the battery to prevent them from draining
• Expired or damaged batteries can cause cauterization on contact with the skin.
Always, therefore, use suitable hand gloves in such cases
• See that the battery is not short-circuited. Do not throw the battery into a fire.
º
º
º
F (0
C to 50
C)
Wood and Material Group Numbers
Measurement at 73
o
F (23
o
C)
No.
Name
No.
Name
4
Abachi
4
Mahogany
5
Abura
5
Maple, Bigleaf
6
Afrormosia
5
Maple, Red
5
Agba
6
Maple, Sugar
4
Alder
6
Meranti
5
Ash
6
Oak Red
4
Aspen
7
Oak, White
4
Basswood
7
Pecan
6
Beech
4
Pine Eastern White
6
Birch
4
Ponderosa
4
Cedar, Eastern
5
Red
3
Cedar, Western
4
Southern Yellow
5
Cherry
4
Poplar
4
Chestnut
5
Ramin
3
Cottonwood
4
Redwood
4
Cypress
8
Rosewood
7
Dogwood
5
Sassafras
5
Douglas Fir
4
Spruce
5
Elm
5
Sycamore
5
Gum, Red
5
Teak
4
Hemlock
6
Walnut, Black
7
Hickory
4
Willow
5
Koa
3
Cloth
5
Lauan, White
3
Cotton
3
Lauan, Red
9
Dry wall
5
Larch
3
Fabric
4
Limba
9
Paper
6
Locust, Black
5
Plywood/Particle board
Group No.
Range
0
23.4 to 79.9%
1
33.4 to 89.9%
2
43.4 to 99.9%
3
6.8 to 63.3%
4
6.7 to 63.2%
5
5.4 to 61.9%
6
3.4 to 59.9%
7
1.6 to 58.1%
8
0.4 to 56.9%
9
0.0 to 56.5%
MO280-en-US_V4.5 8/23
Advertisement

Subscribe to Our Youtube Channel
Related Manuals for Extech Instruments MO280


Summary of Contents for Extech Instruments MO280
- Page 1 Locust, Black Plywood/Particle board area of the sample should be larger than the MO280 sensor area which is 1.6 x the battery to prevent them from draining • Expired or damaged batteries can cause cauterization on contact with the skin.
- Page 2 Technical Support Center: https://support.flir.com Copyright © 2023 Teledyne FLIR Commercial Systems, Inc. All rights reserved including the right of reproduction in whole or in part in any form www.extech.com This document does not contain any export-controlled information MO280-en-US_V4.5 8/23...
Need help?
Do you have a question about the MO280 and is the answer not in the manual?
Questions and answers