Advertisement
USA office: Fontana
AUS office: Truganina
DEU office: FDS GmbH, Neuer Höltigbaum 36, 22143 Hamburg, Deutschland
If you're having difficulty, our friendly
customer team is always here to help.
POL office: Gdańsk
GBR office: Ipswich
ITA office: Milano
FRA office: Saint Vigor d'Ymonville
USA:cs.us@costway.com
POL:sklep@costway.com
AUS:cs.au@costway.com
DEU:cs.de@costway.com
GBR:cs.uk@costway.com
FRA:cs.fr@costway.com
I T A :cs.i t @costway.com
ESP:cs.es@costway.com
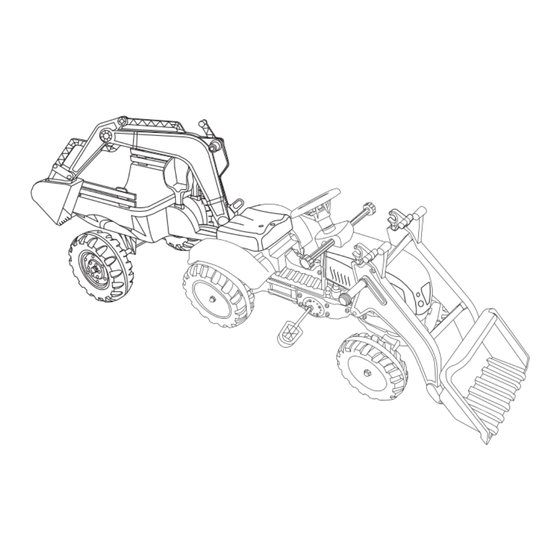
Kids Ride On Tractor
Kinder Aufsitztraktor
Tracteur pour Enfants
Excavadora Eléctrica para Niños
Trattore Cavalcabile per Bambini
Koparka dla dzieci
TQ10169
THIS INSTRUCTION BOOKLET CONTAINS IMPORTANT SAFETY INFORMATION. PLEASE READ AND KEEP FOR FUTURE REFERENCE.
Advertisement
Table of Contents

Related Manuals for Costway TQ10169


Summary of Contents for Costway TQ10169
- Page 1 USA:cs.us@costway.com POL:sklep@costway.com If you're having difficulty, our friendly AUS:cs.au@costway.com DEU:cs.de@costway.com customer team is always here to help. GBR:cs.uk@costway.com FRA:cs.fr@costway.com I T A :cs.i t @costway.com ESP:cs.es@costway.com THIS INSTRUCTION BOOKLET CONTAINS IMPORTANT SAFETY INFORMATION. PLEASE READ AND KEEP FOR FUTURE REFERENCE.
-
Page 2: Before You Start
Before You Start Please read all instructions carefully and keep it for future reference. Warnings Attention! Use it with protective equipment. WARNINGS: Attention! Do not use it in the traffic. Attention! Children should use this product under the parental supervision. 1. -
Page 3: Bevor Sie Beginnen
Bevor Sie beginnen Bitte sorgfältig lesen und zum späteren Nachschlagen aufbewahren. ACHTUNG: Achtung 1. Kleine Teile. Es besteht Erstickungsgefahr. Vorsicht! Müssen Persönliche Schutzausrüstung tragen. Nicht geeignet für Kinder unter 3 Jahren. Vorsicht! Darf nicht im Straßenverkehr verwenden. 2. Montage durch Erwachsene erforderlich. Beaufsichtigung durch Vorsicht! Kinder sollten diesen Artikel unter elterlicher Aufsicht benutzen. -
Page 4: Avant De Commencer
Avant de Commencer Veuillez lire attentivement toutes les instructions et les conserver pour la référence ultérieure. AVERTISSEMENTS: Avertissements 1. Petites pièces. Risque d'étouffement. Attention ! Utilisez ce produit avec un équipement de protection. Ne convient pas aux enfants de moins de 3 ans. Attention ! Ne l'utilisez pas dans la circulation routière. -
Page 5: Antes De Empezar
Antes de Empezar Lea atentamente todas las instrucciones y consérvelas para futuras consultas. ADVERTENCIAS: Advertencias 1. Piezas Pequeñas. Peligro de Asfixia. No apto para ¡Atención! Utilícelo con equipo de protección. ¡Atención! No lo use en el tráfico. niños menores de 3 años. ¡Atención! Los niños deben utilizar este producto bajo la supervisión de sus padres. -
Page 6: Prima Di Iniziare
Prima di Iniziare Si prega di leggere attentamente tutte le istruzioni e conservarle per riferimento futuro. AVVERTENZE: Avvertenza 1. Piccole parti. Pericolo di soffocamento. Non adatto a Attenzione! Utilizzare il prodotto con dispositivi di protezione. Attenzione! Non usare il prodotto nel traffico. bambini di età... -
Page 7: Zanim Zaczniesz
Zanim Zaczniesz Przeczytaj uważnie wszystkie instrukcje i zachowaj je na przyszłość. OSTRZEŻENIA: Ostrzeżenia 1. Małe części. Ryzyko zadławienia. Produkt nieodpowiedni dla dzieci poniżej 3 roku życia. Uwaga! Używaj z ochraniaczami. 2. Wymagany montaż przez osobę dorosłą. Zalecany nadzór osoby Uwaga! Nie używaj go w ruchu ulicznym. Uwaga! Dzieci moga używać... - Page 8 Ø10 5x35mm 4x16mm 5x16mm 6x25mm 8x60mm 5x25mm 6x40mm Tool not included /Werkzeug nicht enthalten /Outil non inclus /Herramienta no incluida /Strumento non incluso /Brak narzędzia w zestawie Ø8X290mm Ø10X390mm Ø8X250mm...
- Page 10 EN: Put the steering chassis on the bottom of the vehicle head and turn right to the correct position. DE: Legen Sie das Fahrgestell auf die Unterseite des Fahrzeugkopfes und drehen Sie es nach rechts in die richtige Position. FR: Placez le châssis de direction sur le bas de la tête du véhicule et tournez à...
- Page 11 EN: Insert the 10*390MM axle through the steering chassis hole, then install the wheel and wheel cover on both sides, and then lock them with the M10 caps. DE: Stecken Sie die 10*390MM Achse durch das Loch im Lenkgehäuse, installieren Sie dann das Rad und die M10x1 A Radabdeckung auf beiden Seiten und sichern Sie sie mit den M10 Kappen.
- Page 12 DE: Legen Sie die M10-Dichtung auf die J-förmige Lenkstange, und führen Sie die J-förmige Lenkstange in das entsprechende Loch unten am Kopf und durch das Loch oben am Kopf. Der Hakenteil der J-förmigen Stange zeigt nach unten und steckt in der Bohrung des Lenkgehäuses.
- Page 13 EN: Install the steering wheel on the top of the J-shaped rod, and lock it with 5*35MM bolt and M5 nut. DE: Setzen Sie das Lenkrad oben auf die J-förmige Stange und befestigen Sie es mit einer 5*35MM Schraube und einer M5 Mutter.
- Page 14 EN: Put the vehicle cover into the body. Install the seat on the upper part, and lock it with 5*16MM self-tapping screws. DE: Setzen Sie die Fahrzeugabdeckung in die Karosserie ein. Installieren Sie den Sitz auf dem oberen Teil und befestigen Sie 5x16mmx2 E ihn mit 5*16MM selbstschneidenden Schrauben.
- Page 15 DE: Führen Sie die 8*290MM Verbindungsstange durch das Loch unter dem Lenkrad und installieren Sie dann die Griffe (Hinweis: Die Öffnungsposition des Griffs sollte mit dem hervorstehenden Teil der Verbindungsstange übereinstimmen). Da die beiden Griffe fest sitzen, können Sie einen Gummihammer verwenden, um sie einzuschlagen.
- Page 16 IT: Installare i due ganci sugli avambracci e fissarli con bulloni da 6*25MM e dadi M6. 6x25mm PL: Umieść dwa haki na przednich ramionach i przymocuj je śrubami 6x25mm i nakrętkami M6. M6 H M8 J Ø8x250mm EN: Install the two hooks on the forearms, and secure them with 6*25MM bolts and M6 nuts.
- Page 17 EN: Insert the 8*250MM forearm connecting rod through the front all'avambraccio sinistro, quindi fissare l'avambraccio destro. hole on the head, then install the left forearm, and lock it with M8 Fissarle utilizzando viti autofilettanti da 5*25MM su entrambi i lati. nut.
- Page 18 IT: Installare la benna anteriore nell'estremità anteriore dell'avambraccio e fissarla con bulloni da 6*40MM e dadi M6. PL: Zamontuj przednią łyżkę w przedniej części przedniego ramienia i zabezpiecz ją śrubami 6x40 mm i nakrętkami M6. DE: Stecken Sie die Schubstange durch das Loch am oberen Ende des rechten Unterarms (runde Stange zeigt nach außen), und drehen Sie den Griff in das Ende der runden Stange.
- Page 19 ES: Coloque la varilla de empuje a través del agujero en el FR: Installez le crochet de levage et fixez-le avec un boulon extremo superior del brazo delantero derecho (la varilla redonda 8*60MM et un écrou M8. Installez ensuite le couvercle du crochet mira hacia afuera), y gire el mango en el extremo de la varilla et utilisez des vis autotaraudeuses de 4*16MM pour verrouiller.
- Page 20 EN: Clamp the lifting hook part into the hanging rod behind the body. EN: Install the rear bucket buckle on the rear of the body. DE: Klemmen Sie das Hebehakenteil in die Aufhängestange hinter DE: Montieren Sie die hintere Schaufelschnalle an der Rückseite der Karosserie.
- Page 21 IT: Inserire l'assale 10*390MM attraverso il foro sul fondo della benna posteriore. Applicare 2 parti in plastica su ciascun lato dell'asse, quindi installare la ruota e il copriruota. Infine, fissarli con il tappo M10. PL: Przełóż oś 10x390mm przez otwór w dolnej części tylnej łyżki. Umieść...
- Page 22 FR: Alignez les garde-corps avec les trous sur les côtés gauche et FR: Insérez le râteau et la pelle respectivement dans le trou à droit du godet arrière et verrouillez-les avec des vis l'extrémité avant du godet arrière. autotaraudeuses de 5*16MM. ES: Inserte el rastrillo y la pala respectivamente en el agujero del ES: Alinee las barandillas con los agujeros de los lados izquierdo extremo delantero del cubo trasero.
- Page 23 EN: Align the hole of the rear bucket with the hole of the lifting hook part, and then insert the fixing piece. Return / Damage Claim Instructions DE: Richten Sie das Loch der hinteren Schaufel mit dem Loch des Hebehakenteils aus und setzen Sie dann das Befestigungsstück DO NOT discard the box / original packaging.
- Page 24 Instructions De Retour / Réclamation De Dommages Istruzioni Per La Restituzione / Reclamo Per Danni NE PAS jeter la boîte/l'emballage d'origine. NON scartare la scatola / confezione originale. Dans le cas où un retour est requis, l'article doit être retourné dans sa boîte Nel caso in cui sia richiesto un reso, l'articolo deve essere restituito nella scatola d'origine.
Need help?
Do you have a question about the TQ10169 and is the answer not in the manual?
Questions and answers